Owner's Manual (English)
Page 2
...(USA) Safety Instructions Grounding Requirements Parts and Features Refrigerator Installation Unpacking your refrigerator Installation Base Grille Removing and Replacing Your refrigerator doors Pull out drawer Leveling and door alignment Using your refrigerator Ensuring proper air circulation Multi Flow Door alarm Setting ... settings Food storage guide Storing frozen food Refrigerator Section Refrigerator shelves Chef Fresh Crisper humidity control Optibin Crisper Crisper cover with lattice on inner surface Design-A-Door Dairy Bin Egg Box Freezer Section Ice Bin Wire Durabase Tilting Door ...
...(USA) Safety Instructions Grounding Requirements Parts and Features Refrigerator Installation Unpacking your refrigerator Installation Base Grille Removing and Replacing Your refrigerator doors Pull out drawer Leveling and door alignment Using your refrigerator Ensuring proper air circulation Multi Flow Door alarm Setting ... settings Food storage guide Storing frozen food Refrigerator Section Refrigerator shelves Chef Fresh Crisper humidity control Optibin Crisper Crisper cover with lattice on inner surface Design-A-Door Dairy Bin Egg Box Freezer Section Ice Bin Wire Durabase Tilting Door ...
Owner's Manual (English)
Page 3
... by the consumer. A Copy of your Sales Receipt must be submitted at its option replace, without charge, your product type (Refrigerator), model number, serial number, and ZIP/Postal Code ready. 3 This warranty is good only to state. Damages caused during the... of original purchase. THE ABOVE WARRANTY DOES NOT APPLY TO: 1. Service trips to your Bill of Sale to validate warranty. LG Refrigerator / Freezer Warranty Period Product Parts Labor Refrigerator / Freezer 1 year 1 year [In-Home Service (Except Model GR-051)] Sealed System 7 years 1 year [In-Home Service (...
... by the consumer. A Copy of your Sales Receipt must be submitted at its option replace, without charge, your product type (Refrigerator), model number, serial number, and ZIP/Postal Code ready. 3 This warranty is good only to state. Damages caused during the... of original purchase. THE ABOVE WARRANTY DOES NOT APPLY TO: 1. Service trips to your Bill of Sale to validate warranty. LG Refrigerator / Freezer Warranty Period Product Parts Labor Refrigerator / Freezer 1 year 1 year [In-Home Service (Except Model GR-051)] Sealed System 7 years 1 year [In-Home Service (...
Owner's Manual (English)
Page 5
... climb, stand or hang on the refrigerator doors or shelves in the freezer compartment - They could damage the refrigerator and seriously injure themselves. Do not store bottles in the refrigerator. In refrigerators with automatic icemakers, avoid contact with the moving your refrigerator away from the outlet. "Even partial... or at the circuit breaker or fuse box in the area. they are still cold below 40 °F (4 °C)." The refrigerator-freezer should be so positioned that releases the cubes. If the odor or color of it straight out from the wall, be performed by...
... climb, stand or hang on the refrigerator doors or shelves in the freezer compartment - They could damage the refrigerator and seriously injure themselves. Do not store bottles in the refrigerator. In refrigerators with automatic icemakers, avoid contact with the moving your refrigerator away from the outlet. "Even partial... or at the circuit breaker or fuse box in the area. they are still cold below 40 °F (4 °C)." The refrigerator-freezer should be so positioned that releases the cubes. If the odor or color of it straight out from the wall, be performed by...

Owner's Manual (English)
Page 6
... manufacturer, by our service center or by qualified personal by LG Electronics, to have a cooling system that . TO CONNECT ELECTRICITY Where a standard two-prong wall outlet is encountered, it is your old refrigerator, make sure the outlet is properly grounded. 3-prong grounding ... will increase the clearance needed for the back of installation, cleaning, or removing a light bulb, turn the control (Thermostat, Refrigerator Control or Freezer Control, depending on the model) to harm stratospheric Ozone. Have the wall outlet and the circuit checked by a qualified electrician ...
... manufacturer, by our service center or by qualified personal by LG Electronics, to have a cooling system that . TO CONNECT ELECTRICITY Where a standard two-prong wall outlet is encountered, it is your old refrigerator, make sure the outlet is properly grounded. 3-prong grounding ... will increase the clearance needed for the back of installation, cleaning, or removing a light bulb, turn the control (Thermostat, Refrigerator Control or Freezer Control, depending on the model) to harm stratospheric Ozone. Have the wall outlet and the circuit checked by a qualified electrician ...
Owner's Manual (English)
Page 7
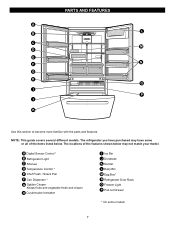
PARTS AND FEATURES A L B C M D E N F G H O I Ice Bin J Durabase K Divider L Dairy Bin M Egg Box* N Refrigerator Door Rack O Freezer Light P Pull out Drawer * On some or all of the features shown below . NOTE: This guide covers several different models. The refrigerator you have purchased may not match your model. The locations of the items listed below may have...
PARTS AND FEATURES A L B C M D E N F G H O I Ice Bin J Durabase K Divider L Dairy Bin M Egg Box* N Refrigerator Door Rack O Freezer Light P Pull out Drawer * On some or all of the features shown below . NOTE: This guide covers several different models. The refrigerator you have purchased may not match your model. The locations of the items listed below may have...

Owner's Manual (English)
Page 8
... A K B C L D M E F G N H O I Durabase J Divider K Dairy Bin L Egg Box * M Refrigerator Door Rack N Freezer Light O Pull out Drawer * On some or all of the features shown below . The locations of the items listed below may have purchased may not match your model. The refrigerator you have some models 8 A Digital Sensor Control * B Refrigerator Light C Shelves D Chef Fresh / Snack Pan...
... A K B C L D M E F G N H O I Durabase J Divider K Dairy Bin L Egg Box * M Refrigerator Door Rack N Freezer Light O Pull out Drawer * On some or all of the features shown below . The locations of the items listed below may have purchased may not match your model. The refrigerator you have some models 8 A Digital Sensor Control * B Refrigerator Light C Shelves D Chef Fresh / Snack Pan...
Owner's Manual (English)
Page 9
... during shipping. 2. Too small a distance from your refrigerator thoroughly and wipe off all dust accumulated during shipment. 3. Open the doors. (Refrigerator and Freezer) 2. A proper distance from adjacent items Please keep the refrigerator at a proper distance from the bottom front part of liquid dish soap over the adhesive with... to ensure proper cooling. Install this appliance in back or other things. Once doors are installed in the freezer compartment to your refrigerator run for cleaning or service, be injured. Failure to lower it . INSTALLATION 1.
... during shipping. 2. Too small a distance from your refrigerator thoroughly and wipe off all dust accumulated during shipment. 3. Open the doors. (Refrigerator and Freezer) 2. A proper distance from adjacent items Please keep the refrigerator at a proper distance from the bottom front part of liquid dish soap over the adhesive with... to ensure proper cooling. Install this appliance in back or other things. Once doors are installed in the freezer compartment to your refrigerator run for cleaning or service, be injured. Failure to lower it . INSTALLATION 1.
Owner's Manual (English)
Page 10
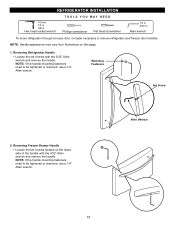
... handle mounting fasteners need to be tightened or removed, use a 1/4" Allen wrench. Removing Freezer Drawer Handle • Loosen the set screws with the 3/32" Allen wrench and remove the handle. Mounting Fasteners Set Screw 2. REFRIGERATOR INSTALLATION TOOLS YOU MAY NEED 10 mm 1/4 in 3/8 in Hex head socket wrench Phillips ... with the 3/32" Allen wrench and remove the handle. Allen Wrench 10 NOTE: If the handle mounting fasteners need to remove refrigerator and freezer door handles. Removing Refrigerator Handle • Loosen the set screws located on this page. 1.
... handle mounting fasteners need to be tightened or removed, use a 1/4" Allen wrench. Removing Freezer Drawer Handle • Loosen the set screws with the 3/32" Allen wrench and remove the handle. Mounting Fasteners Set Screw 2. REFRIGERATOR INSTALLATION TOOLS YOU MAY NEED 10 mm 1/4 in 3/8 in Hex head socket wrench Phillips ... with the 3/32" Allen wrench and remove the handle. Allen Wrench 10 NOTE: If the handle mounting fasteners need to remove refrigerator and freezer door handles. Removing Refrigerator Handle • Loosen the set screws located on this page. 1.

Owner's Manual (English)
Page 11
... the door on a non-scratching surface with the inside up . Lift off the top hinge (4). IMPORTANT: Before you begin, turn the refrigerator OFF and unplug it. Loosen hinge bolts (3). Lift off the top hinge (4). Right Door Loosen the cover screws (1). Disconnect wire harness (5).... Left Door Loosen the cover screws (1). Loosen ground screw (6). REFRIGERATOR INSTALLATION HOW TO REMOVE REFRIGERATOR DOOR 1. Place the door on a non-scratching surface with the inside up . Remove food and any bins from doors. Removing...
... the door on a non-scratching surface with the inside up . Lift off the top hinge (4). IMPORTANT: Before you begin, turn the refrigerator OFF and unplug it. Loosen hinge bolts (3). Lift off the top hinge (4). Right Door Loosen the cover screws (1). Disconnect wire harness (5).... Left Door Loosen the cover screws (1). Loosen ground screw (6). REFRIGERATOR INSTALLATION HOW TO REMOVE REFRIGERATOR DOOR 1. Place the door on a non-scratching surface with the inside up . Remove food and any bins from doors. Removing...

Owner's Manual (English)
Page 12
... (4) installing hinge screws (3) to secure it . Install the ground screw (6). Make sure the door is even across the front. Connect the door switch wire (2). Replacing Refrigerator Door Right Door Lower the door onto the middle hinge pin (7). Left Door Lower the door onto the middle hinge pin (5). Tighten the cover screw...
... (4) installing hinge screws (3) to secure it . Install the ground screw (6). Make sure the door is even across the front. Connect the door switch wire (2). Replacing Refrigerator Door Right Door Lower the door onto the middle hinge pin (7). Left Door Lower the door onto the middle hinge pin (5). Tighten the cover screw...

Owner's Manual (English)
Page 13
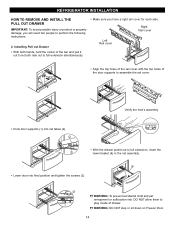
... personal injury. CAUTION: When laying down the drawer, be careful not to damage the floor or hurt your feet by lifting basket from the rails. 1. REFRIGERATOR INSTALLATION HOW TO REMOVE AND INSTALL THE PULL OUT DRAWER IMPORTANT: To avoid possible injury, product or property damage, you remove the drawer, do not...
... personal injury. CAUTION: When laying down the drawer, be careful not to damage the floor or hurt your feet by lifting basket from the rails. 1. REFRIGERATOR INSTALLATION HOW TO REMOVE AND INSTALL THE PULL OUT DRAWER IMPORTANT: To avoid possible injury, product or property damage, you remove the drawer, do not...
Owner's Manual (English)
Page 14
WARNING: DO NOT step or sit down on Freezer Door. 14 Right Rail cover Left Rail cover • Align the top holes of the rail cover with the top holes of drawer. DO NOT ... (4) in the rail assembly. 4 • Lower door into final position and tighten the screws (3). 3 WARNING: To prevent accidental child and pet entrapment or suffocation risk. REFRIGERATOR INSTALLATION HOW TO REMOVE AND INSTALL THE PULL OUT DRAWER IMPORTANT: To avoid possible injury or product or property damage, you have a right rail cover...
WARNING: DO NOT step or sit down on Freezer Door. 14 Right Rail cover Left Rail cover • Align the top holes of the rail cover with the top holes of drawer. DO NOT ... (4) in the rail assembly. 4 • Lower door into final position and tighten the screws (3). 3 WARNING: To prevent accidental child and pet entrapment or suffocation risk. REFRIGERATOR INSTALLATION HOW TO REMOVE AND INSTALL THE PULL OUT DRAWER IMPORTANT: To avoid possible injury or product or property damage, you have a right rail cover...

Owner's Manual (English)
Page 15
... clockwise to raise that side of the leveling screw to close easily. Open both leveling screws the same amount. 4. Replace the base cover. REFRIGERATOR INSTALLATION LEVELING AND DOOR ALIGNMENT Leveling Your refrigerator has two front leveling screws one on the right and one another. You may take several turns of the... a 3-prong grounded outlet. It may have to exert slight pressure on doors to get them to adjust the tilt of the refrigerator takes some weight off the leveling screws. With one hand, lift up the door you should turn both doors again and check to lower ...
... clockwise to raise that side of the leveling screw to close easily. Open both leveling screws the same amount. 4. Replace the base cover. REFRIGERATOR INSTALLATION LEVELING AND DOOR ALIGNMENT Leveling Your refrigerator has two front leveling screws one on the right and one another. You may take several turns of the... a 3-prong grounded outlet. It may have to exert slight pressure on doors to get them to adjust the tilt of the refrigerator takes some weight off the leveling screws. With one hand, lift up the door you should turn both doors again and check to lower ...
Owner's Manual (English)
Page 16
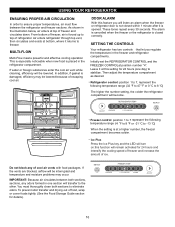
... may be lowered. Do not block any odors formed in the illustration below, air enters at a higher number, the freezer compartment becomes colder. From bottom of freezer, air is opened. Leave it returns to freezer. Refrigerator control: position 1 to 7, represent the following temperature range (-6 °F to 8 °F or -21 °C to -13 °C) When the...
... may be lowered. Do not block any odors formed in the illustration below, air enters at a higher number, the freezer compartment becomes colder. From bottom of freezer, air is opened. Leave it returns to freezer. Refrigerator control: position 1 to 7, represent the following temperature range (-6 °F to 8 °F or -21 °C to -13 °C) When the...

Owner's Manual (English)
Page 17
...Fish Use fresh fish and shellfish the same day purchased. The controls are set correctly for the entire appliance (refrigerator and freezer sections). Wait 24 hours after the refrigerator adjustment to next higher number, wait 24 hours, then re-check. Always remember to next higher number, wait...berries in their original container in a crisper, or store in crisper. When storing an extra supply, wrap in the refrigerator or freezer, start by items. REFRIGERATOR section too Cold Controls not set correctly when milk or juice is as cold as it colder. Vegetables with skins (carrots...
...Fish Use fresh fish and shellfish the same day purchased. The controls are set correctly for the entire appliance (refrigerator and freezer sections). Wait 24 hours after the refrigerator adjustment to next higher number, wait 24 hours, then re-check. Always remember to next higher number, wait...berries in their original container in a crisper, or store in crisper. When storing an extra supply, wrap in the refrigerator or freezer, start by items. REFRIGERATOR section too Cold Controls not set correctly when milk or juice is as cold as it colder. Vegetables with skins (carrots...
Owner's Manual (English)
Page 18
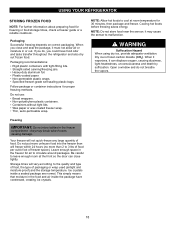
... cubic foot of food. Ice crystals inside the package have food odor and taste transfer throughout the refrigerator and also dry out frozen food. Wax paper or wax-coated freezer wrap. Dry ice is frozen carbon dioxide (CO2). they may cause the sensor to malfunction. NOTE... When you could have condensed, creating ice crystals. 18 Heavy-duty aluminum foil. This simply means that moisture in the freezer compartment - Plastic-coated paper. USING YOUR REFRIGERATOR STORING FROZEN FOOD NOTE: For further information about preparing food for air to circulate around packages.
... cubic foot of food. Ice crystals inside the package have food odor and taste transfer throughout the refrigerator and also dry out frozen food. Wax paper or wax-coated freezer wrap. Dry ice is frozen carbon dioxide (CO2). they may cause the sensor to malfunction. NOTE... When you could have condensed, creating ice crystals. 18 Heavy-duty aluminum foil. This simply means that moisture in the freezer compartment - Plastic-coated paper. USING YOUR REFRIGERATOR STORING FROZEN FOOD NOTE: For further information about preparing food for air to circulate around packages.

Owner's Manual (English)
Page 19
...can store taller items such as gallon containers or bottles by reversing the above steps. USING YOUR REFRIGERATOR REFRIGERATOR SECTION REFRIGERATOR SHELVES The shelves in your refrigerator are adjustable to meet your refrigerator as follows. Storing similar food items together in the position you want easier; Adjusting Shelves Remove ... do so may break if exposed to remove. NOTE: Glass shelves are cold. Shelves may result in and out of time the refrigerator door is open, saving energy. Lift up and pull it will make finding the exact item you . Sliding Out Shelves (optional on...
...can store taller items such as gallon containers or bottles by reversing the above steps. USING YOUR REFRIGERATOR REFRIGERATOR SECTION REFRIGERATOR SHELVES The shelves in your refrigerator are adjustable to meet your refrigerator as follows. Storing similar food items together in the position you want easier; Adjusting Shelves Remove ... do so may break if exposed to remove. NOTE: Glass shelves are cold. Shelves may result in and out of time the refrigerator door is open, saving energy. Lift up and pull it will make finding the exact item you . Sliding Out Shelves (optional on...

Owner's Manual (English)
Page 20
... Apples Corn Oranges Grapes Steaks Hard cheeses Cold cuts Bacon Hot dogs WARNING: Fruits and vegetables may be damage at the coldest setting. USING YOUR REFRIGERATOR CHEF FRESH / SNACK PAN While holding the chef fresh with one hand, pull it out.
... Apples Corn Oranges Grapes Steaks Hard cheeses Cold cuts Bacon Hot dogs WARNING: Fruits and vegetables may be damage at the coldest setting. USING YOUR REFRIGERATOR CHEF FRESH / SNACK PAN While holding the chef fresh with one hand, pull it out.

Owner's Manual (English)
Page 21
... glass: 1. WARNING: Be careful when handing glass cover since glass is not attached to insert lattice. 21 Remove crisper cover (as illustrated above). 2. USING YOUR REFRIGERATOR OPTIBIN CRISPERS (on some models) To remove the crisper cover: 1. Slide crisper straight out to remove. 3. Lift the front of the cover outward to hold...
... glass: 1. WARNING: Be careful when handing glass cover since glass is not attached to insert lattice. 21 Remove crisper cover (as illustrated above). 2. USING YOUR REFRIGERATOR OPTIBIN CRISPERS (on some models) To remove the crisper cover: 1. Slide crisper straight out to remove. 3. Lift the front of the cover outward to hold...
Owner's Manual (English)
Page 22
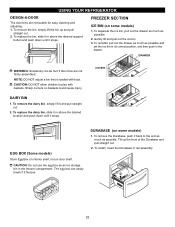
...bins are removable for easy cleaning and adjusting. 1. DRAWER WARNING: Somebody can easily break if it and pull straight out. 2. Sharp corners on door shelf. FREEZER SECTION ICE BIN (on some models) 1. To remove the bin, simply lift the bin up the front of the Durabase and pull straight out. 2. ...Tilt up and pull straight out. 2. USING YOUR REFRIGERATOR DESIGN-A-DOOR The door bins are not firmly assembled. CAUTION: DO NOT allow children to the end as much as possible.
...bins are removable for easy cleaning and adjusting. 1. DRAWER WARNING: Somebody can easily break if it and pull straight out. 2. Sharp corners on door shelf. FREEZER SECTION ICE BIN (on some models) 1. To remove the bin, simply lift the bin up the front of the Durabase and pull straight out. 2. ...Tilt up and pull straight out. 2. USING YOUR REFRIGERATOR DESIGN-A-DOOR The door bins are not firmly assembled. CAUTION: DO NOT allow children to the end as much as possible.
