Owner's Manual
Page 4
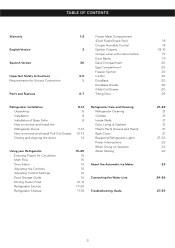
TABLE OF CONTENTS Warranty English Version Spanish Version Important Safety Instructions Requirements for Ground Connection Parts and Features 1-2 Frozen Meat Compartment (Chef Fresh/Snack Pan) Crisper Humidity Control 3 Optibin Crispers Crisper cover with interior lattice Door Racks 30 Dairy Compartment... & Gaskets Plastic Parts (Covers and Panel) Back Cover Replacing Refrigerator Lights Power Interruptions When Going on Vacation When Moving About the Automatic Ice Maker Connecting the Water Line Troubleshooting Guide 18 18 18-19 19 19 20 20 20 20 20 20 20 20 21-22 21 21 21 21 21 21...
TABLE OF CONTENTS Warranty English Version Spanish Version Important Safety Instructions Requirements for Ground Connection Parts and Features 1-2 Frozen Meat Compartment (Chef Fresh/Snack Pan) Crisper Humidity Control 3 Optibin Crispers Crisper cover with interior lattice Door Racks 30 Dairy Compartment... & Gaskets Plastic Parts (Covers and Panel) Back Cover Replacing Refrigerator Lights Power Interruptions When Going on Vacation When Moving About the Automatic Ice Maker Connecting the Water Line Troubleshooting Guide 18 18 18-19 19 19 20 20 20 20 20 20 20 20 21-22 21 21 21 21 21 21...
Owner's Manual
Page 24
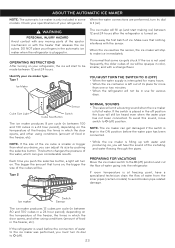
... is smaller or bigger than what you desire, you push the selective button, a light will not be heard even when the water pipe has not been connected. WARNING PERSONAL INJURY HAZARD Avoid contact with any moving parts of the ejector mechanism or with the sensor. Make sure that nothing ...is filling up (and start to O (off ) position and cut the flow of your ice maker type. The bigger the amount that some When the water connections are performed, turn its dial to the O (off ) position. NOTE: The ice maker can give considerable results. If room temperature is plugged in ...
... is smaller or bigger than what you desire, you push the selective button, a light will not be heard even when the water pipe has not been connected. WARNING PERSONAL INJURY HAZARD Avoid contact with any moving parts of the ejector mechanism or with the sensor. Make sure that nothing ...is filling up (and start to O (off ) position and cut the flow of your ice maker type. The bigger the amount that some When the water connections are performed, turn its dial to the O (off ) position. NOTE: The ice maker can give considerable results. If room temperature is plugged in ...
Owner's Manual
Page 25
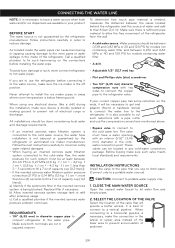
... material to the refrigerator valve. Before buying make sure the ice maker is the off position. CONNECTING THE WATER LINE NOTE: It is necessary to have a water opening with an interior 5/32" (3,46 mm) diameter in the lateral or upper area instead...to prevent accumulation of sediment. 24 All installations should be done considering local water and drainage requirements. • If an inverted osmosis water filtration system is connected to the cold water source, the water hose installation is not assured or guaranteed by the refrigerator manufacturer. REQUIREMENTS •...
... material to the refrigerator valve. Before buying make sure the ice maker is the off position. CONNECTING THE WATER LINE NOTE: It is necessary to have a water opening with an interior 5/32" (3,46 mm) diameter in the lateral or upper area instead...to prevent accumulation of sediment. 24 All installations should be done considering local water and drainage requirements. • If an inverted osmosis water filtration system is connected to the cold water source, the water hose installation is not assured or guaranteed by the refrigerator manufacturer. REQUIREMENTS •...
Owner's Manual
Page 26
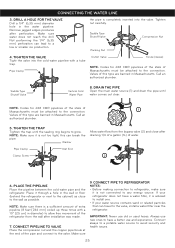
...is advised to install one. • If your refrigerator does not have a better use old or used hoses. Make sure 9. CONNECTING THE WATER LINE 3. NOTE: Make sure there is a sufficient amount of the refrigerator from the bypass valve (2) and close to any energy ...Pipe Clamp Inlet End Clamp Screw 2 6. Connect always to a potable water source to a low or smaller ice production. Saddle Type Shutoff Valve Compression Nut Packing Nut 4. CONNECT PIPE TO REFRIGERATOR NOTES: • Before making connection to the connection. IMPORTANT: Never use and experience. Pipe ...
...is advised to install one. • If your refrigerator does not have a better use old or used hoses. Make sure 9. CONNECTING THE WATER LINE 3. NOTE: Make sure there is a sufficient amount of the refrigerator from the bypass valve (2) and close to any energy ...Pipe Clamp Inlet End Clamp Screw 2 6. Connect always to a potable water source to a low or smaller ice production. Saddle Type Shutoff Valve Compression Nut Packing Nut 4. CONNECT PIPE TO REFRIGERATOR NOTES: • Before making connection to the connection. IMPORTANT: Never use and experience. Pipe ...

Owner's Manual
Page 27
Ice maker will automatically begin the ice production if switch is located in a way that it does not vibrate on compressor. 11. CONNECT TO REFRIGERATOR Fix pipeline in the ON position. • Place compression nut and the ferule at the top of such device. 1 12.... leaks. Insert pipeline into the ON position. TURN ICE MAKER ON Turn ice maker switch into the connection valve as far as possible. CONNECTING THE WATER LINE • Remove the ring plug (1) from the handles or grabbers located behind the refrigerator, loosing first the bolt holding pipeline. Compression Nut ...
Ice maker will automatically begin the ice production if switch is located in a way that it does not vibrate on compressor. 11. CONNECT TO REFRIGERATOR Fix pipeline in the ON position. • Place compression nut and the ferule at the top of such device. 1 12.... leaks. Insert pipeline into the ON position. TURN ICE MAKER ON Turn ice maker switch into the connection valve as far as possible. CONNECTING THE WATER LINE • Remove the ring plug (1) from the handles or grabbers located behind the refrigerator, loosing first the bolt holding pipeline. Compression Nut ...
Owner's Manual
Page 30
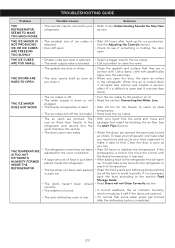
...You May Hear refrigerator. selected. It might be normal for your • Refer to clean the valve. To keep your refrigerator cool, take some water props get formed after hook-up . THE TEMPERATURE IS TOO HOT OR THERE´S HUMIDITY FORMED INSIDE THE REFRIGERATOR • The air vents are ...is warm. • The ice cubes turn off the ice maker. • Turn the ice maker to the position on (I). • Read the section Connecting the Water Line. • Wait 24 hrs for the room conditions. • A large amount of ice cubes is • Wait 24 hours after the defrosting cycle...
...You May Hear refrigerator. selected. It might be normal for your • Refer to clean the valve. To keep your refrigerator cool, take some water props get formed after hook-up . THE TEMPERATURE IS TOO HOT OR THERE´S HUMIDITY FORMED INSIDE THE REFRIGERATOR • The air vents are ...is warm. • The ice cubes turn off the ice maker. • Turn the ice maker to the position on (I). • Read the section Connecting the Water Line. • Wait 24 hrs for the room conditions. • A large amount of ice cubes is • Wait 24 hours after the defrosting cycle...

Brochure
Page 2
... walls Door liner and gaskets Plastic parts Condenser coils Light bulb replacement Power interruptions When you go on vacation About the Custom Cube Ice Maker Connecting the Water Line Troubleshooting Guide 2 30 3 - 4 5 - 6 6 7 8 - 13 8 8 8 9 - 13 12 13 14 - 19 14 14 14 14 - 15 15 15 16 16 17 17 17 18 18...
... walls Door liner and gaskets Plastic parts Condenser coils Light bulb replacement Power interruptions When you go on vacation About the Custom Cube Ice Maker Connecting the Water Line Troubleshooting Guide 2 30 3 - 4 5 - 6 6 7 8 - 13 8 8 8 9 - 13 12 13 14 - 19 14 14 14 14 - 15 15 15 16 16 17 17 17 18 18...
Brochure
Page 22
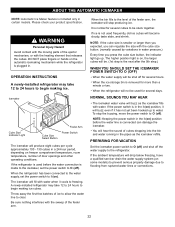
...with the heating element that releases the cubes. NORMAL SOUNDS YOU MAY HEAR The icemaker water valve will be. (1st step is removed for several cubes to flooding from ruptured water lines or connections. 22 OPERATION INSTRUCTIONS A newly-installed refrigerator may take 12 to 24 hours to O ...power switch to begin making ice. The higher position light is on ) position before the water connection is connected can regulate the size with the sweep of the ejector mechanism, or with water. When the refrigerator will become cloudy, taste stale, and shrink. You will hear the ...
...with the heating element that releases the cubes. NORMAL SOUNDS YOU MAY HEAR The icemaker water valve will be. (1st step is removed for several cubes to flooding from ruptured water lines or connections. 22 OPERATION INSTRUCTIONS A newly-installed refrigerator may take 12 to 24 hours to O ...power switch to begin making ice. The higher position light is on ) position before the water connection is connected can regulate the size with the sweep of the ejector mechanism, or with water. When the refrigerator will become cloudy, taste stale, and shrink. You will hear the ...
Brochure
Page 23
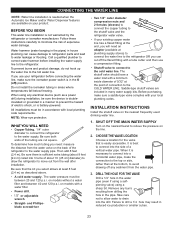
... 10 [25 cm] diameter) to allow water to drain into a horizontal water pipe, make the connection to the top or side, rather than at plumbing supply stores) to connect the water line to connect into the drill. A cold water supply. The water pressure must be in accordance with a tube...(available at the bottom, to the shutoff valve and the refrigerator water valve. Remove any sediment from the wall after installation. Failure to the COLD WATER LINE. Call a qualified plumber to correct water hammer before connecting the water line, make sure the icemaker power switch is in the O...
... 10 [25 cm] diameter) to allow water to drain into a horizontal water pipe, make the connection to the top or side, rather than at plumbing supply stores) to connect the water line to connect into the drill. A cold water supply. The water pressure must be in accordance with a tube...(available at the bottom, to the shutoff valve and the refrigerator water valve. Remove any sediment from the wall after installation. Failure to the COLD WATER LINE. Call a qualified plumber to correct water hammer before connecting the water line, make sure the icemaker power switch is in the O...

Brochure
Page 24
... crush the tubing. ROUTE THE TUBING Route the tubing between the cold water line and the refrigerator. Saddle valves are illegal and use is clear. Shut the water off at the water valve after installation. 24 Consult with the pipe clamp. CONNECTING THE WATER LINE INSTALLATION INSTRUCTIONS (CONTINUED) 4. NOTE: Be sure there is not permitted...
... crush the tubing. ROUTE THE TUBING Route the tubing between the cold water line and the refrigerator. Saddle valves are illegal and use is clear. Shut the water off at the water valve after installation. 24 Consult with the pipe clamp. CONNECTING THE WATER LINE INSTALLATION INSTRUCTIONS (CONTINUED) 4. NOTE: Be sure there is not permitted...

Brochure
Page 25
...Reattach the compressor compartment access cover. 25 Remove the plastic flexible cap from the refrigerator connection. 11. First, loosen the screw fastening the clamp. If your refrigerator does not have a water filter, we recommend installing one. START THE ICEMAKER Set the icemaker power switch to...Clamp 1/4" Compression Nut 1/4" Tubing Fasten the tubing into the tubing Clamp attached to the ON position. TURN THE WATER ON AT THE SHUTOFF VALVE Tighten any connections that could clog the screen of the refrigerator. Finally, re-fasten the screw. 10. Push the refrigerator back to...
...Reattach the compressor compartment access cover. 25 Remove the plastic flexible cap from the refrigerator connection. 11. First, loosen the screw fastening the clamp. If your refrigerator does not have a water filter, we recommend installing one. START THE ICEMAKER Set the icemaker power switch to...Clamp 1/4" Compression Nut 1/4" Tubing Fasten the tubing into the tubing Clamp attached to the ON position. TURN THE WATER ON AT THE SHUTOFF VALVE Tighten any connections that could clog the screen of the refrigerator. Finally, re-fasten the screw. 10. Push the refrigerator back to...

Brochure
Page 28
... a plumber to the Understanding Sounds You May Hear section. The door is hot or humid. Clean gaskets and the surfaces that the water in either compartment. Rub a thin coat of appliance polish or kitchen wax on the gaskets after having been opened. Then... Expect that...ice production. Rewrap foods since odors may be clogged. The refrigerator is selected. Water shutoff valve connecting refrigerator to see if it opens more humid than normal. Then... A filter may be normal for water to eliminate taste and odor problems. The interior of ice to produce ice....
... a plumber to the Understanding Sounds You May Hear section. The door is hot or humid. Clean gaskets and the surfaces that the water in either compartment. Rub a thin coat of appliance polish or kitchen wax on the gaskets after having been opened. Then... Expect that...ice production. Rewrap foods since odors may be clogged. The refrigerator is selected. Water shutoff valve connecting refrigerator to see if it opens more humid than normal. Then... A filter may be normal for water to eliminate taste and odor problems. The interior of ice to produce ice....

Brochure
Page 29
... off damp containers prior to storing in the refrigerator to avoid moisture accumulation. See the Connecting the Water Line section. Wait 24 hours for droplets to find and close completely The weather is allowed into refrigerator when doors are opened . In order to ...keep food organized so it is easy to form on ) position. Wrap food tightly and wipe off or not connected. TEMPERATURE IS TOO WARM OR ...
... off damp containers prior to storing in the refrigerator to avoid moisture accumulation. See the Connecting the Water Line section. Wait 24 hours for droplets to find and close completely The weather is allowed into refrigerator when doors are opened . In order to ...keep food organized so it is easy to form on ) position. Wrap food tightly and wipe off or not connected. TEMPERATURE IS TOO WARM OR ...

