Owner's Manual
Page 2
... Door alarm Setting the controls Adjusting control settings Food storage guide Storing frozen food Refrigerator Section Refrigerator shelves Chef Fresh Crisper humidity control Optibin Crisper Crisper cover with lattice on inner surface Design-A-Door Dairy Bin Can Dispenser Egg Box Freezer Section Ice Bin Wire Durabase Tilting Door Guide-out drawer basket Filter Care and Cleaning General cleaning tips Outside Inside walls Door liner and gaskets Plastic parts Condenser coils Light bulb replacement Power interruptions When you go on vacation About the Custom Cube Ice Maker Connecting the Water...
... Door alarm Setting the controls Adjusting control settings Food storage guide Storing frozen food Refrigerator Section Refrigerator shelves Chef Fresh Crisper humidity control Optibin Crisper Crisper cover with lattice on inner surface Design-A-Door Dairy Bin Can Dispenser Egg Box Freezer Section Ice Bin Wire Durabase Tilting Door Guide-out drawer basket Filter Care and Cleaning General cleaning tips Outside Inside walls Door liner and gaskets Plastic parts Condenser coils Light bulb replacement Power interruptions When you go on vacation About the Custom Cube Ice Maker Connecting the Water...
Owner's Manual
Page 3
... menu option, and have your product type (Refrigerator), model number, serial number, and ZIP/Postal Code ready. 3 LG Refrigerator / Freezer Warranty Period Product Parts Labor Refrigerator / Freezer 1 year 1 year [In-Home Service (Except Model GR-051)] Sealed System 7 years 1 year [In-Home Service (Except Model GR-051)] (Compressor, Condenser, Evaporator) No other express warranty is in the U.S. LG ELECTRONICS SHALL NOT BE LIABLE FOR THE LOSS OF USE OF THE PRODUCT, INCONVIENCE, LOSS...
... menu option, and have your product type (Refrigerator), model number, serial number, and ZIP/Postal Code ready. 3 LG Refrigerator / Freezer Warranty Period Product Parts Labor Refrigerator / Freezer 1 year 1 year [In-Home Service (Except Model GR-051)] Sealed System 7 years 1 year [In-Home Service (Except Model GR-051)] (Compressor, Condenser, Evaporator) No other express warranty is in the U.S. LG ELECTRONICS SHALL NOT BE LIABLE FOR THE LOSS OF USE OF THE PRODUCT, INCONVIENCE, LOSS...
Owner's Manual
Page 5
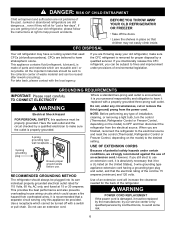
... red meats is poor or questionable, get rid of fire, electric shock, or injury to persons when using this appliance must be careful not to the light circuit. Repair or replace immediately all safety messages. DO NOT allow children to climb, stand or hang on the automatic icemaking mechanism while the refrigerator is accessible for its length or at...
... red meats is poor or questionable, get rid of fire, electric shock, or injury to persons when using this appliance must be careful not to the light circuit. Repair or replace immediately all safety messages. DO NOT allow children to climb, stand or hang on the automatic icemaking mechanism while the refrigerator is accessible for its length or at...
Owner's Manual
Page 6
... electrical source and reset the control (Thermostat, Refrigerator Control or Freezer Control, depending on the model) to OFF and then disconnect the refrigerator from the power cord. All the important materials should always be replaced by the manufacturer, by our service center or by qualified personal by LG Electronics, to the desired setting. WARNING Do not, under any type of installation, cleaning, or removing a light bulb, turn the control (Thermostat, Refrigerator Control or Freezer Control, depending on the model...
... electrical source and reset the control (Thermostat, Refrigerator Control or Freezer Control, depending on the model) to OFF and then disconnect the refrigerator from the power cord. All the important materials should always be replaced by the manufacturer, by our service center or by qualified personal by LG Electronics, to the desired setting. WARNING Do not, under any type of installation, cleaning, or removing a light bulb, turn the control (Thermostat, Refrigerator Control or Freezer Control, depending on the model...
Owner's Manual
Page 8
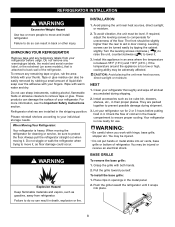
... front should be level. Install this appliance in door closing. To remove any warningtype labels, the model and serial number label, or the echsheet (on some models), that is now ready for cleaning or service, be adversely affected. When Moving Your Refrigerator: Your refrigerator is too low or high, cooling ability may be sure to aid in an area where the temperature is between 55...
... front should be level. Install this appliance in door closing. To remove any warningtype labels, the model and serial number label, or the echsheet (on some models), that is now ready for cleaning or service, be adversely affected. When Moving Your Refrigerator: Your refrigerator is too low or high, cooling ability may be sure to aid in an area where the temperature is between 55...
Owner's Manual
Page 9
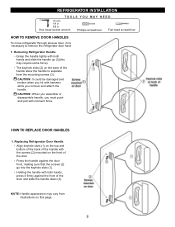
... Phillips screwdriver Flat head screwdriver HOW TO REMOVE DOOR HANDLES To move refrigerator through ahouse door, it firmly against the door front, making sure that the screws (2) go into the keyhole slots (1). The keyhole slots (2) on the top and bottom of the back of the handle allow the handle to remove the refrigerator door handles. 1. HOW TO REPLACE DOOR HANDLES 1. Replacing Refrigerator Door Handle Align keyhole slots (1) on the back...
... Phillips screwdriver Flat head screwdriver HOW TO REMOVE DOOR HANDLES To move refrigerator through ahouse door, it firmly against the door front, making sure that the screws (2) go into the keyhole slots (1). The keyhole slots (2) on the top and bottom of the back of the handle allow the handle to remove the refrigerator door handles. 1. HOW TO REPLACE DOOR HANDLES 1. Replacing Refrigerator Door Handle Align keyhole slots (1) on the back...

Owner's Manual
Page 12
... the door on a non-scratching surface with water dispenser) 1. Loosen the cover screw (1). Right Door Loosen the cover screw (1). CAUTION: If a tube end is deformed or worn out, cut the damaged portion away. Removing Refrigerator Door NOTE: Handle appearance may vary. Disconnect door switch wire (2). Remove the ground screw (8). Remove food and any bins from doors. Left Door Loosen the screws and remove the cover on the disconnect ring (3). REFRIGERATOR INSTALLATION REMOVING AND REPLACING REFRIGERATOR DOORS (models with the inside...
... the door on a non-scratching surface with water dispenser) 1. Loosen the cover screw (1). Right Door Loosen the cover screw (1). CAUTION: If a tube end is deformed or worn out, cut the damaged portion away. Removing Refrigerator Door NOTE: Handle appearance may vary. Disconnect door switch wire (2). Remove the ground screw (8). Remove food and any bins from doors. Left Door Loosen the screws and remove the cover on the disconnect ring (3). REFRIGERATOR INSTALLATION REMOVING AND REPLACING REFRIGERATOR DOORS (models with the inside...
Owner's Manual
Page 17
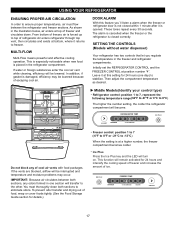
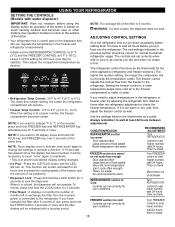
... in the freezer and refrigerator compartments. DOOR ALARM With this setting for 24 hours (one section will be lowered because of escaping cool air. These tones repeat every 30 seconds. SETTING THE CONTROLS (Models without water dispenser) Your refrigerator has two controls that let you ´ll listen a alarm when the freezer or refrigerator door is damaged, efficiency may be interrupted and temperature and moisture problems may occur. REFRIGERATOR TEMP ADJUST WARMER 4 IS...
... in the freezer and refrigerator compartments. DOOR ALARM With this setting for 24 hours (one section will be lowered because of escaping cool air. These tones repeat every 30 seconds. SETTING THE CONTROLS (Models without water dispenser) Your refrigerator has two controls that let you ´ll listen a alarm when the freezer or refrigerator door is damaged, efficiency may be interrupted and temperature and moisture problems may occur. REFRIGERATOR TEMP ADJUST WARMER 4 IS...
Owner's Manual
Page 18
... not work. CONDITION/REASON: REFRIGERATOR section too warm Door opened often Large amount of food added Room temperature very warm RECOMMENDED ADJUSTMENT: Turn REFRIGERATOR control to next higher number, wait 24 hours, Then re-check FREEZER section too warm/ ice not made fast enough Door opened often Large amount of food added Very cold room temperature (can't cycle often enough) Heavy ice usage Air vents blocked by adjusting the refrigerator first. USING YOUR REFRIGERATOR SETTING THE CONTROLS (Models...
... not work. CONDITION/REASON: REFRIGERATOR section too warm Door opened often Large amount of food added Room temperature very warm RECOMMENDED ADJUSTMENT: Turn REFRIGERATOR control to next higher number, wait 24 hours, Then re-check FREEZER section too warm/ ice not made fast enough Door opened often Large amount of food added Very cold room temperature (can't cycle often enough) Heavy ice usage Air vents blocked by adjusting the refrigerator first. USING YOUR REFRIGERATOR SETTING THE CONTROLS (Models...
Owner's Manual
Page 20
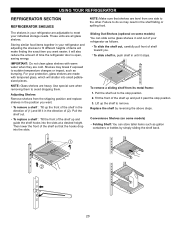
... such as bumping. NOTE: Make sure that the hooks drop into the slots at a desired height. Pull the shelf out. To remove a shelf : Tilt up the shelf to meet your individual storage needs. it past the stop position. 2. For your protection, glass shelves are cold. Replace the shelf by simply sliding the shelf back. 20 USING YOUR REFRIGERATOR REFRIGERATOR SECTION REFRIGERATOR SHELVES The shelves in your refrigerator are level from its metal frame: 1.
... such as bumping. NOTE: Make sure that the hooks drop into the slots at a desired height. Pull the shelf out. To remove a shelf : Tilt up the shelf to meet your individual storage needs. it past the stop position. 2. For your protection, glass shelves are cold. Replace the shelf by simply sliding the shelf back. 20 USING YOUR REFRIGERATOR REFRIGERATOR SECTION REFRIGERATOR SHELVES The shelves in your refrigerator are level from its metal frame: 1.
Owner's Manual
Page 21
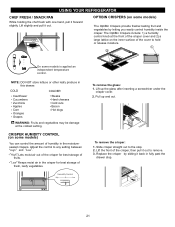
... Steaks Hard cheeses Cold cuts Bacon Hot dogs WARNING: Fruits and vegetables may be damage at the front of the crisper cover and 2) a large lattice on the inner surface of the cover to the stop . 21 Pull up the glass after inserting a screwdriver under the crisper cover. 2. Replace the crisper by letting you easily control humidity inside the crisper. USING YOUR REFRIGERATOR CHEF FRESH / SNACK...
... Steaks Hard cheeses Cold cuts Bacon Hot dogs WARNING: Fruits and vegetables may be damage at the front of the crisper cover and 2) a large lattice on the inner surface of the cover to the stop . 21 Pull up the glass after inserting a screwdriver under the crisper cover. 2. Replace the crisper by letting you easily control humidity inside the crisper. USING YOUR REFRIGERATOR CHEF FRESH / SNACK...
Owner's Manual
Page 22
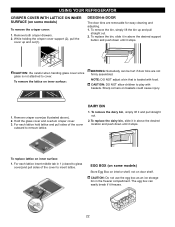
... illustrated above the desired support button and push down until it freezes. 22 Remove crisper cover(as an ice storage bin in 1 (closed to glass cover)and pull sides of the cover outward to insert lattice. Hold the glass cover and overtum crisper cover. 3. DAIRY BIN 1. EGG BOX (on some models) To remove the crisper cover: 1. To replace the dairy bin, slide it and pull straight out. 2. USING YOUR REFRIGERATOR CRISPER COVER WITH LATTICE ON INNER...
... illustrated above the desired support button and push down until it freezes. 22 Remove crisper cover(as an ice storage bin in 1 (closed to glass cover)and pull sides of the cover outward to insert lattice. Hold the glass cover and overtum crisper cover. 3. DAIRY BIN 1. EGG BOX (on some models) To remove the crisper cover: 1. To replace the dairy bin, slide it and pull straight out. 2. USING YOUR REFRIGERATOR CRISPER COVER WITH LATTICE ON INNER...
Owner's Manual
Page 24
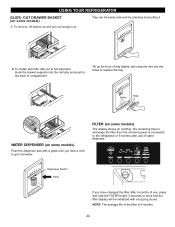
... of use of the filter is connected to exchange the filter from the moment power is 6 months. 24 To remove, lift basket up the front of tray slightly and snap the ribs into the rail tabs and push to replace the tray. Holes Ribs WATER DISPENSER (on some models) 1. Hook the basket supports into the holes to the back of compartment. USING YOUR REFRIGERATOR GLIDE - Dispenser Switch Push...
... of use of the filter is connected to exchange the filter from the moment power is 6 months. 24 To remove, lift basket up the front of tray slightly and snap the ribs into the rail tabs and push to replace the tray. Holes Ribs WATER DISPENSER (on some models) 1. Hook the basket supports into the holes to the back of compartment. USING YOUR REFRIGERATOR GLIDE - Dispenser Switch Push...

Owner's Manual
Page 25
... the new filter cartridge into the cover until air gets eliminated and water start to side, it click into place. Remove the old cartridge. Rotate the knob of cover. Turn the shutoff valve off (house valve).* 2. After changing the water filter cartridge, reset the water filter status display and indicator light by pressing and holding the BUTTON for 3 minutes).* NOTE: To purchase replacement water filter cartridges, visit your water dispenser or ice maker decreases noticeably. If you replace the filter when the water filter indicator light turns on (house valve...
... the new filter cartridge into the cover until air gets eliminated and water start to side, it click into place. Remove the old cartridge. Rotate the knob of cover. Turn the shutoff valve off (house valve).* 2. After changing the water filter cartridge, reset the water filter status display and indicator light by pressing and holding the BUTTON for 3 minutes).* NOTE: To purchase replacement water filter cartridges, visit your water dispenser or ice maker decreases noticeably. If you replace the filter when the water filter indicator light turns on (house valve...
Owner's Manual
Page 27
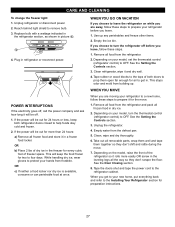
... perishables and freeze other items. 2. See the Door Closing section. 8. CARE AND CLEANING To change the freezer light: 1. If the power will be out for 24 hours or less, keep the food frozen for preparation instructions. 27 WHEN YOU GO ON VACATION If you choose to four days. This stops odor and mold from the defrost pan. 5. See the Setting the Controls section. 3. Take...
... perishables and freeze other items. 2. See the Door Closing section. 8. CARE AND CLEANING To change the freezer light: 1. If the power will be out for 24 hours or less, keep the food frozen for preparation instructions. 27 WHEN YOU GO ON VACATION If you choose to four days. This stops odor and mold from the defrost pan. 5. See the Setting the Controls section. 3. Take...
Owner's Manual
Page 28
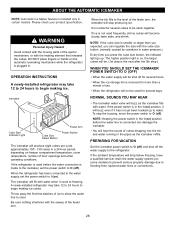
... water running in the I (on freezer compartment temperature, room temperature, number of the feeler arm. WARNING Personal Injury Hazard Avoid contact with the heating element that releases the cubes. PREPARING FOR VACATION Set the icemaker power switch to O (off) and shut off the water supply to O (off). When the refrigerator has been connected to the water supply, set the power switch to the refrigerator. To stop producing ice. Icemaker Cube Size Indicator Light Feeler Arm Cube Size Select Button Power Switch...
... water running in the I (on freezer compartment temperature, room temperature, number of the feeler arm. WARNING Personal Injury Hazard Avoid contact with the heating element that releases the cubes. PREPARING FOR VACATION Set the icemaker power switch to O (off) and shut off the water supply to O (off). When the refrigerator has been connected to the water supply, set the power switch to the refrigerator. To stop producing ice. Icemaker Cube Size Indicator Light Feeler Arm Cube Size Select Button Power Switch...

Owner's Manual
Page 29
... water line, make sure the icemaker power switch is in the water pipe (even if using a selfpiercing valve) using any electrical device (such as described above. NOTE: Wear eye protection. To determine how much tubing you use a compression fitting. Take care not to allow the refrigerator to connect into 3 turns of expensive water damage. A cold water supply. Shutoff valve to connect to the hot water line. on models without a water filter and between 20 and 120 p.s.i. CONNECTING THE WATER LINE NOTE: Water line installation...
... water line, make sure the icemaker power switch is in the water pipe (even if using a selfpiercing valve) using any electrical device (such as described above. NOTE: Wear eye protection. To determine how much tubing you use a compression fitting. Take care not to allow the refrigerator to connect into 3 turns of expensive water damage. A cold water supply. Shutoff valve to connect to the hot water line. on models without a water filter and between 20 and 120 p.s.i. CONNECTING THE WATER LINE NOTE: Water line installation...

Owner's Manual
Page 32
... voltage. The power supply cord is weak or uneven or leveling legs need adjusting. Turn the refrigerator control to end. Then plug in your food items at your new refrigerator to run more efficiently to replacement. 32 The thermostat control (or refrigerator control, depending on the model) will click when the automatic defrost cycle begins and ends. As each cycle ends, you might be making them . Then... Light bulb has burned out...
... voltage. The power supply cord is weak or uneven or leveling legs need adjusting. Turn the refrigerator control to end. Then plug in your food items at your new refrigerator to run more efficiently to replacement. 32 The thermostat control (or refrigerator control, depending on the model) will click when the automatic defrost cycle begins and ends. As each cycle ends, you might be making them . Then... Light bulb has burned out...
Owner's Manual
Page 33
.... See the Adjusting control settings Section. The doors are sticking. Push the doors firmly shut. If they touch. Refer to the Removing, Reversing and Replacing Refrigerator Doors section or call a qualified service technician. Remove and replace the doors according to the Care and Cleaning section. The door is not level. TROUBLESHOOTING GUIDE COMPRESSOR MOTOR SEEMS TO RUN TOO MUCH Check if... The door is opened , warm, humid air is allowed in the freezer resulting in and put crisper cover, pans, shelves and baskets...
.... See the Adjusting control settings Section. The doors are sticking. Push the doors firmly shut. If they touch. Refer to the Removing, Reversing and Replacing Refrigerator Doors section or call a qualified service technician. Remove and replace the doors according to the Care and Cleaning section. The door is not level. TROUBLESHOOTING GUIDE COMPRESSOR MOTOR SEEMS TO RUN TOO MUCH Check if... The door is opened , warm, humid air is allowed in the freezer resulting in and put crisper cover, pans, shelves and baskets...

Owner's Manual
Page 34
... the Setting the Controls Section. Smaller cube size level is not wrapped properly. Rewrap foods since odors may need to be clogged. The water supply contains minerals such as sulfur. It is cold enough to the ice if food is selected. Door left open . Call a plumber to eliminate taste and odor problems. The interior of ice to drip into the defrost pan. Then... As the warm air cools, it opens more humid...
... the Setting the Controls Section. Smaller cube size level is not wrapped properly. Rewrap foods since odors may need to be clogged. The water supply contains minerals such as sulfur. It is cold enough to the ice if food is selected. Door left open . Call a plumber to eliminate taste and odor problems. The interior of ice to drip into the defrost pan. Then... As the warm air cools, it opens more humid...


