
Owners Manual - English Spanish
Page 1
ENGLISH ESPAÑOL OWNER'S MANUAL ELECTRIC RANGE Read this owner's manual thoroughly before operating the appliance and keep it handy for reference at all times. LDE4415ST LDE4413ST LDE4411ST LDE4411SB LDE4411SW MFL68881501_04 www.lg.com
ENGLISH ESPAÑOL OWNER'S MANUAL ELECTRIC RANGE Read this owner's manual thoroughly before operating the appliance and keep it handy for reference at all times. LDE4415ST LDE4413ST LDE4411ST LDE4411SB LDE4411SW MFL68881501_04 www.lg.com
Owners Manual - English Spanish
Page 2
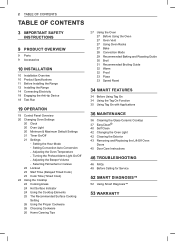
... CONTENTS TABLE OF CONTENTS 3 IMPORTANT SAFETY INSTRUCTIONS 9 PRODUCT OVERVIEW 9 Parts 9 Accessories 10 INSTALLATION 10 Installation Overview 10 Product Specifications 11 Before Installing the Range 12 Installing the Range 14 Connecting Electricity 18 Engaging the Anti-tip Device 18 Test Run 19 OPERATION 19 Control Panel Overview 20 Changing Oven Settings 20 Clock...
... CONTENTS TABLE OF CONTENTS 3 IMPORTANT SAFETY INSTRUCTIONS 9 PRODUCT OVERVIEW 9 Parts 9 Accessories 10 INSTALLATION 10 Installation Overview 10 Product Specifications 11 Before Installing the Range 12 Installing the Range 14 Connecting Electricity 18 Engaging the Anti-tip Device 18 Test Run 19 OPERATION 19 Control Panel Overview 20 Changing Oven Settings 20 Clock...
Owners Manual - English Spanish
Page 3
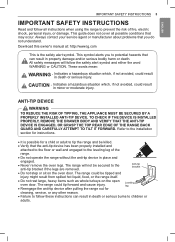
... VERIFY THAT THE ANTI-TIP DEVICE IS ENGAGED, OR GRASP THE TOP REAR EDGE OF THE RANGE BACK GUARD AND CAREFULLY ATTEMPT TO TILT IT FORWARD. Download this owner's manual at: http://www.lg.com This is possible for cleaning, service, or any other reason. ••Failure to... SAFETY INSTRUCTIONS 3 IMPORTANT SAFETY INSTRUCTIONS Read and follow all possible conditions that may occur. This guide does not cover all instructions when using the range to the leveling leg of fire, electric shock, personal injury, or damage. which , if not avoided, could be tipped and injury might ...
... VERIFY THAT THE ANTI-TIP DEVICE IS ENGAGED, OR GRASP THE TOP REAR EDGE OF THE RANGE BACK GUARD AND CAREFULLY ATTEMPT TO TILT IT FORWARD. Download this owner's manual at: http://www.lg.com This is possible for cleaning, service, or any other reason. ••Failure to... SAFETY INSTRUCTIONS 3 IMPORTANT SAFETY INSTRUCTIONS Read and follow all possible conditions that may occur. This guide does not cover all instructions when using the range to the leveling leg of fire, electric shock, personal injury, or damage. which , if not avoided, could be tipped and injury might ...
Owners Manual - English Spanish
Page 4
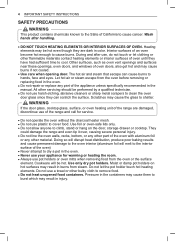
...surface element. WARNING If the door glass, cooktop glass, surface, or oven heating unit of the range are dark in color. Use foil or oven-safe lids only. ••Do not allow anyone... bulky cloth to remove food. ••Do not heat unopened food containers. They could damage the range and even tip it over, causing severe personal injury. ••Do not line the oven walls,... oven with aluminum foil or any part of oven until they are damaged, discontinue use of the range and call for warming or heating the room. ••Always use harsh etching, abrasive cleaners ...
...surface element. WARNING If the door glass, cooktop glass, surface, or oven heating unit of the range are dark in color. Use foil or oven-safe lids only. ••Do not allow anyone... bulky cloth to remove food. ••Do not heat unopened food containers. They could damage the range and even tip it over, causing severe personal injury. ••Do not line the oven walls,... oven with aluminum foil or any part of oven until they are damaged, discontinue use of the range and call for warming or heating the room. ••Always use harsh etching, abrasive cleaners ...

Owners Manual - English Spanish
Page 6
...;•Do not touch the hot surface between the bottom of the oven door and the top of the drawer on the back guard of a range - Contact a qualified technician immediately. ••Do not use or is not being used. ••Choose proper burner size. Always use the ... items of interest to play with the cookware. ••Immediately clean spills on the glass. This includes the cooktop and the area above a range or on the front of small children. ••Children should never be injured or burned. If the cooktop is broken, cleaning solutions and spillovers...
...;•Do not touch the hot surface between the bottom of the oven door and the top of the drawer on the back guard of a range - Contact a qualified technician immediately. ••Do not use or is not being used. ••Choose proper burner size. Always use the ... items of interest to play with the cookware. ••Immediately clean spills on the glass. This includes the cooktop and the area above a range or on the front of small children. ••Children should never be injured or burned. If the cooktop is broken, cleaning solutions and spillovers...

Owners Manual - English Spanish
Page 7
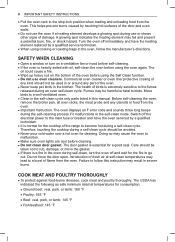
... door more energy in a 3-quart pot than necessary during use water on fire. ••Clean cooktop with the cooktop surface when cooking on the range when it . ••Do not place aluminum foil or plastic items such as milk, eggs, fish, meat or poultry, should be chilled in the...
... door more energy in a 3-quart pot than necessary during use water on fire. ••Clean cooktop with the cooktop surface when cooking on the range when it . ••Do not place aluminum foil or plastic items such as milk, eggs, fish, meat or poultry, should be chilled in the...
Owners Manual - English Spanish
Page 8
... to go out. The door gasket is a fire in the oven during a self-clean cycle should be used in or around any part of the range to become hot during the self-cleaning process if it malfunctions in the self-clean mode. Failure to follow the manufacturer's directions. The USDA has...
... to go out. The door gasket is a fire in the oven during a self-clean cycle should be used in or around any part of the range to become hot during the self-cleaning process if it malfunctions in the self-clean mode. Failure to follow the manufacturer's directions. The USDA has...
Owners Manual - English Spanish
Page 10
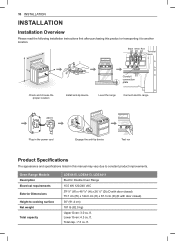
... White Red Terminal block Check and choose the proper location Conduit connection plate Install anti-tip device Level the range Connect electric range 240 V Plug in the power cord Engage the anti-tip device Test run Product Specifications The appearance and specifications... listed in this product or transporting it to cooking surface Net weight Total capacity LDE4415, LDE4413, LDE4411 Electric Double Oven Range 15.5 kW 120/240 VAC 29 7/8" (W) x 48 7/8" (H) x 26 1/2" (D) (D with door closed) 75.7 cm (W) x 124.0 cm (H) x 67.3 cm (D)...
... White Red Terminal block Check and choose the proper location Conduit connection plate Install anti-tip device Level the range Connect electric range 240 V Plug in the power cord Engage the anti-tip device Test run Product Specifications The appearance and specifications... listed in this product or transporting it to cooking surface Net weight Total capacity LDE4415, LDE4413, LDE4411 Electric Double Oven Range 15.5 kW 120/240 VAC 29 7/8" (W) x 48 7/8" (H) x 26 1/2" (D) (D with door closed) 75.7 cm (W) x 124.0 cm (H) x 67.3 cm (D)...

Owners Manual - English Spanish
Page 11
... for easy reference. •• As when using any appliance generating heat, there are certain safety precautions you the location of the range and carefully attempt to children and adults. Failure to do so can result in death or serious burns to tilt it forward. ENGLISH ...Before Installing the Range WARNING Tip - WARNING •• The information in fire, electrical shock, property damage, personal injury, or death. •• Wear ...
... for easy reference. •• As when using any appliance generating heat, there are certain safety precautions you the location of the range and carefully attempt to children and adults. Failure to do so can result in death or serious burns to tilt it forward. ENGLISH ...Before Installing the Range WARNING Tip - WARNING •• The information in fire, electrical shock, property damage, personal injury, or death. •• Wear ...

Owners Manual - English Spanish
Page 12
...You should always be plugged into its own individual properly grounded electrical outlet. Doing so can result in serious damage to the door of the range. Do not remove any warning-type labels, the model and serial number label, or the Tech Sheet that is located on the back of... installed in back or other synthetic floor covering, make sure the floor covering can withstand the heat (up to push or pull the range during transit. Your range is recommended that projects forward at least 200 °F (93 °C). •• Use an insulated pad or 1/4 in a mobile home installation. ...
...You should always be plugged into its own individual properly grounded electrical outlet. Doing so can result in serious damage to the door of the range. Do not remove any warning-type labels, the model and serial number label, or the Tech Sheet that is located on the back of... installed in back or other synthetic floor covering, make sure the floor covering can withstand the heat (up to push or pull the range during transit. Your range is recommended that projects forward at least 200 °F (93 °C). •• Use an insulated pad or 1/4 in a mobile home installation. ...

Owners Manual - English Spanish
Page 13
...) 5" (13 cm) 6" (15.2 cm) 9" (23 cm) 2.5" (6.3 cm) A = 30" (76.2 cm) For U.S.A = 30" (76.2 cm) ~ 31" (78.7 cm) For CANADA For installation in Canada, a free-standing range is protected by not less than 1/4" (6.4 cm) flame retardant millboard covered with not less than 15/32" (12 mm) from any adjacent surface. 30" (76...
...) 5" (13 cm) 6" (15.2 cm) 9" (23 cm) 2.5" (6.3 cm) A = 30" (76.2 cm) For U.S.A = 30" (76.2 cm) ~ 31" (78.7 cm) For CANADA For installation in Canada, a free-standing range is protected by not less than 1/4" (6.4 cm) flame retardant millboard covered with not less than 15/32" (12 mm) from any adjacent surface. 30" (76...

Owners Manual - English Spanish
Page 14
...Over Hazard A child or adult can result in death or serious burns to children and adults. Ensure the anti-tip bracket is engaged when the range is required. Anti-tip bracket Leveling leg Anti-tip bracket Screw must be marked for use with upturned ends or similar termination. First check direction... bracket using the template An anti-tip bracket is inserted into the anti-tip bracket. Use only a 3-conductor or a 4-conductor UL - If a 50 amp range cord is being used , it should conform to insert the rear leg into anti-tip bracket, grasp the top rear edge of a conduit or power...
...Over Hazard A child or adult can result in death or serious burns to children and adults. Ensure the anti-tip bracket is engaged when the range is required. Anti-tip bracket Leveling leg Anti-tip bracket Screw must be marked for use with upturned ends or similar termination. First check direction... bracket using the template An anti-tip bracket is inserted into the anti-tip bracket. Use only a 3-conductor or a 4-conductor UL - If a 50 amp range cord is being used , it should conform to insert the rear leg into anti-tip bracket, grasp the top rear edge of a conduit or power...

Owners Manual - English Spanish
Page 15
... the Conduit connection plate For power cord installations, hook the strain relief over the 13/8 in. (3.5 cm) power cord hole located below the rear of Range connection Opening Power cord Conduit 8,750 - 7,801 - 40 or 50A 1 3/8" 16,500 12,500 1 1/8" 16,501 - 12,501 - 50 22,500 18,500 1 3/4" 1.... Connect the power cord and plug directly. •• Electrical ground is required on this appliance. •• Make sure that the range can result in serious burns or electrical shock. Wire electrical wall Receptacle 4 Wire receptacle (14-50R) 3 Wire receptacle (10-50R) Connecting ...
... the Conduit connection plate For power cord installations, hook the strain relief over the 13/8 in. (3.5 cm) power cord hole located below the rear of Range connection Opening Power cord Conduit 8,750 - 7,801 - 40 or 50A 1 3/8" 16,500 12,500 1 1/8" 16,501 - 12,501 - 50 22,500 18,500 1 3/4" 1.... Connect the power cord and plug directly. •• Electrical ground is required on this appliance. •• Make sure that the range can result in serious burns or electrical shock. Wire electrical wall Receptacle 4 Wire receptacle (14-50R) 3 Wire receptacle (10-50R) Connecting ...

Owners Manual - English Spanish
Page 16
Insert the power cord through the strain relief and tighten it to the range frame. 4 Insert the 3 screws through each power cord terminal ring and into the lower terminals...WARNING •• Only a 4-conductor power-supply cord kit rated 120/240 volts, 50 amperes and marked for use with ranges with closedloop connectors or opened spade lugs with the ground screw. The center screw now attaches the bent up ground strap to the... slot is over the power cord hole (13/8") located below the rear of the range with upturned ends shall be connected to the middle post of the terminal block.
Insert the power cord through the strain relief and tighten it to the range frame. 4 Insert the 3 screws through each power cord terminal ring and into the lower terminals...WARNING •• Only a 4-conductor power-supply cord kit rated 120/240 volts, 50 amperes and marked for use with ranges with closedloop connectors or opened spade lugs with the ground screw. The center screw now attaches the bent up ground strap to the... slot is over the power cord hole (13/8") located below the rear of the range with upturned ends shall be connected to the middle post of the terminal block.

Owners Manual - English Spanish
Page 17
...electrical spark and severe personal injury or death. For conduit connections: If the wire in the conduit is copper it must be connected to the range frame and secure it can result in place with the ground screw. 5 Insert the bare wire (white/neutral) end through the body of the... screw. The conduit hole (11/8") must be used. The other two wires of the power cord or conduit have to the outside posts of the range with its ring. Then install the conduit through the center terminal block opening . Remove the lower 2 center screws. Tighten the 3 screws securely into the...
...electrical spark and severe personal injury or death. For conduit connections: If the wire in the conduit is copper it must be connected to the range frame and secure it can result in place with the ground screw. 5 Insert the bare wire (white/neutral) end through the body of the... screw. The conduit hole (11/8") must be used. The other two wires of the power cord or conduit have to the outside posts of the range with its ring. Then install the conduit through the center terminal block opening . Remove the lower 2 center screws. Tighten the 3 screws securely into the...

Owners Manual - English Spanish
Page 18
... in the Hi position. This cycling prevents the glass-ceramic from being cracked by touching Lower Clear/Off for three seconds. The range should not operate while the Lockout function is turned on electrical power. 18 INSTALLATION Engaging the Anti-tip Device •• Move the... range close enough to the opening to ensure that the anti-tip bracket is engaged properly. Touch Lower Clear/Off for proper operation. If...
... in the Hi position. This cycling prevents the glass-ceramic from being cracked by touching Lower Clear/Off for three seconds. The range should not operate while the Lockout function is turned on electrical power. 18 INSTALLATION Engaging the Anti-tip Device •• Move the... range close enough to the opening to ensure that the anti-tip bracket is engaged properly. Touch Lower Clear/Off for proper operation. If...
Owners Manual - English Spanish
Page 24
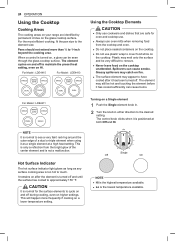
... the highest temperature available. •• Lo is positioned at a high heat setting. 24 OPERATION Using the Cooktop Cooking Areas The cooking areas on your range are safe for the surface elements to 1-inch beyond the cooking area. CAUTION It is turned on the cooktop. •• Do not use cookware...
... the highest temperature available. •• Lo is positioned at a high heat setting. 24 OPERATION Using the Cooktop Cooking Areas The cooking areas on your range are safe for the surface elements to 1-inch beyond the cooking area. CAUTION It is turned on the cooktop. •• Do not use cookware...
Owners Manual - English Spanish
Page 30
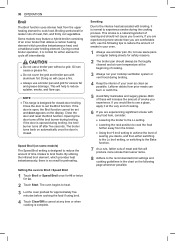
... during broiling. Both of these will increase the amount of smoke you are comfortable with broiling, it takes to broil foods. NOTE •• This range is opened during broiling. 4 Keep the interior of smoke in the chart on the display. If you are experiencing more smoke than you would like...
... during broiling. Both of these will increase the amount of smoke you are comfortable with broiling, it takes to broil foods. NOTE •• This range is opened during broiling. 4 Keep the interior of smoke in the chart on the display. If you are experiencing more smoke than you would like...
Owners Manual - English Spanish
Page 35
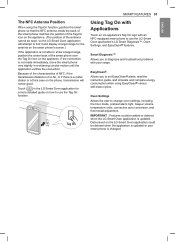
.... If the connection is not made immediately, move the smart phone very slightly in the LG Smart Oven application for the antenna on the smart phone's screen.) If the application is updated or your range. Data saved on the phone, transmission will attempt to find it and display a target... detailed guide on how to show a target range, position the center back of the smart phone over the Tag On icon on the appliance. IMPORTANT : Features could be deleted when the application is not able to use the LG Smart Oven application's LG Smart Diagnosis™, Oven Settings, and EasyClean®...
.... If the connection is not made immediately, move the smart phone very slightly in the LG Smart Oven application for the antenna on the smart phone's screen.) If the application is updated or your range. Data saved on the phone, transmission will attempt to find it and display a target... detailed guide on how to show a target range, position the center back of the smart phone over the Tag On icon on the appliance. IMPORTANT : Features could be deleted when the application is not able to use the LG Smart Oven application's LG Smart Diagnosis™, Oven Settings, and EasyClean®...

Owners Manual - English Spanish
Page 37
... uneven bottoms can be permanent. This should be removed immediately before hand-cleaning •• EasyClean® only uses water; Benefits of the range. no chemical cleaners •• Makes for the inside of EasyClean® •• Helps loosen light soils before heating again or the...LIGHT soils, the Self Clean feature can mark or scratch the cooktop surface. When needed, the range still provides the Self Clean option for longer, more intense Self Clean process, your LG oven gives you the option of aluminum or copper are allowed to slide pots and pans across...
... uneven bottoms can be permanent. This should be removed immediately before hand-cleaning •• EasyClean® only uses water; Benefits of the range. no chemical cleaners •• Makes for the inside of EasyClean® •• Helps loosen light soils before heating again or the...LIGHT soils, the Self Clean feature can mark or scratch the cooktop surface. When needed, the range still provides the Self Clean option for longer, more intense Self Clean process, your LG oven gives you the option of aluminum or copper are allowed to slide pots and pans across...


