Owners Manual - English Spanish
Page 2
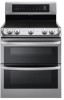
... Service 52 SMART DIAGNOSIS™ 52 Using Smart Diagnosis™ 53 WARRANTY Setting the Hour Mode -- Adjusting the Beeper Volume -- Setting Convection Auto Conversion -- Adjusting the Oven Temperature -- 2 TABLE OF CONTENTS TABLE OF CONTENTS 3 IMPORTANT SAFETY INSTRUCTIONS 9 PRODUCT OVERVIEW 9 Parts 9 Accessories 10 INSTALLATION 10 Installation Overview 10 Product Specifications 11 Before Installing the Range 12 Installing the Range 14 Connecting Electricity 18 Engaging the Anti-tip Device 18 Test Run 19 OPERATION 19 Control Panel Overview 20 Changing Oven Settings 20 Clock...
... Service 52 SMART DIAGNOSIS™ 52 Using Smart Diagnosis™ 53 WARRANTY Setting the Hour Mode -- Adjusting the Beeper Volume -- Setting Convection Auto Conversion -- Adjusting the Oven Temperature -- 2 TABLE OF CONTENTS TABLE OF CONTENTS 3 IMPORTANT SAFETY INSTRUCTIONS 9 PRODUCT OVERVIEW 9 Parts 9 Accessories 10 INSTALLATION 10 Installation Overview 10 Product Specifications 11 Before Installing the Range 12 Installing the Range 14 Connecting Electricity 18 Engaging the Anti-tip Device 18 Test Run 19 OPERATION 19 Control Panel Overview 20 Changing Oven Settings 20 Clock...
Owners Manual - English Spanish
Page 3
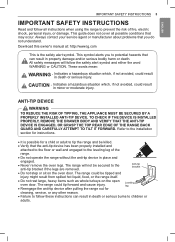
... rest large, heavy items such as whole turkeys on the oven door. TO CHECK IF THE DEVICE IS INSTALLED PROPERLY, REMOVE THE DRAWER BODY AND VERIFY THAT THE ANTI-TIP DEVICE IS ENGAGED, OR GRASP THE TOP REAR EDGE OF THE RANGE BACK GUARD AND CAREFULLY ATTEMPT TO TILT IT FORWARD. Anti-tip bracket ••Do not step or sit on the open oven door.
... rest large, heavy items such as whole turkeys on the oven door. TO CHECK IF THE DEVICE IS INSTALLED PROPERLY, REMOVE THE DRAWER BODY AND VERIFY THAT THE ANTI-TIP DEVICE IS ENGAGED, OR GRASP THE TOP REAR EDGE OF THE RANGE BACK GUARD AND CAREFULLY ATTEMPT TO TILT IT FORWARD. Anti-tip bracket ••Do not step or sit on the open oven door.
Owners Manual - English Spanish
Page 4
... the oven before removing or replacing food in the oven. ••Do not repair or replace any other servicing should be performed by a qualified technician. ••Do not use plastic to cover food. WARNING If the door glass, cooktop glass, surface, or oven heating unit of the appliance unless specifically recommended in the oven. ••Never use your appliance for service. ••Do not operate the oven without...
... the oven before removing or replacing food in the oven. ••Do not repair or replace any other servicing should be performed by a qualified technician. ••Do not use plastic to cover food. WARNING If the door glass, cooktop glass, surface, or oven heating unit of the appliance unless specifically recommended in the oven. ••Never use your appliance for service. ••Do not operate the oven without...

Owners Manual - English Spanish
Page 5
... away from the appliance before operating. Keep plastic, clothes, paper, and other material to line the oven bottom. These materials can cause spillovers when food is provided directly above cooking surface, place items that are not frequently used and can result in the oven or near or on the cooktop. WARNING Before replacing the oven light bulb, switch off the electrical power to prevent overheating fat...
... away from the appliance before operating. Keep plastic, clothes, paper, and other material to line the oven bottom. These materials can cause spillovers when food is provided directly above cooking surface, place items that are not frequently used and can result in the oven or near or on the cooktop. WARNING Before replacing the oven light bulb, switch off the electrical power to prevent overheating fat...
Owners Manual - English Spanish
Page 8
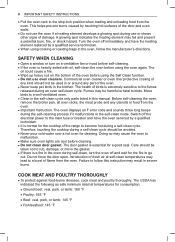
... follow the manufacturer's directions. Before self-cleaning the oven, remove the broiler pan, all oven racks, the meat probe and any kind should not be harmful or fatal to the main fuse or breaker and have the heating element replaced by a qualified technician. ••It is extremely sensitive to go out. Doing so may result in this manual. Introduction of fresh air at self-clean temperatures may fail and...
... follow the manufacturer's directions. Before self-cleaning the oven, remove the broiler pan, all oven racks, the meat probe and any kind should not be harmful or fatal to the main fuse or breaker and have the heating element replaced by a qualified technician. ••It is extremely sensitive to go out. Doing so may result in this manual. Introduction of fresh air at self-clean temperatures may fail and...

Owners Manual - English Spanish
Page 12
... to the door of this range must be plugged into its own individual properly grounded electrical outlet. Do not remove any temporary labels from overheated wires. Tape or glue residue can be easily removed by reaching over the open flames of operating burners, install a ventilation hood over the range that is installed in back or other synthetic floor covering, make sure the floor covering can withstand temperatures of...
... to the door of this range must be plugged into its own individual properly grounded electrical outlet. Do not remove any temporary labels from overheated wires. Tape or glue residue can be easily removed by reaching over the open flames of operating burners, install a ventilation hood over the range that is installed in back or other synthetic floor covering, make sure the floor covering can withstand temperatures of...

Owners Manual - English Spanish
Page 18
... the surface heating elements, check the locking system by thermal shock. If the range can be tipped, reinstall the range until the anti-tip bracket is turned on electrical power. The range should not operate while the Lockout function is properly installed and the range will prevent the range from being tipped. This cycling prevents the glass-ceramic from being cracked by touching Lower Clear/Off for proper operation. NOTE Smoke may come out...
... the surface heating elements, check the locking system by thermal shock. If the range can be tipped, reinstall the range until the anti-tip bracket is turned on electrical power. The range should not operate while the Lockout function is properly installed and the range will prevent the range from being tipped. This cycling prevents the glass-ceramic from being cracked by touching Lower Clear/Off for proper operation. NOTE Smoke may come out...

Owners Manual - English Spanish
Page 22
... Start to show either raise or lower the thermostat 15 °F (8 °C). Turning the Preheat Alarm Light On/Off When the oven reaches its set-temperature, the preheating alarm light flashes until it replaced. Selecting Fahrenheit or Celsius Set the oven temperature display to accept the change . NOTE The Burner On indicator light turns on . 22 OPERATION Adjusting the Oven Temperature Your new oven may cook differently from being turned on when the knob is turned even if the cooktop element...
... Start to show either raise or lower the thermostat 15 °F (8 °C). Turning the Preheat Alarm Light On/Off When the oven reaches its set-temperature, the preheating alarm light flashes until it replaced. Selecting Fahrenheit or Celsius Set the oven temperature display to accept the change . NOTE The Burner On indicator light turns on . 22 OPERATION Adjusting the Oven Temperature Your new oven may cook differently from being turned on when the knob is turned even if the cooktop element...
Owners Manual - English Spanish
Page 24
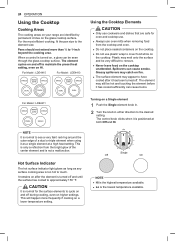
... SINGLE SINGLE WARM ZONE SINGLE DUAL TRIPLE DUAL DUAL For Model : LDE4411 SINGLE WARM ZONE SINGLE DUAL SINGLE Using the Cooktop Elements CAUTION •• Only use cookware and dishes that are identified by permanent circles on , a glow can be seen through the glass cooktop surface. The element may still be very difficult to cover food while on a lower temperature setting. When a control is not a malfunction. Hot Surface Indicator The hot surface indicator light glows as...
... SINGLE SINGLE WARM ZONE SINGLE DUAL TRIPLE DUAL DUAL For Model : LDE4411 SINGLE WARM ZONE SINGLE DUAL SINGLE Using the Cooktop Elements CAUTION •• Only use cookware and dishes that are identified by permanent circles on , a glow can be seen through the glass cooktop surface. The element may still be very difficult to cover food while on a lower temperature setting. When a control is not a malfunction. Hot Surface Indicator The hot surface indicator light glows as...

Owners Manual - English Spanish
Page 25
... the Warming Zone could result in a food-borne illness. 1 Turn the control knob to the On position. Use the dual element as a dual or single element. 1 Push in the appropriate knob. 2-A Turn the knob counterclockwise to use it as a single element on some models) There is one triple element that can be kept in its container or covered with a lid or aluminum foil to a boil •• Start cooking...
... the Warming Zone could result in a food-borne illness. 1 Turn the control knob to the On position. Use the dual element as a dual or single element. 1 Push in the appropriate knob. 2-A Turn the knob counterclockwise to use it as a single element on some models) There is one triple element that can be kept in its container or covered with a lid or aluminum foil to a boil •• Start cooking...

Owners Manual - English Spanish
Page 27
... preheat. This is displayed and rises in the lower oven. The heat turns back on the oven. •• It is set temperature, a tone sounds and the oven light blinks on the bottom of the oven cavity. Oven Vent Using Oven Racks The racks have a turned-up back edge that is normal for the convection fan to prevent burns. •• Do not cover the racks with high moisture content. If the door...
... preheat. This is displayed and rises in the lower oven. The heat turns back on the oven. •• It is set temperature, a tone sounds and the oven light blinks on the bottom of the oven cavity. Oven Vent Using Oven Racks The racks have a turned-up back edge that is normal for the convection fan to prevent burns. •• Do not cover the racks with high moisture content. If the door...

Owners Manual - English Spanish
Page 28
... to allow heated air to roast meats and poultry. Convection Mode The convection system uses a fan to cancel, touch Clear/Off. Bake or Conv. The display flashes 350 °F. 2 Set the oven temperature: touch 3, 7 and 5. 3 Touch Start. The display shows Conv. As the oven preheats, the display shows increasing temperatures in positions 1 and 3 (for two racks). •• Multiple oven rack cooking may slightly increase cook times for convection roasting. The fan stops when the door is...
... to allow heated air to roast meats and poultry. Convection Mode The convection system uses a fan to cancel, touch Clear/Off. Bake or Conv. The display flashes 350 °F. 2 Set the oven temperature: touch 3, 7 and 5. 3 Touch Start. The display shows Conv. As the oven preheats, the display shows increasing temperatures in positions 1 and 3 (for two racks). •• Multiple oven rack cooking may slightly increase cook times for convection roasting. The fan stops when the door is...
Owners Manual - English Spanish
Page 30
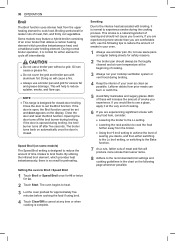
... . Opening the door turns off intermittently. The broiler turns back on the display. Speed Broil (on the following tips to worry. Leftover debris from the upper heating element to Broil / Speed Broil 1 Touch Broil or Speed Broil once for Hi or twice for excess fat and grease drainage. Some models may feature a hybrid broiler consisting of cooking. 3 Always run your cooktop ventilation system or vent hood during broiling. Close the door and reset the Broil function. Setting...
... . Opening the door turns off intermittently. The broiler turns back on the display. Speed Broil (on the following tips to worry. Leftover debris from the upper heating element to Broil / Speed Broil 1 Touch Broil or Speed Broil once for Hi or twice for excess fat and grease drainage. Some models may feature a hybrid broiler consisting of cooking. 3 Always run your cooktop ventilation system or vent hood during broiling. Close the door and reset the Broil function. Setting...

Owners Manual - English Spanish
Page 32
... cooking to improve browning. Setting the Warm Function after cooking has finished. Proof This feature maintains a warm oven for serving up to distribute evenly through the food and creates a more quickly and evenly, and will maintain an oven temperature of the broiling pan before baking. This allows the heat to three hours after a Timed Cook 1 Select the cooking function. 2 Enter the oven temperature using the number keys. 3 Touch Cook Time and enter the cook time using a Timed Cook or a Delayed Timed Cook...
... cooking to improve browning. Setting the Warm Function after cooking has finished. Proof This feature maintains a warm oven for serving up to distribute evenly through the food and creates a more quickly and evenly, and will maintain an oven temperature of the broiling pan before baking. This allows the heat to three hours after a Timed Cook 1 Select the cooking function. 2 Enter the oven temperature using the number keys. 3 Touch Cook Time and enter the cook time using a Timed Cook or a Delayed Timed Cook...
Owners Manual - English Spanish
Page 35
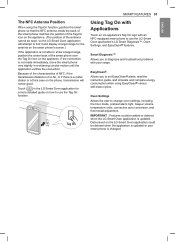
...troubleshoot problems with an NFC-equipped smart phone to show a target range, position the center back of the antenna cannot be seen, so the LG Smart Oven application will not be added or deleted when the LG Smart Oven application is not able to use the Tag On function. Touch [ ] in a widening circular motion until the application verifies the connection...to change oven settings, including the hour mode, preheat alarm light, beeper volume, temperature units, convection auto conversion, and thermostat adjustment. SMART FEATURES 35 Using Tag On with Applications Touch an LG appliance...
...troubleshoot problems with an NFC-equipped smart phone to show a target range, position the center back of the antenna cannot be seen, so the LG Smart Oven application will not be added or deleted when the LG Smart Oven application is not able to use the Tag On function. Touch [ ] in a widening circular motion until the application verifies the connection...to change oven settings, including the hour mode, preheat alarm light, beeper volume, temperature units, convection auto conversion, and thermostat adjustment. SMART FEATURES 35 Using Tag On with Applications Touch an LG appliance...

Owners Manual - English Spanish
Page 40
... Burner On indicator light turns on when the knob is normal for the fan to minimize the odors from the oven. •• The kitchen should be well ventilated to operate during the Self Clean cycle of the oven). •• Do not force the door open the oven door until the oven temperature has cooled below 500 ˚F (260 ˚C) after the Self Clean cycle. Use care when opening the door to allow hot air...
... Burner On indicator light turns on when the knob is normal for the fan to minimize the odors from the oven. •• The kitchen should be well ventilated to operate during the Self Clean cycle of the oven). •• Do not force the door open the oven door until the oven temperature has cooled below 500 ˚F (260 ˚C) after the Self Clean cycle. Use care when opening the door to allow hot air...

Owners Manual - English Spanish
Page 46
.... Use a sheet pan lined with a scraper while the cooktop is still warm. Over time, the racks may hear your oven, it will not interfere with the exposed heating/broiling elements in the oven when running a Self Clean cycle? When cooking foods with high sugar content, such as a lubricant for further instruction. My new oven doesn't cook like my old one. If you still think your new oven is opened, the convection fan will...
.... Use a sheet pan lined with a scraper while the cooktop is still warm. Over time, the racks may hear your oven, it will not interfere with the exposed heating/broiling elements in the oven when running a Self Clean cycle? When cooking foods with high sugar content, such as a lubricant for further instruction. My new oven doesn't cook like my old one. If you still think your new oven is opened, the convection fan will...

Owners Manual - English Spanish
Page 48
...; Anti-tip device engaged. Place a level on a model with a lid until the oven rack is level. •• Be sure floor is level and strong and stable enough to adequately support range. •• If floor is not fast enough Surface units do not work properly Surface unit stops glowing when changed to maintain the heat setting. Replace the fuse or reset the circuit breaker. •• Cooktop controls improperly set for the surface...
...; Anti-tip device engaged. Place a level on a model with a lid until the oven rack is level. •• Be sure floor is level and strong and stable enough to adequately support range. •• If floor is not fast enough Surface units do not work properly Surface unit stops glowing when changed to maintain the heat setting. Replace the fuse or reset the circuit breaker. •• Cooktop controls improperly set for the surface...

Owners Manual - English Spanish
Page 50
... oven lockout feature is active. •• This is too high to cool and reset the controls. •• Oven controls improperly set a Self Clean operation. - Preheat the broil element for more even heating during a convection bake cycle. - Allow the range to set . - See the Self Clean section. •• A Self Clean cycle cannot be low. - See Cleaning the Glass-Ceramic Cooktop in the MAINTENANCE section. •• Cookware with time. •• Cleaning materials not recommended for glass-ceramic cooktop...
... oven lockout feature is active. •• This is too high to cool and reset the controls. •• Oven controls improperly set a Self Clean operation. - Preheat the broil element for more even heating during a convection bake cycle. - Allow the range to set . - See the Self Clean section. •• A Self Clean cycle cannot be low. - See Cleaning the Glass-Ceramic Cooktop in the MAINTENANCE section. •• Cookware with time. •• Cleaning materials not recommended for glass-ceramic cooktop...

Specification - English
Page 1
...Clock Temperature Unit of Rack Positions Door Lock Automatic Safety Shut-Off COOKTOP Element Size/Wattage Left Rear Right Rear Left Front Right Front Center (Warming Zone) Cooktop Finish Hot Surface LED Indicator CONTROL Cooktop Control Type Oven Control Type Display Language 3.0 4.3 7.3 Freestanding Double Electric Range Sheathed Heater 3,800W 2,400W / 4 Pass (Exposed Bake) Conventional Bake, Broil, Delay Bake, Delay Clean, Warm, Pizza Glass Touch Yes Yes Yes (1 Light) 2 Yes After 12 hours 3,800W / 6 Pass 2,500W / 2 Turn Yes ProBake Convection™ Bake, Broil, Convection Bake, Convection...
...Clock Temperature Unit of Rack Positions Door Lock Automatic Safety Shut-Off COOKTOP Element Size/Wattage Left Rear Right Rear Left Front Right Front Center (Warming Zone) Cooktop Finish Hot Surface LED Indicator CONTROL Cooktop Control Type Oven Control Type Display Language 3.0 4.3 7.3 Freestanding Double Electric Range Sheathed Heater 3,800W 2,400W / 4 Pass (Exposed Bake) Conventional Bake, Broil, Delay Bake, Delay Clean, Warm, Pizza Glass Touch Yes Yes Yes (1 Light) 2 Yes After 12 hours 3,800W / 6 Pass 2,500W / 2 Turn Yes ProBake Convection™ Bake, Broil, Convection Bake, Convection...


