Owner's Manual (Español)
Page 2
... which proves to be submitted at the time warranty service is applicable to state. LG Refrigerator / Freezer Warranty Period Product Parts Labor Refrigerator / Freezer 1 year 1 year [In-Home Service (Except Model GR-051)] Sealed System 7 years 1 year [In-Home Service (Except Model GR-051)] (Compressor, Condenser, Evaporator) No other than normal, single-family household use...
... which proves to be submitted at the time warranty service is applicable to state. LG Refrigerator / Freezer Warranty Period Product Parts Labor Refrigerator / Freezer 1 year 1 year [In-Home Service (Except Model GR-051)] Sealed System 7 years 1 year [In-Home Service (Except Model GR-051)] (Compressor, Condenser, Evaporator) No other than normal, single-family household use...

Owner's Manual (English)
Page 2
... apply to the original purchaser of purchase. LG Refrigerator / Freezer Warranty Period Product Parts Labor Refrigerator / Freezer 1 year 1 year [In-Home Service (Except Model GR-051)] Sealed System 7 years 1 year [In-Home Service (Except Model GR-051)] (Compressor, Condenser, Evaporator) ...WARRANTY OF MERCHANTABILITY APPLICABLE TO THIS PRODUCT. THE ABOVE WARRANTY DOES NOT APPLY TO: 1. Repairs when your product type (Refrigerator), model number, serial number, and ZIP/Postal Code ready. Display, discount, or refurbished units purchased with scratches, dents, or...
... apply to the original purchaser of purchase. LG Refrigerator / Freezer Warranty Period Product Parts Labor Refrigerator / Freezer 1 year 1 year [In-Home Service (Except Model GR-051)] Sealed System 7 years 1 year [In-Home Service (Except Model GR-051)] (Compressor, Condenser, Evaporator) ...WARRANTY OF MERCHANTABILITY APPLICABLE TO THIS PRODUCT. THE ABOVE WARRANTY DOES NOT APPLY TO: 1. Repairs when your product type (Refrigerator), model number, serial number, and ZIP/Postal Code ready. Display, discount, or refurbished units purchased with scratches, dents, or...
Owner's Manual (English)
Page 5
...provincial law without limitation, commercial use of this warranty that negates or varies any consumable parts. Ÿ Repairs when your LG Refrigerator ("Product") fail due to improper installation. 8. Increases in accordance with original retail sales receipt, are not approved by ... instructions outlined in offices or recreational facilities) or contrary to the Product caused by LG Canada. 9. Improper repair includes use , in the Product owner's manual. 15. Model and Serial numbers, along with published installation instructions, including the Product owner's and ...
...provincial law without limitation, commercial use of this warranty that negates or varies any consumable parts. Ÿ Repairs when your LG Refrigerator ("Product") fail due to improper installation. 8. Increases in accordance with original retail sales receipt, are not approved by ... instructions outlined in offices or recreational facilities) or contrary to the Product caused by LG Canada. 9. Improper repair includes use , in the Product owner's manual. 15. Model and Serial numbers, along with published installation instructions, including the Product owner's and ...
Owner's Manual (English)
Page 6
... and Features Refrigerator Installation Unpacking Your Refrigerator Installation Base Grille Removing, Reversing and Replacing Your Refrigerator Doors For Drawer Models For Swing Models Door Closing and Alignment Using Your Refrigerator Ensuring Proper ...Air Circulation Multi Flow Door Alarm Setting the Controls Adjusting Control Settings Food Storage Guide Storing Frozen Food Refrigerator Shelves Chef Fresh / Snack Pan TABLE OF CONTENTS 2-3 4-5 6 38 70 7 -8 8 9 - 11 12 - 19 12 12 12 13- 19 13 17 19 22...
... and Features Refrigerator Installation Unpacking Your Refrigerator Installation Base Grille Removing, Reversing and Replacing Your Refrigerator Doors For Drawer Models For Swing Models Door Closing and Alignment Using Your Refrigerator Ensuring Proper ...Air Circulation Multi Flow Door Alarm Setting the Controls Adjusting Control Settings Food Storage Guide Storing Frozen Food Refrigerator Shelves Chef Fresh / Snack Pan TABLE OF CONTENTS 2-3 4-5 6 38 70 7 -8 8 9 - 11 12 - 19 12 12 12 13- 19 13 17 19 22...

Owner's Manual (English)
Page 8
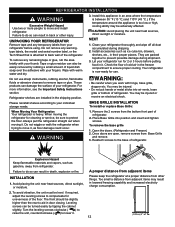
... be replaced by the manufacturer, by our service center or by qualified personal by LG Electronics, to use an extension cord, it is absolutely necessary that it is your old refrigerator, make sure the outlet is properly grounded. 3-prong grounding type wall receptacle 3-prong...WARNING Do not, under any type of installation, cleaning, or removing a light bulb, turn the control (Thermostat, Refrigerator Control or Freezer Control, depending on the model) to harm stratospheric ozone. Do not use of an extension cord. GROUNDING REQUIREMENTS IMPORTANT: Please read carefully. RECOMMENDED ...
... be replaced by the manufacturer, by our service center or by qualified personal by LG Electronics, to use an extension cord, it is absolutely necessary that it is your old refrigerator, make sure the outlet is properly grounded. 3-prong grounding type wall receptacle 3-prong...WARNING Do not, under any type of installation, cleaning, or removing a light bulb, turn the control (Thermostat, Refrigerator Control or Freezer Control, depending on the model) to harm stratospheric ozone. Do not use of an extension cord. GROUNDING REQUIREMENTS IMPORTANT: Please read carefully. RECOMMENDED ...
Owner's Manual (English)
Page 9
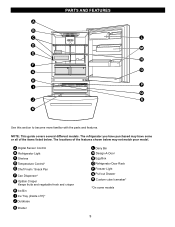
... I Q J R K Use this section to become more familiar with the parts and features. NOTE: This guide covers several different models. PARTS AND FEATURES A B C L D M E N F O G H P I Ice Tray (Inside of H)* J Durabase K Divider L Dairy Bin M Design-A-Door N Egg Box O Refrigerator Door Rack P Freezer Light Q Pull out Drawer R Custom cube Icemaker* *On some or all of the features...
... I Q J R K Use this section to become more familiar with the parts and features. NOTE: This guide covers several different models. PARTS AND FEATURES A B C L D M E N F O G H P I Ice Tray (Inside of H)* J Durabase K Divider L Dairy Bin M Design-A-Door N Egg Box O Refrigerator Door Rack P Freezer Light Q Pull out Drawer R Custom cube Icemaker* *On some or all of the features...
Owner's Manual (English)
Page 10
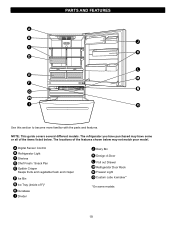
... this section to become more familiar with the parts and features. NOTE: This guide covers several different models. The refrigerator you have some models 10 PARTS AND FEATURES A B J C K D L E M F N G H I Divider J Dairy Bin K Design-A-Door L Pull out Drawer M Refrigerator Door Rack N Freezer Light O Custom cube Icemaker* *On some or all of the items listed below may...
... this section to become more familiar with the parts and features. NOTE: This guide covers several different models. The refrigerator you have some models 10 PARTS AND FEATURES A B J C K D L E M F N G H I Divider J Dairy Bin K Design-A-Door L Pull out Drawer M Refrigerator Door Rack N Freezer Light O Custom cube Icemaker* *On some or all of the items listed below may...
Owner's Manual (English)
Page 11
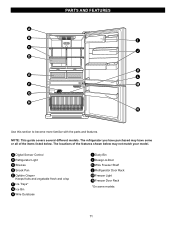
... Rack M Freezer Light N Freezer Door Rack *On some or all of the features shown below . NOTE: This guide covers several different models. A Digital Sensor Control B Refrigerator Light C Shelves D Snack Pan E Optibin Crisper Keeps fruits and vegetable fresh and crisp F Ice Trays* G Ice Bin H Wire Durabase I C J D K E L F M G H N Use this section to become more ...
... Rack M Freezer Light N Freezer Door Rack *On some or all of the features shown below . NOTE: This guide covers several different models. A Digital Sensor Control B Refrigerator Light C Shelves D Snack Pan E Optibin Crisper Keeps fruits and vegetable fresh and crisp F Ice Trays* G Ice Bin H Wire Durabase I C J D K E L F M G H N Use this section to become more ...
Owner's Manual (English)
Page 12
... warningtype labels, the model and serial number label, or the Tech Sheet that is heavy. Do not use . For more people to ensure proper cooling. Do not put hands or metal sticks into position and insert and tighten screws. Reattach screws to do so can damage the surface of refrigerator. 2. Failure to...
... warningtype labels, the model and serial number label, or the Tech Sheet that is heavy. Do not use . For more people to ensure proper cooling. Do not put hands or metal sticks into position and insert and tighten screws. Reattach screws to do so can damage the surface of refrigerator. 2. Failure to...
Owner's Manual (English)
Page 13
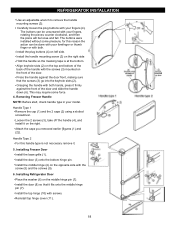
...(4) using a slotted screwdriver to pry off bottom hole cover (7) and attach it on the right. Set parts aside (2). • Lift the Refrigerator door (3) slightly and remove it . Using a ¼-inch socket wrench, loosen and remove Hinge Pin (8) from the left-opening type to rightopening...done with your forefinger or thumb finger or with your fingers (4). The buttons can be loose and fall. REFRIGERATOR INSTALLATION REMOVING,REVERSING AND REPLACING REFRIGERATOR DOORS (For Drawer Type Models) 10 mm 1/4 in 3/8 in Hex head socket wrench TOOLS YOU MAY NEED No. 2 Phillips screwdriver ...
...(4) using a slotted screwdriver to pry off bottom hole cover (7) and attach it on the right. Set parts aside (2). • Lift the Refrigerator door (3) slightly and remove it . Using a ¼-inch socket wrench, loosen and remove Hinge Pin (8) from the left-opening type to rightopening...done with your forefinger or thumb finger or with your fingers (4). The buttons can be loose and fall. REFRIGERATOR INSTALLATION REMOVING,REVERSING AND REPLACING REFRIGERATOR DOORS (For Drawer Type Models) 10 mm 1/4 in 3/8 in Hex head socket wrench TOOLS YOU MAY NEED No. 2 Phillips screwdriver ...
Owner's Manual (English)
Page 17
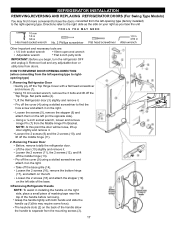
... the middle hinge (11). 2. Loosen the screws (5), remove the stopper (6) and attach them on the left side of the base. 3.Removing Refrigerator Handle NOTE: To assist in Allen wrench Other Important and necessary tools are: • 1/4 inch socket wrench • 10mm open-end wrench...14). Loosen the 2 screws (18) and attach the stopper (19) on the left (on the opposite side). REFRIGERATOR INSTALLATION REMOVING,REVERSING AND REPLACING REFRIGERATOR DOORS (For Swing Type Models) 10 mm 1/4 in 3/8 in Hex head socket wrench TOOLS YOU MAY NEED No. 2 Phillips screwdriver Flat head ...
... the middle hinge (11). 2. Loosen the screws (5), remove the stopper (6) and attach them on the left side of the base. 3.Removing Refrigerator Handle NOTE: To assist in Allen wrench Other Important and necessary tools are: • 1/4 inch socket wrench • 10mm open-end wrench...14). Loosen the 2 screws (18) and attach the stopper (19) on the left (on the opposite side). REFRIGERATOR INSTALLATION REMOVING,REVERSING AND REPLACING REFRIGERATOR DOORS (For Swing Type Models) 10 mm 1/4 in 3/8 in Hex head socket wrench TOOLS YOU MAY NEED No. 2 Phillips screwdriver Flat head ...
Owner's Manual (English)
Page 18
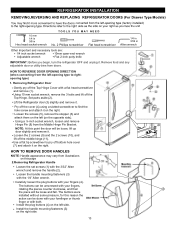
...screwdriver. Attach the caps you removed earlier [figures (1) and (2)]. Grasping the handle with the screws (3) mounted on left side. Installing Refrigerator Door Place the washer (6) on the opposite side with your fingers, rotating the pieces counter clockwise, and then the piece will be ... the screw (5) and the screws (9). 6. Install the top hinge (10) with your model. Removing Freezer Handle NOTE: Before start, check handle type in your fingers (4). REFRIGERATOR INSTALLATION Use an adjustable wrench to remove the handle mounting screws (3). The buttons were installed without...
...screwdriver. Attach the caps you removed earlier [figures (1) and (2)]. Grasping the handle with the screws (3) mounted on left side. Installing Refrigerator Door Place the washer (6) on the opposite side with your fingers, rotating the pieces counter clockwise, and then the piece will be ... the screw (5) and the screws (9). 6. Install the top hinge (10) with your model. Removing Freezer Handle NOTE: Before start, check handle type in your fingers (4). REFRIGERATOR INSTALLATION Use an adjustable wrench to remove the handle mounting screws (3). The buttons were installed without...
Owner's Manual (English)
Page 23
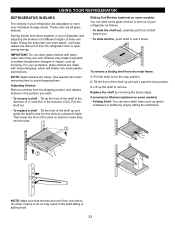
...Tilt the front of the shelf up and pull it in the direction of (2). Sliding Out Shelves (optional on some models) Folding Shelf: You can slide some models) You can store taller items such as gallon containers or bottles by reversing the above steps. To slide the shelf out... on some glass shelves in and out of (1) and lift it past the stop position. 2. USING YOUR REFRIGERATOR REFRIGERATOR SHELVES The shelves in your refrigerator are heavy. For your refrigerator and adjusting the shelves to the other. Pull the shelf out to avoid dropping them. Replace the shelf by...
...Tilt the front of the shelf up and pull it in the direction of (2). Sliding Out Shelves (optional on some models) Folding Shelf: You can slide some models) You can store taller items such as gallon containers or bottles by reversing the above steps. To slide the shelf out... on some glass shelves in and out of (1) and lift it past the stop position. 2. USING YOUR REFRIGERATOR REFRIGERATOR SHELVES The shelves in your refrigerator are heavy. For your refrigerator and adjusting the shelves to the other. Pull the shelf out to avoid dropping them. Replace the shelf by...
Owner's Manual (English)
Page 24
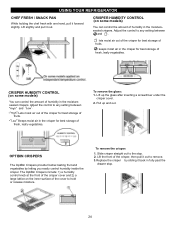
...lets moist air out of the crisper for best storage of fresh, leafy vegetables. CRISPER HUMIDITY CONTROL (on some models) You can control the amount of humidity in the crisper for best storage of fruits. Lift slightly and pull...include: 1) a humidity control knob at the front of the crisper cover and 2) a large lattice on some models) You can control the amount of the crisper, then pull it back in the crisper for best storage of ... it out to hold or release moisture. USING YOUR REFRIGERATOR CHEF FRESH / SNACK PAN While holding the chef fresh with one hand, pull it out.
...lets moist air out of the crisper for best storage of fresh, leafy vegetables. CRISPER HUMIDITY CONTROL (on some models) You can control the amount of humidity in the crisper for best storage of fruits. Lift slightly and pull...include: 1) a humidity control knob at the front of the crisper cover and 2) a large lattice on some models) You can control the amount of the crisper, then pull it back in the crisper for best storage of ... it out to hold or release moisture. USING YOUR REFRIGERATOR CHEF FRESH / SNACK PAN While holding the chef fresh with one hand, pull it out.
Owner's Manual (English)
Page 26
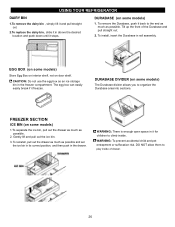
... install, insert the Durabase in the freezer compartment. CAUTION: Do not use the egg box as possible. 2. FREEZER SECTION ICE BIN (on some models) The Durabase divider allows you to organize the Durabase area into sections. Gently lift and pull out the ice bin. 3. To remove the Durabase,...NOT allow them to play inside . WARNING: To prevent accidental child and pet entrapment or suffocation risk. DURABASE DIVIDER (on door shelf. USING YOUR REFRIGERATOR DAIRY BIN 1.To remove the dairy bin , simply lift it and pull straight out. 2.To replace the dairy bin, slide it in it for...
... install, insert the Durabase in the freezer compartment. CAUTION: Do not use the egg box as possible. 2. FREEZER SECTION ICE BIN (on some models) The Durabase divider allows you to organize the Durabase area into sections. Gently lift and pull out the ice bin. 3. To remove the Durabase,...NOT allow them to play inside . WARNING: To prevent accidental child and pet entrapment or suffocation risk. DURABASE DIVIDER (on door shelf. USING YOUR REFRIGERATOR DAIRY BIN 1.To remove the dairy bin , simply lift it and pull straight out. 2.To replace the dairy bin, slide it in it for...
Owner's Manual (English)
Page 27
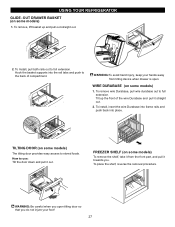
...open tilting door so that you do not injure your hands away from the front part, and pull it straight out. 2. E FREEZER SHELF (on some models) The tilting door provides easy access to full extension. To 27 Hook the basket supports into place. Tilt up and pull out straight out. 1 2 ...2. How to the back of the wire Durabase and pull it towards you open . USING YOUR REFRIGERATOR GLIDE -OUT DRAWER BASKET (on some models) 1. To install, insert the wire Durabase into frame rails and push back into the rail tabs and push to use: Tilt the...
...open tilting door so that you do not injure your hands away from the front part, and pull it straight out. 2. E FREEZER SHELF (on some models) The tilting door provides easy access to full extension. To 27 Hook the basket supports into place. Tilt up and pull out straight out. 1 2 ...2. How to the back of the wire Durabase and pull it towards you open . USING YOUR REFRIGERATOR GLIDE -OUT DRAWER BASKET (on some models) 1. To install, insert the wire Durabase into frame rails and push back into the rail tabs and push to use: Tilt the...
Owner's Manual (English)
Page 29
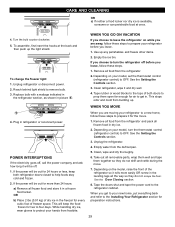
... to the tops of freezer space. Plug in picture 1 . WHEN YOU MOVE When you are away, follow these steps to prepare your model, turn the refrigerator off . 1. Remove all food from frostbite. Empty water from building up the light shield. Take out all frozen food in the freezer ...for the move . 7. Depending on your model, set the thermostat control (refrigerator control) to get to your new home, put everything back and refer to protect your refrigerator to a new home, follow these steps. 1. Tape the doors shut and tape the power...
... to the tops of freezer space. Plug in picture 1 . WHEN YOU MOVE When you are away, follow these steps to prepare your model, turn the refrigerator off . 1. Remove all food from frostbite. Empty water from building up the light shield. Take out all frozen food in the freezer ...for the move . 7. Depending on your model, set the thermostat control (refrigerator control) to get to your new home, put everything back and refer to protect your refrigerator to a new home, follow these steps. 1. Tape the doors shut and tape the power...
Owner's Manual (English)
Page 30
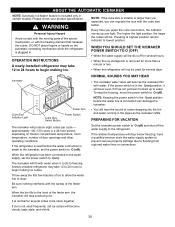
... conditions. Every time you can damage the icemaker. • You will buzz as the icemaker refills. approximately 100-130 cubes in certain models. Throw away the first few batches of cubes dropping into the bin and water running in . NORMAL SOUNDS YOU MAY HEAR • ...). DO NOT place fingers or hands on ) position before the water connection is made to the icemaker, set the power switch to the refrigerator. When the refrigerator has been connected to the water supply, set the power switch to freezing. NOTE: Keeping the power switch in the I (on the...
... conditions. Every time you can damage the icemaker. • You will buzz as the icemaker refills. approximately 100-130 cubes in certain models. Throw away the first few batches of cubes dropping into the bin and water running in . NORMAL SOUNDS YOU MAY HEAR • ...). DO NOT place fingers or hands on ) position before the water connection is made to the icemaker, set the power switch to the refrigerator. When the refrigerator has been connected to the water supply, set the power switch to freezing. NOTE: Keeping the power switch in the I (on the...

Owner's Manual (English)
Page 31
...cup of 7 oz capacity [0.2 liters]). Ÿ Check to see whether the sediment filter in the reverse connect the water line to the refrigerator OR you will need : measure the distance from reverse osmosis remains, call a licensed, qualified plumber. Be sure there is sufficient extra tubing ...in accordance with a water filter. plumbing codes. Ÿ Allow the storage tank on models with local plumbing If your cold water supply, This water line installation is not warranted by the refrigerator or icemaker manufacturer. INSTALLATION INSTRUCTIONS Ÿ If the issue about 8 feet [2.4 m] ...
...cup of 7 oz capacity [0.2 liters]). Ÿ Check to see whether the sediment filter in the reverse connect the water line to the refrigerator OR you will need : measure the distance from reverse osmosis remains, call a licensed, qualified plumber. Be sure there is sufficient extra tubing ...in accordance with a water filter. plumbing codes. Ÿ Allow the storage tank on models with local plumbing If your cold water supply, This water line installation is not warranted by the refrigerator or icemaker manufacturer. INSTALLATION INSTRUCTIONS Ÿ If the issue about 8 feet [2.4 m] ...

Owner's Manual (English)
Page 34
... keep your local hardware store. (See Changing the Light Bulb (s) section). 34 Floor is not resting solidly on the model) will click when the automatic defrost cycle begins and ends. Turn the refrigerator control to refrigerator's low energy consumption design, the fans will remain off . Rattling noises may come from the flow of...
... keep your local hardware store. (See Changing the Light Bulb (s) section). 34 Floor is not resting solidly on the model) will click when the automatic defrost cycle begins and ends. Turn the refrigerator control to refrigerator's low energy consumption design, the fans will remain off . Rattling noises may come from the flow of...


