

Owner's Manual
Page 2
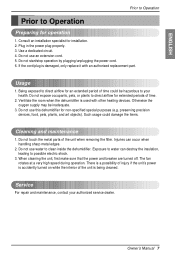
...this page in the event you will find many answers to common problems in the chart of troubleshooting tips. Dealer's Name Date Purchased s Staple your dehumidifier. READ THIS MANUAL Inside you need to call for service at all. If you review our chart of Troubleshooting Tips first, you a great deal ...of time and money over the life of your receipt to this unit. • The dehumidifier is not intended for use and maintain your part can find many helpful hints on how to use by young children or invalids without supervision...
...this page in the event you will find many answers to common problems in the chart of troubleshooting tips. Dealer's Name Date Purchased s Staple your dehumidifier. READ THIS MANUAL Inside you need to call for service at all. If you review our chart of Troubleshooting Tips first, you a great deal ...of time and money over the life of your receipt to this unit. • The dehumidifier is not intended for use and maintain your part can find many helpful hints on how to use by young children or invalids without supervision...

Owner's Manual
Page 4
...it may cause electric shock. Safety Precautions Do not modify power cord length. • It will cause machine failure or electric shock. 4 Dehumidifier Do not share the outlet with wet hands or in damp environment. • It may cause a fire or an electric shock. It... may cause injury. 4hr2.hOr.nO/Onf/fOff HigLhow Fan Speed Timer HuCmoindtirtoyl Bucket full If water enters the product, turn off the dehumidifier's power switch. Always plug into a grounded outlet. • No grounding may cause an electric shock. HuCmoindtirtoyl Bucket full Ventilate before operating...
...it may cause electric shock. Safety Precautions Do not modify power cord length. • It will cause machine failure or electric shock. 4 Dehumidifier Do not share the outlet with wet hands or in damp environment. • It may cause a fire or an electric shock. It... may cause injury. 4hr2.hOr.nO/Onf/fOff HigLhow Fan Speed Timer HuCmoindtirtoyl Bucket full If water enters the product, turn off the dehumidifier's power switch. Always plug into a grounded outlet. • No grounding may cause an electric shock. HuCmoindtirtoyl Bucket full Ventilate before operating...
Owner's Manual
Page 5
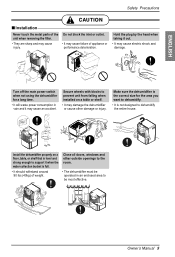
...CAUTION ■Installation Never touch the metal parts of weight. Timer 2h4r.hOr.nO/Onf/fOff Fan Speed LoHwigh CHounmtriodlity Bucket full Install the dehumidifier properly on a table or shelf. • It may cause failure of appliance or performance deterioration. Secure wheels with blocks to support it... removing the filter. • They are sharp and may cause injury. nO/Onf/fOff Fan Speed LowHigh Owner's Manual 5 Make sure the dehumidifier is not designed to be operated in vain and it out. • It may cause an accident. Timer 2h4r.hOr. Hold the plug ...
...CAUTION ■Installation Never touch the metal parts of weight. Timer 2h4r.hOr.nO/Onf/fOff Fan Speed LoHwigh CHounmtriodlity Bucket full Install the dehumidifier properly on a table or shelf. • It may cause failure of appliance or performance deterioration. Secure wheels with blocks to support it... removing the filter. • They are sharp and may cause injury. nO/Onf/fOff Fan Speed LowHigh Owner's Manual 5 Make sure the dehumidifier is not designed to be operated in vain and it out. • It may cause an accident. Timer 2h4r.hOr. Hold the plug ...

Owner's Manual
Page 6
...°F(18°C). Be sure to replace the bucket properly after emptying to prevent water from collecting on the floor. • The appearance of the dehumidifier may deteriorate, change color, or develop surface flaws. • Otherwise, it will be exposed to direct air flow. • This could injure the pet or... Bucket full Wax Thinner Do not put a pet or house plant where it will cause failure. 2h4r.hOr.nO/Onf/fOff Timer Fan Speed LowHigh 6 Dehumidifier Do not use wax, thinner, or a strong detergent. Time Always insert the filter securely.
...°F(18°C). Be sure to replace the bucket properly after emptying to prevent water from collecting on the floor. • The appearance of the dehumidifier may deteriorate, change color, or develop surface flaws. • Otherwise, it will be exposed to direct air flow. • This could injure the pet or... Bucket full Wax Thinner Do not put a pet or house plant where it will cause failure. 2h4r.hOr.nO/Onf/fOff Timer Fan Speed LowHigh 6 Dehumidifier Do not use wax, thinner, or a strong detergent. Time Always insert the filter securely.
Owner's Manual
Page 7
...unit when removing the filter. Such usage could be inadequate. 3. Being exposed to your authorized service dealer. Ventilate the room when the dehumidifier is being cleaned. Injuries can destroy the insulation, leading to direct airflow for an extended period of the unit is used with an... authorized replacement part. Service For repair and maintenance, contact your health. ENGLISH Prior to Operation Prior to clean inside the dehumidifier. Do not use an extension cord. 5. Do not touch the metal parts of time. 2. Plug in the power plug properly. 3. ...
...unit when removing the filter. Such usage could be inadequate. 3. Being exposed to your authorized service dealer. Ventilate the room when the dehumidifier is being cleaned. Injuries can destroy the insulation, leading to direct airflow for an extended period of the unit is used with an... authorized replacement part. Service For repair and maintenance, contact your health. ENGLISH Prior to Operation Prior to clean inside the dehumidifier. Do not use an extension cord. 5. Do not touch the metal parts of time. 2. Plug in the power plug properly. 3. ...
Owner's Manual
Page 8
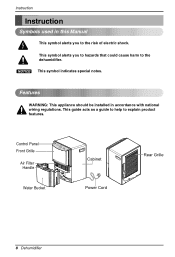
NOTICE This symbol indicates special notes. This symbol alerts you to the risk of electric shock. This guide acts as a guide to help to explain product features. Features WARNING: This appliance should be installed in this Manual This symbol alerts you to hazards that could cause harm to the dehumidifier. Instruction Instruction Symbols used in accordance with national wiring regulations. Control Panel Auto Restart Front Grille Air Filter Handle Water Bucket Cabinet Power Cord Rear Grille 8 Dehumidifier
NOTICE This symbol indicates special notes. This symbol alerts you to the risk of electric shock. This guide acts as a guide to help to explain product features. Features WARNING: This appliance should be installed in this Manual This symbol alerts you to hazards that could cause harm to the dehumidifier. Instruction Instruction Symbols used in accordance with national wiring regulations. Control Panel Auto Restart Front Grille Air Filter Handle Water Bucket Cabinet Power Cord Rear Grille 8 Dehumidifier
Owner's Manual
Page 9
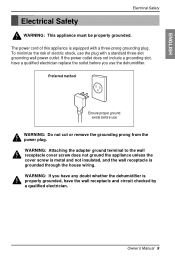
... three-slot grounding wall power outlet. Preferred method Ensure proper ground exists before you have any doubt whether the dehumidifier is properly grounded, have a qualified electrician replace the outlet before use the dehumidifier. Owner's Manual 9 WARNING: If you use WARNING: Do not cut or remove the grounding prong from the power plug...
... three-slot grounding wall power outlet. Preferred method Ensure proper ground exists before you have any doubt whether the dehumidifier is properly grounded, have a qualified electrician replace the outlet before use the dehumidifier. Owner's Manual 9 WARNING: If you use WARNING: Do not cut or remove the grounding prong from the power plug...

Owner's Manual
Page 10
... Receptacle Cover WARNING: Never use of an extension cord due to potential safety hazards. Temporary Use of an adapter due to potential safety hazards. 10 Dehumidifier To disconnect the power cord from the adapter, use only a UL-listed adapter, available from most local hardware stores. For temporary connections, use one hand...
... Receptacle Cover WARNING: Never use of an extension cord due to potential safety hazards. Temporary Use of an adapter due to potential safety hazards. 10 Dehumidifier To disconnect the power cord from the adapter, use only a UL-listed adapter, available from most local hardware stores. For temporary connections, use one hand...
Owner's Manual
Page 11
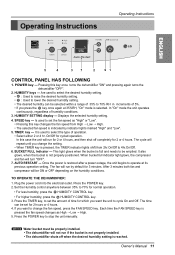
... the bucket is pressed the fan speed changes as "High" or "Low". • Pressing this key once turns the dehumidifier "ON" and pressing again turns the dehumidifier "OFF". 2. TO OPERATE THE DEHUMIDIFIER: 1. Press the TIMER key, to 70% RH in increments of humidity conditions. 3. Press the POWER key to change...unit to operate at 35%RH, "On" mode is reached. The fan will run if the bucket is not properly installed. • The dehumidifier shuts off completely for cycled operation. Set the Humidity control anywhere between 35% to be emptied. Each time the FAN SPEED key is full and...
... the bucket is pressed the fan speed changes as "High" or "Low". • Pressing this key once turns the dehumidifier "ON" and pressing again turns the dehumidifier "OFF". 2. TO OPERATE THE DEHUMIDIFIER: 1. Press the TIMER key, to 70% RH in increments of humidity conditions. 3. Press the POWER key to change...unit to operate at 35%RH, "On" mode is reached. The fan will run if the bucket is not properly installed. • The dehumidifier shuts off completely for cycled operation. Set the Humidity control anywhere between 35% to be emptied. Each time the FAN SPEED key is full and...
Owner's Manual
Page 12
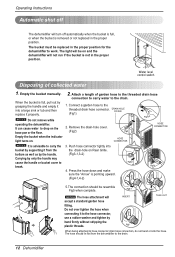
...Fig5 TAKE OUT When being attached to the threaded drain hose connector. (Fig1) DRAIN HOLE COVER Fig1 2. Operating Instructions Automatic shut off The dehumidifier will turn off automatically when the bucket is full, or when the bucket is full, pull out by grasping the handle and empty it into...as by the handle. Press the hose down and make sure the "Arrow" is advisable to carry the bucket by supporting it from the dehumidifier to work. Carrying by hand firmly without stripping the plastic threads. Attach a length of collected water 1. The hose should be replaced in the...
...Fig5 TAKE OUT When being attached to the threaded drain hose connector. (Fig1) DRAIN HOLE COVER Fig1 2. Operating Instructions Automatic shut off The dehumidifier will turn off automatically when the bucket is full, or when the bucket is full, pull out by grasping the handle and empty it into...as by the handle. Press the hose down and make sure the "Arrow" is advisable to carry the bucket by supporting it from the dehumidifier to work. Carrying by hand firmly without stripping the plastic threads. Attach a length of collected water 1. The hose should be replaced in the...
Owner's Manual
Page 13
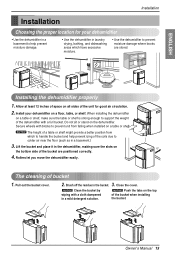
... sides of the coils due to prevent moisture damage where books are positioned correctly. 4. Rollers let you move the dehumidifier easily. Install your dehumidifier • Use the dehumidifier in a basement to help prevent icing of the unit for good air circulation. 2. Pull out the bucket cover....installed on the top of bucket 1. NOTICE Push the tabs on a table or shelf. Auto Restart Auto Restart Auto Restart Installing the dehumidifier properly 1. Do not sit or stand on a floor, table, or shelf. Secure wheels with a full bucket. The cleaning of the...
... sides of the coils due to prevent moisture damage where books are positioned correctly. 4. Rollers let you move the dehumidifier easily. Install your dehumidifier • Use the dehumidifier in a basement to help prevent icing of the unit for good air circulation. 2. Pull out the bucket cover....installed on the top of bucket 1. NOTICE Push the tabs on a table or shelf. Auto Restart Auto Restart Auto Restart Installing the dehumidifier properly 1. Do not sit or stand on a floor, table, or shelf. Secure wheels with a full bucket. The cleaning of the...

Owner's Manual
Page 14
...maintenance. • Be careful when cleaning the coils. Pull out the air filter as shown above precautions could result in place. 14 Dehumidifier Cleaning the front case, bucket and cabinet Auto Restart Clean the front case and the cabinet with a vacuum attachment or brush. Clean...and a mild detergent. Replace it . Failure to perform this annual checkup. (Cost of the inspection is designed to serve you should check your dehumidifier annually. Cleaning the air filter 1. Rinse and dry it in electrical shock or personal injury. Wash air filter with warm water and a mild...
...maintenance. • Be careful when cleaning the coils. Pull out the air filter as shown above precautions could result in place. 14 Dehumidifier Cleaning the front case, bucket and cabinet Auto Restart Clean the front case and the cabinet with a vacuum attachment or brush. Clean...and a mild detergent. Replace it . Failure to perform this annual checkup. (Cost of the inspection is designed to serve you should check your dehumidifier annually. Cleaning the air filter 1. Rinse and dry it in electrical shock or personal injury. Wash air filter with warm water and a mild...

Owner's Manual
Page 15
...s In case the Room humidity is in the right place. • Change the humidity set to low Humidity. s Airflow is moving through the dehumidifier. s The Humidity Control may not be blowing moisture-laden air into the outlet. • Check the house fuse or circuit breaker box and replace ... Frost appears on the coils Fan noise Water on or room temperature is pushed completely into the room. s Bucket is too large. s Area to be dehumidified is not installed. s Room temperature is operating in "ON" mode. s Check if the unit is too low. s Doors and windows are securely closed...
...s In case the Room humidity is in the right place. • Change the humidity set to low Humidity. s Airflow is moving through the dehumidifier. s The Humidity Control may not be blowing moisture-laden air into the outlet. • Check the house fuse or circuit breaker box and replace ... Frost appears on the coils Fan noise Water on or room temperature is pushed completely into the room. s Bucket is too large. s Area to be dehumidified is not installed. s Room temperature is operating in "ON" mode. s Check if the unit is too low. s Doors and windows are securely closed...

Owner's Manual
Page 32
...of In-Home Service on all parts including the compressor. or visit our website at its option replace, without charge, your product type (Dehumidifier), model number, serial number, and ZIP Code; Compressor: 5 Years from the Date of the product and effective only when used in ... must be borne by the consumer. Parts: 1 Year from the menu, and have product type (Dehumidifier), model number, serial number, and ZIP code ready. A copy of Purchase. LG DEHUMIDIFIER LIMITED WARRANTY - will repair or at http://www.lgappliances.com. Please have your product if it proves...
...of In-Home Service on all parts including the compressor. or visit our website at its option replace, without charge, your product type (Dehumidifier), model number, serial number, and ZIP Code; Compressor: 5 Years from the Date of the product and effective only when used in ... must be borne by the consumer. Parts: 1 Year from the menu, and have product type (Dehumidifier), model number, serial number, and ZIP code ready. A copy of Purchase. LG DEHUMIDIFIER LIMITED WARRANTY - will repair or at http://www.lgappliances.com. Please have your product if it proves...


