
Owner's Manual
Page 2
... be supervised to ensure that they do not play with the dehumidifier. • When the power cord is to be replaced, replacement work shall be performed by authorized personnel only using only genuine replacement parts. 2 Dehumidifier READ THIS MANUAL Inside you will find them on a label ...on the side of your dehumidifier. If you need to this unit. • ...
... be supervised to ensure that they do not play with the dehumidifier. • When the power cord is to be replaced, replacement work shall be performed by authorized personnel only using only genuine replacement parts. 2 Dehumidifier READ THIS MANUAL Inside you will find them on a label ...on the side of your dehumidifier. If you need to this unit. • ...
Owner's Manual
Page 9
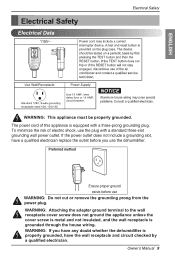
... BUTTON, RESET BUTTON SHOULD POP UP. 4.PRESS RESET BUTTON FOR USE. DO NOT USE IF ABOVE TEST FAILS.WHEN GREEN LIGHTISON, ITIS WORKING PROPERLY! If the power outlet does not include a grounding slot, have the wall receptacle and circuit checked by a qualified electrician. WARNING:...wall receptacle is equipped with a standard three-slot grounding wall power outlet. Preferred method Ensure proper ground exists before you use the dehumidifier. Electrical Safety WARNING: This appliance must be properly grounded. The power cord of electric shock, use WARNING: Do not cut or ...
... BUTTON, RESET BUTTON SHOULD POP UP. 4.PRESS RESET BUTTON FOR USE. DO NOT USE IF ABOVE TEST FAILS.WHEN GREEN LIGHTISON, ITIS WORKING PROPERLY! If the power outlet does not include a grounding slot, have the wall receptacle and circuit checked by a qualified electrician. WARNING:...wall receptacle is equipped with a standard three-slot grounding wall power outlet. Preferred method Ensure proper ground exists before you use the dehumidifier. Electrical Safety WARNING: This appliance must be properly grounded. The power cord of electric shock, use WARNING: Do not cut or ...
Owner's Manual
Page 12
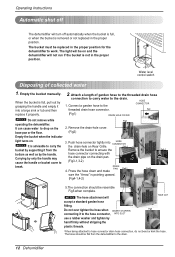
... turn off automatically when the bucket is full, or when the bucket is removed or not replaced in the proper position for the dehumidifier to work. Attach a length of collected water 1. Connect a garden hose to hose connector drain hose connection, do not bend or kink the hose. Fig3-2... the bucket to drop on the drain pan. (Fig3-1,3-2) break. Fig1 (Fig1) DRAIN HOLE COVER NOTICE Do not remove while Fig2 operating the dehumidifier. Carrying by supporting it properly. 2. Press the hose down and make sure the "Arrow" is full, pull out by grasping the handle and...
... turn off automatically when the bucket is full, or when the bucket is removed or not replaced in the proper position for the dehumidifier to work. Attach a length of collected water 1. Connect a garden hose to hose connector drain hose connection, do not bend or kink the hose. Fig3-2... the bucket to drop on the drain pan. (Fig3-1,3-2) break. Fig1 (Fig1) DRAIN HOLE COVER NOTICE Do not remove while Fig2 operating the dehumidifier. Carrying by supporting it properly. 2. Press the hose down and make sure the "Arrow" is full, pull out by grasping the handle and...


