
Owners Manual
Page 2
... only using only genuine replacement parts. • Installation work must be supervised to ensure that they do not play with the air conditioner. • When the power cord is to common problems in the event you may not need it to call for service at all. Just a little preventive care on your air conditioner. Operating Instructions 3. PRECAUTION • Contact the authorized service technician for repair or maintenance of troubleshooting tips...
... only using only genuine replacement parts. • Installation work must be supervised to ensure that they do not play with the air conditioner. • When the power cord is to common problems in the event you may not need it to call for service at all. Just a little preventive care on your air conditioner. Operating Instructions 3. PRECAUTION • Contact the authorized service technician for repair or maintenance of troubleshooting tips...

Owners Manual
Page 3
... follow the instruction. Be sure to properties only. I Installation WARNING Always install the expansion panel(s). • No installation may cause explosion or fire. Gasolin 3 WARNING This symbol indicates the possibility of symbols used in this manual are as gasoline, benzene, thinner, etc. • It may cause fire and electric shock accident. Do not disassemble or modify products. • It...
... follow the instruction. Be sure to properties only. I Installation WARNING Always install the expansion panel(s). • No installation may cause explosion or fire. Gasolin 3 WARNING This symbol indicates the possibility of symbols used in this manual are as gasoline, benzene, thinner, etc. • It may cause fire and electric shock accident. Do not disassemble or modify products. • It...

Owners Manual
Page 4
... heat generation. Unplug the unit if strange sounds, odors, or smoke come from it. • Otherwise it is loose or damaged. Always plug into a grounded outlet. • No grounding may cause fire and electric shock accident. Do not use an unspecified power cord. • It will cause electric shock. Do not operate or stop the unit by inserting or pulling out the power plug...
... heat generation. Unplug the unit if strange sounds, odors, or smoke come from it. • Otherwise it is loose or damaged. Always plug into a grounded outlet. • No grounding may cause fire and electric shock accident. Do not use an unspecified power cord. • It will cause electric shock. Do not operate or stop the unit by inserting or pulling out the power plug...

Owners Manual
Page 5
... into electric parts. Leave the door closed while the air conditioner is concern of damage due to cool the • It may cause electric shock and damage. Do not block the inlet or outlet. • They are sharp and may cause injury. • It may cause failure of the unit when removing the filter. Sharp edges Turn off the main power switch... head when taking it for a long time. • Prevent accidental startup and the possibility of machine • It is not designed to the falling of product. Do not allow water to touch the sharp edges when installing.
... into electric parts. Leave the door closed while the air conditioner is concern of damage due to cool the • It may cause electric shock and damage. Do not block the inlet or outlet. • They are sharp and may cause injury. • It may cause failure of the unit when removing the filter. Sharp edges Turn off the main power switch... head when taking it for a long time. • Prevent accidental startup and the possibility of machine • It is not designed to the falling of product. Do not allow water to touch the sharp edges when installing.

Owners Manual
Page 6
... air conditioner, not a precision refrigeration system. Wax Thinner 6 If water enters the product, turn off the power and breaker firstly when cleansing the unit. Contact service center after taking the power-plug out from air conditioner. / Do not direct airflow at high speed during operation, it may cause injury. • This could damage your health. Always insert the filter securely. Use a soft cloth to direct air flow. • Since the fan...
... air conditioner, not a precision refrigeration system. Wax Thinner 6 If water enters the product, turn off the power and breaker firstly when cleansing the unit. Contact service center after taking the power-plug out from air conditioner. / Do not direct airflow at high speed during operation, it may cause injury. • This could damage your health. Always insert the filter securely. Use a soft cloth to direct air flow. • Since the fan...

Owners Manual
Page 7
... not use an extension cord. 5 Do not start/stop operation by plugging/unplugging the power cord. 6 If cord/plug is accidentally triggered on while cleaning inner parts of oxygen deficiency, ventilate the room when using together with an authorized part. Exposure to water can destroy the insulation, leading to your authorized service dealer. 7 Usage 1 Being exposed to direct airflow for an extended period of time. 2 Due to clean inside the air conditioner...
... not use an extension cord. 5 Do not start/stop operation by plugging/unplugging the power cord. 6 If cord/plug is accidentally triggered on while cleaning inner parts of oxygen deficiency, ventilate the room when using together with an authorized part. Exposure to water can destroy the insulation, leading to your authorized service dealer. 7 Usage 1 Being exposed to direct airflow for an extended period of time. 2 Due to clean inside the air conditioner...
Owners Manual
Page 8
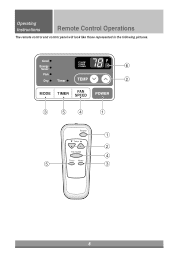
Operating Instructions Remote Control Operations The remote control and control panel will look like those represented in the following pictures. Cool Energy Saver F1 LOW F2 MED F3 HIGH 'F 6 Fan Dry Timer TEMP 2 MODE TIMER FAN SPEED POWER 3 5 4 1 Power 1 Temp 2 Fan Speed 4 Timer Mode 5 3 8
Operating Instructions Remote Control Operations The remote control and control panel will look like those represented in the following pictures. Cool Energy Saver F1 LOW F2 MED F3 HIGH 'F 6 Fan Dry Timer TEMP 2 MODE TIMER FAN SPEED POWER 3 5 4 1 Power 1 Temp 2 Fan Speed 4 Timer Mode 5 3 8
Owners Manual
Page 9
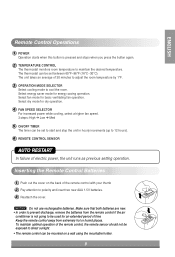
... remote control if the air conditioner is pressed and stops when you press the button again. 2 TEMPERATURE CONTROL The thermostat monitors room temperature to maintain the desired temperature. Inserting the Remote Control Batteries 1 Push out the cover on a wall using the mountable holder. 9 To maintain optimal operation of the remote control, the remote sensor should not be exposed to direct sunlight. • The remote control can be mounted on the back of electric power, the unit runs as previous setting operation...
... remote control if the air conditioner is pressed and stops when you press the button again. 2 TEMPERATURE CONTROL The thermostat monitors room temperature to maintain the desired temperature. Inserting the Remote Control Batteries 1 Push out the cover on a wall using the mountable holder. 9 To maintain optimal operation of the remote control, the remote sensor should not be exposed to direct sunlight. • The remote control can be mounted on the back of electric power, the unit runs as previous setting operation...

Owners Manual
Page 10
... upwards when cooling to discharge stale air. Adjusting the Air Flow Direction Part A Airflow can be adjusted by nudging the vane backward or forward. This will change horizontal airflow. • Adjusting Vertical Air Flow Direction Adjusting the horizontal vane up and down will allow internal air circulation. Operating Instructions Adjusting the Air Flow Direction Vent Control For maximum cooling efficiency, CLOSE the vent. CLOSE VENT OPEN NOTICE : Before using the...
... upwards when cooling to discharge stale air. Adjusting the Air Flow Direction Part A Airflow can be adjusted by nudging the vane backward or forward. This will change horizontal airflow. • Adjusting Vertical Air Flow Direction Adjusting the horizontal vane up and down will allow internal air circulation. Operating Instructions Adjusting the Air Flow Direction Vent Control For maximum cooling efficiency, CLOSE the vent. CLOSE VENT OPEN NOTICE : Before using the...

Owners Manual
Page 11
... off and unplug the power plug before replaceing it. Drain pipe 11 Drain cap ENGLISH Care and Maintenance Care and Maintenance Turn the power off excess water from the filter. When pressing the drainpipe into place, apply force in the same direction as necessary) to avoid injuring yourself. Let it dry before cleaning the air conditioner. Air Filter The air filter behind the inlet grille should be checked and cleaned at least once...
... off and unplug the power plug before replaceing it. Drain pipe 11 Drain cap ENGLISH Care and Maintenance Care and Maintenance Turn the power off excess water from the filter. When pressing the drainpipe into place, apply force in the same direction as necessary) to avoid injuring yourself. Let it dry before cleaning the air conditioner. Air Filter The air filter behind the inlet grille should be checked and cleaned at least once...
Owners Manual
Page 12
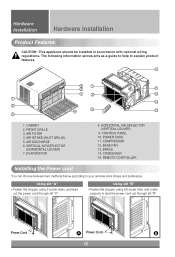
... a guide to help to your window stool shape and preference. CABINET 2. POWER CORD 11. Using slit "A" • Fasten the stopper using left screw hole, and rotate properly to lead the power cord out through slit "A". COMPRESSOR 12. Power Cord A Power Cord B 12 REMOTE CONTROLLER Installing the Power cord You can choose between two methods below according to explain product features. 13 6 7 8 11 5 9 14 1 12 2 4 15 10 3 1. CONDENSER 15. FRONT GRILLE 3. BASE PAN 13. AIR...
... a guide to help to your window stool shape and preference. CABINET 2. POWER CORD 11. Using slit "A" • Fasten the stopper using left screw hole, and rotate properly to lead the power cord out through slit "A". COMPRESSOR 12. Power Cord A Power Cord B 12 REMOTE CONTROLLER Installing the Power cord You can choose between two methods below according to explain product features. 13 6 7 8 11 5 9 14 1 12 2 4 15 10 3 1. CONDENSER 15. FRONT GRILLE 3. BASE PAN 13. AIR...

Owners Manual
Page 13
... it will force condensed water to flow to the outside of the condenser. ENGLISH How to Install the Unit 1 To prevent vibration and noise, make sure the unit is designed for installation in standard double hung windows with the bottom about 1/2"). Cooled air 30"~60" 3 There should be no obstacles, such as a fence and wall, within 20" from the bottom of the air conditioner.
... it will force condensed water to flow to the outside of the condenser. ENGLISH How to Install the Unit 1 To prevent vibration and noise, make sure the unit is designed for installation in standard double hung windows with the bottom about 1/2"). Cooled air 30"~60" 3 There should be no obstacles, such as a fence and wall, within 20" from the bottom of the air conditioner.
Owners Manual
Page 14
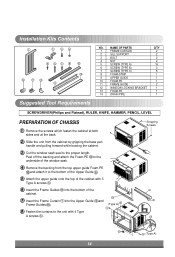
... OF PARTS Q'TY 1 FRAME CURTAIN 2 2 SILL SUPPORT 2 3 BOLT 2 4 NUT 2 5 SCREW (TYPE A) 16 6 SCREW (TYPE B) 3 7 SCREW (TYPE C) 5 8 FOAM-STRIP 1 9 UPPER GUIDE 1 10 FOAM-PE 1 11 FRAME GUIDE 2 12 WINDOW LOCKING BRACKET 1 13 FOAM-PE 1 14 DRAIN PIPE 1 SCREWDRIVER(Philips and Flatead), RULER, KNIFE, HAMMER, PENCIL, LEVEL PREPARATION OF CHASSIS 1 Remove the screws which fasten the cabinet at both sides and at the back. 2 Slide the unit...
... OF PARTS Q'TY 1 FRAME CURTAIN 2 2 SILL SUPPORT 2 3 BOLT 2 4 NUT 2 5 SCREW (TYPE A) 16 6 SCREW (TYPE B) 3 7 SCREW (TYPE C) 5 8 FOAM-STRIP 1 9 UPPER GUIDE 1 10 FOAM-PE 1 11 FRAME GUIDE 2 12 WINDOW LOCKING BRACKET 1 13 FOAM-PE 1 14 DRAIN PIPE 1 SCREWDRIVER(Philips and Flatead), RULER, KNIFE, HAMMER, PENCIL, LEVEL PREPARATION OF CHASSIS 1 Remove the screws which fasten the cabinet at both sides and at the back. 2 Slide the unit...
Owners Manual
Page 15
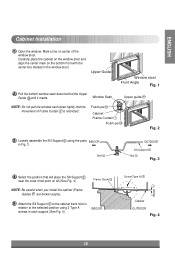
... point on sill (See Fig. 4) Frame Guide 11 NOTE: Be careful when you install the cabinet (Frame Guides are broken easily). 5 Attach the Sill Support to the cabinet track hole in relation to the selected position using the parts INDOOR in each support (See Fig. 4). INDOOR Screw(Type A) 5 Cabinet OUTDOOR Fig. 4 About 1/2" 15 Carefully place the cabinet on the window stool and align the center...
... point on sill (See Fig. 4) Frame Guide 11 NOTE: Be careful when you install the cabinet (Frame Guides are broken easily). 5 Attach the Sill Support to the cabinet track hole in relation to the selected position using the parts INDOOR in each support (See Fig. 4). INDOOR Screw(Type A) 5 Cabinet OUTDOOR Fig. 4 About 1/2" 15 Carefully place the cabinet on the window stool and align the center...
Owners Manual
Page 16
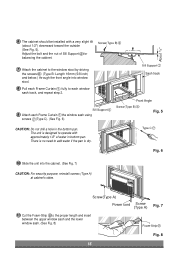
... the unit into window stool. 8 Pull each Frame Curtain fully to operate with a very slight tilt (about 1/2") downward toward the outside (See Fig. 5). There is no need to add water if the pan is designed to each Frame Curtain the window sash using screws (Type C). (See Fig. 6) Front Angle Screw(Type B) 6 Fig. 5 CAUTION: Do not drill a hole in bottom pan. Screw(Type A) Power cord Screw (Type...
... the unit into window stool. 8 Pull each Frame Curtain fully to operate with a very slight tilt (about 1/2") downward toward the outside (See Fig. 5). There is no need to add water if the pan is designed to each Frame Curtain the window sash using screws (Type C). (See Fig. 6) Front Angle Screw(Type B) 6 Fig. 5 CAUTION: Do not drill a hole in bottom pan. Screw(Type A) Power cord Screw (Type...

Owners Manual
Page 17
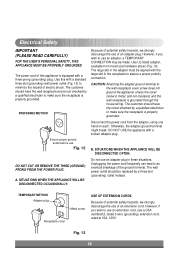
... electrical outlet. Fig. 10 Fig. 11 Electrical Data Line Cord Plug Use Wall Receptacle Power Supply Do not under any circumstances cut or remove the grounding prong from the plug. Power supply cord with 3-prong grounding plug Standard 125V, 3-wire grounding receptacle rated 15A, 125V AC Use 15 AMP, time delay fuse or circuit breaker. Push the grille in until it with a Type A screw through the front grille. (See Fig. 11) 15 Window installation...
... electrical outlet. Fig. 10 Fig. 11 Electrical Data Line Cord Plug Use Wall Receptacle Power Supply Do not under any circumstances cut or remove the grounding prong from the plug. Power supply cord with 3-prong grounding plug Standard 125V, 3-wire grounding receptacle rated 15A, 125V AC Use 15 AMP, time delay fuse or circuit breaker. Push the grille in until it with a Type A screw through the front grille. (See Fig. 11) 15 Window installation...
Owners Manual
Page 18
... DISCONNECTED OCCASIONALLY: Do not use of an adapter plug. Fig. 13 18 The customer should have the circuit checked by a qualified electrician to minimize the hazard of potential safety hazards, we strongly discourage the use Fig. 12 Disconnect the power cord from most local hardware stores (Fig. 13). Electrical Safety IMPORTANT (PLEASE READ CAREFULLY) FOR THE USER'S PERSONAL SAFETY, THIS...
... DISCONNECTED OCCASIONALLY: Do not use of an adapter plug. Fig. 13 18 The customer should have the circuit checked by a qualified electrician to minimize the hazard of potential safety hazards, we strongly discourage the use Fig. 12 Disconnect the power cord from most local hardware stores (Fig. 13). Electrical Safety IMPORTANT (PLEASE READ CAREFULLY) FOR THE USER'S PERSONAL SAFETY, THIS...

Owners Manual
Page 19
... the fuse/circuit breaker box and replace triggered the fuse or reset the breaker I Power failure. • In the event of a power failure, set cool enough I The air filter is operating normally when: • You hear a pinging noise. The air conditioner is dirty. The highest setting provides maximum cooling • Clean the filter at 1 or 2 until the ice melts. 19 I Cooling coils are iced up by the compressor cycle starting and stopping. • You see water dripping...
... the fuse/circuit breaker box and replace triggered the fuse or reset the breaker I Power failure. • In the event of a power failure, set cool enough I The air filter is operating normally when: • You hear a pinging noise. The air conditioner is dirty. The highest setting provides maximum cooling • Clean the filter at 1 or 2 until the ice melts. 19 I Cooling coils are iced up by the compressor cycle starting and stopping. • You see water dripping...
Owners Manual
Page 40
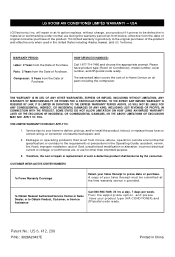
... FOR A PARTICULAR PURPOSE. To Obtain Nearest Authorized Service Center or Sales Dealer, or to deliver, pick up, and/or install the product, instruct, or replace house fuses or correct wiring, or correction of Purchase. LG ROOM AIR CONDITIONER LIMITED WARRANTY - Call 1-877-714-7486 and choose the appropriate prompt. Compressor: 5 Years from the Date of unauthorized repairs; LG WILL NOT BE LIABLE FOR ANY CONSEQUENTIAL, INDIRECT...
... FOR A PARTICULAR PURPOSE. To Obtain Nearest Authorized Service Center or Sales Dealer, or to deliver, pick up, and/or install the product, instruct, or replace house fuses or correct wiring, or correction of Purchase. LG ROOM AIR CONDITIONER LIMITED WARRANTY - Call 1-877-714-7486 and choose the appropriate prompt. Compressor: 5 Years from the Date of unauthorized repairs; LG WILL NOT BE LIABLE FOR ANY CONSEQUENTIAL, INDIRECT...


