
User Guide
Page 3
... unit. On Cleaning Unplug the display before cleaning the face of your LCD display. Do not use this is characteristic of the fixed-resolution LCD panel. Disposal of this product must be carried out in its original material. Therefore, NEVER: Block the bottom ventilation slots by placing the display on the...
... unit. On Cleaning Unplug the display before cleaning the face of your LCD display. Do not use this is characteristic of the fixed-resolution LCD panel. Disposal of this product must be carried out in its original material. Therefore, NEVER: Block the bottom ventilation slots by placing the display on the...
User Guide
Page 6
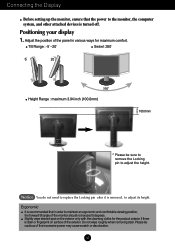
... of the monitor should not exceed 5 degrees. Ergonomic It is removed, to maintain an ergonomic and comfortable viewing position, the forward tilt angle of the panel in order to adjust its height. Notice You do not need to replace the Locking pin after it is recommended that in various ways for...
... of the monitor should not exceed 5 degrees. Ergonomic It is removed, to maintain an ergonomic and comfortable viewing position, the forward tilt angle of the panel in order to adjust its height. Notice You do not need to replace the Locking pin after it is recommended that in various ways for...

User Guide
Page 7
If the monitor head touches the Stand Base, then the Stand Base could crack. Lift the monitor to its highest height to access the Pivot function. Landscape & Portrait : You can rotate the panel 90o clockwise. Head section Stand section 3. Please be cautious and avoid contact between the monitor head and the Stand Base when rotating the screen to utilize the Pivot function. 2. For detailed information, please refer to the Pivot Software CD provided. A6 Connecting the Display Using the Pivot function 1.
If the monitor head touches the Stand Base, then the Stand Base could crack. Lift the monitor to its highest height to access the Pivot function. Landscape & Portrait : You can rotate the panel 90o clockwise. Head section Stand section 3. Please be cautious and avoid contact between the monitor head and the Stand Base when rotating the screen to utilize the Pivot function. 2. For detailed information, please refer to the Pivot Software CD provided. A6 Connecting the Display Using the Pivot function 1.

User Guide
Page 8
Connect the audio cable to its highest height. 1 AUDIO OUT 2 1 * Make sure the panel does not touch the floor when rotating. Slot Hook AUDIO In OUT A 2 1 2 OUT 1 2 AUDIO 1 2 AUDIO D-SUB D-SUB PR PR P B COMPONENT P B COMPONENT Y Y D-SUB DC-OUT ... back slot until you hear the clicking sound. 3. Connecting the speakers - Insert the projecting hook of the external instrument. L246WPM Connecting the speaker 1. Rotate the panel at an angle of 90 degrees as shown in the direction of the monitor. The feature is only for speaker models - A7
Connect the audio cable to its highest height. 1 AUDIO OUT 2 1 * Make sure the panel does not touch the floor when rotating. Slot Hook AUDIO In OUT A 2 1 2 OUT 1 2 AUDIO 1 2 AUDIO D-SUB D-SUB PR PR P B COMPONENT P B COMPONENT Y Y D-SUB DC-OUT ... back slot until you hear the clicking sound. 3. Connecting the speakers - Insert the projecting hook of the external instrument. L246WPM Connecting the speaker 1. Rotate the panel at an angle of 90 degrees as shown in the direction of the monitor. The feature is only for speaker models - A7
User Guide
Page 10
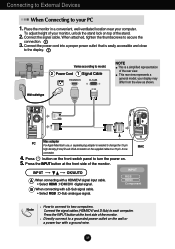
When attached, tighten the thumbscrews to turn the power on. 5. This rear view represents a general model; Press button on the front switch panel to secure the 3. INPUT RGB HDMI Component Note How to connect to each computer. Connect the signal cables (HDMI/DVI and D-Sub) to two computers. ...
When attached, tighten the thumbscrews to turn the power on. 5. This rear view represents a general model; Press button on the front switch panel to secure the 3. INPUT RGB HDMI Component Note How to connect to each computer. Connect the signal cables (HDMI/DVI and D-Sub) to two computers. ...

User Guide
Page 16
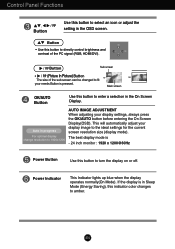
Control Panel Functions Front Panel Controls INPUT Button Select the input signal. You can unlock the OSD controls at any time by pushing the MENU+ Button for several seconds. Press ...
Control Panel Functions Front Panel Controls INPUT Button Select the input signal. You can unlock the OSD controls at any time by pushing the MENU+ Button for several seconds. Press ...
User Guide
Page 17
... Screen Display. If the display is pressed. Button Sub screen • (Picture In Picture) Button The size of the PC signal (RGB, HDMI/DVI). Control Panel Functions Button Use this button to select an icon or adjust the setting in Sleep Mode (Energy Saving), this indicator color changes to amber.
... Screen Display. If the display is pressed. Button Sub screen • (Picture In Picture) Button The size of the PC signal (RGB, HDMI/DVI). Control Panel Functions Button Use this button to select an icon or adjust the setting in Sleep Mode (Energy Saving), this indicator color changes to amber.
User Guide
Page 26
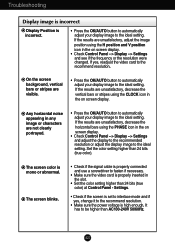
...image to fasten if necessary. • Make sure the video card is properly inserted in the on screen display. • Check Control Panel --> Display --> Settings and see if the frequency or the resolution were changed. A25 Troubleshooting Display image is incorrect Display Position is incorrect...any image or characters are unsatisfactory, decrease the horizontal bars using the CLOCK icon in the on screen display. • Check Control Panel --> Display --> Settings and adjust the display to the recommended resolution or adjust the display image to the ideal setting. Settings. &#...
...image to fasten if necessary. • Make sure the video card is properly inserted in the on screen display. • Check Control Panel --> Display --> Settings and see if the frequency or the resolution were changed. A25 Troubleshooting Display image is incorrect Display Position is incorrect...any image or characters are unsatisfactory, decrease the horizontal bars using the CLOCK icon in the on screen display. • Check Control Panel --> Display --> Settings and adjust the display to the recommended resolution or adjust the display image to the ideal setting. Settings. &#...
User Guide
Page 28
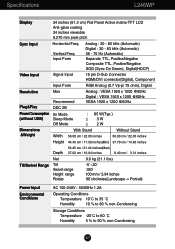
Specifications L246WP Display 24 inches (61.3 cm) Flat Panel Active matrix-TFT LCD Anti-glare coating 24 inches viewable 0.270 mm pixel pitch Sync Input Horizontal Freq. Vertical Freq. Input Form Analog : 30 - 83 ...
Specifications L246WP Display 24 inches (61.3 cm) Flat Panel Active matrix-TFT LCD Anti-glare coating 24 inches viewable 0.270 mm pixel pitch Sync Input Horizontal Freq. Vertical Freq. Input Form Analog : 30 - 83 ...

User Guide
Page 30
Specifications L246WPM Display 24 inches (61.3 cm) Flat Panel Active matrix-TFT LCD Anti-glare coating 24 inches viewable 0.270 mm pixel pitch Sync Input Video Input Horizontal Freq. Input Form Signal Input Analog : ...
Specifications L246WPM Display 24 inches (61.3 cm) Flat Panel Active matrix-TFT LCD Anti-glare coating 24 inches viewable 0.270 mm pixel pitch Sync Input Video Input Horizontal Freq. Input Form Signal Input Analog : ...

