
Owner's Manual
Page 2
... not been designed for this display. A1 On Safety Use only the power cord supplied with your dealer if the display is faulty in this manual or listed on a sloping shelf unless properly secured. If you use another power cord, make sure that it from dropping or pushing objects into the...
... not been designed for this display. A1 On Safety Use only the power cord supplied with your dealer if the display is faulty in this manual or listed on a sloping shelf unless properly secured. If you use another power cord, make sure that it from dropping or pushing objects into the...
Owner's Manual
Page 8
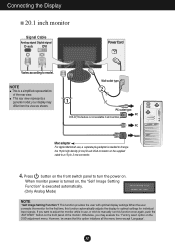
... the user connects the monitor for individual input signals. Press button on the front switch panel to turn the power on the supplied cable to manually run this function once again, push the 'AUTO/SET' button on the front panel of the rear view. When monitor power is needed to adjust...
... the user connects the monitor for individual input signals. Press button on the front switch panel to turn the power on the supplied cable to manually run this function once again, push the 'AUTO/SET' button on the front panel of the rear view. When monitor power is needed to adjust...

Owner's Manual
Page 9
... Line Out, convert to Line Out using the card jumper of the PC sound card. *LINE OUT A terminal used to connect to the Sound Card Manual). Rear AUDIO IN Speaker Out *Line Out Audio Input Connects to the *LINE OUT jack of the program (Refer to the speaker including a built-in...
... Line Out, convert to Line Out using the card jumper of the PC sound card. *LINE OUT A terminal used to connect to the Sound Card Manual). Rear AUDIO IN Speaker Out *Line Out Audio Input Connects to the *LINE OUT jack of the program (Refer to the speaker including a built-in...
Owner's Manual
Page 14
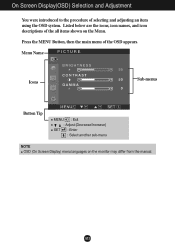
Listed below are the icons, icon names, and icon descriptions of selecting and adjusting an item using the OSD system. Menu Name PICTURE Icons Sub-menus Button Tip MENU : Exit : Adjust (Decrease/Increase) SET : Enter : Select another sub-menu NOTE OSD (On Screen Display) menu languages on the Menu. A13 On Screen Display(OSD) Selection and Adjustment You were introduced to the procedure of the all items shown on the monitor may differ from the manual. Press the MENU Button, then the main menu of the OSD appears.
Listed below are the icons, icon names, and icon descriptions of selecting and adjusting an item using the OSD system. Menu Name PICTURE Icons Sub-menus Button Tip MENU : Exit : Adjust (Decrease/Increase) SET : Enter : Select another sub-menu NOTE OSD (On Screen Display) menu languages on the Menu. A13 On Screen Display(OSD) Selection and Adjustment You were introduced to the procedure of the all items shown on the monitor may differ from the manual. Press the MENU Button, then the main menu of the OSD appears.
Owner's Manual
Page 17
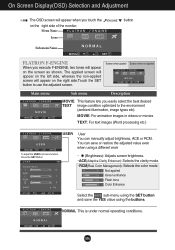
... When you easily select the best desired TEXT image condition optimized to use the adjusted screen. NORMAL This is under normal operating conditions. You can manually adjust brightness, ACE or RCM.
... When you easily select the best desired TEXT image condition optimized to use the adjusted screen. NORMAL This is under normal operating conditions. You can manually adjust brightness, ACE or RCM.
Owner's Manual
Page 18
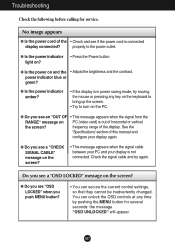
... changed. light on and the • Adjust the brightness and the contrast. G Is the power indicator amber? • If the display is out of this manual and configure your display is connected display connected? G Do you push MENU button? • You can unlock the OSD controls at any key on the...
... changed. light on and the • Adjust the brightness and the contrast. G Is the power indicator amber? • If the display is out of this manual and configure your display is connected display connected? G Do you push MENU button? • You can unlock the OSD controls at any key on the...


