
Owner's Manual (English)
Page 2
Operate the display only from a power source indicated in the specifications of this display. Call your service technician for more than a short period of thunder and lightning, never touch the power cord and signal cable because ...
Operate the display only from a power source indicated in the specifications of this display. Call your service technician for more than a short period of thunder and lightning, never touch the power cord and signal cable because ...
Owner's Manual (English)
Page 12
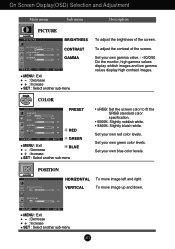
... value. : -50/0/50 On the monitor, high gamma values display whitish images and low gamma values display high contrast images. To move image left and right. MENU : Exit - : Decrease + : Increase SET : Select another sub-menu • sRGB: Set the screen color to fit the SRGB standard color specification. • 6500K: Slightly reddish...
... value. : -50/0/50 On the monitor, high gamma values display whitish images and low gamma values display high contrast images. To move image left and right. MENU : Exit - : Decrease + : Increase SET : Select another sub-menu • sRGB: Set the screen color to fit the SRGB standard color specification. • 6500K: Slightly reddish...

Owner's Manual (English)
Page 13
... TRACKING CLOCK To minimize any vertical bars or stripes visible on the front side of the monitor to ON or OFF. SET : Select another sub-menu Use this function, the signal level is different the required specifications, the color level may deteriorate due to reset immediately. If this function when white and...
... TRACKING CLOCK To minimize any vertical bars or stripes visible on the front side of the monitor to ON or OFF. SET : Select another sub-menu Use this function, the signal level is different the required specifications, the color level may deteriorate due to reset immediately. If this function when white and...

Owner's Manual (English)
Page 15
... your display is connected display connected? G Is the power on the keyboard to bring up the screen. • Try to the power outlet. See the 'Specifications' section of the display. properly to turn on the screen? G Do you see a "OSD LOCKED" message on the PC. G Do you see if the power...
... your display is connected display connected? G Is the power on the keyboard to bring up the screen. • Try to the power outlet. See the 'Specifications' section of the display. properly to turn on the screen? G Do you see a "OSD LOCKED" message on the PC. G Do you see if the power...
Owner's Manual (English)
Page 18
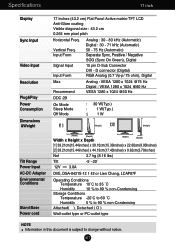
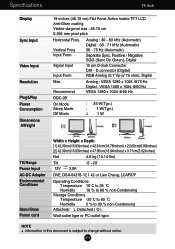
... Height x Depth (Width) (Depth) [1] 39.21cm(15.44inches) x 39.10cm(15.39inches) x 22.60cm(8.90inches) [2] 39.21cm(15.44inches) x 44.19cm(17.40inches) x 9.62cm(3.78inches) Net 3.7 kg (8.16 lbs) Tilt -5˚~20˚ 12V 3.0A DVE, DSA-0421S-12 1 42 or Lien Chang, LCAP07F Operating ... NOTE Information in this document is subject to change without notice. Specifications 17 inch Display Sync Input Video Input Resolution Plug&Play Power Consumption Dimensions &Weight 17 inches (43.2 cm) Flat Panel Active matrix-TFT LCD Anti-Glare coating Visible diagonal size : 43.2 cm 0.264 mm...
... Height x Depth (Width) (Depth) [1] 39.21cm(15.44inches) x 39.10cm(15.39inches) x 22.60cm(8.90inches) [2] 39.21cm(15.44inches) x 44.19cm(17.40inches) x 9.62cm(3.78inches) Net 3.7 kg (8.16 lbs) Tilt -5˚~20˚ 12V 3.0A DVE, DSA-0421S-12 1 42 or Lien Chang, LCAP07F Operating ... NOTE Information in this document is subject to change without notice. Specifications 17 inch Display Sync Input Video Input Resolution Plug&Play Power Consumption Dimensions &Weight 17 inches (43.2 cm) Flat Panel Active matrix-TFT LCD Anti-Glare coating Visible diagonal size : 43.2 cm 0.264 mm...
Owner's Manual (English)
Page 19
Specifications 19 inch Display Sync Input Video Input Resolution Plug&Play Power Consumption Dimensions &Weight 19 inches (48.19 cm) Flat Panel Active matrix-TFT LCD Anti-Glare coating Visible diagonal size : 48.19 cm 0.294 mm pixel pitch Horizontal Freq. Vertical Freq. Input Form Analog : 30 - 83 kHz (Automatic) Digital : ...
Specifications 19 inch Display Sync Input Video Input Resolution Plug&Play Power Consumption Dimensions &Weight 19 inches (48.19 cm) Flat Panel Active matrix-TFT LCD Anti-Glare coating Visible diagonal size : 48.19 cm 0.294 mm pixel pitch Horizontal Freq. Vertical Freq. Input Form Analog : 30 - 83 kHz (Automatic) Digital : ...

Owner's Manual (English)
Page 20
Specifications Preset Modes (Resolution) Display Modes (Resolution) 1 VGA 640 x 350 2 VGA 720 x 400 3 VGA 640 x 480 4 VESA 640 x 480 5 VESA 800 x 600 6 VESA 800 x 600 7 MAC 832 x 624 8 VESA 1024 x 768 9 VESA 1024 x 768 10 MAC 1152 x 870 11 VESA 1152 x 900 *12 VESA 1280 x 1024 **13 VESA 1280 x 1024 Horizontal Freq. (kHz) 31.469 31.468 31.469 37.500 37.879 46.875 49.725 48.363 60.023 68.681 61.805 63.981 79.976 Vertical Freq. (Hz) 70 70 60 75 60 75 75 60 75 75 65 60 75 * Recommend Mode ** Only Analog Mode Indicator MODE On Mode Sleep Mode Off Mode LED Color blue amber Off A19
Specifications Preset Modes (Resolution) Display Modes (Resolution) 1 VGA 640 x 350 2 VGA 720 x 400 3 VGA 640 x 480 4 VESA 640 x 480 5 VESA 800 x 600 6 VESA 800 x 600 7 MAC 832 x 624 8 VESA 1024 x 768 9 VESA 1024 x 768 10 MAC 1152 x 870 11 VESA 1152 x 900 *12 VESA 1280 x 1024 **13 VESA 1280 x 1024 Horizontal Freq. (kHz) 31.469 31.468 31.469 37.500 37.879 46.875 49.725 48.363 60.023 68.681 61.805 63.981 79.976 Vertical Freq. (Hz) 70 70 60 75 60 75 75 60 75 75 65 60 75 * Recommend Mode ** Only Analog Mode Indicator MODE On Mode Sleep Mode Off Mode LED Color blue amber Off A19

Owner's Manual (English)
Page 21
Place the monitor with Wall mount plate. Press and hold on to the installation guide for more details, which it indicates. .4 Install the Wall mount plate. DVI-D DC-... stand body and fold the stand base in the direction of the Wall mount plate or the interchange device. 1. Installing the Wall mount plate This monitor satisfies the specifications of the arrow which is provided when Wall mount plate is connectable with its front facing downward on a soft cloth. 2.
Place the monitor with Wall mount plate. Press and hold on to the installation guide for more details, which it indicates. .4 Install the Wall mount plate. DVI-D DC-... stand body and fold the stand base in the direction of the Wall mount plate or the interchange device. 1. Installing the Wall mount plate This monitor satisfies the specifications of the arrow which is provided when Wall mount plate is connectable with its front facing downward on a soft cloth. 2.
