Owner's Manual
Page 2
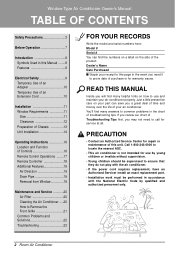
... Use of an Extension Cord 10 Installation 11 Window Requirements 11 Size 11 Clearance 12 Preparation of Chassis 13 Unit Installation 14 Operating Instructions 16 Location and Function of Controls 16 Remote Control Operations ........17 Remote Controller 18 Additional Features 19 Air Direction 19 Drain Pipe 19 Removal from Window 19 Maintenance and Service 20 Air Filter 20 Cleaning the Air Conditioner .....20 How to Remove the Front Grille 21 Common Problems and Solutions 22 Troubleshooting 23 FOR YOUR RECORDS Write the model and serial numbers...
... Use of an Extension Cord 10 Installation 11 Window Requirements 11 Size 11 Clearance 12 Preparation of Chassis 13 Unit Installation 14 Operating Instructions 16 Location and Function of Controls 16 Remote Control Operations ........17 Remote Controller 18 Additional Features 19 Air Direction 19 Drain Pipe 19 Removal from Window 19 Maintenance and Service 20 Air Filter 20 Cleaning the Air Conditioner .....20 How to Remove the Front Grille 21 Common Problems and Solutions 22 Troubleshooting 23 FOR YOUR RECORDS Write the model and serial numbers...

Owner's Manual
Page 3
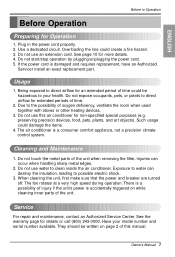
... and electric shock. WARNING • Installation Always install the expansion panel(s). CAUTION This symbol indicates the possibility of injury or damage to ignoring instructions will cause harm or damage. Do not place the power cord near flammable gas or combustibles such as shown below. WARNING This symbol indicates the possibility of death or serious injury. Gasolin Owner's Manual 3 ENGLISH...
... and electric shock. WARNING • Installation Always install the expansion panel(s). CAUTION This symbol indicates the possibility of injury or damage to ignoring instructions will cause harm or damage. Do not place the power cord near flammable gas or combustibles such as shown below. WARNING This symbol indicates the possibility of death or serious injury. Gasolin Owner's Manual 3 ENGLISH...
Owner's Manual
Page 4
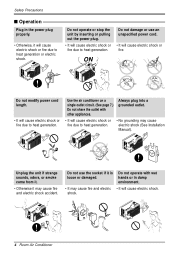
... air conditioner on a single outlet circuit. (See page 7.) Do not share the outlet with wet hands or in the power plug properly. • Otherwise, it is loose or damaged. Do not damage or use the socket if it will cause electric shock or fire due to heat generation. • No grounding may cause electric shock (See Installation Manual). Do not operate or stop...
... air conditioner on a single outlet circuit. (See page 7.) Do not share the outlet with wet hands or in the power plug properly. • Otherwise, it is loose or damaged. Do not damage or use the socket if it will cause electric shock or fire due to heat generation. • No grounding may cause electric shock (See Installation Manual). Do not operate or stop...
Owner's Manual
Page 5
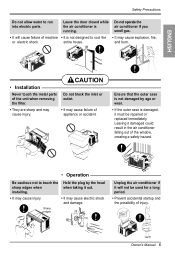
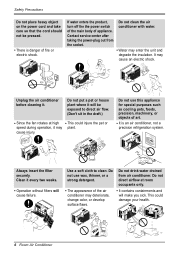
... it must be used for a long period. • Prevent accidental startup and the possibility of appliance or accident. Leave the door closed while the air conditioner is not designed to run into electric parts. and burn. Sharp edges Unplug the air conditioner if it damaged could result in the air conditioner falling out of the unit when removing the filter. • They...
... it must be used for a long period. • Prevent accidental startup and the possibility of appliance or accident. Leave the door closed while the air conditioner is not designed to run into electric parts. and burn. Sharp edges Unplug the air conditioner if it damaged could result in the air conditioner falling out of the unit when removing the filter. • They...
Owner's Manual
Page 6
... or electric shock. Do not use this appliance for special purposes such as cooling pets, foods, precision, machinery, or objects of art. • It is danger of appliance. Clean it . Do not use wax, thinner, or a strong detergent. cause injury. Unplug the air conditioner before cleaning it every two weeks. • Operation without filters will cause failure. Do not drink water drained...
... or electric shock. Do not use this appliance for special purposes such as cooling pets, foods, precision, machinery, or objects of art. • It is danger of appliance. Clean it . Do not use wax, thinner, or a strong detergent. cause injury. Unplug the air conditioner before cleaning it every two weeks. • Operation without filters will cause failure. Do not drink water drained...
Owner's Manual
Page 7
... not touch the metal parts of the unit when removing the filter. When cleaning the unit, first make sure that the power and breaker are turned off. If the power cord is a consumer comfort appliance, not a precision climate control system. Due to your model number and serial number available. The air conditioner is damaged and requires replacement, have an Authorized Servicer install an exact replacement part. Plug in the power cord properly. 2. The fan rotates at a very...
... not touch the metal parts of the unit when removing the filter. When cleaning the unit, first make sure that the power and breaker are turned off. If the power cord is a consumer comfort appliance, not a precision climate control system. Due to your model number and serial number available. The air conditioner is damaged and requires replacement, have an Authorized Servicer install an exact replacement part. Plug in the power cord properly. 2. The fan rotates at a very...
Owner's Manual
Page 11
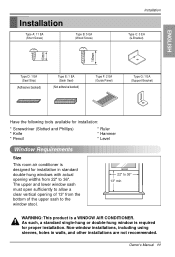
... single-hung or double-hung window is a WINDOW AIR CONDITIONER. Non-window installations, including using sleeves, holes in standard double-hung windows with actual opening of 13" from 22" to 36" 13" min WARNING: This product is required for installation in walls, and other installations are not recommended. Owner's Manual 11 The upper and lower window sash must open sufficiently to allow a clear vertical opening widths from the bottom of...
... single-hung or double-hung window is a WINDOW AIR CONDITIONER. Non-window installations, including using sleeves, holes in standard double-hung windows with actual opening of 13" from 22" to 36" 13" min WARNING: This product is required for installation in walls, and other installations are not recommended. Owner's Manual 11 The upper and lower window sash must open sufficiently to allow a clear vertical opening widths from the bottom of...
Owner's Manual
Page 12
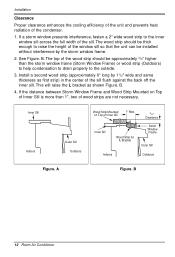
... Window Frame) or wood strip (Outdoors) to help condensation to drain properly to raise the height of Inner Sill 1" Max. 3/4" Clearance Inner Sill Wood Strip for L Bracket Storm Window Frame Outer Sill Indoors Outdoors Figure. If the distance between Storm Window Frame and Wood Strip Mounted on Top of the window sill so that the unit can be thick enough to the outside. 3. See Figure. B 12 Room Air Conditioner...
... Window Frame) or wood strip (Outdoors) to help condensation to drain properly to raise the height of Inner Sill 1" Max. 3/4" Clearance Inner Sill Wood Strip for L Bracket Storm Window Frame Outer Sill Indoors Outdoors Figure. If the distance between Storm Window Frame and Wood Strip Mounted on Top of the window sill so that the unit can be thick enough to the outside. 3. See Figure. B 12 Room Air Conditioner...
Owner's Manual
Page 13
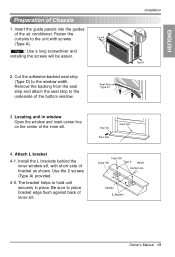
... window Open the window and mark center line on the center of bracket as shown. Locating unit in place. Be sure to the window width. Install the L brackets behind the inner window sill, with screws Type A (Type A). Tip! : Use a long screwdriver and installing the screws will be easier. 2. Inner Sill Outer Sill Type A Inside Center Line 8" 8" Outside L Bracket Owner's Manual 13 ENGLISH Preparation of the air conditioner. Seal Strip (Type D) Installation Type A 3. Insert the guide panels...
... window Open the window and mark center line on the center of bracket as shown. Locating unit in place. Be sure to the window width. Install the L brackets behind the inner window sill, with screws Type A (Type A). Tip! : Use a long screwdriver and installing the screws will be easier. 2. Inner Sill Outer Sill Type A Inside Center Line 8" 8" Outside L Bracket Owner's Manual 13 ENGLISH Preparation of the air conditioner. Seal Strip (Type D) Installation Type A 3. Insert the guide panels...
Owner's Manual
Page 14
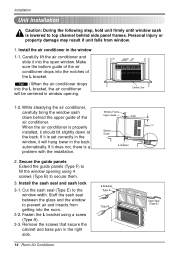
... 3-1. Fasten the L bracket using 4 screws (Type B) to secure them. 3. Cut the sash seal (Type E) to fill the window opening . When the air conditioner is properly installed, it does not, there is a problem with the installation. 2. Personal injury or property damage may result if unit falls from getting into the notches of the air conditioner. Make sure the bottom guide of the air conditioner drops into the room. 3-2. If...
... 3-1. Fasten the L bracket using 4 screws (Type B) to secure them. 3. Cut the sash seal (Type E) to fill the window opening . When the air conditioner is properly installed, it does not, there is a problem with the installation. 2. Personal injury or property damage may result if unit falls from getting into the notches of the air conditioner. Make sure the bottom guide of the air conditioner drops into the room. 3-2. If...
Owner's Manual
Page 15
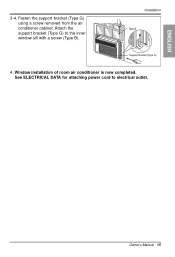
Attach the support bracket (Type G) to electrical outlet. Installation Type B Support Bracket (Type G) 4. Window installation of room air conditioner is now completed. Owner's Manual 15 See ELECTRICAL DATA for attaching power cord to the inner window sill with a screw (Type B). Fasten the support bracket (Type G) using a screw removed from the air conditioner cabinet. ENGLISH 3-4.
Attach the support bracket (Type G) to electrical outlet. Installation Type B Support Bracket (Type G) 4. Window installation of room air conditioner is now completed. Owner's Manual 15 See ELECTRICAL DATA for attaching power cord to the inner window sill with a screw (Type B). Fasten the support bracket (Type G) using a screw removed from the air conditioner cabinet. ENGLISH 3-4.
Owner's Manual
Page 16
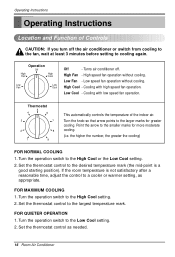
.... Turn the knob so that arrow points to cooling again. If the room temperature is a good starting position). Turn the operation switch to the largest temperature mark. Set the thermostat control to the Low Cool setting. 2. High speed fan operation without cooling. Set the thermostat control as appropriate. Turns air conditioner off the air conditioner or switch from cooling to the fan, wait at least 3 minutes before setting to the larger marks for more moderate cooling. (i.e. Operating Instructions Operating Instructions Location and Function of the indoor air.
.... Turn the knob so that arrow points to cooling again. If the room temperature is a good starting position). Turn the operation switch to the largest temperature mark. Set the thermostat control to the Low Cool setting. 2. High speed fan operation without cooling. Set the thermostat control as appropriate. Turns air conditioner off the air conditioner or switch from cooling to the fan, wait at least 3 minutes before setting to the larger marks for more moderate cooling. (i.e. Operating Instructions Operating Instructions Location and Function of the indoor air.
Owner's Manual
Page 18
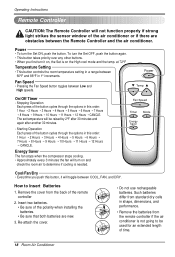
... cover from standard dry cells in 1° increments. Power • To turn the Set ON, push the button. at 72°F Temperature Setting • This button controls the room temperature setting in a range between COOL, FAN, and DRY. Energy Saver The fan stops when the compressor stops cooling. • Approximately every 3 minutes the fan will not function properly if strong light strikes the sensor window of time. 18 Room Air Conditioner Fan Speed Timer Mode Energy Auto Saver Swing Cool/Fan/Dry • Everytime you first turn it will be used...
... cover from standard dry cells in 1° increments. Power • To turn the Set ON, push the button. at 72°F Temperature Setting • This button controls the room temperature setting in a range between COOL, FAN, and DRY. Energy Saver The fan stops when the compressor stops cooling. • Approximately every 3 minutes the fan will not function properly if strong light strikes the sensor window of time. 18 Room Air Conditioner Fan Speed Timer Mode Energy Auto Saver Swing Cool/Fan/Dry • Everytime you first turn it will be used...
Owner's Manual
Page 19
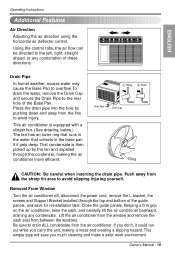
... work environment. Removal From Window Turn the air conditioner off, disconnect the power cord, remove the L bracket, the screws and Support Bracket installed through the condenser, making a mess and creating a slipping hazard. If you don't, it gets deep. This simple step will save for reinstallation later. Push away from the sharp fin area to the rear hole of the guide panels, and save you carry the unit, making...
... work environment. Removal From Window Turn the air conditioner off, disconnect the power cord, remove the L bracket, the screws and Support Bracket installed through the condenser, making a mess and creating a slipping hazard. If you don't, it gets deep. This simple step will save for reinstallation later. Push away from the sharp fin area to the rear hole of the guide panels, and save you carry the unit, making...
Owner's Manual
Page 20
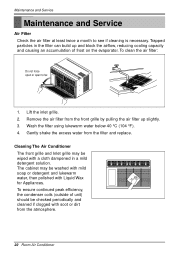
... condenser coils (outside of unit) should be checked periodically and cleaned if clogged with a cloth dampened in the filter can build up slightly. 3. Remove the air filter from the filter and replace. Gently shake the excess water from the front grille by pulling the air filter up and block the airflow, reducing cooling capacity and causing an accumulation of frost on the evaporator. Cleaning The Air Conditioner The...
... condenser coils (outside of unit) should be checked periodically and cleaned if clogged with a cloth dampened in the filter can build up slightly. 3. Remove the air filter from the filter and replace. Gently shake the excess water from the front grille by pulling the air filter up and block the airflow, reducing cooling capacity and causing an accumulation of frost on the evaporator. Cleaning The Air Conditioner The...

Owner's Manual
Page 21
ENGLISH How to Remove the Front Grille Maintenance and Service 1. Remove the screw securing the Front Grille. 1. Remove the screw securing the Front Grille. 3. Remove the thermostat knob and the operation knob by pulling. 2. Push the grille up from the bottom and pull the top of the grille away from the case as the top tabs lift out of their slots. Pull the inlet grille forward 2. Owner's Manual 21
ENGLISH How to Remove the Front Grille Maintenance and Service 1. Remove the screw securing the Front Grille. 1. Remove the screw securing the Front Grille. 3. Remove the thermostat knob and the operation knob by pulling. 2. Push the grille up from the bottom and pull the top of the grille away from the case as the top tabs lift out of their slots. Pull the inlet grille forward 2. Owner's Manual 21
Owner's Manual
Page 22
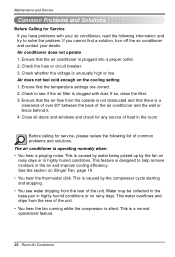
... circuit breaker. 3. This is silent. See the section on the cooling setting 1. This is plugged into a proper outlet. 2. If you have problems with dust. Air does not feel cold enough on Slinger Fan, page 19. • You hear the thermostat click. Ensure that the temperature settings are correct. 2. Maintenance and Service Common Problems and Solutions Before Calling for Service If you cannot find a solution, turn off the air conditioner...
... circuit breaker. 3. This is silent. See the section on the cooling setting 1. This is plugged into a proper outlet. 2. If you have problems with dust. Air does not feel cold enough on Slinger Fan, page 19. • You hear the thermostat click. Ensure that the temperature settings are correct. 2. Maintenance and Service Common Problems and Solutions Before Calling for Service If you cannot find a solution, turn off the air conditioner...


