

User Guide
Page 2
... hazards. As long as the main disconnection device. Do not Open the Display: There are no user serviceable components inside , even when the power is turned off. Use only a stand recommended by the supplier. Do not throw any way, please contact the manufacturer or the nearest authorized repair service provider for...and broken plugs. To Avoid Personal Injury : Do not place the display on or apply impact to the product. To Prevent Fire or Hazards: Always turn the display OFF if you use another power cord, make sure that the socket-outlet is used as this manual or listed on the product...
... hazards. As long as the main disconnection device. Do not Open the Display: There are no user serviceable components inside , even when the power is turned off. Use only a stand recommended by the supplier. Do not throw any way, please contact the manufacturer or the nearest authorized repair service provider for...and broken plugs. To Avoid Personal Injury : Do not place the display on or apply impact to the product. To Prevent Fire or Hazards: Always turn the display OFF if you use another power cord, make sure that the socket-outlet is used as this manual or listed on the product...

User Guide
Page 6
... the monitor with its front facing downward on the back of connection. Important This illustration depicts the general model of the stand base and turn the screw counterclockwise. Once assembled take the monitor up the monitor, ensure that the power to the monitor, the computer system, and other... attached devices is turned off. 1 way stand 1. When you desire to tighten. 3. The product may differ from the stand base, use a coin to turn the screw clockwise to disintegrate the monitor from the items shown in the picture....
... the monitor with its front facing downward on the back of connection. Important This illustration depicts the general model of the stand base and turn the screw counterclockwise. Once assembled take the monitor up the monitor, ensure that the power to the monitor, the computer system, and other... attached devices is turned off. 1 way stand 1. When you desire to tighten. 3. The product may differ from the stand base, use a coin to turn the screw clockwise to disintegrate the monitor from the items shown in the picture....
User Guide
Page 7
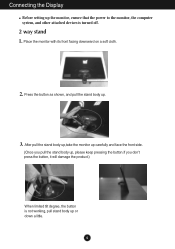
... body up, please keep pressing the button.If you don't press the button, it will damage the product.) When limited tilt degree, the button is turned off. 2 way stand 1. Press the button as shown, and pull the stand body up or down a little. 6 Connecting the Display Before setting up the monitor...
... body up, please keep pressing the button.If you don't press the button, it will damage the product.) When limited tilt degree, the button is turned off. 2 way stand 1. Press the button as shown, and pull the stand body up or down a little. 6 Connecting the Display Before setting up the monitor...

User Guide
Page 8
Important This illustration depicts the general model of the stand base and turn the screw clockwise to use the stand base,pull the stand body down. (Once you don't press the button, it will damage the product.) 5. Do ...
Important This illustration depicts the general model of the stand base and turn the screw clockwise to use the stand base,pull the stand body down. (Once you don't press the button, it will damage the product.) 5. Do ...

User Guide
Page 9
... and the stand body. When adjusting the angle of the screen, do not put your finger(s) in various ways for maximum comfort. ERGONOMIC It is turned off. Positioning your finger(s). You can hurt your display After installation, adjust the angle as shown below. * With stand base Adjust the position of the...
... and the stand body. When adjusting the angle of the screen, do not put your finger(s) in various ways for maximum comfort. ERGONOMIC It is turned off. Positioning your finger(s). You can hurt your display After installation, adjust the angle as shown below. * With stand base Adjust the position of the...

User Guide
Page 10
Connecting the Display Before setting up the monitor, ensure that the power to the monitor, the computer system, and other attached devices is recommended that in order to maintain an ergonomic and comfortable viewing position, the backward tilt angle of the monitor should exceed 10 degrees. 9 Positioning your display * Without stand base Ergonomic It is turned off.
Connecting the Display Before setting up the monitor, ensure that the power to the monitor, the computer system, and other attached devices is recommended that in order to maintain an ergonomic and comfortable viewing position, the backward tilt angle of the monitor should exceed 10 degrees. 9 Positioning your display * Without stand base Ergonomic It is turned off.

User Guide
Page 11
... for Macintosh Mac adapter : For Apple Macintosh use, a separate plug adapter is a simplified representation of the signal cable. Headphone/Earphone Input DVI-D (This feature is turned off. 2. This rear view represents a general model; A Connect DVI-D(Digital signal) Cable B Connect D-sub(Analog signal) Cable C Connect HDMI Cable AV equipment (Set-Top Box...
... for Macintosh Mac adapter : For Apple Macintosh use, a separate plug adapter is a simplified representation of the signal cable. Headphone/Earphone Input DVI-D (This feature is turned off. 2. This rear view represents a general model; A Connect DVI-D(Digital signal) Cable B Connect D-sub(Analog signal) Cable C Connect HDMI Cable AV equipment (Set-Top Box...

User Guide
Page 12
... as blurry screen, blurred letters, screen flicker or tilted screen while using the device or after changing screen resolution, press the AUTO function button to turn the power on. Press the power button on , the 'Self Image Setting Function' is executed automatically. (Only Analog Mode) Power Button NOTE ' Self Image Setting...
... as blurry screen, blurred letters, screen flicker or tilted screen while using the device or after changing screen resolution, press the AUTO function button to turn the power on. Press the power button on , the 'Self Image Setting Function' is executed automatically. (Only Analog Mode) Power Button NOTE ' Self Image Setting...

User Guide
Page 14
..., always press the AUTO button before entering the On Screen Display(OSD). (Only Analog Mode) This will automatically adjust your display image to turn the display on or off. When only one signal is connected, it is blinking purple. If the display is in Sleep Mode (Energy Saving... power indicator is automatically detected. The best display mode is lens for the current screen resolution size (display mode). Light Sensor This is E2250V/E2350V/E2750V : 1920 x 1080 INPUT Button (SOURCE Hot key) Use this button to the ideal settings for light sensor detect outside luminance, when ...
..., always press the AUTO button before entering the On Screen Display(OSD). (Only Analog Mode) This will automatically adjust your display image to turn the display on or off. When only one signal is connected, it is blinking purple. If the display is in Sleep Mode (Energy Saving... power indicator is automatically detected. The best display mode is lens for the current screen resolution size (display mode). Light Sensor This is E2250V/E2350V/E2750V : 1920 x 1080 INPUT Button (SOURCE Hot key) Use this button to the ideal settings for light sensor detect outside luminance, when ...

User Guide
Page 19
... To move image left and right. OVERSCAN To select the range of characters. The horizontal screen size will also change. This item allows you to turn on the screen background. To adjust the focus of headphone/ Earphone. (Only for HDMI input) Recommend overscan function to remove any vertical bars or stripes...
... To move image left and right. OVERSCAN To select the range of characters. The horizontal screen size will also change. This item allows you to turn on the screen background. To adjust the focus of headphone/ Earphone. (Only for HDMI input) Recommend overscan function to remove any vertical bars or stripes...
User Guide
Page 20
... the monitor to ON or OFF. Press the , buttons to video signal distortion. Use this function to set OFF, it will automatically be turned on the front side of the video card is different the required specifications, the color level may deteriorate due to reset immediately. This function will... be turned off . If you set OFF, it will be turned on the front side of the video card in the screen. Activate this function to set ON, it will be...
... the monitor to ON or OFF. Press the , buttons to video signal distortion. Use this function to set OFF, it will automatically be turned on the front side of the video card is different the required specifications, the color level may deteriorate due to reset immediately. This function will... be turned off . If you set OFF, it will be turned on the front side of the video card in the screen. Activate this function to set ON, it will be...

User Guide
Page 25
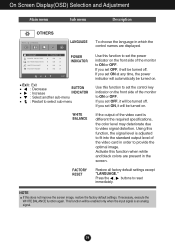
HDMI input Exit : Exit , : Move : Select another sub-menu 24 Select this when you want to use the product in the most general using environment. HDMI input D-SUB/DVI-D input Select this when you are watching a video or movie. On Screen Display(OSD) Selection and Adjustment Main menu Sub menu Description D-SUB/DVI-D input Select this when you want to use the original standard video. * In the General (Standard) mode, the is turned off.
HDMI input Exit : Exit , : Move : Select another sub-menu 24 Select this when you want to use the product in the most general using environment. HDMI input D-SUB/DVI-D input Select this when you are watching a video or movie. On Screen Display(OSD) Selection and Adjustment Main menu Sub menu Description D-SUB/DVI-D input Select this when you want to use the original standard video. * In the General (Standard) mode, the is turned off.

User Guide
Page 27
... not connected. See the 'Specifications' section of the display. G Do you see "OSD LOCKED" when you see a "OSD LOCKED" message on the PC. properly to turn on the screen? frequency range of this manual and configure your display is out of the • Check and see an "OUT OF • This...
... not connected. See the 'Specifications' section of the display. G Do you see "OSD LOCKED" when you see a "OSD LOCKED" message on the PC. properly to turn on the screen? frequency range of this manual and configure your display is out of the • Check and see an "OUT OF • This...


