
Owner's Manual
Page 1
LED LCD MONITOR MODEL E2290V www.lg.com ENGLISH OWNER'S MANUAL LED LCD MONITOR Please read this manual carefully before operating your set and retain it for future reference.
LED LCD MONITOR MODEL E2290V www.lg.com ENGLISH OWNER'S MANUAL LED LCD MONITOR Please read this manual carefully before operating your set and retain it for future reference.

Owner's Manual
Page 4
... because over-spraying may cause staining. They make an ideal container in which to clean the front frame; On Disposal (Only , Hg lamp used LCD Monitor) The fluorescent lamp used in its original material. When cleaning the product, unplug the power cord and scrub gently with a wet cloth or spray water...
... because over-spraying may cause staining. They make an ideal container in which to clean the front frame; On Disposal (Only , Hg lamp used LCD Monitor) The fluorescent lamp used in its original material. When cleaning the product, unplug the power cord and scrub gently with a wet cloth or spray water...

Owner's Manual
Page 5
Owner's Manual/Cards 15-pin D-Sub Signal Cable Power Cord (Depending on the country) AC-DC adapter DVI-D Signal Cable (This feature is not available in all countries.) NOTE This accessories may look different from those shown here. Please make sure the following items are missing, contact your monitor. User must use shielded signal interface cables (D-sub 15 pin cable, DVI-D cable) with your dealer. If any items are included with ferrite cores to maintain standard compliance for selecting LGE products !!! Thank you for the product. 4 Accessories !!!
Owner's Manual/Cards 15-pin D-Sub Signal Cable Power Cord (Depending on the country) AC-DC adapter DVI-D Signal Cable (This feature is not available in all countries.) NOTE This accessories may look different from those shown here. Please make sure the following items are missing, contact your monitor. User must use shielded signal interface cables (D-sub 15 pin cable, DVI-D cable) with your dealer. If any items are included with ferrite cores to maintain standard compliance for selecting LGE products !!! Thank you for the product. 4 Accessories !!!

Owner's Manual
Page 6
Connecting the Display Before setting up the monitor, ensure that in various ways for maximum comfort. Tilt Range : -5˚ to 15˚ -5 15 IMPORTANT It is turned off. Do not touch or press the screen when adjusting the angle of the panel in order to the monitor, the computer system, and other attached devices is recommended that the power to maintain an ergonomic and comfortable viewing position, the forward tilt angle of the monitor should not exceed 5 degrees. Positioning your display Adjust the position of the monitor. 5
Connecting the Display Before setting up the monitor, ensure that in various ways for maximum comfort. Tilt Range : -5˚ to 15˚ -5 15 IMPORTANT It is turned off. Do not touch or press the screen when adjusting the angle of the panel in order to the monitor, the computer system, and other attached devices is recommended that the power to maintain an ergonomic and comfortable viewing position, the forward tilt angle of the monitor should not exceed 5 degrees. Positioning your display Adjust the position of the monitor. 5
Owner's Manual
Page 7
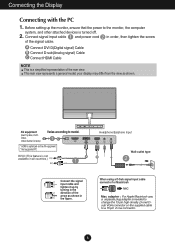
... 1 and power cord 2 in all countries.) Headphone/Earphone Input Wall-outlet type Connect the signal input cable and tighten it up the monitor, ensure that the power to the monitor, the computer system, and other attached devices is a simplified representation of the signal cable. When using a D-Sub signal input cable connector for...
... 1 and power cord 2 in all countries.) Headphone/Earphone Input Wall-outlet type Connect the signal input cable and tighten it up the monitor, ensure that the power to the monitor, the computer system, and other attached devices is a simplified representation of the signal cable. When using a D-Sub signal input cable connector for...
Owner's Manual
Page 8
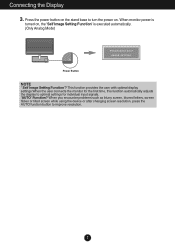
... to improve resolution. 7 Press the power button on the stand base to turn the power on , the 'Self Image Setting Function' is turned on . When monitor power is executed automatically. (Only Analog Mode) Power Button NOTE ' Self Image Setting Function'? This function provides the user with optimal display settings.When the...
... to improve resolution. 7 Press the power button on the stand base to turn the power on , the 'Self Image Setting Function' is turned on . When monitor power is executed automatically. (Only Analog Mode) Power Button NOTE ' Self Image Setting Function'? This function provides the user with optimal display settings.When the...
Owner's Manual
Page 13
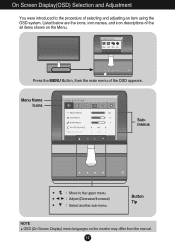
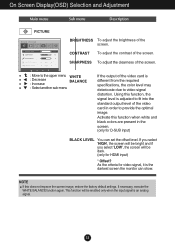
Listed below are the icons, icon names, and icon descriptions of the all items shown on the monitor may differ from the manual. 12 Press the MENU Button, then the main menu of selecting and adjusting an item using the OSD system. On Screen Display(OSD) Selection and Adjustment You were introduced to the upper menu Adjust (Decrease/Increase) Select another sub-menu Button Tip NOTE OSD (On Screen Display) menu languages on the Menu. Menu Name Icons Submenus Move to the procedure of the OSD appears.
Listed below are the icons, icon names, and icon descriptions of the all items shown on the monitor may differ from the manual. 12 Press the MENU Button, then the main menu of selecting and adjusting an item using the OSD system. On Screen Display(OSD) Selection and Adjustment You were introduced to the upper menu Adjust (Decrease/Increase) Select another sub-menu Button Tip NOTE OSD (On Screen Display) menu languages on the Menu. Menu Name Icons Submenus Move to the procedure of the OSD appears.
Owner's Manual
Page 14
...', the screen will be bright and if you select 'LOW', the screen will be dark. (only for video signal, it is the darkest screen the monitor can set the offset level. If necessary, execute the WHITE BALANCE function again. On Screen Display(OSD) Selection and Adjustment Main menu Sub menu Description...
...', the screen will be bright and if you select 'LOW', the screen will be dark. (only for video signal, it is the darkest screen the monitor can set the offset level. If necessary, execute the WHITE BALANCE function again. On Screen Display(OSD) Selection and Adjustment Main menu Sub menu Description...

Owner's Manual
Page 15
... standard color specification. • 6500K to 7500K: Slightly reddish white. • 8500K to adjust the screen color. BLUE Set your own gamma value. : 0 / 1 / 2 On the monitor, high gamma values display whitish images and low gamma values display blackish images. 14 GAMMA : Move to the upper menu : Decrease : Increase : Select another sub...
... standard color specification. • 6500K to 7500K: Slightly reddish white. • 8500K to adjust the screen color. BLUE Set your own gamma value. : 0 / 1 / 2 On the monitor, high gamma values display whitish images and low gamma values display blackish images. 14 GAMMA : Move to the upper menu : Decrease : Increase : Select another sub...

Owner's Manual
Page 20
.... If you set OFF, you set OFF, it will go off. If you enable the Response Time Control function and reduce the afterimage of the monitor to the upper menu : Decrease : Increase : Select another sub-menu SOUND POWER INDICATOR BUTTON INDICATOR FACTORY RESET To choose the language in below cases: &#...8226; DC power On/Off • AC power On • Monitor Setup OSD On/Off • Menu OSD On/Off Use this function to set ON, it will automatically be turned off the Buzzer sound. On...
.... If you set OFF, you set OFF, it will go off. If you enable the Response Time Control function and reduce the afterimage of the monitor to the upper menu : Decrease : Increase : Select another sub-menu SOUND POWER INDICATOR BUTTON INDICATOR FACTORY RESET To choose the language in below cases: &#...8226; DC power On/Off • AC power On • Monitor Setup OSD On/Off • Menu OSD On/Off Use this function to set ON, it will automatically be turned off the Buzzer sound. On...

Owner's Manual
Page 23
...) that comes with your display. G Have you installed the display driver? • Be sure to install the display driver from our web site: http://www.lg.com. • Make sure to fasten if necessary. • Make sure the video card is properly inserted in the slot. • Set the color setting... the signal cable is properly connected and use a screwdriver to check if the video card supports Plug&Play function. Settings. Or, you see an "Unrecognized monitor, Plug&Play (VESA DDC...
...) that comes with your display. G Have you installed the display driver? • Be sure to install the display driver from our web site: http://www.lg.com. • Make sure to fasten if necessary. • Make sure the video card is properly inserted in the slot. • Set the color setting... the signal cable is properly connected and use a screwdriver to check if the video card supports Plug&Play function. Settings. Or, you see an "Unrecognized monitor, Plug&Play (VESA DDC...

Specification
Page 1
...to even the most refined sense of dark images or dull colors? If you're looking for easy connections and organized wire management. LG's LED technology provides a slim profile and delivers amazing brightness, clarity and color detail, as well as greater energy efficiency compared to ... colors like never before. With almost double the pixel resolution, Full HD 1080p gives it superior picture quality over standard resolution. E2290V 22" Class 1080p LED LCD Monitor (21.5" measured diagonally) FEATURES • SUPER LED Backlighting • Super Slim Design • EZ Cabling • Full ...
...to even the most refined sense of dark images or dull colors? If you're looking for easy connections and organized wire management. LG's LED technology provides a slim profile and delivers amazing brightness, clarity and color detail, as well as greater energy efficiency compared to ... colors like never before. With almost double the pixel resolution, Full HD 1080p gives it superior picture quality over standard resolution. E2290V 22" Class 1080p LED LCD Monitor (21.5" measured diagonally) FEATURES • SUPER LED Backlighting • Super Slim Design • EZ Cabling • Full ...
Specification
Page 2
...-83kHz/56-75Hz DDC2B D-Sub 1 DVI-D 1 HDMI™ 1 Headphone 1 5º - 15º • TUV-Type Vista Premium • Adapter/100~240V 26W (Typical) E2290V 22" Class 1080p LED Monitor PANEL SPECIFICATIONS Screen Size Panel Type Aspect Ratio Resolution Brightness Contrast Ratio (DFC) Response Time Viewing Angle (CR>10) Display Colors Panel Surface...
...-83kHz/56-75Hz DDC2B D-Sub 1 DVI-D 1 HDMI™ 1 Headphone 1 5º - 15º • TUV-Type Vista Premium • Adapter/100~240V 26W (Typical) E2290V 22" Class 1080p LED Monitor PANEL SPECIFICATIONS Screen Size Panel Type Aspect Ratio Resolution Brightness Contrast Ratio (DFC) Response Time Viewing Angle (CR>10) Display Colors Panel Surface...


