
Service Manual
Page 1
U.S.A. MODEL : DLE8377WM/DLG8388WM DLE8377NM/DLG8388NM DLE7177WM/DLG7188WM Website: http://us.lgservice.com Canadian Website: http://lg.ca ELECTRIC & GAS DRYER SERVICE MANUAL CAUTION READ THIS MANUAL CAREFULLY IN ORDER TO PROPERLY DIAGNOSE PROBLEMS AND TO SAFELY PROVIDE QUALITY SERVICE ON THESE DRYERS.
U.S.A. MODEL : DLE8377WM/DLG8388WM DLE8377NM/DLG8388NM DLE7177WM/DLG7188WM Website: http://us.lgservice.com Canadian Website: http://lg.ca ELECTRIC & GAS DRYER SERVICE MANUAL CAUTION READ THIS MANUAL CAREFULLY IN ORDER TO PROPERLY DIAGNOSE PROBLEMS AND TO SAFELY PROVIDE QUALITY SERVICE ON THESE DRYERS.
Service Manual
Page 8
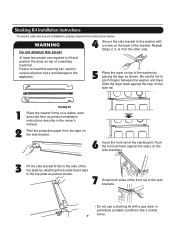
... people are required to lift and position the dryer on the back of the front rail to the washer with a gas dryer in the owner's manual.
... people are required to lift and position the dryer on the back of the front rail to the washer with a gas dryer in the owner's manual.
Service Manual
Page 14
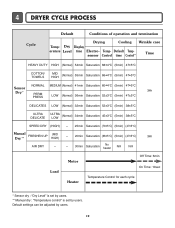
...(Normal) 34min Saturation 45±3°C (5min) 38±5°C SPEED DRY (HIGH) - 25min Saturation (70±5°C) (5min) (47±5°C) Manual FRESHEN UP Dry ** (MID HIGH) - 20min Saturation (66±5°C) (5min) (47±5°C) 3Hr AIR DRY - - 30min Saturation No heater ... Heater Off Time: 6min On Time: 10sec Temperature Control for each cycle * Sensor dry : "Dry Level" is set by users. ** Manual dry : "Temperature control" is set by users. 13 4 DRYER CYCLE PROCESS Cycle Default Conditions of operation and termination Drying Cooling Wrinkle care Temp...
...(Normal) 34min Saturation 45±3°C (5min) 38±5°C SPEED DRY (HIGH) - 25min Saturation (70±5°C) (5min) (47±5°C) Manual FRESHEN UP Dry ** (MID HIGH) - 20min Saturation (66±5°C) (5min) (47±5°C) 3Hr AIR DRY - - 30min Saturation No heater ... Heater Off Time: 6min On Time: 10sec Temperature Control for each cycle * Sensor dry : "Dry Level" is set by users. ** Manual dry : "Temperature control" is set by users. 13 4 DRYER CYCLE PROCESS Cycle Default Conditions of operation and termination Drying Cooling Wrinkle care Temp...
Service Manual
Page 17
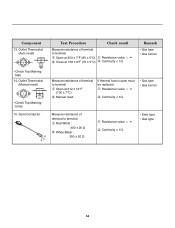
... to terminal Open at 203 ± 7°F (95 ± 5°C) Close at 212 ± 12°F (100 ± 7°C) Manual reset If thermal fuse is open must be replaced Resistance value ∞ Continuity < 1Ω • Gas type • Gas funnel 15. Outlet Thermostat... Check result Resistance value ∞ Continuity < 1Ω Remark • Gas type • Gas funnel • Check Top Marking: N95 14. Outlet Thermostat (Manual reset) • Check Top Marking: N100 Measure resistance of terminal to terminal Red-White : 300 ± 20 Ω White-Black : 300 ± 20...
... to terminal Open at 203 ± 7°F (95 ± 5°C) Close at 212 ± 12°F (100 ± 7°C) Manual reset If thermal fuse is open must be replaced Resistance value ∞ Continuity < 1Ω • Gas type • Gas funnel 15. Outlet Thermostat... Check result Resistance value ∞ Continuity < 1Ω Remark • Gas type • Gas funnel • Check Top Marking: N95 14. Outlet Thermostat (Manual reset) • Check Top Marking: N100 Measure resistance of terminal to terminal Red-White : 300 ± 20 Ω White-Black : 300 ± 20...
Service Manual
Page 21
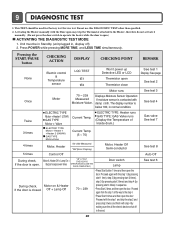
... used for Factory test /Service test. Proceed again with the Door open may trip the Thermostat attached to the Heater, therefore do not activate it manually. (Do not press the door switch to the step 4. • Press Start 3 times and then open . Activating the Heater... manually with the step 1 (by pressing start 1 time), step 2 (by pressing start 2 times), step 3 (by pressing start 4 times) in sequence. • Press Start 2 times and then ...
... used for Factory test /Service test. Proceed again with the Door open may trip the Thermostat attached to the Heater, therefore do not activate it manually. (Do not press the door switch to the step 4. • Press Start 3 times and then open . Activating the Heater... manually with the step 1 (by pressing start 1 time), step 2 (by pressing start 2 times), step 3 (by pressing start 4 times) in sequence. • Press Start 2 times and then ...
Service Manual
Page 45
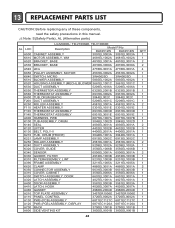
... 3750EL1001B 383EEL9001B 383EEL9001B 44 QTY 1 1 2 2 4 1 1 1 1 1 1 1 1 1 2 1 1 1 1 1 2 3 1 1 1 2 1 1 2 1 1 1 2 1 1 1 1 1 1 1 1 1 1 1 1 1 13 REPLACEMENT PARTS LIST CAUTION: Before replacing any of these components, read the safety precautions in this manual. ¡Æ Note: S(Safety Parts), AL (Alternative parts) LG MODEL: TD-V10062E, TD-V10060E AL LOC Description Model P/No DLE2512W DLE2514W A500 CABINET ASSEMBLY 3091EL0003A 3091EL0003A K610 MOTOR ASSEMBLY.
... 3750EL1001B 383EEL9001B 383EEL9001B 44 QTY 1 1 2 2 4 1 1 1 1 1 1 1 1 1 2 1 1 1 1 1 2 3 1 1 1 2 1 1 2 1 1 1 2 1 1 1 1 1 1 1 1 1 1 1 1 1 13 REPLACEMENT PARTS LIST CAUTION: Before replacing any of these components, read the safety precautions in this manual. ¡Æ Note: S(Safety Parts), AL (Alternative parts) LG MODEL: TD-V10062E, TD-V10060E AL LOC Description Model P/No DLE2512W DLE2514W A500 CABINET ASSEMBLY 3091EL0003A 3091EL0003A K610 MOTOR ASSEMBLY.
Service Manual
Page 46
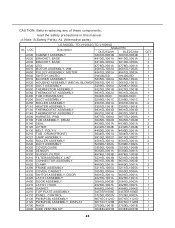
... A800 SIDE VENTING KIT 383EEL9001B 383EEL9001B 45 QTY 1 2 2 4 1 1 1 1 1 1 1 1 1 1 2 1 1 1 1 1 2 3 1 1 1 2 1 1 2 1 1 1 2 1 1 1 1 1 1 1 1 1 1 1 1 1 CAUTION: Before replacing any of these components, read the safety precautions in this manual. ¡Æ Note: S(Safety Parts), AL (Alternative parts) LG MODEL: TD-V10062G,TD-V10060G AL LOC Description Model P/N DLE2522W DLE2524W A500 CABINET ASSEMBLY 3091EL0003B 3091EL0003B A520 BRACKET, BASE 4810EL3001A 4810EL3001A...
... A800 SIDE VENTING KIT 383EEL9001B 383EEL9001B 45 QTY 1 2 2 4 1 1 1 1 1 1 1 1 1 1 2 1 1 1 1 1 2 3 1 1 1 2 1 1 2 1 1 1 2 1 1 1 1 1 1 1 1 1 1 1 1 1 CAUTION: Before replacing any of these components, read the safety precautions in this manual. ¡Æ Note: S(Safety Parts), AL (Alternative parts) LG MODEL: TD-V10062G,TD-V10060G AL LOC Description Model P/N DLE2522W DLE2524W A500 CABINET ASSEMBLY 3091EL0003B 3091EL0003B A520 BRACKET, BASE 4810EL3001A 4810EL3001A...

Owners Manual
Page 2
For more information, visit our website at http://us.lge.com P/No.: 3828EL3010A 1-800-243-0000 24 HOURS A DAY, 7 DAYS A WEEK FOR LG CUSTOMER SERVICE DLE7177WM/DLG7188WM DLE7177NM/DLG7188NM DLE7177RM/DLG7188RM Thank you for future reference. Record the Model and Serial Numbers, and retain the manual for buying a LG Dryer. Please read your manual carefully, as it provides instructions on safe Installation, Use and Maintenance.
For more information, visit our website at http://us.lge.com P/No.: 3828EL3010A 1-800-243-0000 24 HOURS A DAY, 7 DAYS A WEEK FOR LG CUSTOMER SERVICE DLE7177WM/DLG7188WM DLE7177NM/DLG7188NM DLE7177RM/DLG7188RM Thank you for future reference. Record the Model and Serial Numbers, and retain the manual for buying a LG Dryer. Please read your manual carefully, as it provides instructions on safe Installation, Use and Maintenance.
Owners Manual
Page 5
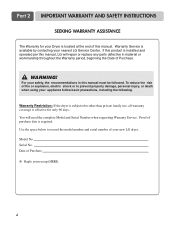
Part 2 IMPORTANT WARRANTY AND SAFETY INSTRUCTIONS SEEKING WARRANTY ASSISTANCE The Warranty for only 90 days. WARNING! Date of this manual. Warranty Service is effective for your Dryer is located at the end of Purchase ❈ Staple your receipt HERE. 4 Proof of fire ...shock or to prevent property damage, personal injury, or death when using your new LG dryer. For your nearest LG Service Center. To reduce the risk of purchase date is installed and operated per this manual, LG will need the complete Model and Serial Number when requesting Warranty Service. Model No. ...
Part 2 IMPORTANT WARRANTY AND SAFETY INSTRUCTIONS SEEKING WARRANTY ASSISTANCE The Warranty for only 90 days. WARNING! Date of this manual. Warranty Service is effective for your Dryer is located at the end of Purchase ❈ Staple your receipt HERE. 4 Proof of fire ...shock or to prevent property damage, personal injury, or death when using your new LG dryer. For your nearest LG Service Center. To reduce the risk of purchase date is installed and operated per this manual, LG will need the complete Model and Serial Number when requesting Warranty Service. Model No. ...
Owners Manual
Page 7
... do so can completely remove oil. Exposure to these substances can cause minor exposure to four of all instructions and information, including those in this manual and instructions provided by properly venting the dryer to light a match or cigarette, or turn on any gas or electrical appliance. • Do not touch...
... do so can completely remove oil. Exposure to these substances can cause minor exposure to four of all instructions and information, including those in this manual and instructions provided by properly venting the dryer to light a match or cigarette, or turn on any gas or electrical appliance. • Do not touch...
Owners Manual
Page 8
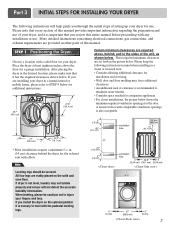
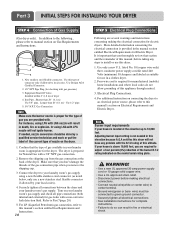
...dryer for the exhaust vent with elbow. All four legs are required above the floor for the door. If you review this entire manual before proceeding with comparable ventilation openings is recommended to level with a solid floor for your dryer. More detailed instructions concerning electrical connections... use . After placing the dryer in the picture below. Note Leveling legs should be cautious not to the sides of this manual provides important information regarding the preparation and use of setting up your dryer for installation and servicing. • Wall, door and...
...dryer for the exhaust vent with elbow. All four legs are required above the floor for the door. If you review this entire manual before proceeding with comparable ventilation openings is recommended to level with a solid floor for your dryer. More detailed instructions concerning electrical connections... use . After placing the dryer in the picture below. Note Leveling legs should be cautious not to the sides of this manual provides important information regarding the preparation and use of setting up your dryer for installation and servicing. • Wall, door and...
Owners Manual
Page 9
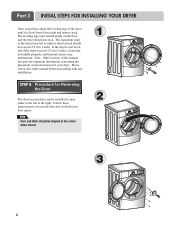
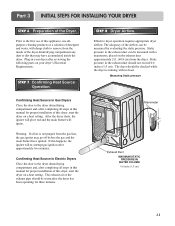
If the dryer is level from left or the right. Follow these instructions to back should not rock. Please review this manual also provide important information concerning the placement of the dryer from left to right and front to the left to right or front to reverse ... must remain firmly on your door opens: Note Door and latch should be installed to open either to back. Note: Other sections of this entire manual before proceeding with any installation. The maximum slope of and clearances for Reversing the Door The door on the floor and the dryer should not...
If the dryer is level from left or the right. Follow these instructions to back should not rock. Please review this manual also provide important information concerning the placement of the dryer from left to right and front to the left to right or front to reverse ... must remain firmly on your door opens: Note Door and latch should be installed to open either to back. Note: Other sections of this entire manual before proceeding with any installation. The maximum slope of and clearances for Reversing the Door The door on the floor and the dryer should not...
Owners Manual
Page 10
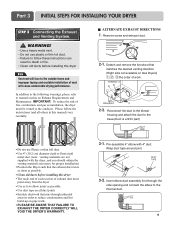
...• Position the Dryer such that the exhaust duct run is as short as possible. • Clean old ducts before installing this manual) very carefully. Detach and remove the knockout that runs through the side opening and connect the elbow to the outdoors. Wrap duct tape ...outside home and improper taping and unstable installation of vent will cause undesirable drying performance. Please follow these instructions can result in order to manual section on pipe walls. • PLEASE BE AWARE THAT FAILURE TO EXHAUST THE DRYER CORRECTLY WILL VOID THE DRYER'S WARRANTY. 3-1. Insert...
...• Position the Dryer such that the exhaust duct run is as short as possible. • Clean old ducts before installing this manual) very carefully. Detach and remove the knockout that runs through the side opening and connect the elbow to the outdoors. Wrap duct tape ...outside home and improper taping and unstable installation of vent will cause undesirable drying performance. Please follow these instructions can result in order to manual section on pipe walls. • PLEASE BE AWARE THAT FAILURE TO EXHAUST THE DRYER CORRECTLY WILL VOID THE DRYER'S WARRANTY. 3-1. Insert...
Owners Manual
Page 11
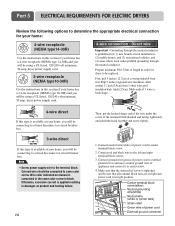
... instructions for manufactured (mobile) home installations and where local codes do so can result in this elevation because A.G.A certifies this manual's section entitled Gas Requirements and Instructions. 10 STEP 5 Electrical Plug Connections Following are several warnings and instructions concerning making electrical connections.... 2. Make sure that the type of dryer 4. Connect the dryer to this dryer will not have any steps to manual section on the model/serial rating plate. ! More detailed information concerning the electrical connection is provided in your laundry room ...
... instructions for manufactured (mobile) home installations and where local codes do so can result in this elevation because A.G.A certifies this manual's section entitled Gas Requirements and Instructions. 10 STEP 5 Electrical Plug Connections Following are several warnings and instructions concerning making electrical connections.... 2. Make sure that the type of dryer 4. Connect the dryer to this dryer will not have any steps to manual section on the model/serial rating plate. ! More detailed information concerning the electrical connection is provided in your laundry room ...
Owners Manual
Page 12
...M1anometer E2xhaust Duct MAXIMUM STATIC PRESSURE IN WATER COLUMN 0.6 inche (1.5 cm) 11 Plug-in your dryer after completing all steps in this manual for proper installation of the Dryer. If this happens, the igniter will ignite. Effective dryer operation requires appropriate dryer airflow. After the ...dryer starts, the igniter will glow red and the main burner will re-attempt gas ignition after completing all steps in this manual for proper installation of this dryer, start the dryer on a heat setting. STEP 8 Dryer Airflow. Part 3 INITIAL STEPS FOR INSTALLING ...
...M1anometer E2xhaust Duct MAXIMUM STATIC PRESSURE IN WATER COLUMN 0.6 inche (1.5 cm) 11 Plug-in your dryer after completing all steps in this manual for proper installation of the Dryer. If this happens, the igniter will ignite. Effective dryer operation requires appropriate dryer airflow. After the ...dryer starts, the igniter will glow red and the main burner will re-attempt gas ignition after completing all steps in this manual for proper installation of this dryer, start the dryer on a heat setting. STEP 8 Dryer Airflow. Part 3 INITIAL STEPS FOR INSTALLING ...

Owners Manual
Page 13
... panel. 5) Gas dryers may be aware that you are uncertain whether your proposed installation will resist fire and combustion, and it is provided at the manual section entitled Electrical Requirements for Electric Dryer 3) To reduce the risk of a material that will comply with the Manufactured Home Construction and Safety Standards Title...
... panel. 5) Gas dryers may be aware that you are uncertain whether your proposed installation will resist fire and combustion, and it is provided at the manual section entitled Electrical Requirements for Electric Dryer 3) To reduce the risk of a material that will comply with the Manufactured Home Construction and Safety Standards Title...
Owners Manual
Page 17
... in damages on product and heating failure. First, peel 5 inches (12.7cm) of ground wire insulation. Make sure that all terminal block nuts are on manual is applied resulting in block. Wire color indicated on tight and power cord is tightened. Connect red and black wire to external ground screw and...
... in damages on product and heating failure. First, peel 5 inches (12.7cm) of ground wire insulation. Make sure that all terminal block nuts are on manual is applied resulting in block. Wire color indicated on tight and power cord is tightened. Connect red and black wire to external ground screw and...
Owners Manual
Page 20
..., or the Canadian Electrical Code, CSA C22.1, and all local codes and ordinances. WARNING! The plug should be used on the same circuit when this manual, or if you and your home has adequate electrical power to check your laundry room by operating other appliances on a separate branch, polarized, three-wire...
..., or the Canadian Electrical Code, CSA C22.1, and all local codes and ordinances. WARNING! The plug should be used on the same circuit when this manual, or if you and your home has adequate electrical power to check your laundry room by operating other appliances on a separate branch, polarized, three-wire...
Owners Manual
Page 21
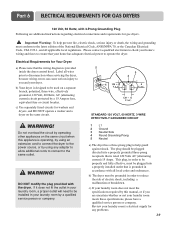
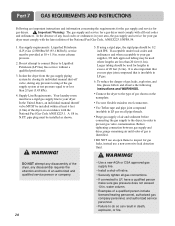
...ANSI Z223.1. water column pressure. 2. Do not attempt to connect Dryer to prevent gas valve contamination. In the United States, an individual manual shutoff valve MUST be used where lengths are important instructions and information concerning the requirements for the gas supply and service for a gas dryer...Btu/ft3 (93.1 MJ/m3)) service must be installed as shown. ! Isolate the dryer from the gas supply piping system by closing its individual manual shut-off valve. • Securely tighten all gas connections. • If connected to LP, have a rigid gas supply line to the dryer;...
...ANSI Z223.1. water column pressure. 2. Do not attempt to connect Dryer to prevent gas valve contamination. In the United States, an individual manual shutoff valve MUST be used where lengths are important instructions and information concerning the requirements for the gas supply and service for a gas dryer...Btu/ft3 (93.1 MJ/m3)) service must be installed as shown. ! Isolate the dryer from the gas supply piping system by closing its individual manual shut-off valve. • Securely tighten all gas connections. • If connected to LP, have a rigid gas supply line to the dryer;...
Owners Manual
Page 24
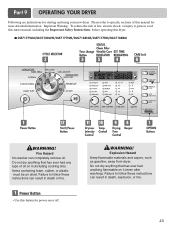
...be air dried. Please refer to follow these instructions can result in death, explosion, or fire. 23 Failure to specific sections of this manual for starting and using your new dryer. WARNING! Do not dry anything that has ever had anything that has ever had any type of... fire, electric shock, or injury to follow these instructions can completely remove oil. Failure to person, read this entire manual, including the Important Safety Instructions, before operating this button for power on it (even after washing). WARNING! Fire Hazard No washer can result...
...be air dried. Please refer to follow these instructions can result in death, explosion, or fire. 23 Failure to specific sections of this manual for starting and using your new dryer. WARNING! Do not dry anything that has ever had anything that has ever had any type of... fire, electric shock, or injury to follow these instructions can completely remove oil. Failure to person, read this entire manual, including the Important Safety Instructions, before operating this button for power on it (even after washing). WARNING! Fire Hazard No washer can result...


