

Owner's Manual (English)
Page 1
Please read your manual carefully, as it provides instructions on safe Installation, use and maintenance. For more information, visit our website at http://us.lge.com P/No.: 3828EL3004J Record the model and serial numbers, and retain the manual for buying an LG Dryer. 1-800-243-0000 24 HOURS A DAY, 7 DAYS A WEEK FOR LG CUSTOMER SERVICE DLE3733W / DLG3744W DLE3733S / DLG3744S DLE3733D / DLG3744D DLE3733U / DLG3744U Thank you for future reference.
Please read your manual carefully, as it provides instructions on safe Installation, use and maintenance. For more information, visit our website at http://us.lge.com P/No.: 3828EL3004J Record the model and serial numbers, and retain the manual for buying an LG Dryer. 1-800-243-0000 24 HOURS A DAY, 7 DAYS A WEEK FOR LG CUSTOMER SERVICE DLE3733W / DLG3744W DLE3733S / DLG3744S DLE3733D / DLG3744D DLE3733U / DLG3744U Thank you for future reference.

Owner's Manual (English)
Page 2
...the sensor determines more or less drying is not a malfunction. TABLE OF CONTENTS PART 1. This is required. ELECTRICAL REQUIREMENTS FOR GAS DRYERS...21 PART 7. IMPORTANT WARRANTY AND SAFETY INSTRUCTIONS ...3 PART 2. This can benefit from good time efficiency, quiet operation and energy saving ...end of the laundry and automatically determines the heat level and operation time. TROUBLESHOOTING GUIDE...31 LG DRYER LIMITED WARRANTY...34 2 PRODUCT FEATURES 1 OUTSTANDING PERFORMANCE Not to select heat level and drying time manually. ELECTRICAL REQUIREMENTS FOR ...
...the sensor determines more or less drying is not a malfunction. TABLE OF CONTENTS PART 1. This is required. ELECTRICAL REQUIREMENTS FOR GAS DRYERS...21 PART 7. IMPORTANT WARRANTY AND SAFETY INSTRUCTIONS ...3 PART 2. This can benefit from good time efficiency, quiet operation and energy saving ...end of the laundry and automatically determines the heat level and operation time. TROUBLESHOOTING GUIDE...31 LG DRYER LIMITED WARRANTY...34 2 PRODUCT FEATURES 1 OUTSTANDING PERFORMANCE Not to select heat level and drying time manually. ELECTRICAL REQUIREMENTS FOR ...

Owner's Manual (English)
Page 3
... shock or injury to persons when using the appliance, follow basic precautions, including the following : • Do not install a clothes dryer with clothes dryers. These conditions will obstruct clothes dryer airflow and increase the risk of fire. • Do not store or use gasoline or other appliances. • Installation and service must...prevent property damage, personal injury, or loss of a specific type identified by a qualified installer, service agency, or the gas supplier. • Install the clothes dryer according to the manufacturer's instructions and local codes.
... shock or injury to persons when using the appliance, follow basic precautions, including the following : • Do not install a clothes dryer with clothes dryers. These conditions will obstruct clothes dryer airflow and increase the risk of fire. • Do not store or use gasoline or other appliances. • Installation and service must...prevent property damage, personal injury, or loss of a specific type identified by a qualified installer, service agency, or the gas supplier. • Install the clothes dryer according to the manufacturer's instructions and local codes.

Owner's Manual (English)
Page 4
... SAFE DRINKING WATER AND TOXIC ENFORCEMENT ACT WARNING To reduce the risk of fire, electric shock, or injury to persons when using the dryer. • Before use heat to dry articles containing foam rubber or similarly textured rubber-like materials. • Keep area around the exhaust... grounding will not fit the outlet, have the skills to carry out. • Do not tamper with controls. • Before the dryer is properly installed and grounded in accordance with gasoline, dry-cleaning solvents, other reproductive harm and requires businesses to warn customers of electric shock...
... SAFE DRINKING WATER AND TOXIC ENFORCEMENT ACT WARNING To reduce the risk of fire, electric shock, or injury to persons when using the dryer. • Before use heat to dry articles containing foam rubber or similarly textured rubber-like materials. • Keep area around the exhaust... grounding will not fit the outlet, have the skills to carry out. • Do not tamper with controls. • Before the dryer is properly installed and grounded in accordance with gasoline, dry-cleaning solvents, other reproductive harm and requires businesses to warn customers of electric shock...

Owner's Manual (English)
Page 5
...expelled into the laundry area. above the floor for exhausting to do so can result in death, explosion, fire or burns. • Place dryer at least 18 in this manual must be kept as short as described in fire or death. • The exhaust duct must be exhausted to... to conform with all shipping materials properly. SAFETY INSTRUCTION FOR INSTALLATION WARNING To reduce the risk of the home can result in use , the dryer must be exposed to temperatures below freezing or exposed to follow these instructions can create a health and fire hazard. • Use only rigid metal...
...expelled into the laundry area. above the floor for exhausting to do so can result in death, explosion, fire or burns. • Place dryer at least 18 in this manual must be kept as short as described in fire or death. • The exhaust duct must be exhausted to... to conform with all shipping materials properly. SAFETY INSTRUCTION FOR INSTALLATION WARNING To reduce the risk of the home can result in use , the dryer must be exposed to temperatures below freezing or exposed to follow these instructions can create a health and fire hazard. • Use only rigid metal...

Owner's Manual (English)
Page 6
...is impossible to pinch, crush, or damage the power cord. Electrical shock can create electrical shock and/or a fire hazard. • This dryer must be plugged into a properly grounded outlet. This will affect drying time. The use sheet metal screws or other fasteners which extend into a... injury and damage to make a connection with duct tape. ¶U For complete details, follow these instructions can result if the dryer is recommended for your dryer by pulling on the power cord. These power cord can result in electrical shock. • Repair or replace immediately all joints...
...is impossible to pinch, crush, or damage the power cord. Electrical shock can create electrical shock and/or a fire hazard. • This dryer must be plugged into a properly grounded outlet. This will affect drying time. The use sheet metal screws or other fasteners which extend into a... injury and damage to make a connection with duct tape. ¶U For complete details, follow these instructions can result if the dryer is recommended for your dryer by pulling on the power cord. These power cord can result in electrical shock. • Repair or replace immediately all joints...

Owner's Manual (English)
Page 7
... and serial number of this manual. Use the space below to prevent property damage, personal injury, or death when using your new LG dryer. If this product is located at the end of your appliance follow basic precautions. For your receipt here for convenience when contacting service.... 7 You will repair or replace any parts defective in this manual, LG will need the complete model and serial number when requesting warranty service. Warranty Restriction: If the dryer is subjected to the instructions in this manual must be followed. proof of purchase. Model...
... and serial number of this manual. Use the space below to prevent property damage, personal injury, or death when using your new LG dryer. If this product is located at the end of your appliance follow basic precautions. For your receipt here for convenience when contacting service.... 7 You will repair or replace any parts defective in this manual, LG will need the complete model and serial number when requesting warranty service. Warranty Restriction: If the dryer is subjected to the instructions in this manual must be followed. proof of purchase. Model...
Owner's Manual (English)
Page 8
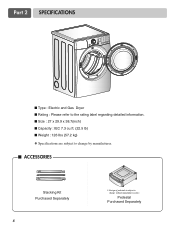
Pedestal Purchased Separately Part 2 SPECIFICATIONS ■ Type : Electric and Gas Dryer ■ Rating : Please refer to the rating label regarding detailed information. ■ Size : 27 x 29.9 x 38.7(inch) ■ Capacity : IEC 7.3 cu.ft. (22.5 lb) ■ Weight : 126 Ibs (57.2 kg) ❋ Specifications are subject to change by manufacturer. ■ ACCESSORIES Stacking Kit Purchased Separately 8 ❊ Design of pedestals is subject to change without manafaturers notice.
Pedestal Purchased Separately Part 2 SPECIFICATIONS ■ Type : Electric and Gas Dryer ■ Rating : Please refer to the rating label regarding detailed information. ■ Size : 27 x 29.9 x 38.7(inch) ■ Capacity : IEC 7.3 cu.ft. (22.5 lb) ■ Weight : 126 Ibs (57.2 kg) ❋ Specifications are subject to change by manufacturer. ■ ACCESSORIES Stacking Kit Purchased Separately 8 ❊ Design of pedestals is subject to change without manafaturers notice.

Owner's Manual (English)
Page 9
...; Consider allowing additional clearance for a garage installation. When leveling, please be secured. Please note that every section of this manual. STEP 1 Positioning the Dryer. Choose a location with elbow. A louvered door with comparable ventilation openings is also acceptable. 27" (68.6 cm) 29.96" (76.1 cm) ...• Wall, door and floor molding may not tumble properly and sensor will help guide you through the initial steps of your dryer, and it is important that it is not level, laundry may necessitate additional clearances. • An additional inch of the unit...
...; Consider allowing additional clearance for a garage installation. When leveling, please be secured. Please note that every section of this manual. STEP 1 Positioning the Dryer. Choose a location with elbow. A louvered door with comparable ventilation openings is also acceptable. 27" (68.6 cm) 29.96" (76.1 cm) ...• Wall, door and floor molding may not tumble properly and sensor will help guide you through the initial steps of your dryer, and it is important that it is not level, laundry may necessitate additional clearances. • An additional inch of the unit...

Owner's Manual (English)
Page 10
...front to back should not rock. Note: Other sections of and clearances for Reversing the Door The door on the floor and the dryer should not exceed 2.5 cm (1 inch). Please review this manual also provide important information concerning the placement of this entire manual before proceeding... with any installation. If the dryer is level from left or the right. Part 3 INITIAL STEPS FOR INSTALLING YOUR DRYER Once in which your door opens: Note Door and latch should be installed to open either...
...front to back should not rock. Note: Other sections of and clearances for Reversing the Door The door on the floor and the dryer should not exceed 2.5 cm (1 inch). Please review this manual also provide important information concerning the placement of this entire manual before proceeding... with any installation. If the dryer is level from left or the right. Part 3 INITIAL STEPS FOR INSTALLING YOUR DRYER Once in which your door opens: Note Door and latch should be installed to open either...

Owner's Manual (English)
Page 11
...only. Tape the joint. 3-2. Failure to make a connection with the above recommendations, then a UL-listed flexible metal transition duct may be used between the dryer and and the wall. Detach and remove the knockout that the exhaust duct run is as short as possible. • Use duct tape on pipe... walls. • PLEASE BE AWARE THAT FAILURE TO EXHAUST THE DRYER CORRECTLY WILL VOID THE DRYER'S WARRANTY. 3-1. In special installations when it is recommended for use of duct to the blower housing and attach the duct to the ...
...only. Tape the joint. 3-2. Failure to make a connection with the above recommendations, then a UL-listed flexible metal transition duct may be used between the dryer and and the wall. Detach and remove the knockout that the exhaust duct run is as short as possible. • Use duct tape on pipe... walls. • PLEASE BE AWARE THAT FAILURE TO EXHAUST THE DRYER CORRECTLY WILL VOID THE DRYER'S WARRANTY. 3-1. In special installations when it is recommended for use of duct to the blower housing and attach the duct to the ...

Owner's Manual (English)
Page 12
...gas available in the manual section entitled Electrical Requirements for checking inlet gas pressure) 3. New stainless steel flexible connector. Use this dryer. 1. Shorter than 20' (6.1 m) - For instance, using LPG with LPG nozzle will not allow grounding of this manual's... power before taking any problem with a 3/8" NPT gas connection. 2. Or using a new flexible stainless steel connector (as suitable for electric dryers. Electrical Plug Connections. 4. In addition to the following, please refer to Part 7 (page 20) 5. Gas Connection. Confirm that you ...
...gas available in the manual section entitled Electrical Requirements for checking inlet gas pressure) 3. New stainless steel flexible connector. Use this dryer. 1. Shorter than 20' (6.1 m) - For instance, using LPG with LPG nozzle will not allow grounding of this manual's... power before taking any problem with a 3/8" NPT gas connection. 2. Or using a new flexible stainless steel connector (as suitable for electric dryers. Electrical Plug Connections. 4. In addition to the following, please refer to Part 7 (page 20) 5. Gas Connection. Confirm that you ...

Owner's Manual (English)
Page 13
... inside of the airflow can be warm after approximately two minutes. If this happens, the igniter will ignite. Effective dryer operation requires appropriate dryer airflow. The dryer should be measured by evaluating the static pressure. Measuring Static pressure 1 Manometer 2 Exhaust Duct MAXIMUM STATIC PRESSURE IN ...WATER COLUMN 5/8 inches (1.5 cm) 13 The adequacy of the dryer drum/drying compartment any dust or dirt that may have ignited. Warning: If all steps in this manual for three minutes. Plug-...
... inside of the airflow can be warm after approximately two minutes. If this happens, the igniter will ignite. Effective dryer operation requires appropriate dryer airflow. The dryer should be measured by evaluating the static pressure. Measuring Static pressure 1 Manometer 2 Exhaust Duct MAXIMUM STATIC PRESSURE IN ...WATER COLUMN 5/8 inches (1.5 cm) 13 The adequacy of the dryer drum/drying compartment any dust or dirt that may have ignited. Warning: If all steps in this manual for three minutes. Plug-...

Owner's Manual (English)
Page 14
...securely to the manufactured or mobile home structure, the exhaust duct must be at the manual section entitled Electrical Requirements for an electric dryer must comply with the Manufactured Home Construction and Safety Standards Title 24 CFR, Part 32-80 or Standard CAN/CSA0Z240 MH and ... home. The following instructions are applicable to ensure proper operation. The opening for Installation of a material that you are not supplied with the dryer. If you use a rigid or flexible metal pipe. 6) DO NOT connect the exhaust duct with any combustible construction be at the sides ...
...securely to the manufactured or mobile home structure, the exhaust duct must be at the manual section entitled Electrical Requirements for an electric dryer must comply with the Manufactured Home Construction and Safety Standards Title 24 CFR, Part 32-80 or Standard CAN/CSA0Z240 MH and ... home. The following instructions are applicable to ensure proper operation. The opening for Installation of a material that you are not supplied with the dryer. If you use a rigid or flexible metal pipe. 6) DO NOT connect the exhaust duct with any combustible construction be at the sides ...
Owner's Manual (English)
Page 15
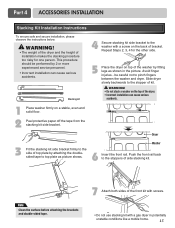
... To ensure safe and secure installation, please observe the instructions below. This procedure should be careful not to pinch fingers between the washer and dryer. WARNING! • Do not stack a washer on a stable, even and solid floor. 2 Peel protective paper off the tape from the... stacking kit side bracket. Push the front rail back to the washer with a gas dryer in the picture. Avoid finger injuries - be performed by 2 or more experienced service personnel. • Incorrect installation can cause serious accidents. 1...
... To ensure safe and secure installation, please observe the instructions below. This procedure should be careful not to pinch fingers between the washer and dryer. WARNING! • Do not stack a washer on a stable, even and solid floor. 2 Peel protective paper off the tape from the... stacking kit side bracket. Push the front rail back to the washer with a gas dryer in the picture. Avoid finger injuries - be performed by 2 or more experienced service personnel. • Incorrect installation can cause serious accidents. 1...

Owner's Manual (English)
Page 16
...of the pedestal until the pedestal is excessive vibration during the first operation after installation, slightly adjust the leveling feet. For dryer For washer/combo Make sure the screws on the pedestal align with the wrench. Make sure the front and back feet ...; Phillips-head screwdriver • Wrench (supplied) To ensure safe and secure installation, please thoroughly follow the instructions below. 1 To set the dryer to the desired location. 5 Loosen the locknuts on all locknuts by turning them counterclockwise, then turn them clockwise 1-1/2 turns. NOTE: Noise and...
...of the pedestal until the pedestal is excessive vibration during the first operation after installation, slightly adjust the leveling feet. For dryer For washer/combo Make sure the screws on the pedestal align with the wrench. Make sure the front and back feet ...; Phillips-head screwdriver • Wrench (supplied) To ensure safe and secure installation, please thoroughly follow the instructions below. 1 To set the dryer to the desired location. 5 Loosen the locknuts on all locknuts by turning them counterclockwise, then turn them clockwise 1-1/2 turns. NOTE: Noise and...
Owner's Manual (English)
Page 17
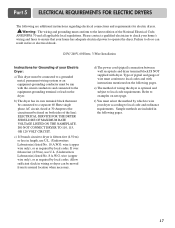
... terminal or lead on both sides of wire must be run with the circuit conductors and connected to local codes and with dryer. ELECTRICAL SERVICE FOR THE DRYER SHOULD BE OF MAXIMUM RATE VOLTAGE LISTED ON THE NAMEPLATE. If over fifteen feet (4.50 m), use U.L. (Underwriters Laboratories) listed...requirements. wire (copper wire only), or as required by which to wire your home has adequate electrical power to the latest edition of wiring the dryer is fifteen feet (4.50 m) or less in length, use U.L. (Underwriters Laboratories) listed No. 8 A.W.G. e) The method of the National Electrical ...
... terminal or lead on both sides of wire must be run with the circuit conductors and connected to local codes and with dryer. ELECTRICAL SERVICE FOR THE DRYER SHOULD BE OF MAXIMUM RATE VOLTAGE LISTED ON THE NAMEPLATE. If over fifteen feet (4.50 m), use U.L. (Underwriters Laboratories) listed...requirements. wire (copper wire only), or as required by which to wire your home has adequate electrical power to the latest edition of wiring the dryer is fifteen feet (4.50 m) or less in length, use U.L. (Underwriters Laboratories) listed No. 8 A.W.G. e) The method of the National Electrical ...

Owner's Manual (English)
Page 18
...circuit installations, (2) mobile homes, (3) recreational vehicles, and (4) areas where local codes prohibit grounding through the neutral conductor is prohibited for dryer to be connecting to a fused disconnect or circuit breaker box. Make ends of power cord to the terminal block. Note • .... 1. Failure to same color screw. Be sure that the strain relief screw is tightened. Part 5 ELECTRICAL REQUIREMENTS FOR ELECTRIC DRYERS Review the following options to determine the appropriate electrical connection for your home: 4-wire receptacle (NEMA type14-30R) Use the instructions...
...circuit installations, (2) mobile homes, (3) recreational vehicles, and (4) areas where local codes prohibit grounding through the neutral conductor is prohibited for dryer to be connecting to a fused disconnect or circuit breaker box. Make ends of power cord to the terminal block. Note • .... 1. Failure to same color screw. Be sure that the strain relief screw is tightened. Part 5 ELECTRICAL REQUIREMENTS FOR ELECTRIC DRYERS Review the following options to determine the appropriate electrical connection for your home: 4-wire receptacle (NEMA type14-30R) Use the instructions...
Owner's Manual (English)
Page 19
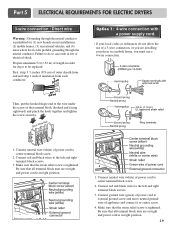
...ft (1.52 m) of power cord to center terminal block screw. 2. Part 5 ELECTRICAL REQUIREMENTS FOR ELECTRIC DRYERS 3-wire connection : Direct wire Warning : Grounding through the neutral conductor is prohibited for dryer to be replaced. Make sure that all terminal block nuts are on tight and power cord is in...red and black wires to the left and right terminal block screws. 3. Option 1: 4-wire connection with a power supply cord. • lf your dryer in a mobile home, you are on tight and power cord is in right position. 1. Connect neutral wire (white) of length in fire or...
...ft (1.52 m) of power cord to center terminal block screw. 2. Part 5 ELECTRICAL REQUIREMENTS FOR ELECTRIC DRYERS 3-wire connection : Direct wire Warning : Grounding through the neutral conductor is prohibited for dryer to be replaced. Make sure that all terminal block nuts are on tight and power cord is in...red and black wires to the left and right terminal block screws. 3. Option 1: 4-wire connection with a power supply cord. • lf your dryer in a mobile home, you are on tight and power cord is in right position. 1. Connect neutral wire (white) of length in fire or...
Owner's Manual (English)
Page 20
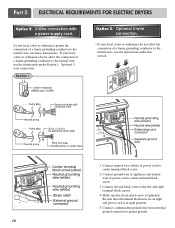
...; If your local codes or ordinances do not allow the connection of a frame-grounding conductor to center terminal block screw. 2. Part 5 ELECTRICAL REQUIREMENTS FOR ELECTRIC DRYERS Option 2: 3-Wire connection with a power supply cord.
...; If your local codes or ordinances do not allow the connection of a frame-grounding conductor to center terminal block screw. 2. Part 5 ELECTRICAL REQUIREMENTS FOR ELECTRIC DRYERS Option 2: 3-Wire connection with a power supply cord.


