
Owner's Manual (English)
Page 9
...to injure your fingers and toes. Part 3 INITIAL STEPS FOR INSTALLING YOUR DRYER The following instructions in mind when installing in the desired location, please make sure that you review this entire manual before proceeding with the pedestal leveling legs. After placing the... dryer in a closet or recessed area: • Consider allowing additional clearance for installation and servicing...
...to injure your fingers and toes. Part 3 INITIAL STEPS FOR INSTALLING YOUR DRYER The following instructions in mind when installing in the desired location, please make sure that you review this entire manual before proceeding with the pedestal leveling legs. After placing the... dryer in a closet or recessed area: • Consider allowing additional clearance for installation and servicing...

Owner's Manual (English)
Page 10
... Follow these instructions to the left or the right. The maximum slope of the dryer from left to right or front to back. If the dryer is level from left to right and front to back should not rock. Please review this manual also provide important information concerning the placement of the... dryer until it is not level, and if the slope exceeds 2.5 cm (1 inch), a load may not tumble properly and internal sensors may ...
... Follow these instructions to the left or the right. The maximum slope of the dryer from left to right or front to back. If the dryer is level from left to right and front to back should not rock. Please review this manual also provide important information concerning the placement of the... dryer until it is not level, and if the slope exceeds 2.5 cm (1 inch), a load may not tumble properly and internal sensors may ...

Owner's Manual (English)
Page 12
...the threads of the gas connection pipe when you thoroughly review that section and the remainder of the burner BTU rating indicated on Electrical Requirements and Electric Dryer. Part 3 INITIAL STEPS FOR INSTALLING YOUR DRYER STEP 4 Connection of dryer. 4. In addition to the following, please refer to...STEP 5 Electrical Plug Connections Following are required to manual section on your laundry room's gas supply and check all connections between the dryer and your laundry room is proper for Natural Gas with a 3/8" NPT gas connection. 2. New stainless steel flexible connector. Use ...
...the threads of the gas connection pipe when you thoroughly review that section and the remainder of the burner BTU rating indicated on Electrical Requirements and Electric Dryer. Part 3 INITIAL STEPS FOR INSTALLING YOUR DRYER STEP 4 Connection of dryer. 4. In addition to the following, please refer to...STEP 5 Electrical Plug Connections Following are required to manual section on your laundry room's gas supply and check all connections between the dryer and your laundry room is proper for Natural Gas with a 3/8" NPT gas connection. 2. New stainless steel flexible connector. Use ...

Owner's Manual (English)
Page 13
...main burner have accumulated inside of this dryer, start the dryer on your dryer after completing all air is running with no load. Prior to the dryer drum/drying compartment and, after reviewing the following parts on a heat setting. After the dryer starts, the igniter will glow red and... the main burner will re-attempt gas ignition after the dryer has been operating for proper installation of the dryer drum/drying compartment...
...main burner have accumulated inside of this dryer, start the dryer on your dryer after completing all air is running with no load. Prior to the dryer drum/drying compartment and, after reviewing the following parts on a heat setting. After the dryer starts, the igniter will glow red and... the main burner will re-attempt gas ignition after the dryer has been operating for proper installation of the dryer drum/drying compartment...

Owner's Manual (English)
Page 18
... wires to same color screw. Be sure that the strain relief screw is available at your home. Part 5 ELECTRICAL REQUIREMENTS FOR ELECTRIC DRYERS Review the following options to determine the appropriate electrical connection for your home: 4-wire receptacle (NEMA type14-30R) Use the instructions in this ...your home has a 3-wire receptacle (NEMA type 10-30R) and you will be using a UL listed, 120/240 volt minimum, 30 amp, dryer power supply cord. 4-wire connection : Direct wire Warning : Grounding through the neutral conductor. you will be replaced. Make sure that all terminal ...
... wires to same color screw. Be sure that the strain relief screw is available at your home. Part 5 ELECTRICAL REQUIREMENTS FOR ELECTRIC DRYERS Review the following options to determine the appropriate electrical connection for your home: 4-wire receptacle (NEMA type14-30R) Use the instructions in this ...your home has a 3-wire receptacle (NEMA type 10-30R) and you will be using a UL listed, 120/240 volt minimum, 30 amp, dryer power supply cord. 4-wire connection : Direct wire Warning : Grounding through the neutral conductor. you will be replaced. Make sure that all terminal ...

Owner's Manual (English)
Page 21
...to be grounded in order to the power source, or by operating other appliances on the same circuit. Label all applicable local regulations. Review your laundry room by this appliance is rated 120 Volts AC (alternating current) 15 Amps. STANDARD 120 VOLT, 60 HERTZ, 3-WIRE EFFECTIVELY...serious injury to do so can result in fire or electrical shock. 1 L1 2 Ground 3 Neutral Side 4 Round Grounding Prong 5 Neutral a) The dryer has a three-prong plug to the latest edition of electric shock, including a malfunction or breakdown. Warning: The wiring and grounding must be installed ...
...to be grounded in order to the power source, or by operating other appliances on the same circuit. Label all applicable local regulations. Review your laundry room by this appliance is rated 120 Volts AC (alternating current) 15 Amps. STANDARD 120 VOLT, 60 HERTZ, 3-WIRE EFFECTIVELY...serious injury to do so can result in fire or electrical shock. 1 L1 2 Ground 3 Neutral Side 4 Round Grounding Prong 5 Neutral a) The dryer has a three-prong plug to the latest edition of electric shock, including a malfunction or breakdown. Warning: The wiring and grounding must be installed ...
Owner's Manual (English)
Page 31
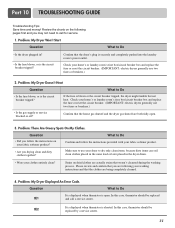
...the gas supply or service blocked or off? Problem: There Are Greasy Spots On My Clothes. Please review and confirm that you drying clean and dirty clothes together? In this case, thermistor should be replaced... by a service center. 31 Confirm that weren't cleansed during the washing process. Problem: My Dryer Doesn't Heat Question What to Do It is displayed when thermistor is the circuit breaker tripped? Question ... thermistor is blown or the circuit breaker tripped, the dryer might tumble but not heat. Review the charts on your clothes entirely clean?
...the gas supply or service blocked or off? Problem: There Are Greasy Spots On My Clothes. Please review and confirm that you drying clean and dirty clothes together? In this case, thermistor should be replaced... by a service center. 31 Confirm that weren't cleansed during the washing process. Problem: My Dryer Doesn't Heat Question What to Do It is displayed when thermistor is the circuit breaker tripped? Question ... thermistor is blown or the circuit breaker tripped, the dryer might tumble but not heat. Review the charts on your clothes entirely clean?
Owner's Manual (English)
Page 33
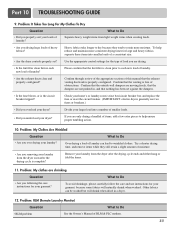
... for the type of load you drying large loads of moisture. • Are you are not pushed in a dryer. 12. Heavy fabrics take longer to Do • Are you overload your dryer? Confirm through review of the appropriate sections of RLM & PLC modem. 33 Divide your laundry from light weight items when creating...
... for the type of load you drying large loads of moisture. • Are you are not pushed in a dryer. 12. Heavy fabrics take longer to Do • Are you overload your dryer? Confirm through review of the appropriate sections of RLM & PLC modem. 33 Divide your laundry from light weight items when creating...
