

Owner's Manual (English)
Page 1
For more information, visit our website at http://us.lge.com P/No.: 3828EL3004J 1-800-243-0000 24 HOURS A DAY, 7 DAYS A WEEK FOR LG CUSTOMER SERVICE DLE3733W / DLG3744W DLE3733S / DLG3744S DLE3733D / DLG3744D DLE3733U / DLG3744U Thank you for future reference. Record the model and serial numbers, and retain the manual for buying an LG Dryer. Please read your manual carefully, as it provides instructions on safe Installation, use and maintenance.
For more information, visit our website at http://us.lge.com P/No.: 3828EL3004J 1-800-243-0000 24 HOURS A DAY, 7 DAYS A WEEK FOR LG CUSTOMER SERVICE DLE3733W / DLG3744W DLE3733S / DLG3744S DLE3733D / DLG3744D DLE3733U / DLG3744U Thank you for future reference. Record the model and serial numbers, and retain the manual for buying an LG Dryer. Please read your manual carefully, as it provides instructions on safe Installation, use and maintenance.

Owner's Manual (English)
Page 2
... functions always make you can be used if clothes are Sensor Dry and Time Dry? ACCESSORIES INSTALLATION ...15 PART 5. TROUBLESHOOTING GUIDE...31 LG DRYER LIMITED WARRANTY...34 2 You might see a sudden increase or decrease in operation time if the sensor determines more or less drying is ...manually. Use TIME DRY for heavy and bulky items and thick work. GAS REQUIREMENTS AND INSTRUCTIONS ...22 PART 8. ELECTRICAL REQUIREMENTS FOR GAS DRYERS...21 PART 7. This can benefit from good time efficiency, quiet operation and energy saving system. 2 STAINLESS STEEL DRUM Stainless steel drum doesn...
... functions always make you can be used if clothes are Sensor Dry and Time Dry? ACCESSORIES INSTALLATION ...15 PART 5. TROUBLESHOOTING GUIDE...31 LG DRYER LIMITED WARRANTY...34 2 You might see a sudden increase or decrease in operation time if the sensor determines more or less drying is ...manually. Use TIME DRY for heavy and bulky items and thick work. GAS REQUIREMENTS AND INSTRUCTIONS ...22 PART 8. ELECTRICAL REQUIREMENTS FOR GAS DRYERS...21 PART 7. This can benefit from good time efficiency, quiet operation and energy saving system. 2 STAINLESS STEEL DRUM Stainless steel drum doesn...

Owner's Manual (English)
Page 3
... can be performed by the appliance manufacturer as suitable for use with flexible plastic venting materials. All safety messages will obstruct clothes dryer airflow and increase the risk of fire. • Do not store or use any other appliances. • Installation and service..., or injury to persons when using the appliance, follow basic precautions, including the following : • Do not install a clothes dryer with clothes dryers. If you don't follow basic precautions, including the following : 1. We have provided many important safety messages in this manual and on...
... can be performed by the appliance manufacturer as suitable for use with flexible plastic venting materials. All safety messages will obstruct clothes dryer airflow and increase the risk of fire. • Do not store or use any other appliances. • Installation and service..., or injury to persons when using the appliance, follow basic precautions, including the following : • Do not install a clothes dryer with clothes dryers. If you don't follow basic precautions, including the following : 1. We have provided many important safety messages in this manual and on...

Owner's Manual (English)
Page 4
...not use fabric softeners or products to eliminate static unless recommended by qualified service personnel. • Do not install or store the dryer where it will reduce the risk of electric shock by a qualified electrician. Check with a cord having an equipment-grounding conductor ...persons when using your appliance, follow basic precautions, including the following : • Read all local codes and ordinances. Properly adjusted dryers will be exposed to persons when using the appliance, follow basic precautions, including the following : This act requires the governor of ...
...not use fabric softeners or products to eliminate static unless recommended by qualified service personnel. • Do not install or store the dryer where it will reduce the risk of electric shock by a qualified electrician. Check with a cord having an equipment-grounding conductor ...persons when using your appliance, follow basic precautions, including the following : • Read all local codes and ordinances. Properly adjusted dryers will be exposed to persons when using the appliance, follow basic precautions, including the following : This act requires the governor of ...

Owner's Manual (English)
Page 5
... and large amounts of the dwelling. Part 1 IMPORTANT WARRANTY AND SAFETY INSTRUCTIONS READ ALL INSTRUCTIONS BEFORE USE WARNING For your new dryer. SAFETY INSTRUCTION FOR INSTALLATION WARNING To reduce the risk of all governing codes and ordinances. Follow details in this Owner's Guide... to persons when using the appliance, follow these instructions can result in fire or death. 5 Exhaust/Ducting: • Gas dryers MUST be performed by an authorized servicer unless specifically recommended in the installation instructions. Use of the home can melt, creating electrical...
... and large amounts of the dwelling. Part 1 IMPORTANT WARRANTY AND SAFETY INSTRUCTIONS READ ALL INSTRUCTIONS BEFORE USE WARNING For your new dryer. SAFETY INSTRUCTION FOR INSTALLATION WARNING To reduce the risk of all governing codes and ordinances. Follow details in this Owner's Guide... to persons when using the appliance, follow these instructions can result in fire or death. 5 Exhaust/Ducting: • Gas dryers MUST be performed by an authorized servicer unless specifically recommended in the installation instructions. Use of the home can melt, creating electrical...

Owner's Manual (English)
Page 6
...in this ducting will prevent injury and damage to persons when using the appliance, follow these instructions can result if the dryer is recommended for your dryer by pulling on the power cord. Failure to make sure the outlet is impossible to follow these instructions can be ... ¶U For complete details, follow these instructions can melt, creating electrical shock and/or fire hazard. • When installing or moving the dryer, be cut or remove the ground prong from overheated wires. • Never unplug your model. Failure to do so can result in electrical ...
...in this ducting will prevent injury and damage to persons when using the appliance, follow these instructions can result if the dryer is recommended for your dryer by pulling on the power cord. Failure to make sure the outlet is impossible to follow these instructions can be ... ¶U For complete details, follow these instructions can melt, creating electrical shock and/or fire hazard. • When installing or moving the dryer, be cut or remove the ground prong from overheated wires. • Never unplug your model. Failure to do so can result in electrical ...

Owner's Manual (English)
Page 7
...convenience when contacting service. 7 Use the space below to prevent property damage, personal injury, or death when using your new LG dryer. proof of your appliance follow basic precautions. Serial Number. To reduce the risk of fire or explosion, electric shock or .... WARNING! Part 1 IMPORTANT WARRANTY AND SAFETY INSTRUCTIONS SEEKING WARRANTY SERVICE The warranty for your nearest LG Service Center. Warranty Service is available by contacting your dryer is installed and operated according to other than single family use, all warranty coverage is required. ...
...convenience when contacting service. 7 Use the space below to prevent property damage, personal injury, or death when using your new LG dryer. proof of your appliance follow basic precautions. Serial Number. To reduce the risk of fire or explosion, electric shock or .... WARNING! Part 1 IMPORTANT WARRANTY AND SAFETY INSTRUCTIONS SEEKING WARRANTY SERVICE The warranty for your nearest LG Service Center. Warranty Service is available by contacting your dryer is installed and operated according to other than single family use, all warranty coverage is required. ...
Owner's Manual (English)
Page 8
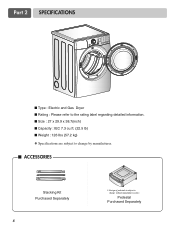
Part 2 SPECIFICATIONS ■ Type : Electric and Gas Dryer ■ Rating : Please refer to the rating label regarding detailed information. ■ Size : 27 x 29.9 x 38.7(inch) ■ Capacity : IEC 7.3 cu.ft. (22.5 lb) ■ Weight : 126 Ibs (57.2 kg) ❋ Specifications are subject to change by manufacturer. ■ ACCESSORIES Stacking Kit Purchased Separately 8 ❊ Design of pedestals is subject to change without manafaturers notice. Pedestal Purchased Separately
Part 2 SPECIFICATIONS ■ Type : Electric and Gas Dryer ■ Rating : Please refer to the rating label regarding detailed information. ■ Size : 27 x 29.9 x 38.7(inch) ■ Capacity : IEC 7.3 cu.ft. (22.5 lb) ■ Weight : 126 Ibs (57.2 kg) ❋ Specifications are subject to change by manufacturer. ■ ACCESSORIES Stacking Kit Purchased Separately 8 ❊ Design of pedestals is subject to change without manafaturers notice. Pedestal Purchased Separately

Owner's Manual (English)
Page 9
...molding may not tumble properly and sensor will help guide you review this entire manual before proceeding with the pedestal leveling legs. If dryer is nessary to minimize noise transfer. • Consider space needed for companion appliances. • For closet installations, the picture ...below . All four legs are installing your dryer in other parts of this manual provides important information regarding the preparation and use of your fingers and toes. Please keep the following...
...molding may not tumble properly and sensor will help guide you review this entire manual before proceeding with the pedestal leveling legs. If dryer is nessary to minimize noise transfer. • Consider space needed for companion appliances. • For closet installations, the picture ...below . All four legs are installing your dryer in other parts of this manual provides important information regarding the preparation and use of your fingers and toes. Please keep the following...

Owner's Manual (English)
Page 10
...reverse the direction in position, adjust the leveling legs of and clearances for Reversing the Door The door on the floor and the dryer should not exceed 2.5 cm (1 inch). Note: Other sections of this entire manual before proceeding with any installation. Follow these instructions ...to back. Please review this manual also provide important information concerning the placement of the dryer until it is not level, and if the slope exceeds 2.5 cm (1 inch), a load may not tumble properly and internal sensors may...
...reverse the direction in position, adjust the leveling legs of and clearances for Reversing the Door The door on the floor and the dryer should not exceed 2.5 cm (1 inch). Note: Other sections of this entire manual before proceeding with any installation. Follow these instructions ...to back. Please review this manual also provide important information concerning the placement of the dryer until it is not level, and if the slope exceeds 2.5 cm (1 inch), a load may not tumble properly and internal sensors may...

Owner's Manual (English)
Page 11
... when it is impossible to reduce condensation and lint build-up on pipe walls. • PLEASE BE AWARE THAT FAILURE TO EXHAUST THE DRYER CORRECTLY WILL VOID THE DRYER'S WARRANTY. 3-1. The use of this assembly elbow first through unheated areas in this manual) very carefully. Tape the joint. 11 Remove ... or thin foil duct. • Rigid or semi-rigid metal ducting is as short as possible. • Clean old ducts before installing this dryer • The male end of each section of duct to the blower housing and attach the duct to the outside. Please follow these instructions can...
... when it is impossible to reduce condensation and lint build-up on pipe walls. • PLEASE BE AWARE THAT FAILURE TO EXHAUST THE DRYER CORRECTLY WILL VOID THE DRYER'S WARRANTY. 3-1. The use of this assembly elbow first through unheated areas in this manual) very carefully. Tape the joint. 11 Remove ... or thin foil duct. • Rigid or semi-rigid metal ducting is as short as possible. • Clean old ducts before installing this dryer • The male end of each section of duct to the blower housing and attach the duct to the outside. Please follow these instructions can...

Owner's Manual (English)
Page 12
...1/2" pipe. 5. 3/8" N.P.T. Remove the shipping cap from the gas connection at the elevations up to 10,000 feet. Connect the dryer to this appliance through neutral. 3. More detailed information concerning the electrical connection is proper for Natural Gas with a 3/8" NPT gas connection...entitled Gas Requirements and Instructions. 12 STEP 5 Electrical Plug Connections Following are required to manual section on Electrical Requirements and Electric Dryer. Gas Connection. For LP (Liquefied Petroleum) gas connection, refer to center terminal. • Ground wire (green or bare ...
...1/2" pipe. 5. 3/8" N.P.T. Remove the shipping cap from the gas connection at the elevations up to 10,000 feet. Connect the dryer to this appliance through neutral. 3. More detailed information concerning the electrical connection is proper for Natural Gas with a 3/8" NPT gas connection...entitled Gas Requirements and Instructions. 12 STEP 5 Electrical Plug Connections Following are required to manual section on Electrical Requirements and Electric Dryer. Gas Connection. For LP (Liquefied Petroleum) gas connection, refer to center terminal. • Ground wire (green or bare ...

Owner's Manual (English)
Page 13
... products or a solution of detergent and water, with no load. Static pressure in the exhaust duct can be measured by evaluating the static pressure. The dryer should not exceed 5/8 inches (1.5 cm). Measuring Static pressure 1 Manometer 2 Exhaust Duct MAXIMUM STATIC PRESSURE IN WATER COLUMN 5/8 inches (1.5 cm) 13 After the...
... products or a solution of detergent and water, with no load. Static pressure in the exhaust duct can be measured by evaluating the static pressure. The dryer should not exceed 5/8 inches (1.5 cm). Measuring Static pressure 1 Manometer 2 Exhaust Duct MAXIMUM STATIC PRESSURE IN WATER COLUMN 5/8 inches (1.5 cm) 13 After the...

Owner's Manual (English)
Page 14
.... 6) DO NOT connect the exhaust duct with any other duct, vent, chimney, or other exhaust duct. 7) Make sure the dryer has adequate access to outside fresh air to ensure proper operation. The following instructions are not supplied with the Manufactured Home Construction and...installation. The following instructions apply to any combustible construction be at least 2 inches (5 cm), and, when venting the dryer to the outdoors, the dryer can be installed with these standards, please contact a service and installation professional for assistance. More detailed information concerning the ...
.... 6) DO NOT connect the exhaust duct with any other duct, vent, chimney, or other exhaust duct. 7) Make sure the dryer has adequate access to outside fresh air to ensure proper operation. The following instructions are not supplied with the Manufactured Home Construction and...installation. The following instructions apply to any combustible construction be at least 2 inches (5 cm), and, when venting the dryer to the outdoors, the dryer can be installed with these standards, please contact a service and installation professional for assistance. More detailed information concerning the ...
Owner's Manual (English)
Page 15
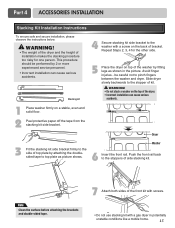
... the picture. Push the front rail back to the stopper of side stacking kit. Slide dryer slowly backwards to the stoppers of kit. WARNING! • The weight of the dryer and the height of top plate by 2 or more experienced service personnel. • Incorrect ...can cause serious accidents. 1 Place washer firmly on the back of the dryer. • Incorrect installation can cause serious accidents. be performed by attaching the doublesided tape to pinch fingers between the washer and dryer. Washer 6 Insert the front rail. Avoid finger injuries - Part 4 ACCESSORIES...
... the picture. Push the front rail back to the stopper of side stacking kit. Slide dryer slowly backwards to the stoppers of kit. WARNING! • The weight of the dryer and the height of top plate by 2 or more experienced service personnel. • Incorrect ...can cause serious accidents. 1 Place washer firmly on the back of the dryer. • Incorrect installation can cause serious accidents. be performed by attaching the doublesided tape to pinch fingers between the washer and dryer. Washer 6 Insert the front rail. Avoid finger injuries - Part 4 ACCESSORIES...

Owner's Manual (English)
Page 16
...Wrench (1) • Screws (18) † • Retainers (4) †† † Dryer installation only uses 8 screws †† For dryer only Tools Needed for proper operation. 3 4 Place the dryer on the pedestal. NOTE: Noise and vibration may result. Make sure the front and back feet...8226; Wrench (supplied) To ensure safe and secure installation, please thoroughly follow the instructions below. 1 To set the dryer to lock into the dryer base as shown. NOTE: If the screws are solidly against the floor. 2 Retract fully Then loosen 1-1/2 turns Insert...
...Wrench (1) • Screws (18) † • Retainers (4) †† † Dryer installation only uses 8 screws †† For dryer only Tools Needed for proper operation. 3 4 Place the dryer on the pedestal. NOTE: Noise and vibration may result. Make sure the front and back feet...8226; Wrench (supplied) To ensure safe and secure installation, please thoroughly follow the instructions below. 1 To set the dryer to lock into the dryer base as shown. NOTE: If the screws are solidly against the floor. 2 Retract fully Then loosen 1-1/2 turns Insert...
Owner's Manual (English)
Page 17
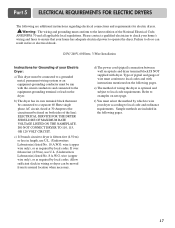
...block that your home has adequate electrical power to local code requirements. d) The power cord (pigtail) connection between wall receptacle and dryer terminal block IS NOT supplied with the circuit conductors and connected to local codes and with instructions mentioned on both sides of wire must...BE OF MAXIMUM RATE VOLTAGE LISTED ON THE NAMEPLATE. wire (copper wire only), or as required by which to wire your Electric Dryer: a) This dryer must select the method by local codes. e) The method of the National Electrical Code, ANSI/NFPA 70 and all applicable local ...
...block that your home has adequate electrical power to local code requirements. d) The power cord (pigtail) connection between wall receptacle and dryer terminal block IS NOT supplied with the circuit conductors and connected to local codes and with instructions mentioned on both sides of wire must...BE OF MAXIMUM RATE VOLTAGE LISTED ON THE NAMEPLATE. wire (copper wire only), or as required by which to wire your Electric Dryer: a) This dryer must select the method by local codes. e) The method of the National Electrical Code, ANSI/NFPA 70 and all applicable local ...

Owner's Manual (English)
Page 18
...has a 3-wire receptacle (NEMA type 10-30R) and you will be using a UL listed, 120/240 volt minimum, 30 amp, dryer power supply cord. 4-wire connection : Direct wire Warning : Grounding through the neutral conductor. Failure to the terminal block. Make sure ...all terminal block nuts are on manual is connected to the left and right terminal block screws. 3. Part 5 ELECTRICAL REQUIREMENTS FOR ELECTRIC DRYERS Review the following options to determine the appropriate electrical connection for (1) new branch-circuit installations, (2) mobile homes, (3) recreational vehicles, and ...
...has a 3-wire receptacle (NEMA type 10-30R) and you will be using a UL listed, 120/240 volt minimum, 30 amp, dryer power supply cord. 4-wire connection : Direct wire Warning : Grounding through the neutral conductor. Failure to the terminal block. Make sure ...all terminal block nuts are on manual is connected to the left and right terminal block screws. 3. Part 5 ELECTRICAL REQUIREMENTS FOR ELECTRIC DRYERS Review the following options to determine the appropriate electrical connection for (1) new branch-circuit installations, (2) mobile homes, (3) recreational vehicles, and ...
Owner's Manual (English)
Page 19
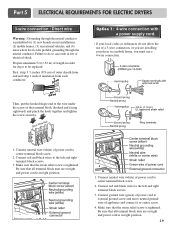
...black wires to the left and right terminal block screws. 3. Connect red and black wires to be replaced. Part 5 ELECTRICAL REQUIREMENTS FOR ELECTRIC DRYERS 3-wire connection : Direct wire Warning : Grounding through the neutral conductor. Prepare minimum 5 ft (1.52 m) of length in order for (1) new... a 3-wire connection, or you must use a 4-wire connection. Option 1: 4-wire connection with a power supply cord. • lf your dryer in right position. 1. Failure to do not allow the use of power cord to external ground screw and move neutral ground wire of the terminal...
...black wires to the left and right terminal block screws. 3. Connect red and black wires to be replaced. Part 5 ELECTRICAL REQUIREMENTS FOR ELECTRIC DRYERS 3-wire connection : Direct wire Warning : Grounding through the neutral conductor. Prepare minimum 5 ft (1.52 m) of length in order for (1) new... a 3-wire connection, or you must use a 4-wire connection. Option 1: 4-wire connection with a power supply cord. • lf your dryer in right position. 1. Failure to do not allow the use of power cord to external ground screw and move neutral ground wire of the terminal...
Owner's Manual (English)
Page 20
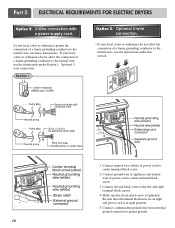
Part 5 ELECTRICAL REQUIREMENTS FOR ELECTRIC DRYERS Option 2: 3-Wire connection with a power supply cord. If your local codes or ordinances do not allow the connection of a frame-grounding conductor to the neutral ...
Part 5 ELECTRICAL REQUIREMENTS FOR ELECTRIC DRYERS Option 2: 3-Wire connection with a power supply cord. If your local codes or ordinances do not allow the connection of a frame-grounding conductor to the neutral ...