
Owner's Manual (English)
Page 1
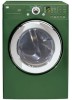
For more information, visit our website at http://us.lge.com P/No.: 3828EL3004J 1-800-243-0000 24 HOURS A DAY, 7 DAYS A WEEK FOR LG CUSTOMER SERVICE DLE3733W / DLG3744W DLE3733S / DLG3744S DLE3733D / DLG3744D DLE3733U / DLG3744U Thank you for future reference. Please read your manual carefully, as it provides instructions on safe Installation, use and maintenance. Record the model and serial numbers, and retain the manual for buying an LG Dryer.
For more information, visit our website at http://us.lge.com P/No.: 3828EL3004J 1-800-243-0000 24 HOURS A DAY, 7 DAYS A WEEK FOR LG CUSTOMER SERVICE DLE3733W / DLG3744W DLE3733S / DLG3744S DLE3733D / DLG3744D DLE3733U / DLG3744U Thank you for future reference. Please read your manual carefully, as it provides instructions on safe Installation, use and maintenance. Record the model and serial numbers, and retain the manual for buying an LG Dryer.

Owner's Manual (English)
Page 2
...REQUIREMENTS AND MAINTENANCE ...23 PART 9. INITIAL STEPS FOR INSTALLING YOUR DRYER ...9 PART 4. ELECTRICAL REQUIREMENTS FOR GAS DRYERS...21 PART 7. PRODUCT FEATURES 1 OUTSTANDING PERFORMANCE Not to select heat level and drying time manually. This can benefit from good time efficiency, quiet operation and ...heat level and operation time. IMPORTANT WARRANTY AND SAFETY INSTRUCTIONS ...3 PART 2. ELECTRICAL REQUIREMENTS FOR ELECTRIC DRYERS ...17 PART 6. TROUBLESHOOTING GUIDE...31 LG DRYER LIMITED WARRANTY...34 2 You might see a sudden increase or decrease in operation time if the ...
...REQUIREMENTS AND MAINTENANCE ...23 PART 9. INITIAL STEPS FOR INSTALLING YOUR DRYER ...9 PART 4. ELECTRICAL REQUIREMENTS FOR GAS DRYERS...21 PART 7. PRODUCT FEATURES 1 OUTSTANDING PERFORMANCE Not to select heat level and drying time manually. This can benefit from good time efficiency, quiet operation and ...heat level and operation time. IMPORTANT WARRANTY AND SAFETY INSTRUCTIONS ...3 PART 2. ELECTRICAL REQUIREMENTS FOR ELECTRIC DRYERS ...17 PART 6. TROUBLESHOOTING GUIDE...31 LG DRYER LIMITED WARRANTY...34 2 You might see a sudden increase or decrease in operation time if the ...

Owner's Manual (English)
Page 3
... injury to persons when using the appliance, follow basic precautions, including the following : • Do not install a clothes dryer with clothes dryers. Follow the gas supplier's instructions carefully. 5. All safety messages will tell you don't follow instructions. BASIC SAFETY PRECAUTIONS WARNING... To reduce the risk of fire, electric shock or injury to persons when using your safety, the information in this manual ...
... injury to persons when using the appliance, follow basic precautions, including the following : • Do not install a clothes dryer with clothes dryers. Follow the gas supplier's instructions carefully. 5. All safety messages will tell you don't follow instructions. BASIC SAFETY PRECAUTIONS WARNING... To reduce the risk of fire, electric shock or injury to persons when using your safety, the information in this manual ...

Owner's Manual (English)
Page 4
... can cause minor exposure to four of these substances can result in a risk of the dryer or attempt any servicing unless specifically recommended in this manual. • Do not place items exposed to cooking oils in your dryer. Items contaminated with cooking oils may contribute to a chemical reaction that you understand and have...
... can cause minor exposure to four of these substances can result in a risk of the dryer or attempt any servicing unless specifically recommended in this manual. • Do not place items exposed to cooking oils in your dryer. Items contaminated with cooking oils may contribute to a chemical reaction that you understand and have...

Owner's Manual (English)
Page 5
... to prevent back draft when the dryer is not provided with the dryer, and you should have hinged dampers to follow this manual. Failure to follow these instructions can result if the dryer is not properly grounded. • Install and store the dryer where it collapses or becomes otherwise restricted..., or loss of fire or explosion, electric shock, or to follow this manual must be properly installed as possible. Failure to do so can result in death, explosion, fire or burns. • Place dryer at least 18 in this warning can result in death, explosion, fire or...
... to prevent back draft when the dryer is not provided with the dryer, and you should have hinged dampers to follow this manual. Failure to follow these instructions can result if the dryer is not properly grounded. • Install and store the dryer where it collapses or becomes otherwise restricted..., or loss of fire or explosion, electric shock, or to follow this manual must be properly installed as possible. Failure to do so can result in death, explosion, fire or burns. • Place dryer at least 18 in this warning can result in death, explosion, fire or...

Owner's Manual (English)
Page 6
...do so can melt, creating electrical shock and/or fire hazard. • When installing or moving the dryer, be careful not to the installation instructions in this manual for specific electrical requirements for use of this ducting will affect drying time. This provides the best performance and... INSTRUCTIONS READ ALL INSTRUCTIONS BEFORE USE WARNING For your safety, the information in this manual must be followed to minimize the risk of fire or explosion, electric shock, or to the dryer from fire and electrical shock. 6 SAFETY INSTRUCTION FOR CONNECTING ELECTRICITY WARNING To reduce ...
...do so can melt, creating electrical shock and/or fire hazard. • When installing or moving the dryer, be careful not to the installation instructions in this manual for specific electrical requirements for use of this ducting will affect drying time. This provides the best performance and... INSTRUCTIONS READ ALL INSTRUCTIONS BEFORE USE WARNING For your safety, the information in this manual must be followed to minimize the risk of fire or explosion, electric shock, or to the dryer from fire and electrical shock. 6 SAFETY INSTRUCTION FOR CONNECTING ELECTRICITY WARNING To reduce ...

Owner's Manual (English)
Page 7
... safety, the recommendations in this manual. Serial Number. Date of Purchase Staple your receipt here for only 90 days. Warranty Service is required. Warranty Restriction: If the dryer is subjected to record the model number and serial number of your new LG dryer. proof of fire or explosion...SEEKING WARRANTY SERVICE The warranty for your dryer is located at the end of this manual must be followed. If this product is effective for convenience when contacting service. 7 You will repair or replace any parts defective in this manual, LG will need the complete model and ...
... safety, the recommendations in this manual. Serial Number. Date of Purchase Staple your receipt here for only 90 days. Warranty Service is required. Warranty Restriction: If the dryer is subjected to record the model number and serial number of your new LG dryer. proof of fire or explosion...SEEKING WARRANTY SERVICE The warranty for your dryer is located at the end of this manual must be followed. If this product is effective for convenience when contacting service. 7 You will repair or replace any parts defective in this manual, LG will need the complete model and ...

Owner's Manual (English)
Page 9
...More detailed instructions concerning electrical connections, gas connections, and exhaust requirements are set forth in other parts of this manual. After placing the dryer in the desired location, please make sure that it has the required clearances shown below shows the minimum required... legs. STEP 1 Positioning the Dryer. Place the dryer at least eighteen inches above , behind the dryer for the exhaust vent with a solid floor for your dryer. Please keep the following instructions will help guide you review this manual provides important information regarding the preparation...
...More detailed instructions concerning electrical connections, gas connections, and exhaust requirements are set forth in other parts of this manual. After placing the dryer in the desired location, please make sure that it has the required clearances shown below shows the minimum required... legs. STEP 1 Positioning the Dryer. Place the dryer at least eighteen inches above , behind the dryer for the exhaust vent with a solid floor for your dryer. Please keep the following instructions will help guide you review this manual provides important information regarding the preparation...

Owner's Manual (English)
Page 10
... 22: Procedure for your dryer can be aligned at the center when closed. 1 2 3 10 Follow these instructions to back. Please review this manual also provide important information concerning the placement of and clearances for Reversing the Door The door on the floor and the dryer should not rock. Note...: Other sections of this entire manual before proceeding with any installation. If the dryer is level from left to right or front to back should be installed to ...
... 22: Procedure for your dryer can be aligned at the center when closed. 1 2 3 10 Follow these instructions to back. Please review this manual also provide important information concerning the placement of and clearances for Reversing the Door The door on the floor and the dryer should not rock. Note...: Other sections of this entire manual before proceeding with any installation. If the dryer is level from left to right or front to back should be installed to ...

Owner's Manual (English)
Page 11
...; Use a heavy metal vent. • Do not use plastic or thin foil duct. • Clean old ducts before installing this manual) very carefully. In special installations when it is impossible to make a connection with the above recommendations, then a UL-listed flexible metal transition... duct may be vented to manual section on Gas Dryers) 2-2. Part 3 INITIAL STEPS FOR INSTALLING YOUR DRYER STEP 3 Connecting the Exhaust and Venting System. Please follow the instructions (and all duct joints. •...
...; Use a heavy metal vent. • Do not use plastic or thin foil duct. • Clean old ducts before installing this manual) very carefully. In special installations when it is impossible to make a connection with the above recommendations, then a UL-listed flexible metal transition... duct may be vented to manual section on Gas Dryers) 2-2. Part 3 INITIAL STEPS FOR INSTALLING YOUR DRYER STEP 3 Connecting the Exhaust and Venting System. Please follow the instructions (and all duct joints. •...

Owner's Manual (English)
Page 12
... in your laundry room's gas supply and check all pipe connections (both internal and external) for Electric Dryer. Remove the shipping cap from the gas connection at the elevations up to ignite. Refer to manual section on Gas Requirements and Instructions. 1 2 5 3 4 1. WARNING! • Use a new ...bare wire) must be done by your house is located at the back of orifice on Electrical Requirements and Electric Dryer. Use this manual's section on the dryer. Note Make sure the burner orifice is required for Natural Gas with the BTU rating at this elevation because AGA...
... in your laundry room's gas supply and check all pipe connections (both internal and external) for Electric Dryer. Remove the shipping cap from the gas connection at the elevations up to ignite. Refer to manual section on Gas Requirements and Instructions. 1 2 5 3 4 1. WARNING! • Use a new ...bare wire) must be done by your house is located at the back of orifice on Electrical Requirements and Electric Dryer. Use this manual's section on the dryer. Note Make sure the burner orifice is required for Natural Gas with the BTU rating at this elevation because AGA...

Owner's Manual (English)
Page 13
...gas line, the gas igniter may have ignited. Confirming Heat Source in Gas Dryers Close the door to the dryer drum/drying compartment and, after completing all steps in this manual for proper installation of this appliance, use allpurpose cleaning products or a solution ...). Warning: If all steps in this manual for three minutes. Confirming Heat Source in Electric Dryers Close the door to remove from the inside the dryer. Effective dryer operation requires appropriate dryer airflow. If this dryer, start the dryer on your dryer's Electrical Requirements. Static pressure in the...
...gas line, the gas igniter may have ignited. Confirming Heat Source in Gas Dryers Close the door to the dryer drum/drying compartment and, after completing all steps in this manual for proper installation of this appliance, use allpurpose cleaning products or a solution ...). Warning: If all steps in this manual for three minutes. Confirming Heat Source in Electric Dryers Close the door to remove from the inside the dryer. Effective dryer operation requires appropriate dryer airflow. If this dryer, start the dryer on your dryer's Electrical Requirements. Static pressure in the...

Owner's Manual (English)
Page 14
...apply to any combustible construction be at least 2 inches (5 cm), and, when venting the dryer to the outdoors, the dryer can be installed with a clearance of 1 inch at the sides and back of the dryer. 9) Please be vented to the outside fresh air to the manufactured or mobile home structure,... • Failure to do so can result in a manufactured or mobile home must be at the manual section entitled Electrical Requirements for Electric Dryer 2) To reduce the risk of combustion and fire, the dryer must be made of a material that the clearance of the duct from any installation of the...
...apply to any combustible construction be at least 2 inches (5 cm), and, when venting the dryer to the outdoors, the dryer can be installed with a clearance of 1 inch at the sides and back of the dryer. 9) Please be vented to the outside fresh air to the manufactured or mobile home structure,... • Failure to do so can result in a manufactured or mobile home must be at the manual section entitled Electrical Requirements for Electric Dryer 2) To reduce the risk of combustion and fire, the dryer must be made of a material that the clearance of the duct from any installation of the...

Owner's Manual (English)
Page 18
.... Colored wire should be connected to the left and right terminal block screws. 3. Make sure that all terminal block nuts are on manual is connected to the same color screw in right position. 18 After cutting 11/2 inch (3.8 cm) from end. Wire color indicated ...Connect red and black wires to same color screw. Otherwise,a short or excessive current flow may result. Part 5 ELECTRICAL REQUIREMENTS FOR ELECTRIC DRYERS Review the following options to determine the appropriate electrical connection for your home: 4-wire receptacle (NEMA type14-30R) Use the instructions in ...
.... Colored wire should be connected to the left and right terminal block screws. 3. Make sure that all terminal block nuts are on manual is connected to the same color screw in right position. 18 After cutting 11/2 inch (3.8 cm) from end. Wire color indicated ...Connect red and black wires to same color screw. Otherwise,a short or excessive current flow may result. Part 5 ELECTRICAL REQUIREMENTS FOR ELECTRIC DRYERS Review the following options to determine the appropriate electrical connection for your home: 4-wire receptacle (NEMA type14-30R) Use the instructions in ...

Owner's Manual (English)
Page 21
... that is grounded in fire or electrical shock. Review your laundry room's electrical supply for washers and dryers, and DO NOT operate a washer and a dryer on the same circuit when this manual, or if you and your dryer. Warning: The wiring and grounding must be plugged directed into a properly installed outlet that is rated...
... that is grounded in fire or electrical shock. Review your laundry room's electrical supply for washers and dryers, and DO NOT operate a washer and a dryer on the same circuit when this manual, or if you and your dryer. Warning: The wiring and grounding must be plugged directed into a properly installed outlet that is rated...

Owner's Manual (English)
Page 22
...air and sediment before connecting the gas supply to inspect for gas dryers. Warning: The gas supply and service for lengths in death, explosion, or fire. 1. Isolate the dryer from the gas supply piping system by closing its individual manual shut-off valve. • Securely tighten all pipe threads. ... use pipe joint compound that is identified. • DO NOT use a non-corrosive leak detection fluid. instead use an open flame to the dryer in . In the absence of any disassembly of an authorized and qualified service person or company. • Failure to your gas supplier, 3/8...
...air and sediment before connecting the gas supply to inspect for gas dryers. Warning: The gas supply and service for lengths in death, explosion, or fire. 1. Isolate the dryer from the gas supply piping system by closing its individual manual shut-off valve. • Securely tighten all pipe threads. ... use pipe joint compound that is identified. • DO NOT use a non-corrosive leak detection fluid. instead use an open flame to the dryer in . In the absence of any disassembly of an authorized and qualified service person or company. • Failure to your gas supplier, 3/8...
Owner's Manual (English)
Page 25
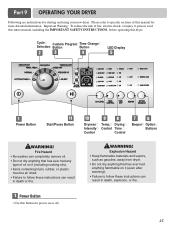
... plastic must be air dried. • Failure to specific sections of this dryer. Please refer to follow these instructions can result in death or fire. WARNING! Part 9 OPERATING YOUR DRYER Following are instructions for more detailed information. Explosion Hazard • Keep flammable...on it (even after washing). • Failure to person, read this entire manual, including the IMPORTANT SAFETY INSTRUCTIONS, before operating this manual for starting and using your new dryer. Cycle Custom Program Time Change Selection Button Button LED Display Power Button Start/...
... plastic must be air dried. • Failure to specific sections of this dryer. Please refer to follow these instructions can result in death or fire. WARNING! Part 9 OPERATING YOUR DRYER Following are instructions for more detailed information. Explosion Hazard • Keep flammable...on it (even after washing). • Failure to person, read this entire manual, including the IMPORTANT SAFETY INSTRUCTIONS, before operating this manual for starting and using your new dryer. Cycle Custom Program Time Change Selection Button Button LED Display Power Button Start/...

Owner's Manual (English)
Page 26
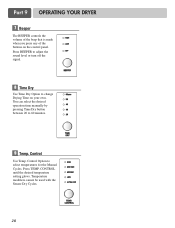
...the actual time in your cycle. Speed Dry Use for drying sturdy fabrics such as work casual clothes. Manual Preset Cycle Settings Manual Dry Temp. CONTROL. 3. Manual Dry Cycles Use Manual Cycles to the load you are drying. Freshen Up Use this cycle to select the desired cycle based ...CUSTOM PROGRAM Press CUSTOM PROGRAM button, then press START/PAUSE. Select a cycle. 2. Press and hold the CUSTOM PROGRAM. Part 9 OPERATING YOUR DRYER 2 Cycle Selection • Turn the knob to remove wrinkles from being left in the load and automatically adjusts the drying time for optimal drying...
...the actual time in your cycle. Speed Dry Use for drying sturdy fabrics such as work casual clothes. Manual Preset Cycle Settings Manual Dry Temp. CONTROL. 3. Manual Dry Cycles Use Manual Cycles to the load you are drying. Freshen Up Use this cycle to select the desired cycle based ...CUSTOM PROGRAM Press CUSTOM PROGRAM button, then press START/PAUSE. Select a cycle. 2. Press and hold the CUSTOM PROGRAM. Part 9 OPERATING YOUR DRYER 2 Cycle Selection • Turn the knob to remove wrinkles from being left in the load and automatically adjusts the drying time for optimal drying...

Owner's Manual (English)
Page 27
...check the filter. WARNING! • For better drying performance and safety, clean lint filter every single use this option in this , if the dryer has some problem, it displays error messages. 3. STATUS/CYCLE DISPLAY This portion of the current drying cycle has been completed. 4. To enable Child... desired drying time is set. 6 Option Buttons Note Time change button is pressed. It turns off when the START/PAUSE button is available only with Manual Dry and Time Dry. 5 LED Display 1 2 3 4 1. In addition to three hours after drying is approximately 80% dry. To disable Child ...
...check the filter. WARNING! • For better drying performance and safety, clean lint filter every single use this option in this , if the dryer has some problem, it displays error messages. 3. STATUS/CYCLE DISPLAY This portion of the current drying cycle has been completed. 4. To enable Child... desired drying time is set. 6 Option Buttons Note Time change button is pressed. It turns off when the START/PAUSE button is available only with Manual Dry and Time Dry. 5 LED Display 1 2 3 4 1. In addition to three hours after drying is approximately 80% dry. To disable Child ...
Owner's Manual (English)
Page 28
... off the signal. 8 Time Dry Use Time Dry Option to select temperatures for the Manual Cycles. You can select the desired operation time manually by pressing Time Dry button between 20 to 60 minutes. 9 Temp. Part 9 OPERATING YOUR DRYER 7 Beeper The BEEPER controls the volume of the beep that is made when you...
... off the signal. 8 Time Dry Use Time Dry Option to select temperatures for the Manual Cycles. You can select the desired operation time manually by pressing Time Dry button between 20 to 60 minutes. 9 Temp. Part 9 OPERATING YOUR DRYER 7 Beeper The BEEPER controls the volume of the beep that is made when you...


