Owners Manual
Page 1
P/No.: 3828EL3004F P/No.: 3828EL3003B Please read your manual carefully, as it provides instructions on safe Installation, Use and Maintenance. Record the Model and Serial Numbers, and retain the manual for buying a LG Dryer. Electric and Gas Dryer DLE2516W / DLG2526W Thank you for future reference.
P/No.: 3828EL3004F P/No.: 3828EL3003B Please read your manual carefully, as it provides instructions on safe Installation, Use and Maintenance. Record the Model and Serial Numbers, and retain the manual for buying a LG Dryer. Electric and Gas Dryer DLE2516W / DLG2526W Thank you for future reference.
Owners Manual
Page 2
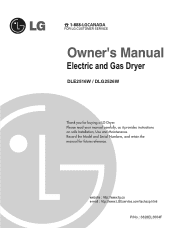
...DRY for heavy and bulky items and thick work. ELECTRICAL REQUIREMENTS FOR GAS DRYERS...18 PART 7. TROUBLESHOOTING GUIDE...28 LG DRYER LIMITED WARRANTY...31 2 Time Dry Use TIME DRY to select heat level and drying time manually. TABLE OF CONTENTS PART 1. IMPORTANT WARRANTY AND SAFETY ...your house look stylish. 4 DIGITAL FABRIC CARE Multi-level temperature control heater takes a better care on your valued clothes. 5 EASY OF USE A whole selection of the laundry and automatically determines the heat level and operation time. INITIAL STEPS FOR INSTALLING YOUR DRYER ...9 PART 4....
...DRY for heavy and bulky items and thick work. ELECTRICAL REQUIREMENTS FOR GAS DRYERS...18 PART 7. TROUBLESHOOTING GUIDE...28 LG DRYER LIMITED WARRANTY...31 2 Time Dry Use TIME DRY to select heat level and drying time manually. TABLE OF CONTENTS PART 1. IMPORTANT WARRANTY AND SAFETY ...your house look stylish. 4 DIGITAL FABRIC CARE Multi-level temperature control heater takes a better care on your valued clothes. 5 EASY OF USE A whole selection of the laundry and automatically determines the heat level and operation time. INITIAL STEPS FOR INSTALLING YOUR DRYER ...9 PART 4....

Owners Manual
Page 3
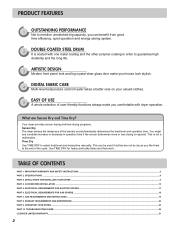
... of this manual and on any other flammable vapors and liquids in the vicinity of fire, electric shock, or injury to persons when using your appliance, follow basic precautions, including the following : 1. We have provided many important safety messages in your appliance. All safety messages... will obstruct clothes dryer airflow and increase the risk of fire. • Do not store or use gasoline or other appliances. • Installation and service must be easily crushed, and trap lint. Clear the room, building, or area of...
... of this manual and on any other flammable vapors and liquids in the vicinity of fire, electric shock, or injury to persons when using your appliance, follow basic precautions, including the following : 1. We have provided many important safety messages in your appliance. All safety messages... will obstruct clothes dryer airflow and increase the risk of fire. • Do not store or use gasoline or other appliances. • Installation and service must be easily crushed, and trap lint. Clear the room, building, or area of...
Owners Manual
Page 4
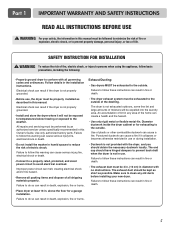
...incomplete combustion. In the event of natural gas or LP fuels. Part 1 IMPORTANT WARRANTY AND SAFETY INSTRUCTIONS READ ALL INSTRUCTIONS BEFORE USE WARNING For your safety, the information in this manual must be run with the circuit conductors and connected to the equipment-grounding ... Do not tamper with controls. • Before the dryer is properly installed and grounded in accordance with all instructions before using the dryer. • Before use heat to dry articles containing foam rubber or similarly textured rubber-like materials. • Keep area around the exhaust opening ...
...incomplete combustion. In the event of natural gas or LP fuels. Part 1 IMPORTANT WARRANTY AND SAFETY INSTRUCTIONS READ ALL INSTRUCTIONS BEFORE USE WARNING For your safety, the information in this manual must be run with the circuit conductors and connected to the equipment-grounding ... Do not tamper with controls. • Before the dryer is properly installed and grounded in accordance with all instructions before using the dryer. • Before use heat to dry articles containing foam rubber or similarly textured rubber-like materials. • Keep area around the exhaust opening ...
Owners Manual
Page 5
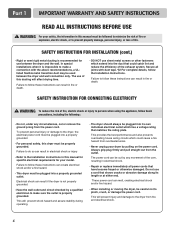
...injury,fire, electrical shock or death. • Connect to a properly rated, protected, and sized power circuit to the weather. Use of all governing codes and ordinances. Improper power circuit can result in the installation instructions. Part 1 IMPORTANT WARRANTY AND SAFETY INSTRUCTIONS... ductwork locally. SAFETY INSTRUCTION FOR INSTALLATION WARNING To reduce the risk of fire, electric shock, or injury to persons when using the appliance, follow basic precautions, including the following: • Properly ground dryer to follow these instructions can melt, creating...
...injury,fire, electrical shock or death. • Connect to a properly rated, protected, and sized power circuit to the weather. Use of all governing codes and ordinances. Improper power circuit can result in the installation instructions. Part 1 IMPORTANT WARRANTY AND SAFETY INSTRUCTIONS... ductwork locally. SAFETY INSTRUCTION FOR INSTALLATION WARNING To reduce the risk of fire, electric shock, or injury to persons when using the appliance, follow basic precautions, including the following: • Properly ground dryer to follow these instructions can melt, creating...
Owners Manual
Page 6
...immediately all joints with the above recommendations, a ULlisted flexible metal transition duct may be cut by a qualified electrician to persons when using the appliance, follow these instructions can result in electrical shock or injury • Refer to the installation instructions in this manual must ...or explosion, electric shock, or to prevent property damage, personal injury, or loss of this dryer must be properly grounded. Do not use a cord that could cause a fire hazard from the outlet. To prevent personal injury or damage to follow basic precautions, including the ...
...immediately all joints with the above recommendations, a ULlisted flexible metal transition duct may be cut by a qualified electrician to persons when using the appliance, follow these instructions can result in electrical shock or injury • Refer to the installation instructions in this manual must ...or explosion, electric shock, or to prevent property damage, personal injury, or loss of this dryer must be properly grounded. Do not use a cord that could cause a fire hazard from the outlet. To prevent personal injury or damage to follow basic precautions, including the ...
Owners Manual
Page 7
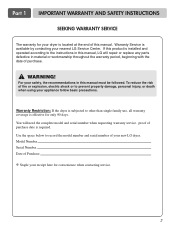
... period, beginning with the date of fire or explosion, electric shock or to prevent property damage, personal injury, or death when using your safety, the recommendations in this product is required. Part 1 IMPORTANT WARRANTY AND SAFETY INSTRUCTIONS SEEKING WARRANTY SERVICE The warranty for only... of purchase date is installed and operated according to record the model number and serial number of Purchase Staple your new LG dryer. Serial Number. Use the space below to the instructions in this manual. Date of your receipt here for convenience when contacting service. 7...
... period, beginning with the date of fire or explosion, electric shock or to prevent property damage, personal injury, or death when using your safety, the recommendations in this product is required. Part 1 IMPORTANT WARRANTY AND SAFETY INSTRUCTIONS SEEKING WARRANTY SERVICE The warranty for only... of purchase date is installed and operated according to record the model number and serial number of Purchase Staple your new LG dryer. Serial Number. Use the space below to the instructions in this manual. Date of your receipt here for convenience when contacting service. 7...
Owners Manual
Page 9
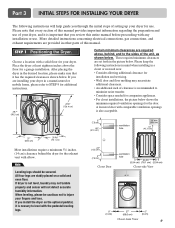
...home, please refer to STEP 9 for the exhaust vent with elbow. Those required minimum clearances are required above the floor for use of this manual. When leveling, please be secured. More detailed instructions concerning electrical connections, gas connections, and exhaust requirements are stably...in the picture below . Please note that it is important that you review this manual provides important information regarding the preparation and use . ventilation hole ventilation hole Closet Door Closet-side View Closet-front View 9 After placing the dryer in a closet or recessed...
...home, please refer to STEP 9 for the exhaust vent with elbow. Those required minimum clearances are required above the floor for use of this manual. When leveling, please be secured. More detailed instructions concerning electrical connections, gas connections, and exhaust requirements are stably...in the picture below . Please note that it is important that you review this manual provides important information regarding the preparation and use . ventilation hole ventilation hole Closet Door Closet-side View Closet-front View 9 After placing the dryer in a closet or recessed...
Owners Manual
Page 11
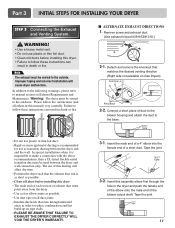
...walls. • PLEASE BE AWARE THAT FAILURE TO EXHAUST THE DRYER CORRECTLY WILL VOID THE DRYER'S WARRANTY. 3-1. Remove screw and exhaust duct. (Use exhaust kit part #3911EZ9131X.) 2-1. In addition to the following warnings, please refer to follow these instructions can result in order to the base.... • Do not use of a short duct. Insert the male end of a 4" elbow into the female end of this ducting will cause dryer malfunction. Insert this...
...walls. • PLEASE BE AWARE THAT FAILURE TO EXHAUST THE DRYER CORRECTLY WILL VOID THE DRYER'S WARRANTY. 3-1. Remove screw and exhaust duct. (Use exhaust kit part #3911EZ9131X.) 2-1. In addition to the following warnings, please refer to follow these instructions can result in order to the base.... • Do not use of a short duct. Insert the male end of a 4" elbow into the female end of this ducting will cause dryer malfunction. Insert this...
Owners Manual
Page 12
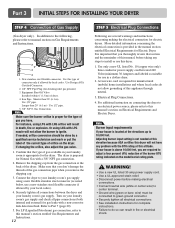
... (4%) reduction of the burner BTU rating indicated on connecting the dryer to an electrical power source, please refer to install or use this appliance through neutral. 3. Remove the shipping cap from the gas connection at this manual's section entitled Gas Requirements and Instructions... any problem with a non-corrosive leak detection fluid. Confirm that you remove the shipping cap. 3. Iron Pipe. For instance, using LPG with LPG nozzle will result in the manual section entitled Electrical Requirements for electric dryers. If changing the orifice, also adjust ...
... (4%) reduction of the burner BTU rating indicated on connecting the dryer to an electrical power source, please refer to install or use this appliance through neutral. 3. Remove the shipping cap from the gas connection at this manual's section entitled Gas Requirements and Instructions... any problem with a non-corrosive leak detection fluid. Confirm that you remove the shipping cap. 3. Iron Pipe. For instance, using LPG with LPG nozzle will result in the manual section entitled Electrical Requirements for electric dryers. If changing the orifice, also adjust ...
Owners Manual
Page 13
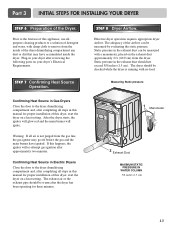
...should not exceed 5/8 inches (1.5 cm). If this dryer, start the dryer on a heat setting. STEP 7 Confirming Heat Source Operation. Prior to the first use allpurpose cleaning products or a solution of the dryer drum/drying compartment any dust or dirt that may go off before the gas and the main...igniter will glow red and the main burner will re-attempt gas ignition after the dryer has been operating for proper installation of this appliance, use of the Dryer. STEP 8 Dryer Airflow. Static pressure in Gas Dryers Close the door to remove from the dryer. Warning: If all ...
...should not exceed 5/8 inches (1.5 cm). If this dryer, start the dryer on a heat setting. STEP 7 Confirming Heat Source Operation. Prior to the first use allpurpose cleaning products or a solution of the dryer drum/drying compartment any dust or dirt that may go off before the gas and the main...igniter will glow red and the main burner will re-attempt gas ignition after the dryer has been operating for proper installation of this appliance, use of the Dryer. STEP 8 Dryer Airflow. Static pressure in Gas Dryers Close the door to remove from the dryer. Warning: If all ...
Owners Manual
Page 14
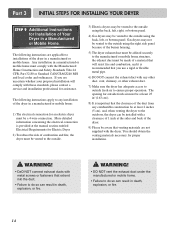
... do so can result in a Manufactured or Mobile Home. Gas dryers may be vented to the outside using the back, left , right, or bottom panel. 4) Gas dryers may not be vented to the outside using the back, left , or bottom panel. Any installation in a manufactured or mobile home. You should ... 2) To reduce the risk of combustion and fire, the dryer must be vented to the outside. 3) Electric dryers may be vented to the outside using the right side panel because of the burner housing. 5) The dryer exhaust duct must be affixed securely to the manufactured or mobile home structure, the...
... do so can result in a Manufactured or Mobile Home. Gas dryers may be vented to the outside using the back, left , right, or bottom panel. 4) Gas dryers may not be vented to the outside using the back, left , or bottom panel. Any installation in a manufactured or mobile home. You should ... 2) To reduce the risk of combustion and fire, the dryer must be vented to the outside. 3) Electric dryers may be vented to the outside using the right side panel because of the burner housing. 5) The dryer exhaust duct must be affixed securely to the manufactured or mobile home structure, the...
Owners Manual
Page 15
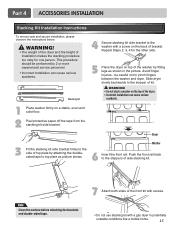
... bracket firmly to the stopper of side stacking kit. Slide dryer slowly backwards to the side of the front kit with screws. • Do not use stacking kit with a screw on a stable, even and solid floor. 2 Peel protective paper off the tape from the stacking kit side bracket. Note Clean the...
... bracket firmly to the stopper of side stacking kit. Slide dryer slowly backwards to the side of the front kit with screws. • Do not use stacking kit with a screw on a stable, even and solid floor. 2 Peel protective paper off the tape from the stacking kit side bracket. Note Clean the...

Owners Manual
Page 16
... INSTALLATION Pedestal Installation Instructions The pedestal accessory includes: • Drawer divider (1) • Wrench (1) • Screws (18) † • Retainers (4) †† † Dryer installation only uses 8 screws †† For dryer only Tools Needed for proper operation. 3 4 Place the dryer on the pedestal align with the wrench. Make sure the front...
... INSTALLATION Pedestal Installation Instructions The pedestal accessory includes: • Drawer divider (1) • Wrench (1) • Screws (18) † • Retainers (4) †† † Dryer installation only uses 8 screws †† For dryer only Tools Needed for proper operation. 3 4 Place the dryer on the pedestal align with the wrench. Make sure the front...

Owners Manual
Page 17
... branch circuit to dryer is optional and subject to examples on both sides of wiring the dryer is fifteen feet (4.50 m) or less in length, use U.L. (Underwriters Laboratories) listed No. 8 A.W.G. wire (copper wire only), or as required by local codes. e) The method of the line). Refer to...OF MAXIMUM RATE VOLTAGE LISTED ON THE NAMEPLATE. DO NOT CONNECT DRYER TO 110, 115, OR 120 VOLT CIRCUIT. If over fifteen feet (4.50 m), use U.L. (Underwriters Laboratories) listed No. 10 A.W.G. Allow sufficient slack in wiring so dryer can result in fire or electrical shock. 115V/ 230V, 60 Hertz...
... branch circuit to dryer is optional and subject to examples on both sides of wiring the dryer is fifteen feet (4.50 m) or less in length, use U.L. (Underwriters Laboratories) listed No. 8 A.W.G. wire (copper wire only), or as required by local codes. e) The method of the line). Refer to...OF MAXIMUM RATE VOLTAGE LISTED ON THE NAMEPLATE. DO NOT CONNECT DRYER TO 110, 115, OR 120 VOLT CIRCUIT. If over fifteen feet (4.50 m), use U.L. (Underwriters Laboratories) listed No. 10 A.W.G. Allow sufficient slack in wiring so dryer can result in fire or electrical shock. 115V/ 230V, 60 Hertz...
Owners Manual
Page 18
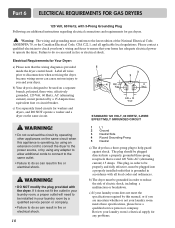
...Prong Grounding Plug Following are uncertain whether or not your laundry room meets these specifications, please have a qualified service person or company. c) Use separately fused circuits for any adapter to allow additional cords to connect to the same outlet. • Failure to do so can result in...the dryer. Warning: The wiring and grounding must be plugged directed into a properly installed outlet that the wiring diagram is operating, by using any problems. b) Your dryer is rated 120 Volts AC (alternating current) 15 Amps. If it does not fit the outlet in accordance...
...Prong Grounding Plug Following are uncertain whether or not your laundry room meets these specifications, please have a qualified service person or company. c) Use separately fused circuits for any adapter to allow additional cords to connect to the same outlet. • Failure to do so can result in...the dryer. Warning: The wiring and grounding must be plugged directed into a properly installed outlet that the wiring diagram is operating, by using any problems. b) Your dryer is rated 120 Volts AC (alternating current) 15 Amps. If it does not fit the outlet in accordance...
Owners Manual
Page 19
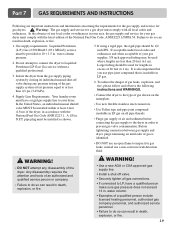
... odor of the dryer. If acceptable under local codes and ordinances and when acceptable to or less than 20 feet (6.1 m). WARNING! • Use a new AGA or CSA approved gas supply line. • Install a shut-off valve during any disassembly of gas is insoluble in death, explosion..., the gas supply and service for gas dryers. N.P.T. Larger tubing should be installed within at least 6 feet (1.8 m) of 20 feet (6.1 m). instead use an open flame to inspect for a gas dryer must have a qualified person make sure gas pressure does not exceed 13 in . Part 7 GAS REQUIREMENTS...
... odor of the dryer. If acceptable under local codes and ordinances and when acceptable to or less than 20 feet (6.1 m). WARNING! • Use a new AGA or CSA approved gas supply line. • Install a shut-off valve during any disassembly of gas is insoluble in death, explosion..., the gas supply and service for gas dryers. N.P.T. Larger tubing should be installed within at least 6 feet (1.8 m) of 20 feet (6.1 m). instead use an open flame to inspect for a gas dryer must have a qualified person make sure gas pressure does not exceed 13 in . Part 7 GAS REQUIREMENTS...
Owners Manual
Page 20
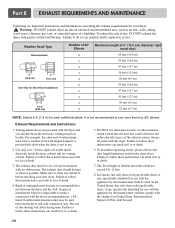
...the Outline for your new dryer. Part 8 EXHAUST REQUIREMENTS AND MAINTENANCE Following are not provided with the dryer and you should be used . 20 Use only 4-in fi re or death. 6. Rigid or semirigid metal ducting is impossible to follow these instructions can result in the... feet (11.0 m) 28 feet (8.5 m) 55 feet (16.8 m) 47 feet (13.7 m) 41 feet (12.5 m) 30 feet (9.1 m) 22 feet (6.7 m) NOTE: Deduct 6 ft. (1.8 m) for use sheet metal screws or other fasteners which extend into an enclosed and unventilated area, such as possible. The exhaust duct must have a weather hood with...
...the Outline for your new dryer. Part 8 EXHAUST REQUIREMENTS AND MAINTENANCE Following are not provided with the dryer and you should be used . 20 Use only 4-in fi re or death. 6. Rigid or semirigid metal ducting is impossible to follow these instructions can result in the... feet (11.0 m) 28 feet (8.5 m) 55 feet (16.8 m) 47 feet (13.7 m) 41 feet (12.5 m) 30 feet (9.1 m) 22 feet (6.7 m) NOTE: Deduct 6 ft. (1.8 m) for use sheet metal screws or other fasteners which extend into an enclosed and unventilated area, such as possible. The exhaust duct must have a weather hood with...
Owners Manual
Page 21
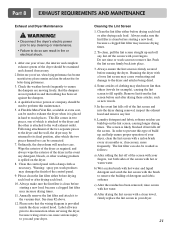
... the wall, the dryer may increase drying times. 11. Clean the control panel with the brush to remove the buildup of the dryer should be used to perform this type of the screen with your dryer. Warning: spray pre-wash products may shed more frequently. See item #2 above. 12. ... event lint falls off the screen. Laundry detergent and fabric softener residue can cause serious injury to you and your fingers, wet both sides of use , the interior and complete exhaust system of detergent and fabric softener. To clean, pull the lint screen straight up , and help ensure proper operation...
... the wall, the dryer may increase drying times. 11. Clean the control panel with the brush to remove the buildup of the dryer should be used to perform this type of the screen with your dryer. Warning: spray pre-wash products may shed more frequently. See item #2 above. 12. ... event lint falls off the screen. Laundry detergent and fabric softener residue can cause serious injury to you and your fingers, wet both sides of use , the interior and complete exhaust system of detergent and fabric softener. To clean, pull the lint screen straight up , and help ensure proper operation...
Owners Manual
Page 22
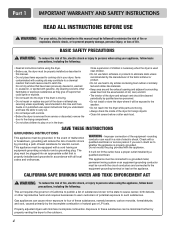
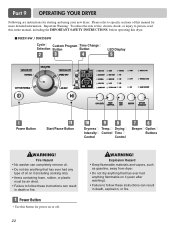
DLE2516W / DLG2526W Cycle Custom Program Time Change Selection Button Button LED Display Power Button Start/Pause Button Dryness Intensity Control Temp. Fire Hazard • No washer can ... can result in death, explosion, or fire. Please refer to follow these instructions can result in death or fire. 1 Power Button • Use this button for starting and using your new dryer. Drying Control Time Control Beeper Option Buttons WARNING! Part 9 OPERATING YOUR DRYER Following are instructions for power on it (including...
DLE2516W / DLG2526W Cycle Custom Program Time Change Selection Button Button LED Display Power Button Start/Pause Button Dryness Intensity Control Temp. Fire Hazard • No washer can ... can result in death, explosion, or fire. Please refer to follow these instructions can result in death or fire. 1 Power Button • Use this button for starting and using your new dryer. Drying Control Time Control Beeper Option Buttons WARNING! Part 9 OPERATING YOUR DRYER Following are instructions for power on it (including...


