Specification
Page 2
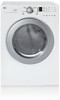
... (WxHxD) 29 1/2" x 43" x 31 1/4" Weight (lbs): Net / Shipping 126 / 144 WA R R A N T Y 1 Year Labor and Parts UPC CODE DLE2516W 048231 009096 DLG2526W 048231 009102 WDP3W 048231 008556 WSTK1 048231 008327 Design and specifications are trademarks of their respective owners. LG Design and Life's Good are subject to change without heat to "set it and...
... (WxHxD) 29 1/2" x 43" x 31 1/4" Weight (lbs): Net / Shipping 126 / 144 WA R R A N T Y 1 Year Labor and Parts UPC CODE DLE2516W 048231 009096 DLG2526W 048231 009102 WDP3W 048231 008556 WSTK1 048231 008327 Design and specifications are trademarks of their respective owners. LG Design and Life's Good are subject to change without heat to "set it and...
Owners Manual
Page 2
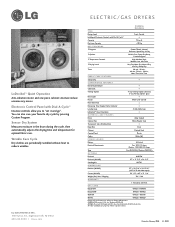
... REQUIREMENTS AND MAINTENANCE ...20 PART 9. TROUBLESHOOTING GUIDE...28 LG DRYER LIMITED WARRANTY...31 2 ACCESSORIES INSTALLATION ...15 PART 5. Your dryer provides sensor drying and time drying programs. Sensor Dry The dryer senses the dampness of user-friendly functions ...efficiency, quiet operation and energy saving system. 2 DOUBLE-COATED STEEL DRUM It is coated with dryer operation. ELECTRICAL REQUIREMENTS FOR ELECTRIC DRYERS ...17 PART 6. PRODUCT FEATURES 1 OUTSTANDING PERFORMANCE Not to mention unmatched big capacity, you can be used if clothes are Sensor Dry and Time Dry? ...
... REQUIREMENTS AND MAINTENANCE ...20 PART 9. TROUBLESHOOTING GUIDE...28 LG DRYER LIMITED WARRANTY...31 2 ACCESSORIES INSTALLATION ...15 PART 5. Your dryer provides sensor drying and time drying programs. Sensor Dry The dryer senses the dampness of user-friendly functions ...efficiency, quiet operation and energy saving system. 2 DOUBLE-COATED STEEL DRUM It is coated with dryer operation. ELECTRICAL REQUIREMENTS FOR ELECTRIC DRYERS ...17 PART 6. PRODUCT FEATURES 1 OUTSTANDING PERFORMANCE Not to mention unmatched big capacity, you can be used if clothes are Sensor Dry and Time Dry? ...

Owners Manual
Page 3
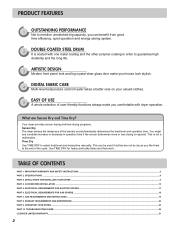
.... If you don't follow basic precautions, including the following : 1. We have provided many important safety messages in this appliance or any gas or electrical appliance. 2. Part 1 IMPORTANT WARRANTY AND SAFETY INSTRUCTIONS READ ALL INSTRUCTIONS BEFORE USE WARNING For your safety, the information in this manual must be followed to minimize the...
.... If you don't follow basic precautions, including the following : 1. We have provided many important safety messages in this appliance or any gas or electrical appliance. 2. Part 1 IMPORTANT WARRANTY AND SAFETY INSTRUCTIONS READ ALL INSTRUCTIONS BEFORE USE WARNING For your safety, the information in this manual must be followed to minimize the...
Owners Manual
Page 4
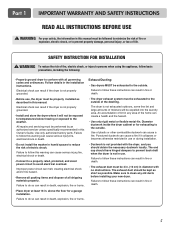
...such substances. WARNING - Check with a qualified electrician or service person if you are moving . • Do not repair or replace any part of children is necessary when the dryer is properly grounded. Do not modify the plug provided with a cord having an equipment-grounding conductor and... grounding plug. Exposure to play on the appliance. Improper connection of natural gas or LP fuels. Gas appliances can result in the dryer. Part 1 IMPORTANT WARRANTY AND SAFETY INSTRUCTIONS READ ALL INSTRUCTIONS BEFORE USE WARNING For your dryer. If it will not fit the outlet, have a...
...such substances. WARNING - Check with a qualified electrician or service person if you are moving . • Do not repair or replace any part of children is necessary when the dryer is properly grounded. Do not modify the plug provided with a cord having an equipment-grounding conductor and... grounding plug. Exposure to play on the appliance. Improper connection of natural gas or LP fuels. Gas appliances can result in the dryer. Part 1 IMPORTANT WARRANTY AND SAFETY INSTRUCTIONS READ ALL INSTRUCTIONS BEFORE USE WARNING For your dryer. If it will not fit the outlet, have a...
Owners Manual
Page 5
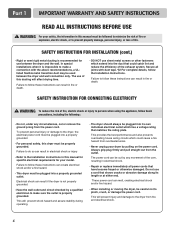
... to do so can result if the dryer is not exhausted outdoors, some fine lint and large amounts of the dwelling. Use only authorized factory parts. Failure to follow these instructions can result in humid spaces to clean any area of fire, electric shock, or injury to the outside . Make sure... fire or explosion, electric shock, or to follow these instructions can create a health and fire hazard. • Use only rigid metal or flexible metal 4in. Part 1 IMPORTANT WARRANTY AND SAFETY INSTRUCTIONS READ ALL INSTRUCTIONS BEFORE USE WARNING For your new dryer.
... to do so can result if the dryer is not exhausted outdoors, some fine lint and large amounts of the dwelling. Use only authorized factory parts. Failure to follow these instructions can result in humid spaces to clean any area of fire, electric shock, or injury to the outside . Make sure... fire or explosion, electric shock, or to follow these instructions can create a health and fire hazard. • Use only rigid metal or flexible metal 4in. Part 1 IMPORTANT WARRANTY AND SAFETY INSTRUCTIONS READ ALL INSTRUCTIONS BEFORE USE WARNING For your new dryer.
Owners Manual
Page 6
... ducting will prevent shock hazard and assure stability during operating. • The dryer should always be plugged into the duct that matches the rating plate. Part 1 IMPORTANT WARRANTY AND SAFETY INSTRUCTIONS READ ALL INSTRUCTIONS BEFORE USE WARNING For your safety, the information in this manual must be followed to minimize the...
... ducting will prevent shock hazard and assure stability during operating. • The dryer should always be plugged into the duct that matches the rating plate. Part 1 IMPORTANT WARRANTY AND SAFETY INSTRUCTIONS READ ALL INSTRUCTIONS BEFORE USE WARNING For your safety, the information in this manual must be followed to minimize the...
Owners Manual
Page 7
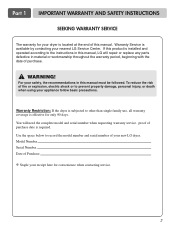
.... Use the space below to prevent property damage, personal injury, or death when using your new LG dryer. WARNING! You will repair or replace any parts defective in material or workmanship throughout the warranty period, beginning with the date of your appliance follow basic...at the end of purchase date is effective for only 90 days. Part 1 IMPORTANT WARRANTY AND SAFETY INSTRUCTIONS SEEKING WARRANTY SERVICE The warranty for convenience when contacting service. 7 proof of this manual, LG will need the complete model and serial number when requesting warranty service...
.... Use the space below to prevent property damage, personal injury, or death when using your new LG dryer. WARNING! You will repair or replace any parts defective in material or workmanship throughout the warranty period, beginning with the date of your appliance follow basic...at the end of purchase date is effective for only 90 days. Part 1 IMPORTANT WARRANTY AND SAFETY INSTRUCTIONS SEEKING WARRANTY SERVICE The warranty for convenience when contacting service. 7 proof of this manual, LG will need the complete model and serial number when requesting warranty service...

Owners Manual
Page 8
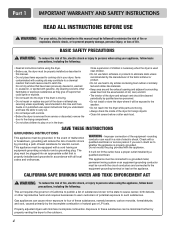
Weight : 126 Ibs (57.2 kg) Specifications are subject to change without manafaturers notice. Pedestal Purchased Separately ACCESSORIES Stacking Kit Purchased Separately 8 Design of pedestals is subject to the rating label regarding detailed information. Size : 27 x 29.9 x 38.7(inch) Capacity : IEC 7.0 cu.ft. Part 2 SPECIFICATIONS Type : Electric and Gas Dryer Rating : Please refer to change by manufacturer.
Weight : 126 Ibs (57.2 kg) Specifications are subject to change without manafaturers notice. Pedestal Purchased Separately ACCESSORIES Stacking Kit Purchased Separately 8 Design of pedestals is subject to the rating label regarding detailed information. Size : 27 x 29.9 x 38.7(inch) Capacity : IEC 7.0 cu.ft. Part 2 SPECIFICATIONS Type : Electric and Gas Dryer Rating : Please refer to change by manufacturer.
Owners Manual
Page 9
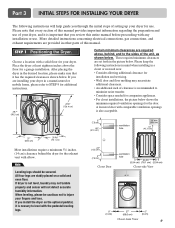
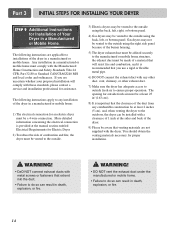
Part 3 INITIAL STEPS FOR INSTALLING YOUR DRYER The following instructions in mind when installing in a manufactured or mobile home, please refer to STEP 9 for additional instructions. ... companion appliances. • For closet installations, the picture below . More detailed instructions concerning electrical connections, gas connections, and exhaust requirements are set forth in other parts of the unit, as shown below shows the minimum required ventilation openings for the door. ventilation hole ventilation hole Closet Door Closet-side View Closet...
Part 3 INITIAL STEPS FOR INSTALLING YOUR DRYER The following instructions in mind when installing in a manufactured or mobile home, please refer to STEP 9 for additional instructions. ... companion appliances. • For closet installations, the picture below . More detailed instructions concerning electrical connections, gas connections, and exhaust requirements are set forth in other parts of the unit, as shown below shows the minimum required ventilation openings for the door. ventilation hole ventilation hole Closet Door Closet-side View Closet...
Owners Manual
Page 10
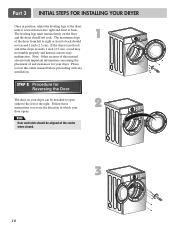
Note: Other sections of this entire manual before proceeding with any installation. 1 STEP 2 Procedure for your dryer. Part 3 INITIAL STEPS FOR INSTALLING YOUR DRYER Once in which your dryer can be aligned at the center when closed. 2 3 10 If the dryer is level ...
Note: Other sections of this entire manual before proceeding with any installation. 1 STEP 2 Procedure for your dryer. Part 3 INITIAL STEPS FOR INSTALLING YOUR DRYER Once in which your dryer can be aligned at the center when closed. 2 3 10 If the dryer is level ...
Owners Manual
Page 11
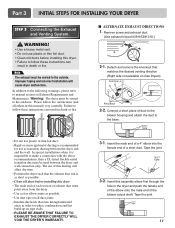
... • Rigid or semi-rigid metal ducting is as short as possible. • Clean old ducts before installing this manual) very carefully. Part 3 INITIAL STEPS FOR INSTALLING YOUR DRYER STEP 3 Connecting the Exhaust and Venting System. Remove screw and exhaust duct. (Use exhaust kit... part #3911EZ9131X.) 2-1. Tape the joint. 3-2. Insert this assembly elbow first through unheated areas in death or fire. Please follow these instructions can ...
... • Rigid or semi-rigid metal ducting is as short as possible. • Clean old ducts before installing this manual) very carefully. Part 3 INITIAL STEPS FOR INSTALLING YOUR DRYER STEP 3 Connecting the Exhaust and Venting System. Remove screw and exhaust duct. (Use exhaust kit... part #3911EZ9131X.) 2-1. Tape the joint. 3-2. Insert this assembly elbow first through unheated areas in death or fire. Please follow these instructions can ...
Owners Manual
Page 12
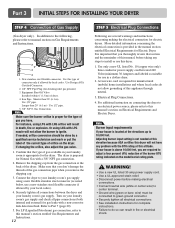
.... The dryer is required for Electric Dryer. Note Burner input requirements If your laundry room's gas supply. In addition to the following, please refer to Part 7 (page 20) 5. For LP (Liquefied Petroleum) gas connection, refer to 10,000 feet. Equipment Shut-Off Valve Installed within 6' (1.8 m) of Gas Supply (Gas dryer ... and where local codes do not allow the burner to your house is located at this elevation because AGA certifies this appliance through neutral. 3. Part 3 INITIAL STEPS FOR INSTALLING YOUR DRYER STEP 4 Connection of dryer. 4.
.... The dryer is required for Electric Dryer. Note Burner input requirements If your laundry room's gas supply. In addition to the following, please refer to Part 7 (page 20) 5. For LP (Liquefied Petroleum) gas connection, refer to 10,000 feet. Equipment Shut-Off Valve Installed within 6' (1.8 m) of Gas Supply (Gas dryer ... and where local codes do not allow the burner to your house is located at this elevation because AGA certifies this appliance through neutral. 3. Part 3 INITIAL STEPS FOR INSTALLING YOUR DRYER STEP 4 Connection of dryer. 4.
Owners Manual
Page 13
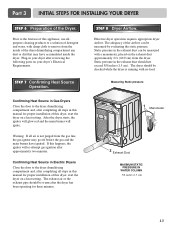
... gas igniter may go off before the gas and the main burner have accumulated inside of the airflow can be warm after reviewing the following parts on a heat setting. Part 3 INITIAL STEPS FOR INSTALLING YOUR DRYER STEP 6 Preparation of detergent and water, with no load.
... gas igniter may go off before the gas and the main burner have accumulated inside of the airflow can be warm after reviewing the following parts on a heat setting. Part 3 INITIAL STEPS FOR INSTALLING YOUR DRYER STEP 6 Preparation of detergent and water, with no load.
Owners Manual
Page 14
..., explosion, or fire. 14 WARNING! • DaO NOT connect exhaust ducts with the Manufactured Home Construction and Safety Standards Title 24 CFR, Part 32-80 or Standard CAN/CSA0Z240 MH and local codes and ordinances. If you use a rigid or flexible metal pipe. 6) DO NOT connect... must be a 4-wire connection. The opening for Installation of Your Dryer in a manufactured or mobile home: 1) The electrical connection for proper installation. Part 3 INITIAL STEPS FOR INSTALLING YOUR DRYER STEP 9 Additional Instructions for outside fresh air must be at least 25 in2 (163 cm2). 8) It is ...
..., explosion, or fire. 14 WARNING! • DaO NOT connect exhaust ducts with the Manufactured Home Construction and Safety Standards Title 24 CFR, Part 32-80 or Standard CAN/CSA0Z240 MH and local codes and ordinances. If you use a rigid or flexible metal pipe. 6) DO NOT connect... must be a 4-wire connection. The opening for Installation of Your Dryer in a manufactured or mobile home: 1) The electrical connection for proper installation. Part 3 INITIAL STEPS FOR INSTALLING YOUR DRYER STEP 9 Additional Instructions for outside fresh air must be at least 25 in2 (163 cm2). 8) It is ...
Owners Manual
Page 15
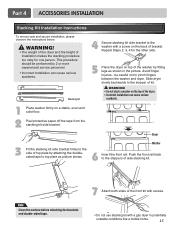
... side bracket to pinch fingers between the washer and dryer. This procedure should be careful not to the washer with a gas dryer in the picture. Part 4 ACCESSORIES INSTALLATION Stacking Kit Installation Instructions To ensure safe and secure installation, please observe the instructions below. WARNING! • Do not stack a washer on the...
... side bracket to pinch fingers between the washer and dryer. This procedure should be careful not to the washer with a gas dryer in the picture. Part 4 ACCESSORIES INSTALLATION Stacking Kit Installation Instructions To ensure safe and secure installation, please observe the instructions below. WARNING! • Do not stack a washer on the...

Owners Manual
Page 16
... 4 leveling feet of the dryer by hand. T-clip 6 Raise Lower Securely tighten all water, power, or gas lines and draining or venting connections before operation. Part 4 ACCESSORIES INSTALLATION Pedestal Installation Instructions The pedestal accessory includes: • Drawer divider (1) • Wrench (1) • Screws (18) † • Retainers (4) †† † Dryer installation...
... 4 leveling feet of the dryer by hand. T-clip 6 Raise Lower Securely tighten all water, power, or gas lines and draining or venting connections before operation. Part 4 ACCESSORIES INSTALLATION Pedestal Installation Instructions The pedestal accessory includes: • Drawer divider (1) • Wrench (1) • Screws (18) † • Retainers (4) †† † Dryer installation...

Owners Manual
Page 17
.... Type of pigtail and gauge of wire must be fused on the following pages. Refer to the equipment-grounding terminal or lead on next page. Part 5 ELECTRICAL REQUIREMENTS FOR ELECTRIC DRYERS The following pages. wire (copper wire only), or as required by local codes. e) The method of the National Electrical Code...
.... Type of pigtail and gauge of wire must be fused on the following pages. Refer to the equipment-grounding terminal or lead on next page. Part 5 ELECTRICAL REQUIREMENTS FOR ELECTRIC DRYERS The following pages. wire (copper wire only), or as required by local codes. e) The method of the National Electrical Code...
Owners Manual
Page 18
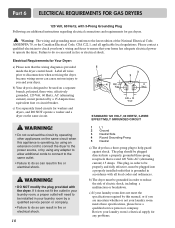
... 120 Volts AC (alternating current) 15 Amps. Review your laundry room's electrical supply for Your Dryer: a) Please note that is designed to operate the dryer. Part 6 ELECTRICAL REQUIREMENTS FOR GAS DRYERS 120 Volt, 60 Hertz, with 3-Prong Grounding Plug Following are uncertain whether or not your laundry room meets these specifications...
... 120 Volts AC (alternating current) 15 Amps. Review your laundry room's electrical supply for Your Dryer: a) Please note that is designed to operate the dryer. Part 6 ELECTRICAL REQUIREMENTS FOR GAS DRYERS 120 Volt, 60 Hertz, with 3-Prong Grounding Plug Following are uncertain whether or not your laundry room meets these specifications...
Owners Manual
Page 19
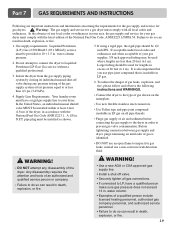
... fluid. Any disassembly requires the attention and tools of gas is identified. • DO NOT use an open flame to do so can result in . Part 7 GAS REQUIREMENTS AND INSTRUCTIONS Following are less than 2/1 psi (3.45 kPa). 4. water column pressure. 2. Isolate the dryer from the gas supply piping system by closing...
... fluid. Any disassembly requires the attention and tools of gas is identified. • DO NOT use an open flame to do so can result in . Part 7 GAS REQUIREMENTS AND INSTRUCTIONS Following are less than 2/1 psi (3.45 kPa). 4. water column pressure. 2. Isolate the dryer from the gas supply piping system by closing...
Owners Manual
Page 20
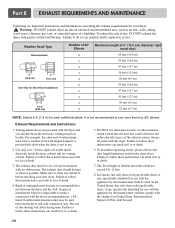
... use of fire, DO NOT exhaust the dryer with plastic or thin foil Ducting. To reduce the risk of this ducting will affect drying time. Part 8 EXHAUST REQUIREMENTS AND MAINTENANCE Following are not provided with the dryer and you should be used .
... use of fire, DO NOT exhaust the dryer with plastic or thin foil Ducting. To reduce the risk of this ducting will affect drying time. Part 8 EXHAUST REQUIREMENTS AND MAINTENANCE Following are not provided with the dryer and you should be used .


