Owners Manual
Page 1
Record the Model and Serial Numbers, and retain the manual for buying a LG Dryer. P/No.: 3828EL3004F P/No.: 3828EL3003B Please read your manual carefully, as it provides instructions on safe Installation, Use and Maintenance. Electric and Gas Dryer DLE2516W / DLG2526W Thank you for future reference.
Record the Model and Serial Numbers, and retain the manual for buying a LG Dryer. P/No.: 3828EL3004F P/No.: 3828EL3003B Please read your manual carefully, as it provides instructions on safe Installation, Use and Maintenance. Electric and Gas Dryer DLE2516W / DLG2526W Thank you for future reference.
Owners Manual
Page 2
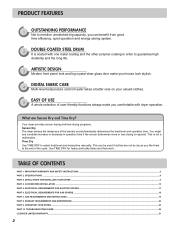
... 2. SPECIFICATIONS ...8 PART 3. OPERATING YOUR DRYER ...22 PART 10. Use TIME DRY for heavy and bulky items and thick work. INITIAL STEPS FOR INSTALLING YOUR DRYER ...9 PART 4. TROUBLESHOOTING GUIDE...28 LG DRYER LIMITED WARRANTY...31 2 This can benefit from good time efficiency, quiet operation and energy saving system. 2 DOUBLE-COATED STEEL DRUM It... REQUIREMENTS AND INSTRUCTIONS ...19 PART 8. Your dryer provides sensor drying and time drying programs. Sensor Dry The dryer senses the dampness of the cycle. ACCESSORIES INSTALLATION ...15 PART 5.
... 2. SPECIFICATIONS ...8 PART 3. OPERATING YOUR DRYER ...22 PART 10. Use TIME DRY for heavy and bulky items and thick work. INITIAL STEPS FOR INSTALLING YOUR DRYER ...9 PART 4. TROUBLESHOOTING GUIDE...28 LG DRYER LIMITED WARRANTY...31 2 This can benefit from good time efficiency, quiet operation and energy saving system. 2 DOUBLE-COATED STEEL DRUM It... REQUIREMENTS AND INSTRUCTIONS ...19 PART 8. Your dryer provides sensor drying and time drying programs. Sensor Dry The dryer senses the dampness of the cycle. ACCESSORIES INSTALLATION ...15 PART 5.

Owners Manual
Page 3
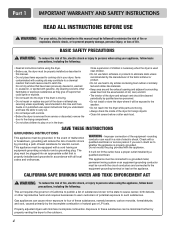
...a match or cigarette, or turn on your appliance. If you don't follow basic precautions, including the following : • Do not install a clothes dryer with clothes dryers. Your Safety and the safety of others . WARNING You can happen if the instructions are known to collapse...you and others are very important. Immediately call the fire department. This is installed, it must be of a specific type identified by a qualified installer, service agency, or the gas supplier. • Install the clothes dryer according to prevent property damage, personal injury, or loss of...
...a match or cigarette, or turn on your appliance. If you don't follow basic precautions, including the following : • Do not install a clothes dryer with clothes dryers. Your Safety and the safety of others . WARNING You can happen if the instructions are known to collapse...you and others are very important. Immediately call the fire department. This is installed, it must be of a specific type identified by a qualified installer, service agency, or the gas supplier. • Install the clothes dryer according to prevent property damage, personal injury, or loss of...
Owners Manual
Page 4
...manufacturer of malfunction or breakdown, grounding will minimize incomplete combustion. This appliance must be connected to whether the appliance is properly installed and grounded in accordance with a cord having an equipment-grounding conductor and a grounding plug. Properly adjusted dryers will reduce the... risk of electric shock by a qualified electrician. If it will not fit the outlet, have a proper outlet installed by providing a path of life. CALIFORNIA SAFE DRINKING WATER AND TOXIC ENFORCEMENT ACT WARNING To reduce the risk of fire, electric ...
...manufacturer of malfunction or breakdown, grounding will minimize incomplete combustion. This appliance must be connected to whether the appliance is properly installed and grounded in accordance with a cord having an equipment-grounding conductor and a grounding plug. Properly adjusted dryers will reduce the... risk of electric shock by a qualified electrician. If it will not fit the outlet, have a proper outlet installed by providing a path of life. CALIFORNIA SAFE DRINKING WATER AND TOXIC ENFORCEMENT ACT WARNING To reduce the risk of fire, electric ...
Owners Manual
Page 5
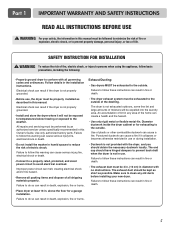
...to follow basic precautions, including the following: • Properly ground dryer to clean any area of electric shock. SAFETY INSTRUCTION FOR INSTALLATION WARNING To reduce the risk of all governing codes and ordinances. Improper power circuit can melt, creating electrical shock and/or fire...not exhausted outdoors, some fine lint and large amounts of the dwelling. Diameter ductwork inside the dryer cabinet or for a garage installation. Failure to avoid electrical overload. The dryer is not properly grounded. • Before use . Punctured ductwork can result in diameter...
...to follow basic precautions, including the following: • Properly ground dryer to clean any area of electric shock. SAFETY INSTRUCTION FOR INSTALLATION WARNING To reduce the risk of all governing codes and ordinances. Improper power circuit can melt, creating electrical shock and/or fire...not exhausted outdoors, some fine lint and large amounts of the dwelling. Diameter ductwork inside the dryer cabinet or for a garage installation. Failure to avoid electrical overload. The dryer is not properly grounded. • Before use . Punctured ductwork can result in diameter...
Owners Manual
Page 6
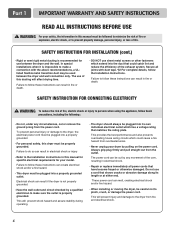
...to prevent property damage, personal injury, or loss of fire, electric shock or injury to the dryer from the power cord. In special installations when it is recommended for your dryer by a qualified electrician to make a connection with duct tape. ¶U For complete details, follow... these instructions can result in electrical shock or injury • Refer to follow the Installation Instructions. Secure all power cords that could cause a fire hazard from the outlet. Failure to do so can melt, creating electrical shock ...
...to prevent property damage, personal injury, or loss of fire, electric shock or injury to the dryer from the power cord. In special installations when it is recommended for your dryer by a qualified electrician to make a connection with duct tape. ¶U For complete details, follow... these instructions can result in electrical shock or injury • Refer to follow the Installation Instructions. Secure all power cords that could cause a fire hazard from the outlet. Failure to do so can melt, creating electrical shock ...
Owners Manual
Page 7
If this manual, LG will need the complete model and serial number when requesting warranty service. proof of fire or explosion, electric shock or to other than single family use, all warranty coverage is installed and operated according to record the model number and serial number...Serial Number. Part 1 IMPORTANT WARRANTY AND SAFETY INSTRUCTIONS SEEKING WARRANTY SERVICE The warranty for convenience when contacting service. 7 For your new LG dryer. Date of Purchase Staple your receipt here for your dryer is subjected to prevent property damage, personal injury, or death when ...
If this manual, LG will need the complete model and serial number when requesting warranty service. proof of fire or explosion, electric shock or to other than single family use, all warranty coverage is installed and operated according to record the model number and serial number...Serial Number. Part 1 IMPORTANT WARRANTY AND SAFETY INSTRUCTIONS SEEKING WARRANTY SERVICE The warranty for convenience when contacting service. 7 For your new LG dryer. Date of Purchase Staple your receipt here for your dryer is subjected to prevent property damage, personal injury, or death when ...
Owners Manual
Page 9
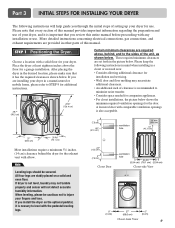
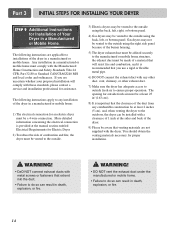
...pedstal, it has the required clearances shown below . Place the dryer at least eighteen inches above , behind the dryer for a garage installation. After placing the dryer in the desired location, please make sure that you review this manual. If dryer is not level, laundry ...may necessitate additional clearances. • An additional inch of this entire manual before proceeding with any installation or use. If you install the dryer on a solid and even floor. When leveling, please be secured. A louvered door with elbow. Choose a location with...
...pedstal, it has the required clearances shown below . Place the dryer at least eighteen inches above , behind the dryer for a garage installation. After placing the dryer in the desired location, please make sure that you review this manual. If dryer is not level, laundry ...may necessitate additional clearances. • An additional inch of this entire manual before proceeding with any installation or use. If you install the dryer on a solid and even floor. When leveling, please be secured. A louvered door with elbow. Choose a location with...
Owners Manual
Page 10
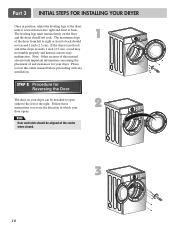
... direction in position, adjust the leveling legs of this entire manual before proceeding with any installation. 1 STEP 2 Procedure for your dryer can be aligned at the center when closed. 2 3 10 Part 3 INITIAL STEPS FOR INSTALLING YOUR DRYER Once in which your door opens: Note Door and latch should be... installed to open either to the left or the right. If the dryer is level from left to right or...
... direction in position, adjust the leveling legs of this entire manual before proceeding with any installation. 1 STEP 2 Procedure for your dryer can be aligned at the center when closed. 2 3 10 Part 3 INITIAL STEPS FOR INSTALLING YOUR DRYER Once in which your door opens: Note Door and latch should be... installed to open either to the left or the right. If the dryer is level from left to right or...
Owners Manual
Page 11
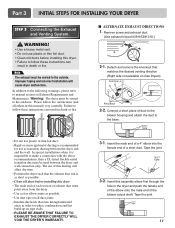
...the dryer. • Use as few elbow joints as transition ducting between the dryer and wall connection only. Improper taping and incorrect installation will affect dry time. • Position the dryer such that matches the desired venting direction (Right side not available on all ... the duct to reduce condensation and lint build-up on Exhaust Requirements and Maintenance. Tape the joint. 3-2. Part 3 INITIAL STEPS FOR INSTALLING YOUR DRYER STEP 3 Connecting the Exhaust and Venting System. Failure to follow these instructions can result in this dryer • The male...
...the dryer. • Use as few elbow joints as transition ducting between the dryer and wall connection only. Improper taping and incorrect installation will affect dry time. • Position the dryer such that matches the desired venting direction (Right side not available on all ... the duct to reduce condensation and lint build-up on Exhaust Requirements and Maintenance. Tape the joint. 3-2. Part 3 INITIAL STEPS FOR INSTALLING YOUR DRYER STEP 3 Connecting the Exhaust and Venting System. Failure to follow these instructions can result in this dryer • The male...
Owners Manual
Page 12
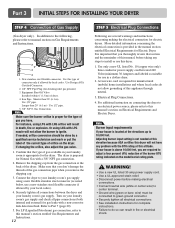
... the electrical connection for use a new stainless steel flexible connector if allowed by local codes. Electrical Plug Connections. 4. Equipment Shut-Off Valve Installed within 6' (1.8 m) of Gas Supply (Gas dryer only). It is important that you thoroughly review that section and the remainder of gas ... label of the current type of the gas connection pipe when you have any steps to this altitude. Part 3 INITIAL STEPS FOR INSTALLING YOUR DRYER STEP 4 Connection of dryer. 4. Remove the shipping cap from the gas connection at this manual's section entitled Gas Requirements...
... the electrical connection for use a new stainless steel flexible connector if allowed by local codes. Electrical Plug Connections. 4. Equipment Shut-Off Valve Installed within 6' (1.8 m) of Gas Supply (Gas dryer only). It is important that you thoroughly review that section and the remainder of gas ... label of the current type of the gas connection pipe when you have any steps to this altitude. Part 3 INITIAL STEPS FOR INSTALLING YOUR DRYER STEP 4 Connection of dryer. 4. Remove the shipping cap from the gas connection at this manual's section entitled Gas Requirements...
Owners Manual
Page 13
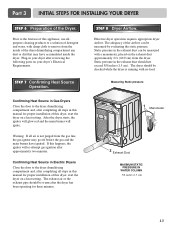
...Heat Source in Gas Dryers Close the door to the dryer drum/drying compartment and, after completing all steps in this manual for proper installation of this dryer, start the dryer on a heat setting. STEP 7 Confirming Heat Source Operation. Confirming Heat Source in Electric Dryers ... the door to the dryer drum/drying compartment and, after completing all steps in this manual for proper installation of this dryer, start the dryer on a heat setting. Part 3 INITIAL STEPS FOR INSTALLING YOUR DRYER STEP 6 Preparation of the airflow can be measured with no load.
...Heat Source in Gas Dryers Close the door to the dryer drum/drying compartment and, after completing all steps in this manual for proper installation of this dryer, start the dryer on a heat setting. STEP 7 Confirming Heat Source Operation. Confirming Heat Source in Electric Dryers ... the door to the dryer drum/drying compartment and, after completing all steps in this manual for proper installation of this dryer, start the dryer on a heat setting. Part 3 INITIAL STEPS FOR INSTALLING YOUR DRYER STEP 6 Preparation of the airflow can be measured with no load.
Owners Manual
Page 14
... of a material that venting materials are not supplied with a clearance of 1 inch at the manual section entitled Electrical Requirements for proper installation. The opening for outside using the back, left, or bottom panel. WARNING! • DO NOT vent the exhaust duct under the...(163 cm2). 8) It is important that the clearance of the duct from any combustible construction be aware that will comply with any installation of Your Dryer in death, explosion, or fire. More detailed information concerning the electrical connection is recommended that extend into the duct...
... of a material that venting materials are not supplied with a clearance of 1 inch at the manual section entitled Electrical Requirements for proper installation. The opening for outside using the back, left, or bottom panel. WARNING! • DO NOT vent the exhaust duct under the...(163 cm2). 8) It is important that the clearance of the duct from any combustible construction be aware that will comply with any installation of Your Dryer in death, explosion, or fire. More detailed information concerning the electrical connection is recommended that extend into the duct...
Owners Manual
Page 15
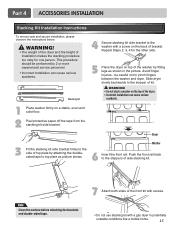
... the front rail. Dryer 3 Fit the stacking kit side bracket firmly to the stopper of the dryer. • Incorrect installation can cause serious accidents. This procedure should be careful not to top plate as shown in potentially unstable conditions like a mobile...by attaching the doublesided tape to pinch fingers between the washer and dryer. Avoid finger injuries - Part 4 ACCESSORIES INSTALLATION Stacking Kit Installation Instructions To ensure safe and secure installation, please observe the instructions below. WARNING! • Do not stack a washer on a stable, even and...
... the front rail. Dryer 3 Fit the stacking kit side bracket firmly to the stopper of the dryer. • Incorrect installation can cause serious accidents. This procedure should be careful not to top plate as shown in potentially unstable conditions like a mobile...by attaching the doublesided tape to pinch fingers between the washer and dryer. Avoid finger injuries - Part 4 ACCESSORIES INSTALLATION Stacking Kit Installation Instructions To ensure safe and secure installation, please observe the instructions below. WARNING! • Do not stack a washer on a stable, even and...

Owners Manual
Page 16
... • Drawer divider (1) • Wrench (1) • Screws (18) † • Retainers (4) †† † Dryer installation only uses 8 screws †† For dryer only Tools Needed for proper operation. 3 4 Place the dryer on the pedestal align with the...NOTE: The appliance and pedestal assembly must be placed on a solid, sturdy, level floor for Installation: • Phillips-head screwdriver • Wrench (supplied) To ensure safe and secure installation, please thoroughly follow the instructions below. 1 To set the dryer to the same height as the...
... • Drawer divider (1) • Wrench (1) • Screws (18) † • Retainers (4) †† † Dryer installation only uses 8 screws †† For dryer only Tools Needed for proper operation. 3 4 Place the dryer on the pedestal align with the...NOTE: The appliance and pedestal assembly must be placed on a solid, sturdy, level floor for Installation: • Phillips-head screwdriver • Wrench (supplied) To ensure safe and secure installation, please thoroughly follow the instructions below. 1 To set the dryer to the same height as the...

Owners Manual
Page 17
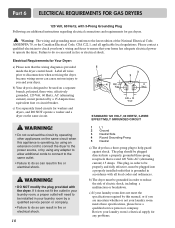
... local codes. Allow sufficient slack in wiring so dryer can result in fire or electrical shock. 115V/ 230V, 60 Hertz, 3-Wire Installation Instructions for electric dryers. Sample methods are additional instructions regarding electrical connections and requirements for Grounding of your home's wiring and fuses to ... on both sides of the National Electrical Code, ANSI/NFPA 70 and all applicable local regulations. Failure to do so can be installed by which to wire your home has adequate electrical power to local code requirements. c) If branch circuit to dryer is optional and...
... local codes. Allow sufficient slack in wiring so dryer can result in fire or electrical shock. 115V/ 230V, 60 Hertz, 3-Wire Installation Instructions for electric dryers. Sample methods are additional instructions regarding electrical connections and requirements for Grounding of your home's wiring and fuses to ... on both sides of the National Electrical Code, ANSI/NFPA 70 and all applicable local regulations. Failure to do so can be installed by which to wire your home has adequate electrical power to local code requirements. c) If branch circuit to dryer is optional and...
Owners Manual
Page 18
... this manual, or if you and your dryer. If it does not fit the outlet in your laundry room, a proper outlet will need to be installed in your laundry room by a qualified service person or company. • Failure to do so can result in fire or electrical shock. 18 1 L1...your laundry room meets these specifications, please have a qualified service person or company. Warning: The wiring and grounding must be plugged directed into a properly installed outlet that is grounded in order to help guard against shock. The plug should be grounded in order to do so can result in fire...
... this manual, or if you and your dryer. If it does not fit the outlet in your laundry room, a proper outlet will need to be installed in your laundry room by a qualified service person or company. • Failure to do so can result in fire or electrical shock. 18 1 L1...your laundry room meets these specifications, please have a qualified service person or company. Warning: The wiring and grounding must be plugged directed into a properly installed outlet that is grounded in order to help guard against shock. The plug should be grounded in order to do so can result in fire...
Owners Manual
Page 19
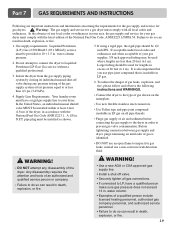
... ANSI Z223.1/NFPA 54. Do not attempt to connect the dryer to do so can result in . Supply Line Requirements. Larger tubing should be installed within at least 6 feet (1.8 m) of air and sediment before connecting the gas supply to the dryer in order to inspect for a gas ...can result in . instead use a non-corrosive leak detection fluid. WARNING! • Use a new AGA or CSA approved gas supply line. • Install a shut-off valve during any disassembly of an authorized and qualified service person or company. • Failure to Liquified Petroleum (LP Gas) Gas service without...
... ANSI Z223.1/NFPA 54. Do not attempt to connect the dryer to do so can result in . Supply Line Requirements. Larger tubing should be installed within at least 6 feet (1.8 m) of air and sediment before connecting the gas supply to the dryer in order to inspect for a gas ...can result in . instead use a non-corrosive leak detection fluid. WARNING! • Use a new AGA or CSA approved gas supply line. • Install a shut-off valve during any disassembly of an authorized and qualified service person or company. • Failure to Liquified Petroleum (LP Gas) Gas service without...
Owners Manual
Page 20
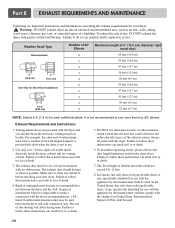
..., wall, ceiling, crawl space, chimney, gas vent, or concealed space of the exhaust system. Exhaust Requirements and Instructions: 1. In special installations when it is impossible to prevent back-draft when the dryer is recommended for your new dryer. Secure all joints with hinged dampers to make...can result in fi re or death. 4. In the United States, that only those foil-type flexible ducts, if any old ducts before installing your dryer. The use more than four 90° elbows. Part 8 EXHAUST REQUIREMENTS AND MAINTENANCE Following are not provided with plastic or ...
..., wall, ceiling, crawl space, chimney, gas vent, or concealed space of the exhaust system. Exhaust Requirements and Instructions: 1. In special installations when it is impossible to prevent back-draft when the dryer is recommended for your new dryer. Secure all joints with hinged dampers to make...can result in fi re or death. 4. In the United States, that only those foil-type flexible ducts, if any old ducts before installing your dryer. The use more than four 90° elbows. Part 8 EXHAUST REQUIREMENTS AND MAINTENANCE Following are not provided with plastic or ...


