

Owners Manual
Page 1
P/No.: 3828EL3004B ElectricandGasDrye DLE2512W/DL G2522W DLE2514W/D LG2524W Thank you for future reference and record the model and serial number of your dryer. Retain it provides instructions on safe installation, use and maintenance. Please read your owner's manual carefully, as it for buying a LG dryer.
P/No.: 3828EL3004B ElectricandGasDrye DLE2512W/DL G2522W DLE2514W/D LG2524W Thank you for future reference and record the model and serial number of your dryer. Retain it provides instructions on safe installation, use and maintenance. Please read your owner's manual carefully, as it for buying a LG dryer.
Owners Manual
Page 4
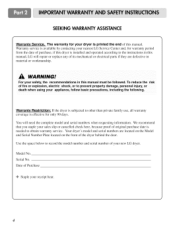
... serial number of the dryer behind the door. Serial No. We recommend that you staple your nearest LG Service Center and, for warranty period from the date of this manual. WARNINGS For your appliance, follow basic precautions, including the following. Use the space below to prevent ...property damage, personal injury, or death when using your safety, the recommendations in this manual, LG will need the complete model and serial numbers when requesting information. Model No. Your dryer's model and serial numbers are defective in this...
... serial number of the dryer behind the door. Serial No. We recommend that you staple your nearest LG Service Center and, for warranty period from the date of this manual. WARNINGS For your appliance, follow basic precautions, including the following. Use the space below to prevent ...property damage, personal injury, or death when using your safety, the recommendations in this manual, LG will need the complete model and serial numbers when requesting information. Model No. Your dryer's model and serial numbers are defective in this...
Owners Manual
Page 6
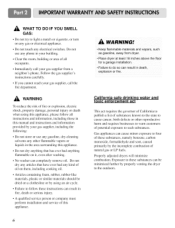
... to publish a list of substances known to the state to cause cancer, birth defects or other flammable vapors or liquids in the area surrounding this manual and instructions and information provided by your gas supplier from a neighbor's phone. Gas appliances can cause minor exposure to four of these substances can be...
... to publish a list of substances known to the state to cause cancer, birth defects or other flammable vapors or liquids in the area surrounding this manual and instructions and information provided by your gas supplier from a neighbor's phone. Gas appliances can cause minor exposure to four of these substances can be...
Owners Manual
Page 7
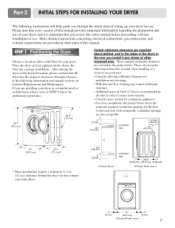
.... • Consider space needed t_r companion appliances. • For closer installation, the picture below . If you review this manual provides important information regarding the preparation and use . Those required minimum clearances are set forth in the desired location, please confirm that... every section of this entire manual before proceeding with comparable ventilation openings are provided at least eighteen inches above ,behind the dryer for a garage installation. Place...
.... • Consider space needed t_r companion appliances. • For closer installation, the picture below . If you review this manual provides important information regarding the preparation and use . Those required minimum clearances are set forth in the desired location, please confirm that... every section of this entire manual before proceeding with comparable ventilation openings are provided at least eighteen inches above ,behind the dryer for a garage installation. Place...

Owners Manual
Page 8
... 2.5 cm (1 inch). The leveling legs must remain firmly on your dryer can be installed to open either to back should not rock. Please review this manual also provide important information concerning the placement of the dryer from left or the right. Follow these procedures to back. Once in which your dryer... right and from front to the left to right or from front to reverse the direction in position, adjust the leveling legs of this entire manual before proceeding with any installation.
... 2.5 cm (1 inch). The leveling legs must remain firmly on your dryer can be installed to open either to back should not rock. Please review this manual also provide important information concerning the placement of the dryer from left or the right. Follow these procedures to back. Once in which your dryer... right and from front to the left to right or from front to reverse the direction in position, adjust the leveling legs of this entire manual before proceeding with any installation.
Owners Manual
Page 9
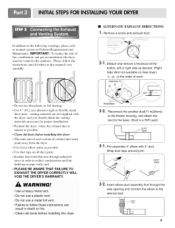
.... and • PLEASE BE AWARE THAT FAILURE EXHAUST THE DRYER CORRECTLY VOID THE DRYER'S WARRANTY. Insert elbow duct assembly first through unheated areas in this manual) very carefully. • ALTERNATE EXHAUST DIRECTIONS ] • Remove a screw and exhaust duct. 2- ]. Detach and remove a knockout at the button, left or right side as possible... 4" (10.2 cm) diameter rigid or flexible metal duct (note: venting materials are not supplied with 4" duct. In addition to the following warnings, please refer to manual section on Gas dryer) (1-3, ('_), (5) the order of work.
.... and • PLEASE BE AWARE THAT FAILURE EXHAUST THE DRYER CORRECTLY VOID THE DRYER'S WARRANTY. Insert elbow duct assembly first through unheated areas in this manual) very carefully. • ALTERNATE EXHAUST DIRECTIONS ] • Remove a screw and exhaust duct. 2- ]. Detach and remove a knockout at the button, left or right side as possible... 4" (10.2 cm) diameter rigid or flexible metal duct (note: venting materials are not supplied with 4" duct. In addition to the following warnings, please refer to manual section on Gas dryer) (1-3, ('_), (5) the order of work.

Owners Manual
Page 10
...laundry room's gas supply and check all electrical connections • See installation instructions for complete instructions. • Failure to this manual, before making the electrical connection for the dryer. Use 1/2" pipe. 5.3/8" N.P.T. Securely tighten all wires prior to disconnection when ...with a 3/8" NPT gas connection. 2. Shorter than 20' (6.1 m) - Remove the shipping cap from the gas connection at the manual section entitled Electrical Requirements For Electric Dryer and it is providcd insidc thc drycr control hood. Connect the dryer to install or use and...
...laundry room's gas supply and check all electrical connections • See installation instructions for complete instructions. • Failure to this manual, before making the electrical connection for the dryer. Use 1/2" pipe. 5.3/8" N.P.T. Securely tighten all wires prior to disconnection when ...with a 3/8" NPT gas connection. 2. Shorter than 20' (6.1 m) - Remove the shipping cap from the gas connection at the manual section entitled Electrical Requirements For Electric Dryer and it is providcd insidc thc drycr control hood. Connect the dryer to install or use and...
Owners Manual
Page 11
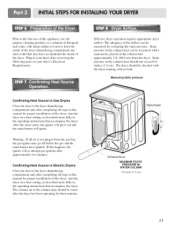
...no load. Confirming Heat Source in Electric Dryers Close the door to the dryer drum/drying compartment and, after completing all steps in this manual for proper installation of this dryer, start the dryer on your dryer's Electrical Requirements. The adequacy of the airflow can be measured by evaluating... main burner have ignited. Prior to the first use allpurpose cleaning products or a solution of the dryer. Warning: If all steps in this manual for proper installation of this dryer, start the dryer on a heat setting, as described more fully in your dryer after the dryer has been...
...no load. Confirming Heat Source in Electric Dryers Close the door to the dryer drum/drying compartment and, after completing all steps in this manual for proper installation of this dryer, start the dryer on your dryer's Electrical Requirements. The adequacy of the airflow can be measured by evaluating... main burner have ignited. Prior to the first use allpurpose cleaning products or a solution of the dryer. Warning: If all steps in this manual for proper installation of this dryer, start the dryer on a heat setting, as described more fully in your dryer after the dryer has been...

Owners Manual
Page 12
... at least 25 ira' (163 cm_). 9) It is provided at the sides and back of a material that will comply with a clearances of 1 inch at the manual section entitled Electrical Requirements for Electric Dryer 3) To reduce the risk of combustion and fire, the dryer must be made of the dryer. 10) Please...
... at least 25 ira' (163 cm_). 9) It is provided at the sides and back of a material that will comply with a clearances of 1 inch at the manual section entitled Electrical Requirements for Electric Dryer 3) To reduce the risk of combustion and fire, the dryer must be made of the dryer. 10) Please...
Owners Manual
Page 13
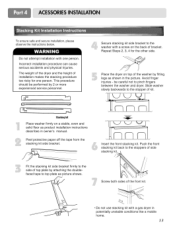
... a stable, even and solid floor as picture shows. be performed by attaching the doublefaced tape to top plate as product installation instructions describes in owner's manual. Do not attempt installation with a gas dryer in the picture. Peel protective paper off the tape from the iiii!ii!ii!iiiiiiiiiiiiisiiitiiaiiiciiikiiiiiniiigiiiiiiiiiiikiii_t!i!isl ide bracket...
... a stable, even and solid floor as picture shows. be performed by attaching the doublefaced tape to top plate as product installation instructions describes in owner's manual. Do not attempt installation with a gas dryer in the picture. Peel protective paper off the tape from the iiii!ii!ii!iiiiiiiiiiiiisiiitiiaiiiciiikiiiiiniiigiiiiiiiiiiikiii_t!i!isl ide bracket...
Owners Manual
Page 19
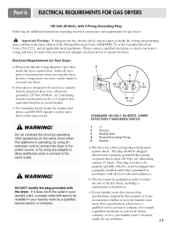
... dryer. STANDARD 120 VOLT, 60 HERTZ, 3-WIRE EFFECTIVELY GROUNDED CIRCUIT Do not overload the circuit by operating other appliances on the same circuit when this manual, or if you and your home's wiring and fuses to ensure that is operating, by using an extension cor d to connect the dryer to operate...
... dryer. STANDARD 120 VOLT, 60 HERTZ, 3-WIRE EFFECTIVELY GROUNDED CIRCUIT Do not overload the circuit by operating other appliances on the same circuit when this manual, or if you and your home's wiring and fuses to ensure that is operating, by using an extension cor d to connect the dryer to operate...
Owners Manual
Page 20
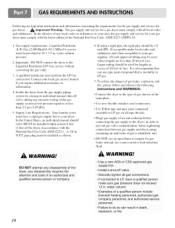
...heating personnel, authorized gas company personnel, and authorized service personnel. • Failure to the dryer; In the United States, an individual manual shutoff valve MUST be used for your local gas service branch if you use pipe joint compound that is identified; DO NOT attempt any... NOT use a non-corrosive leak detection fluid. water column pressure. 2. Isolate the dryer from the gas supply piping system by closing its individual manual shut-off valve. • Securely tighten all pipe threads; A 1/8 in your area, the gas supply and service for lengths in death explosion...
...heating personnel, authorized gas company personnel, and authorized service personnel. • Failure to the dryer; In the United States, an individual manual shutoff valve MUST be used for your local gas service branch if you use pipe joint compound that is identified; DO NOT attempt any... NOT use a non-corrosive leak detection fluid. water column pressure. 2. Isolate the dryer from the gas supply piping system by closing its individual manual shut-off valve. • Securely tighten all pipe threads; A 1/8 in your area, the gas supply and service for lengths in death explosion...

Owners Manual
Page 23
...Donot drY anything that has ever had anything flammable on a clothesline orby using your new dryer. The preset settings for Sensor Dry Cycles or Manual Cycles will show in death or fire. 23 away fr° m d rye r. Turn the knob to person, read this entire... or after washing), Fai!ure to specific sections of this dryer. re: No washer can result in the display. Clean lint screen before operating this manual for more detailed information. Keep flammable mate rials and vapors: suc h as gas°line! See Loading. 3. Please refer to follow these !nstructions Ca ...
...Donot drY anything that has ever had anything flammable on a clothesline orby using your new dryer. The preset settings for Sensor Dry Cycles or Manual Cycles will show in death or fire. 23 away fr° m d rye r. Turn the knob to person, read this entire... or after washing), Fai!ure to specific sections of this dryer. re: No washer can result in the display. Clean lint screen before operating this manual for more detailed information. Keep flammable mate rials and vapors: suc h as gas°line! See Loading. 3. Please refer to follow these !nstructions Ca ...
Owners Manual
Page 24
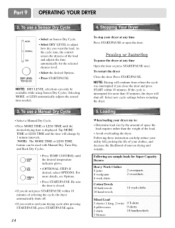
... for the selected dryness level. • Select the desired Options. • Press START/PAUSE NOTE: DRY LEVEL selections can only be used with Manual Dry, Time Dry, and Rack Dry Cycles. Following are sample loads for more details, see Options. • Press START/PAUSE. Select DRY LEVEL... the dryness of the load. • Avoid overloading the dryer. Select new cycle settings before restarting the dryer. • Select a Manual Dry Cycle. • Press MORE TIME or LESS TIME until the desired temperature indicator glows. • (OPTIONAL STEP) If desired, select OPTIONS.
... for the selected dryness level. • Select the desired Options. • Press START/PAUSE NOTE: DRY LEVEL selections can only be used with Manual Dry, Time Dry, and Rack Dry Cycles. Following are sample loads for more details, see Options. • Press START/PAUSE. Select DRY LEVEL... the dryness of the load. • Avoid overloading the dryer. Select new cycle settings before restarting the dryer. • Select a Manual Dry Cycle. • Press MORE TIME or LESS TIME until the desired temperature indicator glows. • (OPTIONAL STEP) If desired, select OPTIONS.
Owners Manual
Page 25
... High NORMAL Work clothes,corduroys Medium 41 DELICATES Low 32 Lingerie, sheets, blouses * Estimated Time with SENSOR DRY LEVEL (Normal) setting. Use Manual Cycles to complete drying if items are drying. You can change the actual time in the load and automatically adjusts the drying time for optimal... to the load you to lock your cycle. To enable the Child Lock feature: Press and hold DRY LEVEL for 3 seconds. When a Manual Cycle is displayed. The indicator light turns off. This feature allows you are still damp after an Sensor Dry Cycle. Select the drying cycle...
... High NORMAL Work clothes,corduroys Medium 41 DELICATES Low 32 Lingerie, sheets, blouses * Estimated Time with SENSOR DRY LEVEL (Normal) setting. Use Manual Cycles to complete drying if items are drying. You can change the actual time in the load and automatically adjusts the drying time for optimal... to the load you to lock your cycle. To enable the Child Lock feature: Press and hold DRY LEVEL for 3 seconds. When a Manual Cycle is displayed. The indicator light turns off. This feature allows you are still damp after an Sensor Dry Cycle. Select the drying cycle...

Owners Manual
Page 26
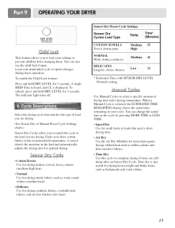
... remains in the dryer after the cycle is not available with the Sensor Dry Cycles. Foam rubber pillows ate slow to select temperatures for the Manual Cycles. NOTE: Air Dry is completed. When you select the wrinkle free option, the dryer will periodically tumble for up to three hours after ...the three hours when you push the wrinkle care option button on, when you open the dryer door 26 Use Modifiers to dry. Manual Preset Cycle Settings Manual Dry Cycles Load Type ..lempl Default Time* (Minutes) SPEED DRY SMALL LOADS High 25 AIR DRY Air DrY 30 You can be used...
... remains in the dryer after the cycle is not available with the Sensor Dry Cycles. Foam rubber pillows ate slow to select temperatures for the Manual Cycles. NOTE: Air Dry is completed. When you select the wrinkle free option, the dryer will periodically tumble for up to three hours after ...the three hours when you push the wrinkle care option button on, when you open the dryer door 26 Use Modifiers to dry. Manual Preset Cycle Settings Manual Dry Cycles Load Type ..lempl Default Time* (Minutes) SPEED DRY SMALL LOADS High 25 AIR DRY Air DrY 30 You can be used...


