

Owners Manual
Page 1
P/No.: 3828EL3004B ElectricandGasDrye DLE2512W/DL G2522W DLE2514W/D LG2524W Thank you for future reference and record the model and serial number of your owner's manual carefully, as it for buying a LG dryer. Please read your dryer. Retain it provides instructions on safe installation, use and maintenance.
P/No.: 3828EL3004B ElectricandGasDrye DLE2512W/DL G2522W DLE2514W/D LG2524W Thank you for future reference and record the model and serial number of your owner's manual carefully, as it for buying a LG dryer. Please read your dryer. Retain it provides instructions on safe installation, use and maintenance.
Owners Manual
Page 2
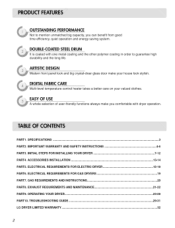
... 20 PART8. OPERATING YOUR DRYER ... 23-28 PART10. DOUBLE-COATED STEELDRUM It is coated with dryer operation. ACCESSORIES INSTALLATION ... 13-14 PART5. ELECTRICAL REQUIREMENTS FOR ELECTRIC DRYER 15-18 PART6. INITIAL STEPS FOR INSTALLING YOUR DRYER 7-12 PART4. EXHAUST REQUIREMENTS... from good time efficiency, quiet operation and energy saving system. SPECIFICATIONS ... 3 PART2. PART1. ELECTRICAL REQUIREMENTS FOR GAS DRYERS 19 PART7. DIGITAL FABRIC CARE Multi-level temperature control heater takes a better care on your house look stylish. IMPORTANT WARRANTY...
... 20 PART8. OPERATING YOUR DRYER ... 23-28 PART10. DOUBLE-COATED STEELDRUM It is coated with dryer operation. ACCESSORIES INSTALLATION ... 13-14 PART5. ELECTRICAL REQUIREMENTS FOR ELECTRIC DRYER 15-18 PART6. INITIAL STEPS FOR INSTALLING YOUR DRYER 7-12 PART4. EXHAUST REQUIREMENTS... from good time efficiency, quiet operation and energy saving system. SPECIFICATIONS ... 3 PART2. PART1. ELECTRICAL REQUIREMENTS FOR GAS DRYERS 19 PART7. DIGITAL FABRIC CARE Multi-level temperature control heater takes a better care on your house look stylish. IMPORTANT WARRANTY...
Owners Manual
Page 3
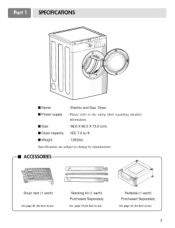
Stacking kit (1 each ) Purchased Separately See page 14 for how to use. Pedestal (1 each ) Purchased Separately See page 13for how to use. • Name : Electric and Gas Dryer • Power supply : Please refer to the rating label regarding detailed information. • Size • Dryer capacity : 68.6 X 96.5 X 73.0 (cm) : IEC 7.0 cu.ft. • Weight : 126(Ibs) Specifications are subject to change by manufacturer. --II ACCESSORIES Dryer rack (1 each) See page 26 for how to use. 3
Stacking kit (1 each ) Purchased Separately See page 14 for how to use. Pedestal (1 each ) Purchased Separately See page 13for how to use. • Name : Electric and Gas Dryer • Power supply : Please refer to the rating label regarding detailed information. • Size • Dryer capacity : 68.6 X 96.5 X 73.0 (cm) : IEC 7.0 cu.ft. • Weight : 126(Ibs) Specifications are subject to change by manufacturer. --II ACCESSORIES Dryer rack (1 each) See page 26 for how to use. 3
Owners Manual
Page 4
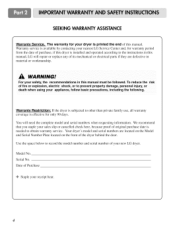
To reduce the risk of fire or explosion, electric shock, or to record the model number and serial number of your new LG dryer. Use the space below to prevent property damage, personal injury, or death when using your safety, the recommendations in this manual.... WARNINGS For your appliance, follow basic precautions, including the following. Date of Purchase _\t/ :_ Staple your dryer is printed the end of purchase, if this manual, LG will need the complete model and serial numbers when requesting information. We recommend that you staple your nearest...
To reduce the risk of fire or explosion, electric shock, or to record the model number and serial number of your new LG dryer. Use the space below to prevent property damage, personal injury, or death when using your safety, the recommendations in this manual.... WARNINGS For your appliance, follow basic precautions, including the following. Date of Purchase _\t/ :_ Staple your dryer is printed the end of purchase, if this manual, LG will need the complete model and serial numbers when requesting information. We recommend that you staple your nearest...
Owners Manual
Page 5
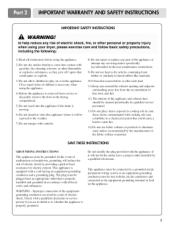
... or discarded, remove the door to the drying compartment. 5) Do not reach into contact with a qualified electrician or service person if you are in your dryer. IMPORTANT SAFETY INSTRUCTIONS WARNING! This appliance is properly grounded. WARNING - hnproper connection of the equipmentgrounding conductor can result in the user-maintenance instructions. 9) Do not...
... or discarded, remove the door to the drying compartment. 5) Do not reach into contact with a qualified electrician or service person if you are in your dryer. IMPORTANT SAFETY INSTRUCTIONS WARNING! This appliance is properly grounded. WARNING - hnproper connection of the equipmentgrounding conductor can result in the user-maintenance instructions. 9) Do not...
Owners Manual
Page 6
...air cycle. • Failure to follow these substances, namely benzene, carbon monoxide, formaldehyde and soot, caused primarily by properly venting the dryer to the outdoors. Do not use any gasoline, dry-cleaning solvents any electrical switches. Follow the gas supplier's instructions carefully. •...; If you cannot reach your gas supplier from dryer. • Place dryer at least 18 inches above the floor for a garage installation. • Failure to do so can completely remove oil. Do...
...air cycle. • Failure to follow these substances, namely benzene, carbon monoxide, formaldehyde and soot, caused primarily by properly venting the dryer to the outdoors. Do not use any gasoline, dry-cleaning solvents any electrical switches. Follow the gas supplier's instructions carefully. •...; If you cannot reach your gas supplier from dryer. • Place dryer at least 18 inches above the floor for a garage installation. • Failure to do so can completely remove oil. Do...
Owners Manual
Page 7
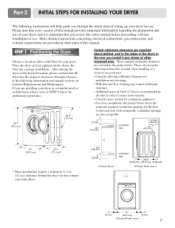
...38.7" (98.3 crn) 27 68.6 cm) 29.6" (75.3 cm) Certain minimum clearance are provided at least eighteen inches above ,behind the dryer for use . Please note that every section of this entire manual before proceeding with a solid floor for a garage installation. The following instructions will... additional clearance t_r installation and servicing. • Wall,door and flow molding may require additional clearance. • Additional space of the dryer in the ever you install it is recommended an all sides in order to reduce noise transfer. • Consider space needed t_r companion...
...38.7" (98.3 crn) 27 68.6 cm) 29.6" (75.3 cm) Certain minimum clearance are provided at least eighteen inches above ,behind the dryer for use . Please note that every section of this entire manual before proceeding with a solid floor for a garage installation. The following instructions will... additional clearance t_r installation and servicing. • Wall,door and flow molding may require additional clearance. • Additional space of the dryer in the ever you install it is recommended an all sides in order to reduce noise transfer. • Consider space needed t_r companion...

Owners Manual
Page 8
... to right or from front to back should not rock. Follow these procedures to reverse the direction in position, adjust the leveling legs of the dryer until it is not level, and if the slope exceeds 2.5 cm (1 inch), a load may not tumble properly and internal sensors may malfunction. If ...the dryer is level from left to right and from front to back. Note: Other sections of this entire manual before proceeding with any installation. Please review ...
... to right or from front to back should not rock. Follow these procedures to reverse the direction in position, adjust the leveling legs of the dryer until it is not level, and if the slope exceeds 2.5 cm (1 inch), a load may not tumble properly and internal sensors may malfunction. If ...the dryer is level from left to right and from front to back. Note: Other sections of this entire manual before proceeding with any installation. Please review ...
Owners Manual
Page 9
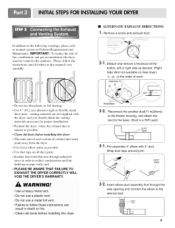
...runs through the side opening and connect the elbow to the base. (Duct is shorter as possible • Clean old ducts beJbre installing this dryer • The male end of each section of work. Detach and remove a knockout at the button, left or right side as possible &#...Exhaust Requirements and Maintenance. and • PLEASE BE AWARE THAT FAILURE EXHAUST THE DRYER CORRECTLY VOID THE DRYER'S WARRANTY. To reduce the risk of fire, combustion, and gas accumulation, the dryer must point away from the dryer • Use fewer elbow joints as desired. (Right Side Vent not available on...
...runs through the side opening and connect the elbow to the base. (Duct is shorter as possible • Clean old ducts beJbre installing this dryer • The male end of each section of work. Detach and remove a knockout at the button, left or right side as possible &#...Exhaust Requirements and Maintenance. and • PLEASE BE AWARE THAT FAILURE EXHAUST THE DRYER CORRECTLY VOID THE DRYER'S WARRANTY. To reduce the risk of fire, combustion, and gas accumulation, the dryer must point away from the dryer • Use fewer elbow joints as desired. (Right Side Vent not available on...

Owners Manual
Page 10
... and Instructions. _2 5 _-3 New stainless steel flexible connector. Use Design AGA Certified Connector. 2. 1/8" NPT Pipe Plug (for electric dryers. Gas Conuection 1. Confirm that the type of connector only if allowed by your laundry room is appropriate for use a new stainless steel...the back of this manual, before making the electrical connection for checking inlet gas pressure) 3. Label all connections between the dryer and your laundry room's gas supply and check all electrical connections • See installation instructions for manufactured (mobile) home installations...
... and Instructions. _2 5 _-3 New stainless steel flexible connector. Use Design AGA Certified Connector. 2. 1/8" NPT Pipe Plug (for electric dryers. Gas Conuection 1. Confirm that the type of connector only if allowed by your laundry room is appropriate for use a new stainless steel...the back of this manual, before making the electrical connection for checking inlet gas pressure) 3. Label all connections between the dryer and your laundry room's gas supply and check all electrical connections • See installation instructions for manufactured (mobile) home installations...
Owners Manual
Page 11
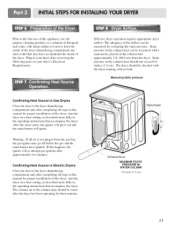
... Heat Source in this manual for proper installation of this dryer, start the dryer on your dryer after the dryer has been operating for proper installation of this manual for three minutes. Effective dryer operation requires appropriate dryer airflow. The adequacy of the airflow can be measured by...on a heat setting, as described more fully in this dryer, start the dryer on the exhaust duct approximately 2 ft. (60.9 cm) from the dryer. The exhaust air or the exhaust pipe should be checked with the dryer running with no load. Prior to the first use allpurpose ...
... Heat Source in this manual for proper installation of this dryer, start the dryer on your dryer after the dryer has been operating for proper installation of this manual for three minutes. Effective dryer operation requires appropriate dryer airflow. The adequacy of the airflow can be measured by...on a heat setting, as described more fully in this dryer, start the dryer on the exhaust duct approximately 2 ft. (60.9 cm) from the dryer. The exhaust air or the exhaust pipe should be checked with the dryer running with no load. Prior to the first use allpurpose ...

Owners Manual
Page 12
... installation. Any installation in a manufactured or mobile home must be made of the dryer in a manufactured or mobile home: 1) The gas dryer must be vented to the outside. 4) Electric dryers may be aware that the clearance of the duct from any combustible construction be at... the manual section entitled Electrical Requirements for an electric dryer must comply with metal screws or fasteners that will comply with the dryer. WARNING! More detailed information concerning the electrical connection is recommended that you use a rigid or...
... installation. Any installation in a manufactured or mobile home must be made of the dryer in a manufactured or mobile home: 1) The gas dryer must be vented to the outside. 4) Electric dryers may be aware that the clearance of the duct from any combustible construction be at... the manual section entitled Electrical Requirements for an electric dryer must comply with metal screws or fasteners that will comply with the dryer. WARNING! More detailed information concerning the electrical connection is recommended that you use a rigid or...
Owners Manual
Page 13
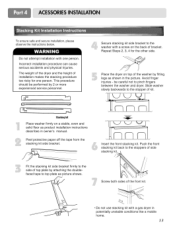
... personnel. ...# Stachingkit Place washer firmly on top of installation makes the stacking procedure too risky for the other side. The weight of the dryer and the height of the washer by attaching the doublefaced tape to top plate as shown in potentially unstable conditions like a mobile home. 13...stoppers of side Fit the stacking kit side bracket firmly to the stopper of the front kit. • Do not use stacking kit with a gas dryer in the picture. Repeat Steps 2, 3, 4 for one person. Avoid finger injuries - This procedure should be careful not to the washer with one ...
... personnel. ...# Stachingkit Place washer firmly on top of installation makes the stacking procedure too risky for the other side. The weight of the dryer and the height of the washer by attaching the doublefaced tape to top plate as shown in potentially unstable conditions like a mobile home. 13...stoppers of side Fit the stacking kit side bracket firmly to the stopper of the front kit. • Do not use stacking kit with a gas dryer in the picture. Repeat Steps 2, 3, 4 for one person. Avoid finger injuries - This procedure should be careful not to the washer with one ...
Owners Manual
Page 14
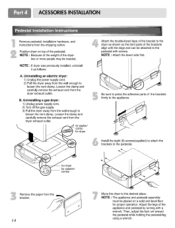
... and pedestal assembly must be needed. B. Loosen the clamp and carefully remove the exhaust vent from the bracket. /4 Move the dryer to the desired place. Install the eight (8) screws(supplied) to attach the brackets to the pedestal. •_....'_.j" "_ for...leg using a wrench. for washer/ combo for proper operation. Uninstalling an electric dryer: 1) Unplug the power supply cord, 2) Pull the dryer away from the shipping carton. Adjust the legs of the bracket to the dryer as follows: A. Remove pedestal, installation hardware, and instructions from the wall enough...
... and pedestal assembly must be needed. B. Loosen the clamp and carefully remove the exhaust vent from the bracket. /4 Move the dryer to the desired place. Install the eight (8) screws(supplied) to attach the brackets to the pedestal. •_....'_.j" "_ for...leg using a wrench. for washer/ combo for proper operation. Uninstalling an electric dryer: 1) Unplug the power supply cord, 2) Pull the dryer away from the shipping carton. Adjust the legs of the bracket to the dryer as follows: A. Remove pedestal, installation hardware, and instructions from the wall enough...

Owners Manual
Page 15
...for field installation in the following pages. g) You must be run with the circuit conductors and connected to local codes and with dryer. terminal or lead on the following pages. d) If branch circuit to the latest edition of the National Electrical Code, ANSI/NFPA ..., 60 Hertz, single phase circuit, AC (alternating current) circuit, fused at 30 Amperes (the circuit must be connected to you and your Electric Electric Dryer: a) Please note that listed on next page. If over fifteen feet (4.50 m), use U.L. (Underwriters Laboratories) listed No. 10 A.W.G. e) The power...
...for field installation in the following pages. g) You must be run with the circuit conductors and connected to local codes and with dryer. terminal or lead on the following pages. d) If branch circuit to the latest edition of the National Electrical Code, ANSI/NFPA ..., 60 Hertz, single phase circuit, AC (alternating current) circuit, fused at 30 Amperes (the circuit must be connected to you and your Electric Electric Dryer: a) Please note that listed on next page. If over fifteen feet (4.50 m), use U.L. (Underwriters Laboratories) listed No. 10 A.W.G. e) The power...

Owners Manual
Page 16
... supply cord. @ 4!wiledirect If this type is available at this type is in order t_r dryer to be using a UL listed, 120/240 volt minimum, 30 amp, dryer power supply cord. Prepare minimum 5fl(l.52m) of power cord to the left and right terminal block screws. 3. Make a 5 inch of power cord External...
... supply cord. @ 4!wiledirect If this type is available at this type is in order t_r dryer to be using a UL listed, 120/240 volt minimum, 30 amp, dryer power supply cord. Prepare minimum 5fl(l.52m) of power cord to the left and right terminal block screws. 3. Make a 5 inch of power cord External...

Owners Manual
Page 17
...of a 3 wire connection, or you are on tight and power cord is in right position. Prepare minimum 5ft(1.52m) of length in order for dryer to center terminal block screw. 2. Then, put the hooked shape end of the wire under the screw of power cord External ground connector 1. Connect ... cord to be sure that the strain relief screw is not available. and be replaced. Make sure that all terminal block nuts are installing your dryer in a mobile home, you must use a 4wire connection. (N4-wirereceptacle EMA type 14-30R) nt plug _1 NeeG/°/pdoP rg ng _ SPtadeetcer2nic_awlsith ...
...of a 3 wire connection, or you are on tight and power cord is in right position. Prepare minimum 5ft(1.52m) of length in order for dryer to center terminal block screw. 2. Then, put the hooked shape end of the wire under the screw of power cord External ground connector 1. Connect ... cord to be sure that the strain relief screw is not available. and be replaced. Make sure that all terminal block nuts are installing your dryer in a mobile home, you must use a 4wire connection. (N4-wirereceptacle EMA type 14-30R) nt plug _1 NeeG/°/pdoP rg ng _ SPtadeetcer2nic_awlsith ...
Owners Manual
Page 19
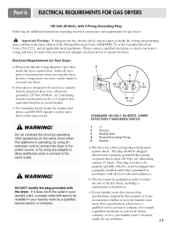
...your laundry room a proper outlet will need to be used on the same circuit when this manual, or if you and your dryer. b) The dryer must conform to the latest edition of electric shock, including a malfunction or breakdown. STANDARD 120 VOLT, 60 HERTZ, 3-WIRE ...alternating current) circuit protected by a qualified service person or corn party. 1 L1 2 Ground 3 Neutral Side 4 Round Grounding Prong 5 Neutral a) The dryer has a three-prong plug to help prevent fire, electric shock, serious injury or death, the wiring and grounding must be plugged directed into a properly ...
...your laundry room a proper outlet will need to be used on the same circuit when this manual, or if you and your dryer. b) The dryer must conform to the latest edition of electric shock, including a malfunction or breakdown. STANDARD 120 VOLT, 60 HERTZ, 3-WIRE ...alternating current) circuit protected by a qualified service person or corn party. 1 L1 2 Ground 3 Neutral Side 4 Round Grounding Prong 5 Neutral a) The dryer has a three-prong plug to help prevent fire, electric shock, serious injury or death, the wiring and grounding must be plugged directed into a properly ...
Owners Manual
Page 20
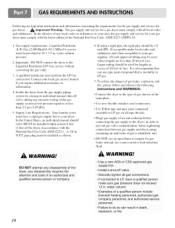
...; To reduce the danger of gas leaks, explosion, and fire, please follow and observe the following instructions and WARNINGS: Connect the dryer to the type of a qualified person include licensed heating personnel, authorized gas company personnel, and authorized service personnel. • Failure ...off valve, during any local codes or ordinances in order to prevent gas valve contamination, before connecting the gas supply to the dryer; Isolate the dryer from the gas supply piping system by closing its individual manual shut-off valve. • Securely tighten all local codes and...
...; To reduce the danger of gas leaks, explosion, and fire, please follow and observe the following instructions and WARNINGS: Connect the dryer to the type of a qualified person include licensed heating personnel, authorized gas company personnel, and authorized service personnel. • Failure ...off valve, during any local codes or ordinances in order to prevent gas valve contamination, before connecting the gas supply to the dryer; Isolate the dryer from the gas supply piping system by closing its individual manual shut-off valve. • Securely tighten all local codes and...

Owners Manual
Page 21
...operating results, please observe the duct length limitations noted in diameter with no obstructions. To reduce the risk of fire, DO NOT exhaust the dryer with duct tape. 5. Make sure to use . 2. Do not install flexible duct in use more than 4 90 ° elbows.... m) 1 47 feet (14.3 m) 2 41 feet (12.5 m) 3 30 feet (9.1 m) 4 22 feet (6.7 m) NOTE : Deduct 6 feet (1.8 m) for your new dryer. 3. Following are not provided with the dryer and you should be four inches (10.2 cm) in the chart above. 21 Venting materials are important instructions and information concerning the...
...operating results, please observe the duct length limitations noted in diameter with no obstructions. To reduce the risk of fire, DO NOT exhaust the dryer with duct tape. 5. Make sure to use . 2. Do not install flexible duct in use more than 4 90 ° elbows.... m) 1 47 feet (14.3 m) 2 41 feet (12.5 m) 3 30 feet (9.1 m) 4 22 feet (6.7 m) NOTE : Deduct 6 feet (1.8 m) for your new dryer. 3. Following are not provided with the dryer and you should be four inches (10.2 cm) in the chart above. 21 Venting materials are important instructions and information concerning the...


