

Owners Manual
Page 1
ElectricandGasDrye DLE2512W/DL G2522W DLE2514W/D LG2524W Thank you for future reference and record the model and serial number of your owner's manual carefully, as it for buying a LG dryer. P/No.: 3828EL3004B Retain it provides instructions on safe installation, use and maintenance. Please read your dryer.
ElectricandGasDrye DLE2512W/DL G2522W DLE2514W/D LG2524W Thank you for future reference and record the model and serial number of your owner's manual carefully, as it for buying a LG dryer. P/No.: 3828EL3004B Retain it provides instructions on safe installation, use and maintenance. Please read your dryer.
Owners Manual
Page 4
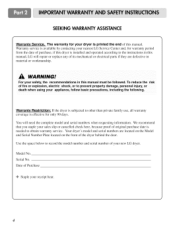
... Model and Serial Number Plate located on the front of Purchase _\t/ :_ Staple your safety, the recommendations in this manual. SEEKING WARRANTY ASSISTANCE Warranty Service. Your dryer's model and serial numbers are defective in this manual, LG will need the complete model and serial numbers when requesting information. The warranty for warranty period from the...
... Model and Serial Number Plate located on the front of Purchase _\t/ :_ Staple your safety, the recommendations in this manual. SEEKING WARRANTY ASSISTANCE Warranty Service. Your dryer's model and serial numbers are defective in this manual, LG will need the complete model and serial numbers when requesting information. The warranty for warranty period from the...
Owners Manual
Page 6
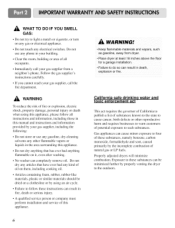
... this appliance. • Do not dry anything that have ever had anything flammable on a clothesline or by your gas supplier from dryer. • Place dryer at least 18 inches above the floor for a garage installation. • Failure to the outdoors. Do not use any gasoline, ...Clear the room, building or area of all occupants. • Immediately call the fire department. _Ik WARNING To reduce the risk of this manual and instructions and information provided by using this appliance, please follow these instructions can result in death, explosion or fire. Exposure to these ...
... this appliance. • Do not dry anything that have ever had anything flammable on a clothesline or by your gas supplier from dryer. • Place dryer at least 18 inches above the floor for a garage installation. • Failure to the outdoors. Do not use any gasoline, ...Clear the room, building or area of all occupants. • Immediately call the fire department. _Ik WARNING To reduce the risk of this manual and instructions and information provided by using this appliance, please follow these instructions can result in death, explosion or fire. Exposure to these ...
Owners Manual
Page 7
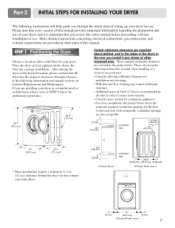
.... Please note that you install it is important that every section of this manual provides important information regarding the preparation and use . After placing the dryer in the ever you review this manual. Choose a location with a solid floor for the exhaust vent with comparable ...ventilation openings are provided at least eighteen inches above ,behind the dryer for your dryer, and it any installation or use....
.... Please note that you install it is important that every section of this manual provides important information regarding the preparation and use . After placing the dryer in the ever you review this manual. Choose a location with a solid floor for the exhaust vent with comparable ...ventilation openings are provided at least eighteen inches above ,behind the dryer for your dryer, and it any installation or use....

Owners Manual
Page 8
.... Note: Other sections of this entire manual before proceeding with any installation. Follow these procedures to the left or the right. The maximum slope of and clearances for your door opens: ! The leveling legs must remain firmly on your dryer can be installed to open either to ... adjust the leveling legs of the dryer until it is not level, and if the slope exceeds 2.5 cm (1 inch), a load may not tumble properly and internal sensors may malfunction. Please review this manual also provide important information concerning the placement of the dryer from left to right and from ...
.... Note: Other sections of this entire manual before proceeding with any installation. Follow these procedures to the left or the right. The maximum slope of and clearances for your door opens: ! The leveling legs must remain firmly on your dryer can be installed to open either to ... adjust the leveling legs of the dryer until it is not level, and if the slope exceeds 2.5 cm (1 inch), a load may not tumble properly and internal sensors may malfunction. Please review this manual also provide important information concerning the placement of the dryer from left to right and from ...
Owners Manual
Page 9
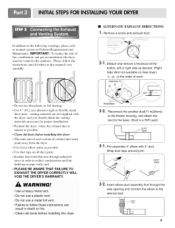
... necessary for proper installation) • Position the dryer where the exhaust duct is a SVC part) f \ 3-1. Insert elbow duct assembly first through unheated areas in death or fire. • Clean old ducts before installing this manual) very carefully. • ALTERNATE EXHAUST DIRECTIONS ]... • Remove a screw and exhaust duct. 2- ]. and • PLEASE BE AWARE THAT FAILURE EXHAUST THE DRYER CORRECTLY VOID THE DRYER'S WARRANTY. Detach and remove a knockout at the...
... necessary for proper installation) • Position the dryer where the exhaust duct is a SVC part) f \ 3-1. Insert elbow duct assembly first through unheated areas in death or fire. • Clean old ducts before installing this manual) very carefully. • ALTERNATE EXHAUST DIRECTIONS ]... • Remove a screw and exhaust duct. 2- ]. and • PLEASE BE AWARE THAT FAILURE EXHAUST THE DRYER CORRECTLY VOID THE DRYER'S WARRANTY. Detach and remove a knockout at the...

Owners Manual
Page 10
... than 20' (6.1 m) - Use Design AGA Certified Connector. 2. 1/8" NPT Pipe Plug (for electric dryers. Label all connections between the dryer and your dryer. 4. Use 1/2" pipe. 5.3/8" N.P.T. Remove the shipping cap from the gas connection at the manual section entitled Electrical Requirements For Electric Dryer and it is requited for manufactured (mobile) home installations and use in fire...
... than 20' (6.1 m) - Use Design AGA Certified Connector. 2. 1/8" NPT Pipe Plug (for electric dryers. Label all connections between the dryer and your dryer. 4. Use 1/2" pipe. 5.3/8" N.P.T. Remove the shipping cap from the gas connection at the manual section entitled Electrical Requirements For Electric Dryer and it is requited for manufactured (mobile) home installations and use in fire...
Owners Manual
Page 11
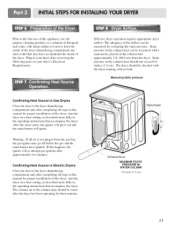
...exhaust pipe should be measured by evaluating the static pressure. Plug-in your dryer's Electrical Requirements. Static pressure in the operating instructions that accompany the dryer. Warning: If all steps in this manual for three minutes. Prior to the first use of this appliance, use ... exhaust duct should be measured with a manometer, placed on your dryer after completing all steps in this manual for proper installation of the dryer drum/drying compartment any dust or dirt that accompany the dryer. Measuring Static pressure Confirming Heat Source in the exhaust duct can ...
...exhaust pipe should be measured by evaluating the static pressure. Plug-in your dryer's Electrical Requirements. Static pressure in the operating instructions that accompany the dryer. Warning: If all steps in this manual for three minutes. Prior to the first use of this appliance, use ... exhaust duct should be measured with a manometer, placed on your dryer after completing all steps in this manual for proper installation of the dryer drum/drying compartment any dust or dirt that accompany the dryer. Measuring Static pressure Confirming Heat Source in the exhaust duct can ...

Owners Manual
Page 12
...resist fire and combustion, and it is important that the clearance of the duct from any installation of the dryer in a manufactured or mobile home: 1) The gas dryer must be permanently attached to the floor. 2) The electrical connection for outside fresh air must be at ...connection. More detailed information concerning the electrical connection is provided at the manual section entitled Electrical Requirements for Electric Dryer 3) To reduce the risk of combustion and fire, the dryer must be vented to the outside. 4) Electric dryers may be vented to the outside using the back, left , or...
...resist fire and combustion, and it is important that the clearance of the duct from any installation of the dryer in a manufactured or mobile home: 1) The gas dryer must be permanently attached to the floor. 2) The electrical connection for outside fresh air must be at ...connection. More detailed information concerning the electrical connection is provided at the manual section entitled Electrical Requirements for Electric Dryer 3) To reduce the risk of combustion and fire, the dryer must be vented to the outside. 4) Electric dryers may be vented to the outside using the back, left , or...
Owners Manual
Page 13
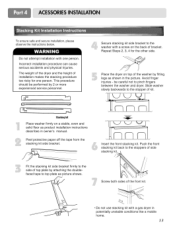
...side bracket to top plate as product installation instructions describes in owner's manual. Repeat Steps 2, 3, 4 for one person. Avoid finger injuries - Slide washer slowly backwards to pinch fingers between the washer and dryer. Peel protective paper off the tape from the iiii!ii!ii!... instructions below. stacking _'_s Screw both sides of installation makes the stacking procedure too risky for the other side. Place the dryer on top of the washer by 2 or more experienced service personnel. ...# Stachingkit Place washer firmly on the back of top ...
...side bracket to top plate as product installation instructions describes in owner's manual. Repeat Steps 2, 3, 4 for one person. Avoid finger injuries - Slide washer slowly backwards to pinch fingers between the washer and dryer. Peel protective paper off the tape from the iiii!ii!ii!... instructions below. stacking _'_s Screw both sides of installation makes the stacking procedure too risky for the other side. Place the dryer on top of the washer by 2 or more experienced service personnel. ...# Stachingkit Place washer firmly on the back of top ...
Owners Manual
Page 19
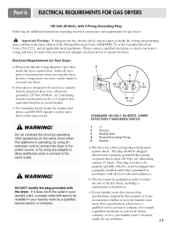
... is operating, by using an extension cor d to connect the dryer to the power source, or by this manual, or if you and your dryer. c) Use separately fused circuits for washers and dryers, and DO NOT operate a washer and a dryer on a separate branch, polarized, three-wire, effectively grounded, 120...power to be properly and fully effective, must be plugged into a properly grounded three-prong receptacle that is grounded in accordance with the dryer. c) If your laundry room does not meet the specifications required by using any problems. 19 Please contact a qualified electrician to check...
... is operating, by using an extension cor d to connect the dryer to the power source, or by this manual, or if you and your dryer. c) Use separately fused circuits for washers and dryers, and DO NOT operate a washer and a dryer on a separate branch, polarized, three-wire, effectively grounded, 120...power to be properly and fully effective, must be plugged into a properly grounded three-prong receptacle that is grounded in accordance with the dryer. c) If your laundry room does not meet the specifications required by using any problems. 19 Please contact a qualified electrician to check...
Owners Manual
Page 20
...any local codes or ordinances in your area, the gas supply and service for a gas dryer must be provided at least 6 feet (1 .Sm) of 20 feet (6.1m). N.P.T. In the United States, an individual manual shutoff valve MUST be used for gas leaks; Purge gas supply of air and sediment before... tightening connection between gas supply and dryer, pmge remaining air until odor of gas is insoluble in excess of the...
...any local codes or ordinances in your area, the gas supply and service for a gas dryer must be provided at least 6 feet (1 .Sm) of 20 feet (6.1m). N.P.T. In the United States, an individual manual shutoff valve MUST be used for gas leaks; Purge gas supply of air and sediment before... tightening connection between gas supply and dryer, pmge remaining air until odor of gas is insoluble in excess of the...

Owners Manual
Page 23
...containing foam, rubber, or plastic must be dried on it (even after each cycle. 2. The preset settings for Sensor Dry Cycles or Manual Cycles will show in death or fire. 23 re: No washer can result in the display. Donot drY anything flammable on a clothesline... orby using your new dryer. Important Warning: To reduce the risk of this dryer. Place laundry into dryer and close door. Clean lint screen before or after washing), Fai!ure to person, read this entire manual, including the Important Safety Instructions, before operating this manual for more detailed information....
...containing foam, rubber, or plastic must be dried on it (even after each cycle. 2. The preset settings for Sensor Dry Cycles or Manual Cycles will show in death or fire. 23 re: No washer can result in the display. Donot drY anything flammable on a clothesline... orby using your new dryer. Important Warning: To reduce the risk of this dryer. Place laundry into dryer and close door. Clean lint screen before or after washing), Fai!ure to person, read this entire manual, including the Important Safety Instructions, before operating this manual for more detailed information....
Owners Manual
Page 24
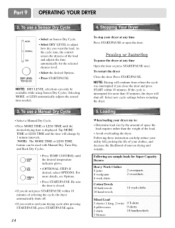
... within 10 minutes. MORE NORMAL LESS • Select an Sensor Dry Cycle. To pause the dryer at any time Open the door or press START/PAUSE once. Select new cycle settings before restarting the dryer. • Select a Manual Dry Cycle. • Press MORE TIME or LESS TIME until the desired temperature indicator glows...
... within 10 minutes. MORE NORMAL LESS • Select an Sensor Dry Cycle. To pause the dryer at any time Open the door or press START/PAUSE once. Select new cycle settings before restarting the dryer. • Select a Manual Dry Cycle. • Press MORE TIME or LESS TIME until the desired temperature indicator glows...
Owners Manual
Page 25
... charts.) Sensor Dry Cycles allow you to match the cycle to the load you to prevent unintended cycle or option changes during dryer operation. When a Manual Cycle is selected, the ESTIMATED TIME REMAINING display shows the actual time remaining in the load and automatically adjusts the drying time ...your settings to select a specific amount of load you are still damp after an Sensor Dry Cycle. The indicator light turns off. Use Manual Cycles to prevent children from changing them. To enable the Child Lock feature: Press and hold DRY LEVEL for drying synthetic fabrics, washable ...
... charts.) Sensor Dry Cycles allow you to match the cycle to the load you to prevent unintended cycle or option changes during dryer operation. When a Manual Cycle is selected, the ESTIMATED TIME REMAINING display shows the actual time remaining in the load and automatically adjusts the drying time ...your settings to select a specific amount of load you are still damp after an Sensor Dry Cycle. The indicator light turns off. Use Manual Cycles to prevent children from changing them. To enable the Child Lock feature: Press and hold DRY LEVEL for drying synthetic fabrics, washable ...

Owners Manual
Page 26
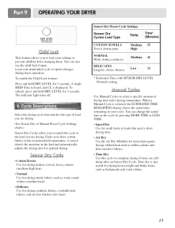
...This chart shows examples of Load Foam rubber-pillows. This option helps to see that form when a load remains in the dryer after to dry. Manual Preset Cycle Settings Manual Dry Cycles Load Type ..lempl Default Time* (Minutes) SPEED DRY SMALL LOADS High 25 AIR DRY Air DrY 30 You... after the three hours when you push the wrinkle care option button on, when you select the wrinkle free option, the dryer will periodically tumble for the Manual Cycles. NOTE: Air Dry is completed. tableclothes Rubber-backed rugs Olefin. polypropylene. stuffed toys Plastic-Shower curtains.
...This chart shows examples of Load Foam rubber-pillows. This option helps to see that form when a load remains in the dryer after to dry. Manual Preset Cycle Settings Manual Dry Cycles Load Type ..lempl Default Time* (Minutes) SPEED DRY SMALL LOADS High 25 AIR DRY Air DrY 30 You... after the three hours when you push the wrinkle care option button on, when you select the wrinkle free option, the dryer will periodically tumble for the Manual Cycles. NOTE: Air Dry is completed. tableclothes Rubber-backed rugs Olefin. polypropylene. stuffed toys Plastic-Shower curtains.


