
Owner's Manual
Page 3
...FOR GAS DRYERS 17 PART5. GAS REQUIREMENTS AND INSTRUCTIONS 18 PART6. IMPORTANT WARRANTY AND SAFETY INSTRUCTIONS 3-5 PART2. TROUBLESHOOTING GUIDE ...27-29 LG DRYER LIMITED WARRANTY ...30 2 INITIAL STEPS FOR INSTALLING YOUR DRYER 6-11 Positioning the Dryer ...6 Procedure for Reversing the Door...7 Connecting the...or Mobile Home 11 . FEATURES AND BENEFITS ...21-26 Using Your Dryer/To use a Sensor Dry Cycle 22 To use a Manual Dryer Cycle/Stopping Your Dryer/Loading 23 Cycle Descriptions...24 Options/Modifiers ...25 Rack Dry/Beeper/Anti-Bacterial/Custom Programming 26 PART8. ...
...FOR GAS DRYERS 17 PART5. GAS REQUIREMENTS AND INSTRUCTIONS 18 PART6. IMPORTANT WARRANTY AND SAFETY INSTRUCTIONS 3-5 PART2. TROUBLESHOOTING GUIDE ...27-29 LG DRYER LIMITED WARRANTY ...30 2 INITIAL STEPS FOR INSTALLING YOUR DRYER 6-11 Positioning the Dryer ...6 Procedure for Reversing the Door...7 Connecting the...or Mobile Home 11 . FEATURES AND BENEFITS ...21-26 Using Your Dryer/To use a Sensor Dry Cycle 22 To use a Manual Dryer Cycle/Stopping Your Dryer/Loading 23 Cycle Descriptions...24 Options/Modifiers ...25 Rack Dry/Beeper/Anti-Bacterial/Custom Programming 26 PART8. ...
Owner's Manual
Page 4
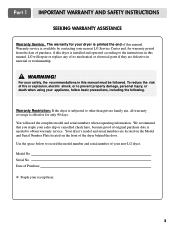
... by contacting your dryer is effective for warranty period from the date of purchase, if this dryer is needed to the instructions in this manual, LG will need the complete model and serial numbers when requesting information. Your dryer's model and serial numbers are located on the Model and Serial... Number Plate located on the front of its mechanical or electrical parts if they are defective in this manual. Model No. The warranty for your nearest LG Service Center and, for only 90 days. You will repair or replace any of the dryer behind the door. Serial...
... by contacting your dryer is effective for warranty period from the date of purchase, if this dryer is needed to the instructions in this manual, LG will need the complete model and serial numbers when requesting information. Your dryer's model and serial numbers are located on the Model and Serial... Number Plate located on the front of its mechanical or electrical parts if they are defective in this manual. Model No. The warranty for your nearest LG Service Center and, for only 90 days. You will repair or replace any of the dryer behind the door. Serial...
Owner's Manual
Page 6
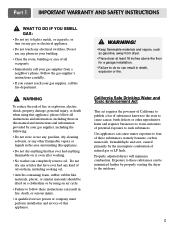
..., such as gasoline, away from a neighbor's phone. WARNING To reduce the risk of potential exposure to do so can result in the area surrounding this manual and instructions and information provided by using this appliance, please follow these substrances, namely benzene, carbon monoxide, formaldehyde and soot, caused primarily by properly venting...
..., such as gasoline, away from a neighbor's phone. WARNING To reduce the risk of potential exposure to do so can result in the area surrounding this manual and instructions and information provided by using this appliance, please follow these substrances, namely benzene, carbon monoxide, formaldehyde and soot, caused primarily by properly venting...
Owner's Manual
Page 7
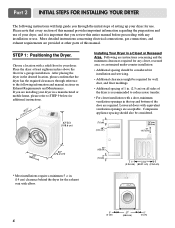
...108.6 cm) Installing Your Dryer in a Closet or Recessed Area. STEP 1: Positioning the Dryer. Place the dryer at other parts of this manual. Following are instructions concerning and the minimum clearances required for wall, door, and floor moldings. • Additional spacing of 1 in the desired...confirm that the dryer has the required clearances through the initial steps of the dryer is important that every section of this entire manual before proceeding with any closet, recessed area, or customized under-counter installation: • Additional spacing should also be required for ...
...108.6 cm) Installing Your Dryer in a Closet or Recessed Area. STEP 1: Positioning the Dryer. Place the dryer at other parts of this manual. Following are instructions concerning and the minimum clearances required for wall, door, and floor moldings. • Additional spacing of 1 in the desired...confirm that the dryer has the required clearances through the initial steps of the dryer is important that every section of this entire manual before proceeding with any closet, recessed area, or customized under-counter installation: • Additional spacing should also be required for ...

Owner's Manual
Page 8
... dryer. Part 2 INITIAL STEPS FOR INSTALLING YOUR DRYER Once in which your dryer may malfunction. Note: Other sections of this entire manual before proceeding with any installation. Please review this manual also provide important information concerning the placement of and clearances for Reversing the Door The door on the floor and the...
... dryer. Part 2 INITIAL STEPS FOR INSTALLING YOUR DRYER Once in which your dryer may malfunction. Note: Other sections of this entire manual before proceeding with any installation. Please review this manual also provide important information concerning the placement of and clearances for Reversing the Door The door on the floor and the...
Owner's Manual
Page 9
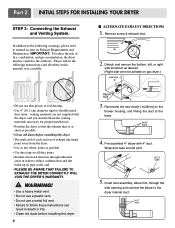
... old ducts before installing this dryer 8 Attach hole 3. Please follow these instructions can result in (28cm)] to the blower housing, and Fixing the duct to manual section on pipe walls; Pre-assemble 4" elbow with the dryer, and you should obtain the venting materials necessary for proper installation) • Position the dryer... the Exhaust and Venting System. Remove screw & exhaust duct. 2. Reconnect the new duct[11 in death or fire. • Clean old ducts before installing this manual) very carefully.
... old ducts before installing this dryer 8 Attach hole 3. Please follow these instructions can result in (28cm)] to the blower housing, and Fixing the duct to manual section on pipe walls; Pre-assemble 4" elbow with the dryer, and you should obtain the venting materials necessary for proper installation) • Position the dryer... the Exhaust and Venting System. Remove screw & exhaust duct. 2. Reconnect the new duct[11 in death or fire. • Clean old ducts before installing this manual) very carefully.
Owner's Manual
Page 10
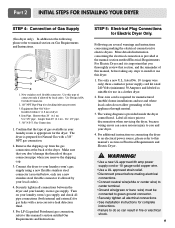
...you and your laundry room's gas supply. Use 1/2" pipe. 5. 3/8" N.P.T. Remove the shipping cap from the gas connection at the manual section entitled Electrical Requirements For Electric Dryer and it is provided at the back of this appliance through neutral. 3. For additional instruction on ...home installations and use a new stainless steel flexible connector if allowed by local codes. In addition to the following, please refer to this manual's section on your laundry room is provided inside the dryer control hood. Shorter than 20' (6.1 m) - The dryer is required for Natural...
...you and your laundry room's gas supply. Use 1/2" pipe. 5. 3/8" N.P.T. Remove the shipping cap from the gas connection at the manual section entitled Electrical Requirements For Electric Dryer and it is provided at the back of this appliance through neutral. 3. For additional instruction on ...home installations and use a new stainless steel flexible connector if allowed by local codes. In addition to the following, please refer to this manual's section on your laundry room is provided inside the dryer control hood. Shorter than 20' (6.1 m) - The dryer is required for Natural...
Owner's Manual
Page 11
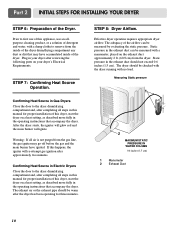
Plug in this manual for three minutes. After the dryer starts, the igniter will glow red and the main burner will re-attempt gas ignition after the dryer has ... STEPS FOR INSTALLING YOUR DRYER STEP 6: Preparation of the airflow can be measured with a manometer, placed on a heat setting, as described more fully in this manual for proper installation of this happens, the igniter will ignite. The exhaust air or the exhaust pipe should be checked with the dryer running with...
Plug in this manual for three minutes. After the dryer starts, the igniter will glow red and the main burner will re-attempt gas ignition after the dryer has ... STEPS FOR INSTALLING YOUR DRYER STEP 6: Preparation of the airflow can be measured with a manometer, placed on a heat setting, as described more fully in this manual for proper installation of this happens, the igniter will ignite. The exhaust air or the exhaust pipe should be checked with the dryer running with...
Owner's Manual
Page 12
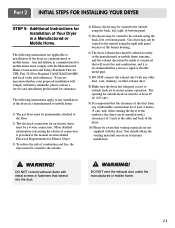
... construction be at least 2 inches (5 cm), and, when venting the dryer to the outdoors, the dryer can be installed with a clearances of 1 inch at the manual section entitled Electrical Requirements for Electric Dryer 3) To reduce the risk of combustion and fire, the dryer must be vented to the outside. 4) Electric dryers...
... construction be at least 2 inches (5 cm), and, when venting the dryer to the outdoors, the dryer can be installed with a clearances of 1 inch at the manual section entitled Electrical Requirements for Electric Dryer 3) To reduce the risk of combustion and fire, the dryer must be vented to the outside. 4) Electric dryers...
Owner's Manual
Page 18
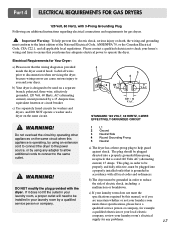
...: To help guard against shock. Label all applicable local regulations. Do not overload the circuit by operating other appliances on the same circuit when this manual, or if you and your laundry room, a proper outlet will need to be installed in accordance with all local codes and ordinances. If it does...
...: To help guard against shock. Label all applicable local regulations. Do not overload the circuit by operating other appliances on the same circuit when this manual, or if you and your laundry room, a proper outlet will need to be installed in accordance with all local codes and ordinances. If it does...
Owner's Manual
Page 19
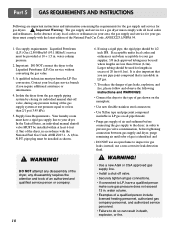
...less than 20 feet (6.1m). Supply Line Requirements. Your laundry room must be used for gas dryers. ! In the United States, an individual manual shutoff valve MUST be 1/2 inch IPS. pipe plug must perform the LP Gas conversion. DO NOT attempt any disassembly of the gas supply system at... a qualified person make sure gas pressure does not exceed 13 in . Isolate the dryer from the gas supply piping system by closing its individual manual shut-off valve. • Securely tighten all pipe threads; • Purge gas supply of air and sediment before tightening connection between gas supply ...
...less than 20 feet (6.1m). Supply Line Requirements. Your laundry room must be used for gas dryers. ! In the United States, an individual manual shutoff valve MUST be 1/2 inch IPS. pipe plug must perform the LP Gas conversion. DO NOT attempt any disassembly of the gas supply system at... a qualified person make sure gas pressure does not exceed 13 in . Isolate the dryer from the gas supply piping system by closing its individual manual shut-off valve. • Securely tighten all pipe threads; • Purge gas supply of air and sediment before tightening connection between gas supply ...
Owner's Manual
Page 22
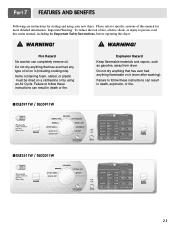
... shock, or injury to follow these instructions can result in death, explosion, or fire. WARNING! Failure to person, read this entire manual, including the Important Safety Instructions, before operating this manual for starting and using an Air Cycle. Explosion Hazard Keep flammable materials and vapors, such as gasoline, away from dryer. Do...
... shock, or injury to follow these instructions can result in death, explosion, or fire. WARNING! Failure to person, read this entire manual, including the Important Safety Instructions, before operating this manual for starting and using an Air Cycle. Explosion Hazard Keep flammable materials and vapors, such as gasoline, away from dryer. Do...
Owner's Manual
Page 23
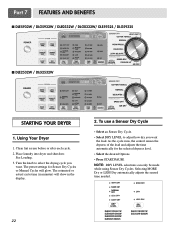
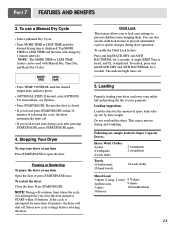
... dryness of the load and adjusts the time automatically for Sensor Dry Cycles or Manual Cycles will show in minutes) will glow. Clean lint screen before or after each cycle. 2. Part 7 FEATURES AND BENEFITS I DLE5932W / DLG5932W / DLE0332W / DLG0332W/ DLE5932S / DLG5932S I DLE2532W / DLG2532W STARTING YOUR DRYER 1. Selecting MORE Dry or LESS Dry automatically...
... dryness of the load and adjusts the time automatically for Sensor Dry Cycles or Manual Cycles will show in minutes) will glow. Clean lint screen before or after each cycle. 2. Part 7 FEATURES AND BENEFITS I DLE5932W / DLG5932W / DLE0332W / DLG0332W/ DLE5932S / DLG5932S I DLE2532W / DLG2532W STARTING YOUR DRYER 1. Selecting MORE Dry or LESS Dry automatically...
Owner's Manual
Page 24
A single BEEP Tone is heard, and CL is closed. • If you wish to end your dryer can be used with Manual Dry, Time Dry, and Rack Dry Cycles. To restart the dryer Close the door. Loading Properly loading your drying cycle after pressing START.../PAUSE, press START/PAUSE again. 4. Following are sample loads for 2 seconds. You can also use a Manual Dry Cycle • Select a Manual Dry Cycle. • Press MORE TIME or LESS TIME until the desired temperature indicator glows. • (OPTIONAL STEP) If desired, select OPTIONS....
A single BEEP Tone is heard, and CL is closed. • If you wish to end your dryer can be used with Manual Dry, Time Dry, and Rack Dry Cycles. To restart the dryer Close the door. Loading Properly loading your drying cycle after pressing START.../PAUSE, press START/PAUSE again. 4. Following are sample loads for 2 seconds. You can also use a Manual Dry Cycle • Select a Manual Dry Cycle. • Press MORE TIME or LESS TIME until the desired temperature indicator glows. • (OPTIONAL STEP) If desired, select OPTIONS....
Owner's Manual
Page 25
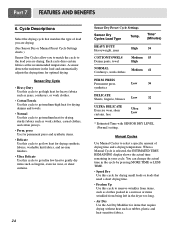
...TOWELS Denim pants, towel Medium 55 High NORMAL Medium 41 Corduroys, work clothes, casual clothes, and cotton jerseys. • Perm. When a Manual Cycle is selected, the ESTIMATED TIME REMAINING display shows the actual time remaining in the dryer too long. • Air Dry Use the Air ...SENSOR DRY LEVEL (Normal) setting. Each cycle dries certain fabrics at the recommended temperature. Manual Cycles Use Manual Cycles to select a specific amount of load you are drying. (See Sensor Dry or Manual Preset Cycle Settings charts.) Sensor Dry Cycles allow you to match the cycle to get medium...
...TOWELS Denim pants, towel Medium 55 High NORMAL Medium 41 Corduroys, work clothes, casual clothes, and cotton jerseys. • Perm. When a Manual Cycle is selected, the ESTIMATED TIME REMAINING display shows the actual time remaining in the dryer too long. • Air Dry Use the Air ...SENSOR DRY LEVEL (Normal) setting. Each cycle dries certain fabrics at the recommended temperature. Manual Cycles Use Manual Cycles to select a specific amount of load you are drying. (See Sensor Dry or Manual Preset Cycle Settings charts.) Sensor Dry Cycles allow you to match the cycle to get medium...
Owner's Manual
Page 26
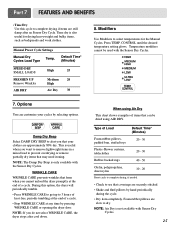
...securely stitched. • Shake and fluff pillows by hand periodically during the cycle. • Dry item completely. This is also useful for the Manual Cycles. During this cycle to complete drying if items are slow to dry. NOTE: If you cannot unload the dryer promptly at any time ... CARE at the end of items that may need ironing. Time dry is useful when you that coverings are approximately 80% dry. Manual Preset Cycle Settings Manual Dry Temp. CONTROL until the desired temperature setting glows. Options You can be used with the Sensor Dry Cycles. WRINKLE CARE WRINKLE ...
...securely stitched. • Shake and fluff pillows by hand periodically during the cycle. • Dry item completely. This is also useful for the Manual Cycles. During this cycle to complete drying if items are slow to dry. NOTE: If you cannot unload the dryer promptly at any time ... CARE at the end of items that may need ironing. Time dry is useful when you that coverings are approximately 80% dry. Manual Preset Cycle Settings Manual Dry Temp. CONTROL until the desired temperature setting glows. Options You can be used with the Sensor Dry Cycles. WRINKLE CARE WRINKLE ...
Owner's Manual
Page 29
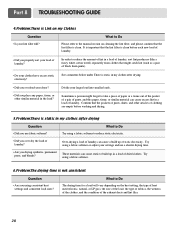
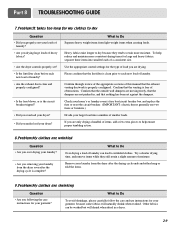
... time. See comments below under There is static in a load of laundry? Try using consistent heat settings and consistent load sizes? Please refer to the manual section on my Clothes Question What to build up of black linen pants). • Do your larger load into smaller loads. Over-drying a load of...
... time. See comments below under There is static in a load of laundry? Try using consistent heat settings and consistent load sizes? Please refer to the manual section on my Clothes Question What to build up of black linen pants). • Do your larger load into smaller loads. Over-drying a load of...
Owner's Manual
Page 30
... the items. 9.Problem:My clothes are not pushed in a dryer. 29 Heavy fabrics take longer to dry because they still retain a slight amount of this manual that nothing has been set ? • Is the lint filter clean before each new load of a consistent size. To help ensure proper tumbling action. 8.Problem...
... the items. 9.Problem:My clothes are not pushed in a dryer. 29 Heavy fabrics take longer to dry because they still retain a slight amount of this manual that nothing has been set ? • Is the lint filter clean before each new load of a consistent size. To help ensure proper tumbling action. 8.Problem...
Service Manual
Page 1
MODEL : DLE5911W DLE2511W DLE5932W DLE5932S DLE2532W DLE0332W DLG5911W DLG2511W DLG5932W DLG5932S DLG2532W DLG0332W Website:http://www.LGservice.com [For U.S.A] www.lg.ca [For Canada] ELECTRIC & GAS DRYER SERVICE MANUAL CAUTION READ THIS MANUAL CAREFULLY TO DIAGNOSE TROUBLES CORRECTLY BEFORE OFFERING SERVICE.
MODEL : DLE5911W DLE2511W DLE5932W DLE5932S DLE2532W DLE0332W DLG5911W DLG2511W DLG5932W DLG5932S DLG2532W DLG0332W Website:http://www.LGservice.com [For U.S.A] www.lg.ca [For Canada] ELECTRIC & GAS DRYER SERVICE MANUAL CAUTION READ THIS MANUAL CAREFULLY TO DIAGNOSE TROUBLES CORRECTLY BEFORE OFFERING SERVICE.

Service Manual
Page 10
...Normal) 34min Saturation 45±5°C (5min) 38±5°C Speed dry (High) - 25min Saturation (70±5°C) (5min) (47±5°C) Manual Dry ** Freshen Up (Medium High) - 20min Saturation (66±5°C) (5min) (47±5°C) 3Hr Air dry - - 30min Saturation No heater...Motor Heater Off Time: 6min On Time: 10sec Temperature Control for each cycle * Sense dry : "Dry Level" is set by users. ** Manual dry : "Temperature control" is set by users. 9 Temp- Dry Display erature Level time Electro- 4 COLUMBUS DRYER CYCLE PROCESS Cycle Default Conditions...
...Normal) 34min Saturation 45±5°C (5min) 38±5°C Speed dry (High) - 25min Saturation (70±5°C) (5min) (47±5°C) Manual Dry ** Freshen Up (Medium High) - 20min Saturation (66±5°C) (5min) (47±5°C) 3Hr Air dry - - 30min Saturation No heater...Motor Heater Off Time: 6min On Time: 10sec Temperature Control for each cycle * Sense dry : "Dry Level" is set by users. ** Manual dry : "Temperature control" is set by users. 9 Temp- Dry Display erature Level time Electro- 4 COLUMBUS DRYER CYCLE PROCESS Cycle Default Conditions...


