
Owners Manual
Page 2
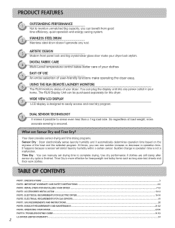
... performance if clothes are still damp after sensor dry cycle is not a malfunction. J PART1 SPECIFICATIONS ...PART2 IMPORTANT WARRANTY AND SAFETY INSTRUCTIONS ...PART& INITIAL STEPS FOR INSTALLING YOUR DRYER ...PART4 ACCESSORIES INSTALLATION ...PART5. DIGITAL FABRICCARE Multi-Level temperature control takes better care of your clothes EASYOF...Dry : You can be purchased separately for heavyweight and bulky items such as king-size bed sheets and thick work clothes. TROUBLESHOOTING GUIDE ...LG DRYER LiMiTED WARRANTY ...2 3 4-6 7-12 13-14 15-18 19 20 21-22 23-30 31-33 34 You can plug the...
... performance if clothes are still damp after sensor dry cycle is not a malfunction. J PART1 SPECIFICATIONS ...PART2 IMPORTANT WARRANTY AND SAFETY INSTRUCTIONS ...PART& INITIAL STEPS FOR INSTALLING YOUR DRYER ...PART4 ACCESSORIES INSTALLATION ...PART5. DIGITAL FABRICCARE Multi-Level temperature control takes better care of your clothes EASYOF...Dry : You can be purchased separately for heavyweight and bulky items such as king-size bed sheets and thick work clothes. TROUBLESHOOTING GUIDE ...LG DRYER LiMiTED WARRANTY ...2 3 4-6 7-12 13-14 15-18 19 20 21-22 23-30 31-33 34 You can plug the...
Owners Manual
Page 4
... will repair or replace any parts defective in this manual. Proof of Purchase. For your safety, the recommendations in material or workmanship throughout the Warranty period, beginning the Date of purchase date is installed and operated per this product is required. Model No. If this manual, LG will need the complete Model...
... will repair or replace any parts defective in this manual. Proof of Purchase. For your safety, the recommendations in material or workmanship throughout the Warranty period, beginning the Date of purchase date is installed and operated per this product is required. Model No. If this manual, LG will need the complete Model...
Owners Manual
Page 5
...) The interior of the appliance and exhaust duct should be exposed to the weather. 7) Do not tamper with controls. 8) Do not repair or replace any part of the appliance or attempt any risk of electric shock, fire, or other flammable or explosive substances, as to whether the appliance is equipped with...
...) The interior of the appliance and exhaust duct should be exposed to the weather. 7) Do not tamper with controls. 8) Do not repair or replace any part of the appliance or attempt any risk of electric shock, fire, or other flammable or explosive substances, as to whether the appliance is equipped with...
Owners Manual
Page 7
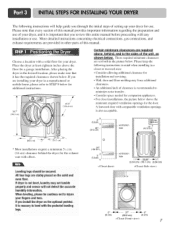
... the solid and even floor. When leveling, please be secured. More detailed instructions concerning electrical connections, gas connections, and exhaust requirements are provided in other parts of your dryer, and it is important that it is not level, laundry may force additional clearances. • An additional inch of setting up your...
... the solid and even floor. When leveling, please be secured. More detailed instructions concerning electrical connections, gas connections, and exhaust requirements are provided in other parts of your dryer, and it is important that it is not level, laundry may force additional clearances. • An additional inch of setting up your...
Owners Manual
Page 9
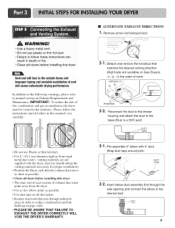
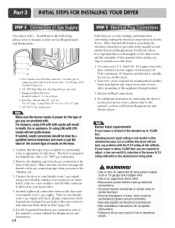
... plastic or thin foil duct. • Failure to follow the instructions (and all duct joints • Insulate ductwork that the exhaust duct run is a SVC part) DUCT TAPE f \ 3-1. IMPORTANT: To reduce the risk of exhaust duct must be vented to reduce condensation and lint build-up on all others in order...
... plastic or thin foil duct. • Failure to follow the instructions (and all duct joints • Insulate ductwork that the exhaust duct run is a SVC part) DUCT TAPE f \ 3-1. IMPORTANT: To reduce the risk of exhaust duct must be vented to reduce condensation and lint build-up on all others in order...
Owners Manual
Page 10
... this manual, before making the electrical connection l_r electric dryers. For additional instruction on connecting the dryer to an electrical power source, please refer to Part 7(page 20) 5. Iron Pipe. More detailed information concerning the electrical connection is prepared tbr Natural Gas with LPG If needed, nozzle conversion should be connected...
... this manual, before making the electrical connection l_r electric dryers. For additional instruction on connecting the dryer to an electrical power source, please refer to Part 7(page 20) 5. Iron Pipe. More detailed information concerning the electrical connection is prepared tbr Natural Gas with LPG If needed, nozzle conversion should be connected...
Owners Manual
Page 11
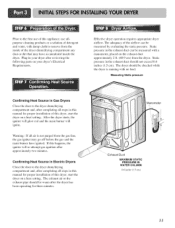
...). Plug-in your dryer after completing all steps in Electric Dryers Close the door to the dryer drum/drying compartment and, after reviewing the following parts on the exhaust duct approximately 2 ft. (60.9 cm) from the gas line, the gas igniter may have ignited. Confirming Heat Source in this manual for...
...). Plug-in your dryer after completing all steps in Electric Dryers Close the door to the dryer drum/drying compartment and, after reviewing the following parts on the exhaust duct approximately 2 ft. (60.9 cm) from the gas line, the gas igniter may have ignited. Confirming Heat Source in this manual for...
Owners Manual
Page 12
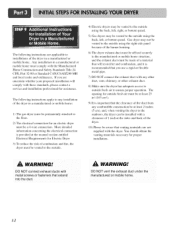
... standards, please contact a service and installation professional for assistance. DO NOT connect exhaust ducts with the Manufactured Home Construction and Safety Standards Title 24 CFR, Part 32-80 or Standard CAN/CSAOZ240 MH and local codes and ordinances. The opening for outside fresh air must be at the manual section entitled...
... standards, please contact a service and installation professional for assistance. DO NOT connect exhaust ducts with the Manufactured Home Construction and Safety Standards Title 24 CFR, Part 32-80 or Standard CAN/CSAOZ240 MH and local codes and ordinances. The opening for outside fresh air must be at the manual section entitled...
Owners Manual
Page 14
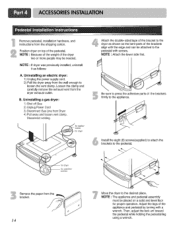
...clamp and carefully remove the exhaust vent from the bracket. /4 Move the dryer to the desired place. B. I Be sure to press the adhesive parts of the brackets align with the edge and can be needed. NOTE : Attach the lower side first. for proper operation. NOTE : If dryer was... previously installed, uninstall it as shown so the bent parts of the brackets firmly to the pedestal with a wrench. Position dryer on a solid and level floor for dryer washer/ combo Remove the paper ...
...clamp and carefully remove the exhaust vent from the bracket. /4 Move the dryer to the desired place. B. I Be sure to press the adhesive parts of the brackets align with the edge and can be needed. NOTE : Attach the lower side first. for proper operation. NOTE : If dryer was... previously installed, uninstall it as shown so the bent parts of the brackets firmly to the pedestal with a wrench. Position dryer on a solid and level floor for dryer washer/ combo Remove the paper ...
Owners Manual
Page 34
...use for other than intended purpose. 3. Please have your product type (Dryer), model number, serial number, and ZiP Code; LG WiLL NOT BELIABLEFOR ANY CONSEQUENTIAL,iNDiRECT,OR iNCiDENTAL DAMAGES OF ANY KIND, iNCLUDiNG LOSTREVENUESOR PROFITS,iN CONNECTION WITHTHE PRODUCT. To Obtain NearestAuthorizedServiceCenterorSales...Alaska, Hawaii, and U.S.Territories. Therefore, the cost of repair or replacement of In-Home Service on all parts including the Drum Tub and Motor. CUSTOMERINTER-ACTIVECENTERNUMBERS: To Prove Warranty Coverage Retain your Sales Receipt must be borne by the ...
...use for other than intended purpose. 3. Please have your product type (Dryer), model number, serial number, and ZiP Code; LG WiLL NOT BELIABLEFOR ANY CONSEQUENTIAL,iNDiRECT,OR iNCiDENTAL DAMAGES OF ANY KIND, iNCLUDiNG LOSTREVENUESOR PROFITS,iN CONNECTION WITHTHE PRODUCT. To Obtain NearestAuthorizedServiceCenterorSales...Alaska, Hawaii, and U.S.Territories. Therefore, the cost of repair or replacement of In-Home Service on all parts including the Drum Tub and Motor. CUSTOMERINTER-ACTIVECENTERNUMBERS: To Prove Warranty Coverage Retain your Sales Receipt must be borne by the ...


