
Owners Manual
Page 6
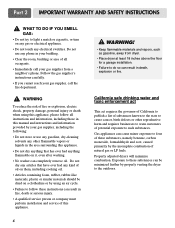
...clothesline or by using this appliance. 6 ! Follow the gas supplier's instructions carefully. • If you cannot reach your gas supplier from dryer. • Place dryer at least 18 inches above the floor for a garage installation. • Failure to the outdoors. Do not dry any articles that has ...minor exposure to four of these substances can be minimized further by the incomplete combustion of potential exposure to light a match or cigarette, or turn on any gas or electrical appliance. • Do not touch any kind of oil on them, including cooking oil. • Articles ...
...clothesline or by using this appliance. 6 ! Follow the gas supplier's instructions carefully. • If you cannot reach your gas supplier from dryer. • Place dryer at least 18 inches above the floor for a garage installation. • Failure to the outdoors. Do not dry any articles that has ...minor exposure to four of these substances can be minimized further by the incomplete combustion of potential exposure to light a match or cigarette, or turn on any gas or electrical appliance. • Do not touch any kind of oil on them, including cooking oil. • Articles ...

Owners Manual
Page 10
.... • Use a UL approved strain relief. • Disconnect power before taking any steps to you remove the shipping cap. 3. Turn on Electrical Requirements and Electric Dryer. ! For additional instruction on connecting the dryer to an electrical power source, please refer to this manual's section on your laundry room is prepared for manufactured (mobile...
.... • Use a UL approved strain relief. • Disconnect power before taking any steps to you remove the shipping cap. 3. Turn on Electrical Requirements and Electric Dryer. ! For additional instruction on connecting the dryer to an electrical power source, please refer to this manual's section on your laundry room is prepared for manufactured (mobile...
Owners Manual
Page 23
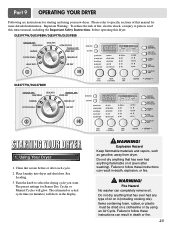
...oil on a clothesline or by using your new dryer. The estimated or actual cycle time (in minutes) will glow. WARNING! Explosion Hazard Keep flammable materials and vapors, such as gasoline, away from dryer. Turn the knob to follow these instructions can completely remove ...oil. Part 9 OPERATING YOUR DRYER Following are instructions for Sensor Dry Cycles or Manual Cycles will show in the display. ! DLE5977W/DLG5988W/DLE5977B/DLG5988B DLE3777W/DLG3788W STARTING YOUR...
...oil on a clothesline or by using your new dryer. The estimated or actual cycle time (in minutes) will glow. WARNING! Explosion Hazard Keep flammable materials and vapors, such as gasoline, away from dryer. Turn the knob to follow these instructions can completely remove ...oil. Part 9 OPERATING YOUR DRYER Following are instructions for Sensor Dry Cycles or Manual Cycles will show in the display. ! DLE5977W/DLG5988W/DLE5977B/DLG5988B DLE3777W/DLG3788W STARTING YOUR...

Owners Manual
Page 25
You can change the actual time in the dryer too long. • Air Dry Use the Air Dry Modifier for items that require drying without heat such as clothes packed in a suitcase or items wrinkled from changing them. The indicator light turns off. 6. You can also use the child lock...heat) • Delicates Use for optimal drying Sensor Dry Cycle • Heavy Duty Use this cycle to prevent unintended cycle or option changes during dryer operation. A sensor detects the moisture in your settings to the load you are drying. (See Sensor Dry or Manual Preset Cycle Settings charts.) ...
You can change the actual time in the dryer too long. • Air Dry Use the Air Dry Modifier for items that require drying without heat such as clothes packed in a suitcase or items wrinkled from changing them. The indicator light turns off. 6. You can also use the child lock...heat) • Delicates Use for optimal drying Sensor Dry Cycle • Heavy Duty Use this cycle to prevent unintended cycle or option changes during dryer operation. A sensor detects the moisture in your settings to the load you are drying. (See Sensor Dry or Manual Preset Cycle Settings charts.) ...
Owners Manual
Page 28
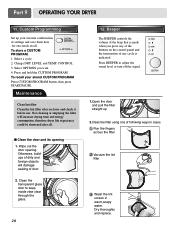
... fingers across the filter Vacuum the lint filter Wash the lint screen in cases. Part 9 OPERATING YOUR DRYER 11. Clean the transparent glass door to adjust the sound level or turn off the signal. 1.Open the door and pull the filter straight up your stored CUSTOM PROGRAM Press CUSTOM.... Select OPTIONS you press any cycle is indicated. Otherwise, buildups of dirty and foreign objects will increase drying time and energy consumption, therefore dryer life expectancy could be shortened after each use and check it before use. Press and hold the CUSTOM PROGRAM. I Clean the door and ...
... fingers across the filter Vacuum the lint filter Wash the lint screen in cases. Part 9 OPERATING YOUR DRYER 11. Clean the transparent glass door to adjust the sound level or turn off the signal. 1.Open the door and pull the filter straight up your stored CUSTOM PROGRAM Press CUSTOM.... Select OPTIONS you press any cycle is indicated. Otherwise, buildups of dirty and foreign objects will increase drying time and energy consumption, therefore dryer life expectancy could be shortened after each use and check it before use. Press and hold the CUSTOM PROGRAM. I Clean the door and ...
Service Manual
Page 8
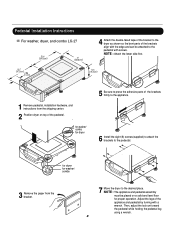
... lock unt toward the pedestal while holding the pedestal leg using a wrench. 8 Pedestal Installation Instructions For washer, dryer, and combo LG 27 4 Attach the double-faced tape of the bracket to the dryer as shown so the bent parts of the brackets align with the edge and can be placed on top... of the appliance and pedestal by turning with screws. for dryer . NOTE : The appliance and pedestal assembly must be attached ...
... lock unt toward the pedestal while holding the pedestal leg using a wrench. 8 Pedestal Installation Instructions For washer, dryer, and combo LG 27 4 Attach the double-faced tape of the bracket to the dryer as shown so the bent parts of the brackets align with the edge and can be placed on top... of the appliance and pedestal by turning with screws. for dryer . NOTE : The appliance and pedestal assembly must be attached ...

Service Manual
Page 12
... if allowed by local codes (Use Design A.G.A. Use 3/8" pipe Longer than 20' (6.1 m) - 3-2. Connect Gas Supply Pipe (Gas Dryer ONLY) For further assistance, refer to section on gas and check all connections securely. Use 1/2" pipe 5 3/8" N.P.T. Turn on Gas Requirements. 1. Certified Connector) 2 1/8" N.P.T. Gas Connection 12 Make certain your laundry room. Make sure you do...
... if allowed by local codes (Use Design A.G.A. Use 3/8" pipe Longer than 20' (6.1 m) - 3-2. Connect Gas Supply Pipe (Gas Dryer ONLY) For further assistance, refer to section on gas and check all connections securely. Use 1/2" pipe 5 3/8" N.P.T. Turn on Gas Requirements. 1. Certified Connector) 2 1/8" N.P.T. Gas Connection 12 Make certain your laundry room. Make sure you do...
Service Manual
Page 23
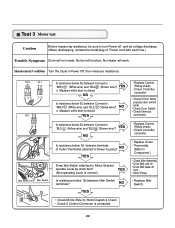
Measurement Condition Turn the Dryer's Power Off, then measure resistance. YES • Replace Control. (Relay check) • Check Controller connector. • Check if Door flame presses door switch knob. • ... blower housing? " (White wire) and "BL2- YES NO Is resistance below 1Ω between Connector "WH3- Test 3 Motor test Caution Before measuring resistance, be sure to turn Power off from • Motor Pulley. • Replace Idler Switch. • Check Motor.(Refer to 'Motor Diagram & Check') • Check if Control Connector is contacted...
Measurement Condition Turn the Dryer's Power Off, then measure resistance. YES • Replace Control. (Relay check) • Check Controller connector. • Check if Door flame presses door switch knob. • ... blower housing? " (White wire) and "BL2- YES NO Is resistance below 1Ω between Connector "WH3- Test 3 Motor test Caution Before measuring resistance, be sure to turn Power off from • Motor Pulley. • Replace Idler Switch. • Check Motor.(Refer to 'Motor Diagram & Check') • Check if Control Connector is contacted...
Service Manual
Page 24
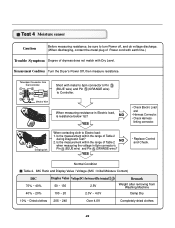
... linking connector. YES • Replace Control and Check. Is the measurement within the range of Table 2 during Diagnostic Test? 2. Damping cloth When contacting cloth to turn Power off, and do voltage discharge. (When discharging, contact the metal plug of Power cord with earth line.) Trouble Symptom Degree of dryness does not... Voltage(DC) (between 6Pin terminal 50 ~ 130 2.5V 100 ~ 20 2.0V ~ 4.0V ) Remark Weight after removing from the Controller. Short with Dry Level. Measurement Condition Turn the Dryer's Power Off, then measure resistance.
... linking connector. YES • Replace Control and Check. Is the measurement within the range of Table 2 during Diagnostic Test? 2. Damping cloth When contacting cloth to turn Power off, and do voltage discharge. (When discharging, contact the metal plug of Power cord with earth line.) Trouble Symptom Degree of dryness does not... Voltage(DC) (between 6Pin terminal 50 ~ 130 2.5V 100 ~ 20 2.0V ~ 4.0V ) Remark Weight after removing from the Controller. Short with Dry Level. Measurement Condition Turn the Dryer's Power Off, then measure resistance.

Service Manual
Page 25
... (Refer to Component testing.) Measure while Door is closed . Test 5 Door switch test Caution Before measuring resistance, be sure to turn Power off, and do voltage discharge. (When discharging, contact the metal plug of Power cord with earth line.) Door Opening is not...is below 250Ω between "BL2- Check if resistance is not sensed. (Drum motor will flash at 0.5 second intervals.) Measurement Condition After turning Dryer Power Off, measure resistance. Check Harness-linking connector. 25 "(Black wire) Connector WH3, RD3 after YES taking WH3, RD3 out from Controller....
... (Refer to Component testing.) Measure while Door is closed . Test 5 Door switch test Caution Before measuring resistance, be sure to turn Power off, and do voltage discharge. (When discharging, contact the metal plug of Power cord with earth line.) Door Opening is not...is below 250Ω between "BL2- Check if resistance is not sensed. (Drum motor will flash at 0.5 second intervals.) Measurement Condition After turning Dryer Power Off, measure resistance. Check Harness-linking connector. 25 "(Black wire) Connector WH3, RD3 after YES taking WH3, RD3 out from Controller....


