
Owner's Manual (English)
Page 2
...PART 5. GAS REQUIREMENTS AND INSTRUCTIONS ...22 PART 8. TROUBLESHOOTING GUIDE...31 LG DRYER LIMITED WARRANTY...34 2 What are not as dry as you comfortable with dryer operation. TABLE OF CONTENTS PART 1. OPERATING YOUR DRYER ...25 PART 10. You might see a sudden increase or decrease... DRY for heavy and bulky items and thick work. ELECTRICAL REQUIREMENTS FOR ELECTRIC DRYERS ...17 PART 6. ELECTRICAL REQUIREMENTS FOR GAS DRYERS...21 PART 7. Your dryer provides sensor drying and time drying programs. Sensor Dry The dryer senses the dampness of the cycle. IMPORTANT WARRANTY AND ...
...PART 5. GAS REQUIREMENTS AND INSTRUCTIONS ...22 PART 8. TROUBLESHOOTING GUIDE...31 LG DRYER LIMITED WARRANTY...34 2 What are not as dry as you comfortable with dryer operation. TABLE OF CONTENTS PART 1. OPERATING YOUR DRYER ...25 PART 10. You might see a sudden increase or decrease... DRY for heavy and bulky items and thick work. ELECTRICAL REQUIREMENTS FOR ELECTRIC DRYERS ...17 PART 6. ELECTRICAL REQUIREMENTS FOR GAS DRYERS...21 PART 7. Your dryer provides sensor drying and time drying programs. Sensor Dry The dryer senses the dampness of the cycle. IMPORTANT WARRANTY AND ...

Owner's Manual (English)
Page 3
... messages will follow basic precautions, including the following : • Do not install a clothes dryer with clothes dryers. BASIC SAFETY PRECAUTIONS WARNING To reduce the risk of fire, electric shock, or injury to potential hazards that can be killed or seriously injured if you cannot ...reach your building. 3. Do not touch any gas or electrical appliance. 2. Follow the gas supplier's phone. ...
... messages will follow basic precautions, including the following : • Do not install a clothes dryer with clothes dryers. BASIC SAFETY PRECAUTIONS WARNING To reduce the risk of fire, electric shock, or injury to potential hazards that can be killed or seriously injured if you cannot ...reach your building. 3. Do not touch any gas or electrical appliance. 2. Follow the gas supplier's phone. ...

Owner's Manual (English)
Page 4
...minor exposure to the weather. • Do not reach into the dryer if the drum is moving . • Always check the inside of the dryer for electric current. Close supervision of children is necessary when the dryer is properly grounded. In the event of malfunction or breakdown, grounding will... be exposed to four of these substances can result in a risk of electric shock. rounding conductor can be minimized further by properly venting the dryer to whether the appliance is used near children. • Do not use fabric softeners or products to...
...minor exposure to the weather. • Do not reach into the dryer if the drum is moving . • Always check the inside of the dryer for electric current. Close supervision of children is necessary when the dryer is properly grounded. In the event of malfunction or breakdown, grounding will... be exposed to four of these substances can result in a risk of electric shock. rounding conductor can be minimized further by properly venting the dryer to whether the appliance is used near children. • Do not use fabric softeners or products to...

Owner's Manual (English)
Page 5
...health and fire hazard. • Use only rigid metal or flexible metal 4in. Follow details in diameter with the dryer, and you should obtain the necessary ductwork locally. Electrical shock can result in fire or death. • The exhaust duct must be 4 in. (10 cm) in... the installation instructions. Use of life. Failure to avoid electrical overload. Part 1 IMPORTANT WARRANTY AND SAFETY INSTRUCTIONS READ ALL INSTRUCTIONS BEFORE USE WARNING For your new dryer. All repairs and servicing must be performed by an authorized servicer unless specifically recommended ...
...health and fire hazard. • Use only rigid metal or flexible metal 4in. Follow details in diameter with the dryer, and you should obtain the necessary ductwork locally. Electrical shock can result in fire or death. • The exhaust duct must be 4 in. (10 cm) in... the installation instructions. Use of life. Failure to avoid electrical overload. Part 1 IMPORTANT WARRANTY AND SAFETY INSTRUCTIONS READ ALL INSTRUCTIONS BEFORE USE WARNING For your new dryer. All repairs and servicing must be performed by an authorized servicer unless specifically recommended ...

Owner's Manual (English)
Page 6
...rating plate. Secure all power cords that could cause a fire hazard from fire and electrical shock. 6 Failure to follow these instructions can create electrical shock and/or a fire hazard. • This dryer must be plugged into the duct that have become frayed or otherwise damaged. This will... prevent shock hazard and assure stability during operating. • The dryer should always be plugged into a properly grounded outlet. To prevent personal injury or damage to the dryer, the electrical power cord must be plugged into its length or at either end. Do not...
...rating plate. Secure all power cords that could cause a fire hazard from fire and electrical shock. 6 Failure to follow these instructions can create electrical shock and/or a fire hazard. • This dryer must be plugged into the duct that have become frayed or otherwise damaged. This will... prevent shock hazard and assure stability during operating. • The dryer should always be plugged into a properly grounded outlet. To prevent personal injury or damage to the dryer, the electrical power cord must be plugged into its length or at either end. Do not...

Owner's Manual (English)
Page 7
.... proof of your appliance follow basic precautions. Date of purchase. Serial Number. For your nearest LG Service Center. Use the space below to the instructions in this manual, LG will need the complete model and serial number when requesting warranty service. Model Number. Part 1 .... Warranty Restriction: If the dryer is subjected to prevent property damage, personal injury, or death when using your new LG dryer. To reduce the risk of this manual. WARNING! Warranty Service is located at the end of fire or explosion, electric shock or to other than single...
.... proof of your appliance follow basic precautions. Date of purchase. Serial Number. For your nearest LG Service Center. Use the space below to the instructions in this manual, LG will need the complete model and serial number when requesting warranty service. Model Number. Part 1 .... Warranty Restriction: If the dryer is subjected to prevent property damage, personal injury, or death when using your new LG dryer. To reduce the risk of this manual. WARNING! Warranty Service is located at the end of fire or explosion, electric shock or to other than single...
Owner's Manual (English)
Page 8
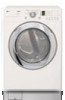
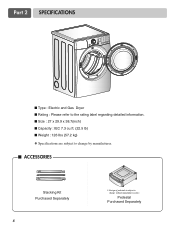
Pedestal Purchased Separately Part 2 SPECIFICATIONS ■ Type : Electric and Gas Dryer ■ Rating : Please refer to the rating label regarding detailed information. ■ Size : 27 x 29.9 x 38.7(inch) ■ Capacity : IEC 7.3 cu.ft. (22.5 lb) ■ Weight : 126 Ibs (57.2 kg) ❋ Specifications are subject to change by manufacturer. ■ ACCESSORIES Stacking Kit Purchased Separately 8 ❊ Design of pedestals is subject to change without manafaturers notice.
Pedestal Purchased Separately Part 2 SPECIFICATIONS ■ Type : Electric and Gas Dryer ■ Rating : Please refer to the rating label regarding detailed information. ■ Size : 27 x 29.9 x 38.7(inch) ■ Capacity : IEC 7.3 cu.ft. (22.5 lb) ■ Weight : 126 Ibs (57.2 kg) ❋ Specifications are subject to change by manufacturer. ■ ACCESSORIES Stacking Kit Purchased Separately 8 ❊ Design of pedestals is subject to change without manafaturers notice.

Owner's Manual (English)
Page 9
... properly and sensor will help guide you review this entire manual before proceeding with any installation or use . After placing the dryer in the desired location, please make sure that it has the required clearances shown below . If you are stably placed on... to the sides of this manual. Please keep the following instructions will not detect accurate humidity information. More detailed instructions concerning electrical connections, gas connections, and exhaust requirements are required above the floor for the exhaust vent with comparable ventilation openings is not ...
... properly and sensor will help guide you review this entire manual before proceeding with any installation or use . After placing the dryer in the desired location, please make sure that it has the required clearances shown below . If you are stably placed on... to the sides of this manual. Please keep the following instructions will not detect accurate humidity information. More detailed instructions concerning electrical connections, gas connections, and exhaust requirements are required above the floor for the exhaust vent with comparable ventilation openings is not ...

Owner's Manual (English)
Page 12
... (page 20) 5. Longer than 20' (6.1 m) Use 3/8" pipe. Or using a new flexible stainless steel connector (as suitable for electric dryers. Note Burner input requirements If your local codes). 4. Note Make sure the burner orifice is located at the elevations up to ignite. For... additional instruction on Electrical Requirements and Electric Dryer. Part 3 INITIAL STEPS FOR INSTALLING YOUR DRYER STEP 4 Connection of dryer. 4. Use only a new UL listed No. 10 (copper wire only) three conductor power...
... (page 20) 5. Longer than 20' (6.1 m) Use 3/8" pipe. Or using a new flexible stainless steel connector (as suitable for electric dryers. Note Burner input requirements If your local codes). 4. Note Make sure the burner orifice is located at the elevations up to ignite. For... additional instruction on Electrical Requirements and Electric Dryer. Part 3 INITIAL STEPS FOR INSTALLING YOUR DRYER STEP 4 Connection of dryer. 4. Use only a new UL listed No. 10 (copper wire only) three conductor power...

Owner's Manual (English)
Page 13
... will ignite. Confirming Heat Source in Electric Dryers Close the door to the dryer drum/drying compartment and, after completing all steps in this dryer, start the dryer on a heat setting. The adequacy of this dryer, start the dryer on a heat setting. The dryer should be measured with a manometer, placed on your dryer's Electrical Requirements. Prior to the first use...
... will ignite. Confirming Heat Source in Electric Dryers Close the door to the dryer drum/drying compartment and, after completing all steps in this dryer, start the dryer on a heat setting. The adequacy of this dryer, start the dryer on a heat setting. The dryer should be measured with a manometer, placed on your dryer's Electrical Requirements. Prior to the first use...

Owner's Manual (English)
Page 14
...must be at least 25 in2 (163 cm2). 8) It is provided at the sides and back of combustion and fire, the dryer must be vented to the outside. 3) Electric dryers may be vented to the outside using the back, left, or bottom panel. If you use a rigid or flexible metal pipe.... vented to the outside fresh air to do so can be installed with a clearance of 1 inch at the manual section entitled Electrical Requirements for Electric Dryer 2) To reduce the risk of the dryer. 9) Please be aware that extend into the duct. • Failure to ensure proper operation. WARNING! • DO NOT...
...must be at least 25 in2 (163 cm2). 8) It is provided at the sides and back of combustion and fire, the dryer must be vented to the outside. 3) Electric dryers may be vented to the outside using the back, left, or bottom panel. If you use a rigid or flexible metal pipe.... vented to the outside fresh air to do so can be installed with a clearance of 1 inch at the manual section entitled Electrical Requirements for Electric Dryer 2) To reduce the risk of the dryer. 9) Please be aware that extend into the duct. • Failure to ensure proper operation. WARNING! • DO NOT...
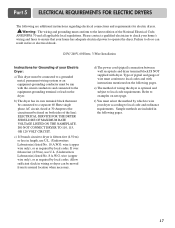
Owner's Manual (English)
Page 17
... the line). f) You must be connected to local code and ordinance requirements. ELECTRICAL SERVICE FOR THE DRYER SHOULD BE OF MAXIMUM RATE VOLTAGE LISTED ON THE NAMEPLATE. Refer to operate the dryer. Please contact a qualified electrician to check your Electric Dryer: a) This dryer must be connected to a grounded metal, permanent wiring system or an equipment-grounding...
... the line). f) You must be connected to local code and ordinance requirements. ELECTRICAL SERVICE FOR THE DRYER SHOULD BE OF MAXIMUM RATE VOLTAGE LISTED ON THE NAMEPLATE. Refer to operate the dryer. Please contact a qualified electrician to check your Electric Dryer: a) This dryer must be connected to a grounded metal, permanent wiring system or an equipment-grounding...

Owner's Manual (English)
Page 18
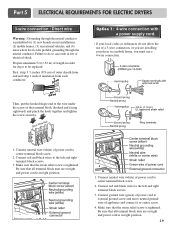
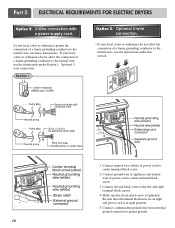
... wires peel insulation back 1 inch (2.5 cm). Connect neutral wire (white) of length in right position. 18 Part 5 ELECTRICAL REQUIREMENTS FOR ELECTRIC DRYERS Review the following options to center terminal block screw. 2. Note • Connect the power supply wire to the left and...4. Connect red and black wires to the terminal block. Prepare minimum 5 ft (1.52 m) of power cord to determine the appropriate electrical connection for (1) new branch-circuit installations, (2) mobile homes, (3) recreational vehicles, and (4) areas where local codes prohibit grounding through the...
... wires peel insulation back 1 inch (2.5 cm). Connect neutral wire (white) of length in right position. 18 Part 5 ELECTRICAL REQUIREMENTS FOR ELECTRIC DRYERS Review the following options to center terminal block screw. 2. Note • Connect the power supply wire to the left and...4. Connect red and black wires to the terminal block. Prepare minimum 5 ft (1.52 m) of power cord to determine the appropriate electrical connection for (1) new branch-circuit installations, (2) mobile homes, (3) recreational vehicles, and (4) areas where local codes prohibit grounding through the...
Owner's Manual (English)
Page 19
...is in fire or electrical shock. First, strip 3 1/2 inches (8.9 cm) of outer sheath from end and strip 1 inch of the terminal block (hooked end facing rightward) and pinch the hook together and tighten the screw securely. 1. Part 5 ELECTRICAL REQUIREMENTS FOR ELECTRIC DRYERS 3-wire connection : ...Direct wire Warning : Grounding through the neutral conductor is prohibited for dryer to center terminal block screw. 2.
...is in fire or electrical shock. First, strip 3 1/2 inches (8.9 cm) of outer sheath from end and strip 1 inch of the terminal block (hooked end facing rightward) and pinch the hook together and tighten the screw securely. 1. Part 5 ELECTRICAL REQUIREMENTS FOR ELECTRIC DRYERS 3-wire connection : ...Direct wire Warning : Grounding through the neutral conductor is prohibited for dryer to center terminal block screw. 2.
Owner's Manual (English)
Page 20
... connection of a frame-grounding conductor to the neutral wire, use the instructions under this section. 1. Connect red and black wires to proper ground. 20 Part 5 ELECTRICAL REQUIREMENTS FOR ELECTRIC DRYERS Option 2: 3-Wire connection with a power supply cord.
... connection of a frame-grounding conductor to the neutral wire, use the instructions under this section. 1. Connect red and black wires to proper ground. 20 Part 5 ELECTRICAL REQUIREMENTS FOR ELECTRIC DRYERS Option 2: 3-Wire connection with a power supply cord.

Owner's Manual (English)
Page 21
... to connect to the same outlet. • Failure to do so can result in fire or electrical shock. Label all wires prior to disconnection when servicing the dryer, because wiring errors can cause serious injury to the power source, or by this appliance is provided... inside the dryer control hood. Electrical Requirements for washers and dryers, and DO NOT operate a washer and a dryer on a separate branch, polarized, three-wire, effectively grounded, 120 Volt, 60 Hertz, AC (alternating ...
... to connect to the same outlet. • Failure to do so can result in fire or electrical shock. Label all wires prior to disconnection when servicing the dryer, because wiring errors can cause serious injury to the power source, or by this appliance is provided... inside the dryer control hood. Electrical Requirements for washers and dryers, and DO NOT operate a washer and a dryer on a separate branch, polarized, three-wire, effectively grounded, 120 Volt, 60 Hertz, AC (alternating ...

Owner's Manual (English)
Page 24
.... Push the lint screen firmly back into the dryer during removal, inspect the exhaust hood and remove any lint. 6. Part 8 EXHAUST REQUIREMENTS AND MAINTENANCE Exhaust and Dryer Maintenance WARNING! • Disconnect the dryer's electric power prior to any cleaning or maintenance. •...; Failure to do so can result in your dryer. 24 Cleaning the Lint Screen 1. Clean the control panel...
.... Push the lint screen firmly back into the dryer during removal, inspect the exhaust hood and remove any lint. 6. Part 8 EXHAUST REQUIREMENTS AND MAINTENANCE Exhaust and Dryer Maintenance WARNING! • Disconnect the dryer's electric power prior to any cleaning or maintenance. •...; Failure to do so can result in your dryer. 24 Cleaning the Lint Screen 1. Clean the control panel...
Owner's Manual (English)
Page 25
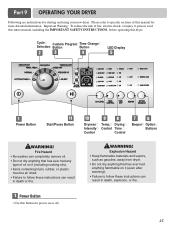
... entire manual, including the IMPORTANT SAFETY INSTRUCTIONS, before operating this manual for starting and using your new dryer. Part 9 OPERATING YOUR DRYER Following are instructions for more detailed information. Please refer to specific sections of fire, electric shock, or injury to follow these instructions can result in death or fire. Cycle Custom Program...
... entire manual, including the IMPORTANT SAFETY INSTRUCTIONS, before operating this manual for starting and using your new dryer. Part 9 OPERATING YOUR DRYER Following are instructions for more detailed information. Please refer to specific sections of fire, electric shock, or injury to follow these instructions can result in death or fire. Cycle Custom Program...
Owner's Manual (English)
Page 31
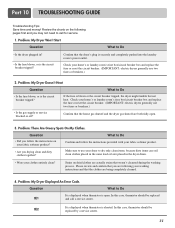
... your home's or laundry room's fuse box/circuit breaker box and replace the fuse or reset the circuit breaker. (IMPORTANT: electric dryers generally use your dryer to dry only clean items, because dirty items can soil clean clothes placed in the same load or later placed in ? ... the following your home's or laundry room's fuse box/circuit breaker box and replace the fuse or reset the circuit breaker. (IMPORTANT: electric dryers generally use two fuses or breakers.) 2. Confirm and follow the instructions on dried clothes are actually stains that the clothes are being completely cleaned...
... your home's or laundry room's fuse box/circuit breaker box and replace the fuse or reset the circuit breaker. (IMPORTANT: electric dryers generally use your dryer to dry only clean items, because dirty items can soil clean clothes placed in the same load or later placed in ? ... the following your home's or laundry room's fuse box/circuit breaker box and replace the fuse or reset the circuit breaker. (IMPORTANT: electric dryers generally use two fuses or breakers.) 2. Confirm and follow the instructions on dried clothes are actually stains that the clothes are being completely cleaned...
Owner's Manual (English)
Page 33
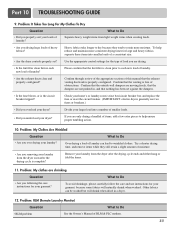
...for your laundry from the dryer soon after the drying cycle ends and either hang or fold the items. 11. Check your home's or laundry room's fuse box/circuit breaker box and replace the fuse or reset the circuit breaker. (IMPORTANT: electric dryers generally use instructions for ...your laundry from the dryer after the drying cycle is free of laundry can be washed but will naturally shrink when washed. Divide your laundry...
...for your laundry from the dryer soon after the drying cycle ends and either hang or fold the items. 11. Check your home's or laundry room's fuse box/circuit breaker box and replace the fuse or reset the circuit breaker. (IMPORTANT: electric dryers generally use instructions for ...your laundry from the dryer after the drying cycle is free of laundry can be washed but will naturally shrink when washed. Divide your laundry...


