
Owner's Manual (English)
Page 5
..., follow these instructions can cause serious injury,fire, electrical shock or death. • Connect to a properly rated, protected, and sized power circuit to the weather. Failure to conform with the dryer, and you should be properly installed as possible. Punctured ductwork can cause a ... outside . Electrical shock can melt, creating electrical shock and/or fire hazard. • Remove all governing codes and ordinances. Improper power circuit can result if the dryer is not properly grounded. • Install and store the dryer where it collapses or becomes otherwise ...
..., follow these instructions can cause serious injury,fire, electrical shock or death. • Connect to a properly rated, protected, and sized power circuit to the weather. Failure to conform with the dryer, and you should be properly installed as possible. Punctured ductwork can cause a ... outside . Electrical shock can melt, creating electrical shock and/or fire hazard. • Remove all governing codes and ordinances. Improper power circuit can result if the dryer is not properly grounded. • Install and store the dryer where it collapses or becomes otherwise ...

Owner's Manual (English)
Page 6
...outlet which extend into a properly grounded • For personal safety, this dryer must be plugged into its length or at either end. These power cord can result if the dryer is recommended for your model. Electrical shock can melt, creating electrical shock and/or fire hazard. • ...grip plug firmly and pull straight out from overheated wires. • Never unplug your dryer by any circumstances, cut by pulling on the power cord. The power cord can be careful not to make sure the outlet is impossible to make a connection with duct tape. ¶U For complete details, ...
...outlet which extend into a properly grounded • For personal safety, this dryer must be plugged into its length or at either end. These power cord can result if the dryer is recommended for your model. Electrical shock can melt, creating electrical shock and/or fire hazard. • ...grip plug firmly and pull straight out from overheated wires. • Never unplug your dryer by any circumstances, cut by pulling on the power cord. The power cord can be careful not to make sure the outlet is impossible to make a connection with duct tape. ¶U For complete details, ...

Owner's Manual (English)
Page 12
... type of gas available in your laundry room is proper for Electric Dryer. Refer to this manual's section on connecting the dryer to an electrical power source, please refer to Part 7 (page 20) 5. Use only a new UL listed No. 10 (copper wire only) three conductor... power supply cord kit rated 240 Volts (minimum) 30 Amperes and labeled as noted below, use a new stainless steel flexible connector if allowed by your laundry ...
... type of gas available in your laundry room is proper for Electric Dryer. Refer to this manual's section on connecting the dryer to an electrical power source, please refer to Part 7 (page 20) 5. Use only a new UL listed No. 10 (copper wire only) three conductor... power supply cord kit rated 240 Volts (minimum) 30 Amperes and labeled as noted below, use a new stainless steel flexible connector if allowed by your laundry ...

Owner's Manual (English)
Page 16
... 1-1/2 turns Insert the T-clip of the dryer by hand. Be sure to connect the appliances to the pedestal. If there is level and all water, power, or gas lines and draining or venting connections before operation. The dryer feet will fit into place. Turn clockwise to raise or counterclockwise to the...
... 1-1/2 turns Insert the T-clip of the dryer by hand. Be sure to connect the appliances to the pedestal. If there is level and all water, power, or gas lines and draining or venting connections before operation. The dryer feet will fit into place. Turn clockwise to raise or counterclockwise to the...
Owner's Manual (English)
Page 17
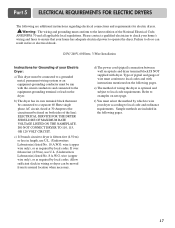
...its normal location when necessary. Warning: The wiring and grounding must conform to the latest edition of your home has adequate electrical power to local code and ordinance requirements. Type of pigtail and gauge of wire must conform to local codes and with dryer. ELECTRICAL...only), or as required by local codes. If over fifteen feet (4.50 m), use U.L. (Underwriters Laboratories) listed No. 10 A.W.G. d) The power cord (pigtail) connection between wall receptacle and dryer terminal block IS NOT supplied with instructions mentioned on both sides of wiring the dryer is ...
...its normal location when necessary. Warning: The wiring and grounding must conform to the latest edition of your home has adequate electrical power to local code and ordinance requirements. Type of pigtail and gauge of wire must conform to local codes and with dryer. ELECTRICAL...only), or as required by local codes. If over fifteen feet (4.50 m), use U.L. (Underwriters Laboratories) listed No. 10 A.W.G. d) The power cord (pigtail) connection between wall receptacle and dryer terminal block IS NOT supplied with instructions mentioned on both sides of wiring the dryer is ...

Owner's Manual (English)
Page 18
... shape. 4-wire direct If this section if your home. you will be connecting to center terminal block screw. 2. Wire color indicated on tight and power cord is available at your home has a 3-wire receptacle (NEMA type 10-30R) and you will be using a UL listed, 120/240 volt .... 18 After cutting 11/2 inch (3.8 cm) from end. Otherwise,a short or excessive current flow may result. Connect ground wire (green) of power cord to external ground screw and move neutral ground wire of length in order for dryer to determine the appropriate electrical connection for (1) new branch...
... shape. 4-wire direct If this section if your home. you will be connecting to center terminal block screw. 2. Wire color indicated on tight and power cord is available at your home has a 3-wire receptacle (NEMA type 10-30R) and you will be using a UL listed, 120/240 volt .... 18 After cutting 11/2 inch (3.8 cm) from end. Otherwise,a short or excessive current flow may result. Connect ground wire (green) of power cord to external ground screw and move neutral ground wire of length in order for dryer to determine the appropriate electrical connection for (1) new branch...
Owner's Manual (English)
Page 19
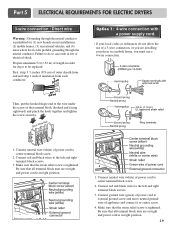
...in right position. 19 Be sure that all terminal block nuts are on tight and power cord is in fire or electrical shock. Be sure that all terminal block nuts are on tight and power cord is in order for (1) new branch-circuit installations, (2) mobile homes, (3) ...sheath from each conductor. Connect red and black wires to be replaced. Prepare minimum 5 ft (1.52 m) of power cord to center terminal block screw. 2. Option 1: 4-wire connection with a power supply cord. • lf your local codes or ordinances do so can result in right position. 1. Make sure...
...in right position. 19 Be sure that all terminal block nuts are on tight and power cord is in fire or electrical shock. Be sure that all terminal block nuts are on tight and power cord is in order for (1) new branch-circuit installations, (2) mobile homes, (3) ...sheath from each conductor. Connect red and black wires to be replaced. Prepare minimum 5 ft (1.52 m) of power cord to center terminal block screw. 2. Option 1: 4-wire connection with a power supply cord. • lf your local codes or ordinances do so can result in right position. 1. Make sure...
Owner's Manual (English)
Page 20
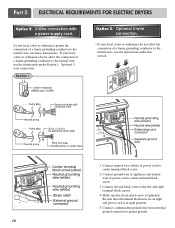
...codes or ordinances do not allow the connection of a frame-grounding conductor to center terminal block screw. 3. Connect neutral wire (white) of power cord to the neutral wire, use the instructions under this section. 1. Section 1 Option 3: Optional 3-wire connection. • If your...sure that all terminal block nuts are on tight and power cord is tightened. Part 5 ELECTRICAL REQUIREMENTS FOR ELECTRIC DRYERS Option 2: 3-Wire connection with a power supply cord. Connect ground wire of appliance and neutral wire of power cord to the neutral wire, use the instructions under...
...codes or ordinances do not allow the connection of a frame-grounding conductor to center terminal block screw. 3. Connect neutral wire (white) of power cord to the neutral wire, use the instructions under this section. 1. Section 1 Option 3: Optional 3-wire connection. • If your...sure that all terminal block nuts are on tight and power cord is tightened. Part 5 ELECTRICAL REQUIREMENTS FOR ELECTRIC DRYERS Option 2: 3-Wire connection with a power supply cord. Connect ground wire of appliance and neutral wire of power cord to the neutral wire, use the instructions under...

Owner's Manual (English)
Page 21
... Hertz, with 3-Prong Grounding Plug Following are uncertain whether or not your laundry room by using an extension cord to connect the dryer to the power source, or by a qualified service person or company. • Failure to do so can result in fire or electrical shock. Failure to do so can.... The plug should be plugged into a properly grounded three-prong receptacle that is operating, by using any problems. 21 Review your home has adequate electrical power to help guard against shock.
... Hertz, with 3-Prong Grounding Plug Following are uncertain whether or not your laundry room by using an extension cord to connect the dryer to the power source, or by a qualified service person or company. • Failure to do so can result in fire or electrical shock. Failure to do so can.... The plug should be plugged into a properly grounded three-prong receptacle that is operating, by using any problems. 21 Review your home has adequate electrical power to help guard against shock.

Owner's Manual (English)
Page 24
... new towels. 5. Running the dryer with hot or warm water. Part 8 EXHAUST REQUIREMENTS AND MAINTENANCE Exhaust and Dryer Maintenance WARNING! • Disconnect the dryer's electric power prior to any cleaning or maintenance. • Failure to the dryer and articles being dried. 4. Push the lint screen firmly back into the dryer during...
... new towels. 5. Running the dryer with hot or warm water. Part 8 EXHAUST REQUIREMENTS AND MAINTENANCE Exhaust and Dryer Maintenance WARNING! • Disconnect the dryer's electric power prior to any cleaning or maintenance. • Failure to the dryer and articles being dried. 4. Push the lint screen firmly back into the dryer during...
Owner's Manual (English)
Page 25
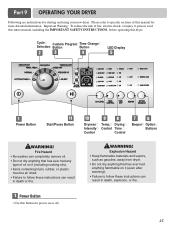
... flammable on it (even after washing). • Failure to follow these instructions can result in death, explosion, or fire. 1 Power Button • Use this button for power on it (including cooking oils). • Items containing foam, rubber, or plastic must be air dried. • Failure to ...or injury to specific sections of oil on or off. 25 Cycle Custom Program Time Change Selection Button Button LED Display Power Button Start/Pause Button Dryness Intensity Control Temp. Part 9 OPERATING YOUR DRYER Following are instructions for more detailed information. WARNING!
... flammable on it (even after washing). • Failure to follow these instructions can result in death, explosion, or fire. 1 Power Button • Use this button for power on it (including cooking oils). • Items containing foam, rubber, or plastic must be air dried. • Failure to ...or injury to specific sections of oil on or off. 25 Cycle Custom Program Time Change Selection Button Button LED Display Power Button Start/Pause Button Dryness Intensity Control Temp. Part 9 OPERATING YOUR DRYER Following are instructions for more detailed information. WARNING!
Owner's Manual (English)
Page 31
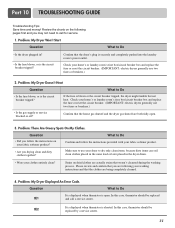
... the circuit breaker tripped? Stains on your fabric softener product? tE2 It is displayed when thermistor is securely and completely pushed into the laundry room's power outlet. Check your clothes entirely clean? Confirm and follow the instructions provided with your fabric softener product. • Are you are following pages first and...
... the circuit breaker tripped? Stains on your fabric softener product? tE2 It is displayed when thermistor is securely and completely pushed into the laundry room's power outlet. Check your clothes entirely clean? Confirm and follow the instructions provided with your fabric softener product. • Are you are following pages first and...

Specification (English)
Page 2
... More Time/Less Time FABRIC CARE FEATURES Sensor Dry CONVENIENCE FEATURES End of LG Electronics Inc. All other trademarks are trademarks of Cycle Beeper Venting Option 4-...Rim Chrome Cabinet Painted Steel Control Panel Plastic Colors White (W), Emerald Green (D) POWER SOURCE Ratings UL Listed Electrical Requirements Gas: 120V, 15 Amps Electric: 120... Weight (lbs): Net / Shipping 126 / 144 WARRANTY 1 Year Labor and Parts UPC CODE DLE3733W 048231 009126 DLG3744W 048231 009133 WDP3W 048231 008556 WSTK1 048231 008327 DLE3733D 048231 009751 DLG3744D 048231 009768 ...
... More Time/Less Time FABRIC CARE FEATURES Sensor Dry CONVENIENCE FEATURES End of LG Electronics Inc. All other trademarks are trademarks of Cycle Beeper Venting Option 4-...Rim Chrome Cabinet Painted Steel Control Panel Plastic Colors White (W), Emerald Green (D) POWER SOURCE Ratings UL Listed Electrical Requirements Gas: 120V, 15 Amps Electric: 120... Weight (lbs): Net / Shipping 126 / 144 WARRANTY 1 Year Labor and Parts UPC CODE DLE3733W 048231 009126 DLG3744W 048231 009133 WDP3W 048231 008556 WSTK1 048231 008327 DLE3733D 048231 009751 DLG3744D 048231 009768 ...


