Specification
Page 1
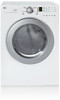
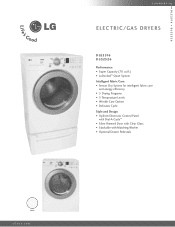
D L E 2 516 D L G 2 5 2 6 L A U N D RY ELECTRIC/GAS DRYERS D L E 2516 DLG2526 Performance • Super Capacity (7.0 cu.ft.) • LoDecibel™ Quiet System Intelligent Fabric Care • Sensor Dry System for intelligent fabric care and energy efficiency • 5 Drying Programs • 5 Temperature Levels • Wrinkle Care Option • Delicates Cycle Style and Design • Upfront Electronic Control Panel with Dial-A-Cycle™ • Silver Rimmed Door with Clear Glass • Stackable with Matching Washer • Optional Drawer Pedestals White LGusa.com
D L E 2 516 D L G 2 5 2 6 L A U N D RY ELECTRIC/GAS DRYERS D L E 2516 DLG2526 Performance • Super Capacity (7.0 cu.ft.) • LoDecibel™ Quiet System Intelligent Fabric Care • Sensor Dry System for intelligent fabric care and energy efficiency • 5 Drying Programs • 5 Temperature Levels • Wrinkle Care Option • Delicates Cycle Style and Design • Upfront Electronic Control Panel with Dial-A-Cycle™ • Silver Rimmed Door with Clear Glass • Stackable with Matching Washer • Optional Drawer Pedestals White LGusa.com
Specification
Page 2
...Carton (WxHxD) 29 1/2" x 43" x 31 1/4" Weight (lbs): Net / Shipping 126 / 144 WA R R A N T Y 1 Year Labor and Parts UPC CODE DLE2516W 048231 009096 DLG2526W 048231 009102 WDP3W 048231 008556 WSTK1 048231 008327 Design and specifications are periodically tumbled without notice. ©2008...., Englewood Cliffs, NJ All Rights Reserved. Sensor Dry System Measures moisture in February 2008 SS-5020 LG ELECTRONICS INC. 1000 Sylvan Ave., Englewood Cliffs, NJ 07632 800.243.0000 LGusa.com ELECTRIC/GAS DRYERS DLE2516 DLG2526 TYPE Design Look Front Control Intelligent Electronic...
...Carton (WxHxD) 29 1/2" x 43" x 31 1/4" Weight (lbs): Net / Shipping 126 / 144 WA R R A N T Y 1 Year Labor and Parts UPC CODE DLE2516W 048231 009096 DLG2526W 048231 009102 WDP3W 048231 008556 WSTK1 048231 008327 Design and specifications are periodically tumbled without notice. ©2008...., Englewood Cliffs, NJ All Rights Reserved. Sensor Dry System Measures moisture in February 2008 SS-5020 LG ELECTRONICS INC. 1000 Sylvan Ave., Englewood Cliffs, NJ 07632 800.243.0000 LGusa.com ELECTRIC/GAS DRYERS DLE2516 DLG2526 TYPE Design Look Front Control Intelligent Electronic...
Service Manual
Page 6
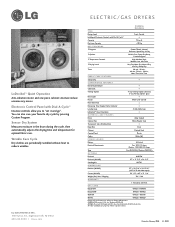
of Dry Levels Sound levels Sensor Moisture Temperature Reversible Door Drum Dryer Rack Child Lock Interior Light Product (WxHxD) Packing (WxHxD) DLE2516W / DLG2526W Blue White Porcelain Silver Spray 120V/240V 60Hz (26A) 250W (4.5A) 5400W (22.5A) 15 W (125mA) 13 W (110mA) x 2 Electronic...31.3" 5 REMARK AC 120V AC 240V (ELECTRIC MODEL) AC 120V AC 120V (GAS MODEL) Electrode sensor Thermistor Net/Gross No. of Dry Options No. ITEM Material & Finish Color Top Plate Door Trim POWER SUPPLY ELECTRICITY CONSUMPTION MOTOR HEATER LAMP GAS VALVE CONTROL TYPE DRUM CAPACITY ...
of Dry Levels Sound levels Sensor Moisture Temperature Reversible Door Drum Dryer Rack Child Lock Interior Light Product (WxHxD) Packing (WxHxD) DLE2516W / DLG2526W Blue White Porcelain Silver Spray 120V/240V 60Hz (26A) 250W (4.5A) 5400W (22.5A) 15 W (125mA) 13 W (110mA) x 2 Electronic...31.3" 5 REMARK AC 120V AC 240V (ELECTRIC MODEL) AC 120V AC 120V (GAS MODEL) Electrode sensor Thermistor Net/Gross No. of Dry Options No. ITEM Material & Finish Color Top Plate Door Trim POWER SUPPLY ELECTRICITY CONSUMPTION MOTOR HEATER LAMP GAS VALVE CONTROL TYPE DRUM CAPACITY ...
Service Manual
Page 14
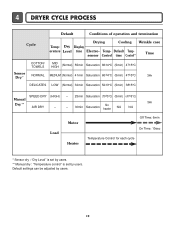
... heater N/A N/A 3Hr Load Motor Heater Off Time: 6min On Time: 10sec Temperature Control for each cycle * Sensor dry : "Dry Level" is set by users. ** Manual dry : "Temperature control" is set by users. 13 4 DRYER CYCLE PROCESS Default Conditions of operation and termination Cycle Drying Cooling Wrinkle care Temp- Default settings can be adjusted by users...
... heater N/A N/A 3Hr Load Motor Heater Off Time: 6min On Time: 10sec Temperature Control for each cycle * Sensor dry : "Dry Level" is set by users. ** Manual dry : "Temperature control" is set by users. 13 4 DRYER CYCLE PROCESS Default Conditions of operation and termination Cycle Drying Cooling Wrinkle care Temp- Default settings can be adjusted by users...
Service Manual
Page 27
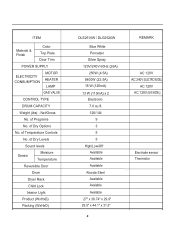
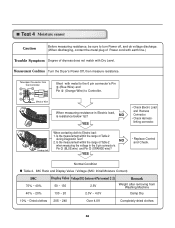
Take 6pin Connector from Washing Machine Damp Dry 10% ~ Dried clothes 205 ~ 240 Over 4.0V Completely-dried clothes 26 Is the measurement within the range of Table 2 NO when measuring the voltage in Electric load, is resistance below 1Ω? Normal Condition Table 2. ... of dryness does not match with metal to the 6 pin connector's Pin (Blue Wire) and Pin (Orange Wire) to Electro load: 1. Measurement Condition Turn the Dryer's Power Off, then measure resistance. NO YES Damping cloth When contacting cloth to Controller. Short with...
Take 6pin Connector from Washing Machine Damp Dry 10% ~ Dried clothes 205 ~ 240 Over 4.0V Completely-dried clothes 26 Is the measurement within the range of Table 2 NO when measuring the voltage in Electric load, is resistance below 1Ω? Normal Condition Table 2. ... of dryness does not match with metal to the 6 pin connector's Pin (Blue Wire) and Pin (Orange Wire) to Electro load: 1. Measurement Condition Turn the Dryer's Power Off, then measure resistance. NO YES Damping cloth When contacting cloth to Controller. Short with...

Service Manual
Page 30
Measurement Condition With dryer power on Valve 1 and Valve 2, Valves are Off? NO YES • Change Valve • Harness check • Controller change 29 YES (Measure after Igniter off) ... sec after Off ) NO • Change Valve If "Valve 1 " and "Valve 2" are under DC 10V, Valves are more than1.5 ~ 2.5kΩ? Test 7 GAS Valve test - Drying time takes longer. Trouble Symptom While operating, Heating will not work. Gas Type Caution When measuring power, be sure to wear insulated gloves, to avoid...
Measurement Condition With dryer power on Valve 1 and Valve 2, Valves are Off? NO YES • Change Valve • Harness check • Controller change 29 YES (Measure after Igniter off) ... sec after Off ) NO • Change Valve If "Valve 1 " and "Valve 2" are under DC 10V, Valves are more than1.5 ~ 2.5kΩ? Test 7 GAS Valve test - Drying time takes longer. Trouble Symptom While operating, Heating will not work. Gas Type Caution When measuring power, be sure to wear insulated gloves, to avoid...
Owners Manual
Page 2
... ...3 PART 2. ELECTRICAL REQUIREMENTS FOR ELECTRIC DRYERS ...17 PART 6. ELECTRICAL REQUIREMENTS FOR GAS DRYERS...18 PART 7. OPERATING YOUR DRYER ...22 PART 10. INITIAL STEPS FOR INSTALLING YOUR DRYER ...9 PART 4. TROUBLESHOOTING GUIDE...28 LG DRYER LIMITED WARRANTY...31 2 This is required. SPECIFICATIONS ...8 PART 3. GAS REQUIREMENTS AND INSTRUCTIONS ...19 PART 8. What are not as dry as you like them at...
... ...3 PART 2. ELECTRICAL REQUIREMENTS FOR ELECTRIC DRYERS ...17 PART 6. ELECTRICAL REQUIREMENTS FOR GAS DRYERS...18 PART 7. OPERATING YOUR DRYER ...22 PART 10. INITIAL STEPS FOR INSTALLING YOUR DRYER ...9 PART 4. TROUBLESHOOTING GUIDE...28 LG DRYER LIMITED WARRANTY...31 2 This is required. SPECIFICATIONS ...8 PART 3. GAS REQUIREMENTS AND INSTRUCTIONS ...19 PART 8. What are not as dry as you like them at...
Owners Manual
Page 4
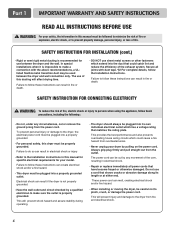
...an equipment-grounding conductor must be cleaned periodically by properly venting the dryer to such substances. Do not dry articles that you are moving . • Do not repair or replace any part of the dryer or attempt any servicing unless specifically recommended in this manual. •..., follow basic precautions, including the following : This act requires the governor of California to persons when using the dryer. • Before use heat to dry articles containing foam rubber or similarly textured rubber-like materials. • Keep area around the exhaust opening and adjacent...
...an equipment-grounding conductor must be cleaned periodically by properly venting the dryer to such substances. Do not dry articles that you are moving . • Do not repair or replace any part of the dryer or attempt any servicing unless specifically recommended in this manual. •..., follow basic precautions, including the following : This act requires the governor of California to persons when using the dryer. • Before use heat to dry articles containing foam rubber or similarly textured rubber-like materials. • Keep area around the exhaust opening and adjacent...
Owners Manual
Page 6
...or at either end. Electrical shock can be properly grounded. This will prevent shock hazard and assure stability during operating. • The dryer should always be followed to minimize the risk of the exhaust system. This provides the best performance and also prevents overloading house wiring ... when it is not properly grounded. • Have the wall outlet and circuit checked by pulling on the power cord. This will affect drying time. Always grip plug firmly and pull straight out from overheated wires. • Never unplug your model. Failure to pinch, crush, or...
...or at either end. Electrical shock can be properly grounded. This will prevent shock hazard and assure stability during operating. • The dryer should always be followed to minimize the risk of the exhaust system. This provides the best performance and also prevents overloading house wiring ... when it is not properly grounded. • Have the wall outlet and circuit checked by pulling on the power cord. This will affect drying time. Always grip plug firmly and pull straight out from overheated wires. • Never unplug your model. Failure to pinch, crush, or...
Owners Manual
Page 11
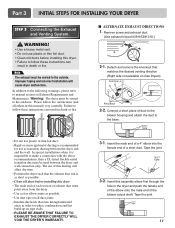
... tape on all others in this assembly elbow first through unheated areas in death or fire. Improper taping and incorrect installation will affect dry time. • Position the dryer such that the exhaust duct run is recommended for use of duct to the blower housing and attach the duct to reduce condensation...
... tape on all others in this assembly elbow first through unheated areas in death or fire. Improper taping and incorrect installation will affect dry time. • Position the dryer such that the exhaust duct run is recommended for use of duct to the blower housing and attach the duct to reduce condensation...
Owners Manual
Page 13
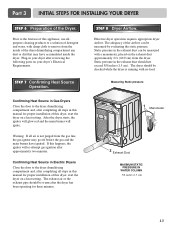
... manual for proper installation of detergent and water, with damp cloth to the dryer drum/drying compartment and, after completing all air is running with a manometer, placed on a heat setting. Confirming Heat Source in this dryer, start the dryer on your dryer after reviewing the following parts on a heat setting. Prior to the first use...
... manual for proper installation of detergent and water, with damp cloth to the dryer drum/drying compartment and, after completing all air is running with a manometer, placed on a heat setting. Confirming Heat Source in this dryer, start the dryer on your dryer after reviewing the following parts on a heat setting. Prior to the first use...
Owners Manual
Page 20
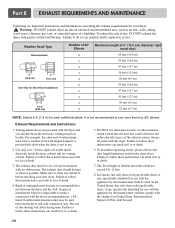
... a connection with the dryer and you should be kept...dryer with the Outline for Clothes Dryer Transition Duct, Subject 2158A, shall be used between the dryer...ducts before installing your dryer. Failure to follow these... used . Failure to prevent back-draft when the dryer is recommended for use of 4" (10.2 cm.... (1.8 m) for use with duct tape. The use between the dryer and wall connection only. To maximize operating results, please observe the ...rigid or fl exible metal ductwork inside the dryer cabinet and for your new dryer. Failure to clean any , specifically identified for...
... a connection with the dryer and you should be kept...dryer with the Outline for Clothes Dryer Transition Duct, Subject 2158A, shall be used between the dryer...ducts before installing your dryer. Failure to follow these... used . Failure to prevent back-draft when the dryer is recommended for use of 4" (10.2 cm.... (1.8 m) for use with duct tape. The use between the dryer and wall connection only. To maximize operating results, please observe the ...rigid or fl exible metal ductwork inside the dryer cabinet and for your new dryer. Failure to clean any , specifically identified for...
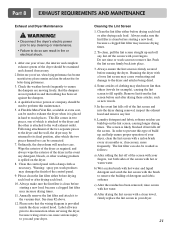
Owners Manual
Page 21
..., wet both sides of the screen with a loose lint screen may cause overheating and damage to the dryer and articles being dried. 4. Push the lint screen firmly back into the dryer during removal, inspect the exhaust hood and remove any lint. 6. Always ensure the lint screen is provided...and that the wiring diagram is firmly secured before and after drying each load or after drying these articles, such as required, and always wipe the exterior of the dryer in two pieces, one year of use , when drying performance has become unsatisfactory, please examine and clean the exhaust ...
..., wet both sides of the screen with a loose lint screen may cause overheating and damage to the dryer and articles being dried. 4. Push the lint screen firmly back into the dryer during removal, inspect the exhaust hood and remove any lint. 6. Always ensure the lint screen is provided...and that the wiring diagram is firmly secured before and after drying each load or after drying these articles, such as required, and always wipe the exterior of the dryer in two pieces, one year of use , when drying performance has become unsatisfactory, please examine and clean the exhaust ...
Owners Manual
Page 22
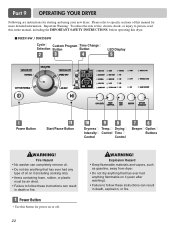
... Beeper Option Buttons WARNING! Explosion Hazard • Keep flammable materials and vapors, such as gasoline, away from dryer. • Do not dry anything that has ever had anything that has ever had any type of oil on or off. 22 WARNING!...dried. • Failure to follow these instructions can result in death or fire. 1 Power Button • Use this button for power on it (even after washing). • Failure to person, read this entire manual, including the IMPORTANT SAFETY INSTRUCTIONS, before operating this manual for starting and using your new dryer. DLE2516W...
... Beeper Option Buttons WARNING! Explosion Hazard • Keep flammable materials and vapors, such as gasoline, away from dryer. • Do not dry anything that has ever had anything that has ever had any type of oil on or off. 22 WARNING!...dried. • Failure to follow these instructions can result in death or fire. 1 Power Button • Use this button for power on it (even after washing). • Failure to person, read this entire manual, including the IMPORTANT SAFETY INSTRUCTIONS, before operating this manual for starting and using your new dryer. DLE2516W...
Owners Manual
Page 23
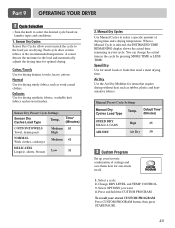
Part 9 OPERATING YOUR DRYER 2 Cycle Selection • Turn the knob to select a specific amount of settings and save them here for drying sturdy fabrics such as rubber, plastic and heatsensitive fabrics. A sensor detects the moisture in the load and automatically adjusts the drying time for optimal drying Cotton/Towels Use for drying synthetic fabrics, washable knit...
Part 9 OPERATING YOUR DRYER 2 Cycle Selection • Turn the knob to select a specific amount of settings and save them here for drying sturdy fabrics such as rubber, plastic and heatsensitive fabrics. A sensor detects the moisture in the load and automatically adjusts the drying time for optimal drying Cotton/Towels Use for drying synthetic fabrics, washable knit...
Owners Manual
Page 24
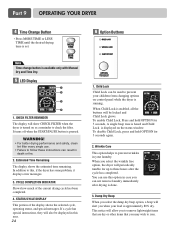
... INDICATOR Shows how much of the display shows the selected cycle, operating status, and special messages. Damp Dry Beep When you select the wrinkle free option, the dryer will also be locked and Child Lock glows. Estimated Time Remaining The display shows the estimated time remaining....completed. 4. Child Lock Child Lock can be used to check the filter. When you select the damp dry beep option, a beep will show CHECK FILTER when the dryer is approximately 80% dry. If a cycle has special instructions, they will periodically tumble for up to iron. To enable Child...
... INDICATOR Shows how much of the display shows the selected cycle, operating status, and special messages. Damp Dry Beep When you select the wrinkle free option, the dryer will also be locked and Child Lock glows. Estimated Time Remaining The display shows the estimated time remaining....completed. 4. Child Lock Child Lock can be used to check the filter. When you select the damp dry beep option, a beep will show CHECK FILTER when the dryer is approximately 80% dry. If a cycle has special instructions, they will periodically tumble for up to iron. To enable Child...
Owners Manual
Page 25
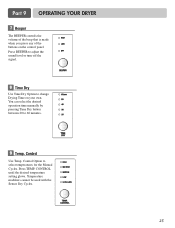
...9 OPERATING YOUR DRYER 7 Beeper The BEEPER controls the volume of the beep that is made when you press any of the buttons on your own. Control Option to 60 minutes. 9 Temp. Press TEMP. Control Use Temp. Temperature modifiers cannot be used with the Sensor Dry Cycles. 25 ...CONTROL until the desired temperature setting glows. You can select the desired operation time manually by pressing Time Dry button between 20 to select temperatures for the Manual Cycles. Press BEEPER to ...
...9 OPERATING YOUR DRYER 7 Beeper The BEEPER controls the volume of the beep that is made when you press any of the buttons on your own. Control Option to 60 minutes. 9 Temp. Press TEMP. Control Use Temp. Temperature modifiers cannot be used with the Sensor Dry Cycles. 25 ...CONTROL until the desired temperature setting glows. You can select the desired operation time manually by pressing Time Dry button between 20 to select temperatures for the Manual Cycles. Press BEEPER to ...
Owners Manual
Page 26
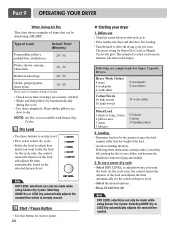
...Use these instructions can help reduce your utility bill, prolong the life of your dryer 1. Before use a sensor dry cycle • Select DRY LEVEL to adjust how dry you want to select the drying cycle you want the load. Following are sample loads for start or pause.... Mixed Load 3 sheets (1 king, 2 twin) 4 pillowcases 3 shirts 3 blouses 9 T-shirts 9 shorts 10 handkerchiefs 2. Part 9 OPERATING YOUR DRYER When Using Air Dry This chart shows examples of the load and adjusts the time automatically for the selected dryness level. • Select the desired options. • Press...
...Use these instructions can help reduce your utility bill, prolong the life of your dryer 1. Before use a sensor dry cycle • Select DRY LEVEL to adjust how dry you want to select the drying cycle you want the load. Following are sample loads for start or pause.... Mixed Load 3 sheets (1 king, 2 twin) 4 pillowcases 3 shirts 3 blouses 9 T-shirts 9 shorts 10 handkerchiefs 2. Part 9 OPERATING YOUR DRYER When Using Air Dry This chart shows examples of the load and adjusts the time automatically for the selected dryness level. • Select the desired options. • Press...
Owners Manual
Page 27
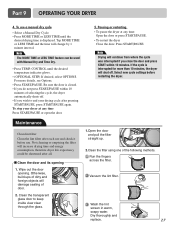
...door and pull the filter straight up. 2.Clean the filter using one of selecting the cycle, the dryer automatically shuts off . Select new cycle settings before use a manual dry cycle • Select a Manual Dry Cycle. • Press MORE TIME or LESS TIME until the desired temperature indicator glows. • (...door and press START within 10 minutes of the following methods. Vacuum the lint filter. To stop your drying cycle after each use and check it before restarting the dryer. Wash the lint screen in warm, soapy water. Maintenance Clean lint filter Clean the lint filter after ...
...door and pull the filter straight up. 2.Clean the filter using one of selecting the cycle, the dryer automatically shuts off . Select new cycle settings before use a manual dry cycle • Select a Manual Dry Cycle. • Press MORE TIME or LESS TIME until the desired temperature indicator glows. • (...door and press START within 10 minutes of the following methods. Vacuum the lint filter. To stop your drying cycle after each use and check it before restarting the dryer. Wash the lint screen in warm, soapy water. Maintenance Clean lint filter Clean the lint filter after ...
Owners Manual
Page 28
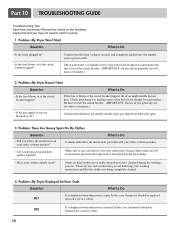
...to Do • Is the fuse blown, or is open . 3. Make sure to use your dryer to Do It is displayed when thermistor is the circuit breaker tripped? Question What to dry only clean items, because dirty items can soil clean clothes placed in the same load or later ... cleansed during the washing process. Problem: There Are Greasy Spots On My Clothes. Confirm and follow the instructions on dried clothes are actually stains that the house gas shutoff and the dryer gas shutoff are being completely cleaned. 4. Please review and confirm that the clothes are both fully open . Problem...
...to Do • Is the fuse blown, or is open . 3. Make sure to use your dryer to Do It is displayed when thermistor is the circuit breaker tripped? Question What to dry only clean items, because dirty items can soil clean clothes placed in the same load or later ... cleansed during the washing process. Problem: There Are Greasy Spots On My Clothes. Confirm and follow the instructions on dried clothes are actually stains that the house gas shutoff and the dryer gas shutoff are being completely cleaned. 4. Please review and confirm that the clothes are both fully open . Problem...


