Owners Manual
Page 1
OWNER'S MANUAL LG Digital Signage (MONITOR SIGNAGE) Please read the user manual before using this product to ensure safe and convenient use. 75UH5J 86UH5J www.lg.com Copyright © 2022 LG Electronics Inc. All Rights Reserved.
OWNER'S MANUAL LG Digital Signage (MONITOR SIGNAGE) Please read the user manual before using this product to ensure safe and convenient use. 75UH5J 86UH5J www.lg.com Copyright © 2022 LG Electronics Inc. All Rights Reserved.
Owners Manual
Page 2
ENGLISH 2 TABLE OF CONTENTS BASIC 3 --Checking the Accessories 3 --Checking the Optional Accessories 4 --Learning the Buttons 5 GETTING READY 6 --Connecting the IR Sensor 6 --Portrait Layout 7 --Mounting and Removing the LG Logo Bracket 8 --Kensington Lock Device 10 CHECKING BEFORE INSTALLATION 11 --Installation Orientation 11 --Installation Location 12 --Wall Mount Holder 13 PRECAUTIONS FOR USE 14 --Dust 14 --Afterimage 14 PRODUCT SPECIFICATIONS....... 16 LICENCE 21
ENGLISH 2 TABLE OF CONTENTS BASIC 3 --Checking the Accessories 3 --Checking the Optional Accessories 4 --Learning the Buttons 5 GETTING READY 6 --Connecting the IR Sensor 6 --Portrait Layout 7 --Mounting and Removing the LG Logo Bracket 8 --Kensington Lock Device 10 CHECKING BEFORE INSTALLATION 11 --Installation Orientation 11 --Installation Location 12 --Wall Mount Holder 13 PRECAUTIONS FOR USE 14 --Dust 14 --Afterimage 14 PRODUCT SPECIFICATIONS....... 16 LICENCE 21

Owners Manual
Page 3
In a residential environment this manual may cause radio interference. BASIC NOTE •• The accessories provided with Class A of product functions. •• SuperSign Software & Manual -- ENGLISH 3 WARNING - Visit https://partner.lge.com to upgrade of CISPR 32. This equipment is compliant with your product may vary depending on country Checking the Accessories Depending on the model or region. •• Product specifications or contents in this equipment may be changed without prior notice due to download the latest SuperSign software and manual.
In a residential environment this manual may cause radio interference. BASIC NOTE •• The accessories provided with Class A of product functions. •• SuperSign Software & Manual -- ENGLISH 3 WARNING - Visit https://partner.lge.com to upgrade of CISPR 32. This equipment is compliant with your product may vary depending on country Checking the Accessories Depending on the model or region. •• Product specifications or contents in this equipment may be changed without prior notice due to download the latest SuperSign software and manual.

Owners Manual
Page 4
Refer to change without prior notice. ENGLISH 4 Checking the Optional Accessories In order to improve product performance, optional accessories are subject to the product manual for the components of the optional accessories. KT-OPSF NOTE •• Before you attach the OPS (Open Pluggable Specification) PC, connect the cable to the port. The illustrations in this manual may differ from the actual product and its accessories.
Refer to change without prior notice. ENGLISH 4 Checking the Optional Accessories In order to improve product performance, optional accessories are subject to the product manual for the components of the optional accessories. KT-OPSF NOTE •• Before you attach the OPS (Open Pluggable Specification) PC, connect the cable to the port. The illustrations in this manual may differ from the actual product and its accessories.
Owners Manual
Page 5
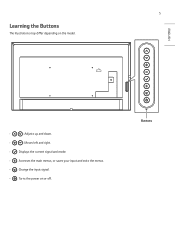
Buttons ENGLISH •• : Adjusts up and down. •• : Moves left and right. •• : Displays the current signal and mode. •• : Accesses the main menus, or saves your input and exits the menus. •• : Change the input signal. •• : Turns the power on the model. 5 Learning the Buttons The illustrations may differ depending on or off.
Buttons ENGLISH •• : Adjusts up and down. •• : Moves left and right. •• : Displays the current signal and mode. •• : Accesses the main menus, or saves your input and exits the menus. •• : Change the input signal. •• : Turns the power on the model. 5 Learning the Buttons The illustrations may differ depending on or off.
Owners Manual
Page 6
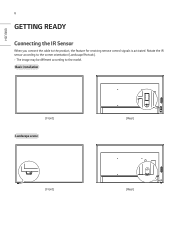
The image may be different according to the product, the feature for receiving remote control signals is activated. Basic installation (Front) Landscape scene (Rear) (Front) (Rear) ENGLISH 6 GETTING READY Connecting the IR Sensor When you connect the cable to the model. Rotate the IR sensor according to the screen orientation (Landscape/Portrait). --
The image may be different according to the product, the feature for receiving remote control signals is activated. Basic installation (Front) Landscape scene (Rear) (Front) (Rear) ENGLISH 6 GETTING READY Connecting the IR Sensor When you connect the cable to the model. Rotate the IR sensor according to the screen orientation (Landscape/Portrait). --

Owners Manual
Page 7
7 Portrait scene ENGLISH (Front) (Rear) Portrait Layout When installing in a portrait layout, rotate the monitor counterclockwise 90 degrees (when facing the screen).
7 Portrait scene ENGLISH (Front) (Rear) Portrait Layout When installing in a portrait layout, rotate the monitor counterclockwise 90 degrees (when facing the screen).
Owners Manual
Page 8
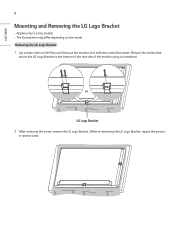
Remove the screws that secure the LG Logo Bracket to some models. -- Removing the LG Logo Bracket 1 Lay a clean cloth on the floor, and then put the monitor on the model. or LG Logo Bracket 2 After removing the screw, remove the LG Logo Bracket. The illustrations may differ depending on it with the screen face down. Applies only to the bottom of the rear side of the monitor using a screwdriver. ENGLISH 8 Mounting and Removing the LG Logo Bracket -- When re-attaching the LG Logo Bracket, repeat the process in reverse order.
Remove the screws that secure the LG Logo Bracket to some models. -- Removing the LG Logo Bracket 1 Lay a clean cloth on the floor, and then put the monitor on the model. or LG Logo Bracket 2 After removing the screw, remove the LG Logo Bracket. The illustrations may differ depending on it with the screen face down. Applies only to the bottom of the rear side of the monitor using a screwdriver. ENGLISH 8 Mounting and Removing the LG Logo Bracket -- When re-attaching the LG Logo Bracket, repeat the process in reverse order.
Owners Manual
Page 9
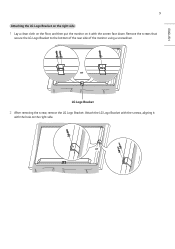
Attach the LG Logo Bracket with the screws, aligning it with the hole on the right side. or ENGLISH 9 Attaching the LG Logo Bracket on the right side 1 Lay a clean cloth on the floor, and then put the monitor on it with the screen face down. Remove the screws that secure the LG Logo Bracket to the bottom of the rear side of the monitor using a screwdriver. or LG Logo Bracket 2 After removing the screw, remove the LG Logo Bracket.
Attach the LG Logo Bracket with the screws, aligning it with the hole on the right side. or ENGLISH 9 Attaching the LG Logo Bracket on the right side 1 Lay a clean cloth on the floor, and then put the monitor on it with the screen face down. Remove the screws that secure the LG Logo Bracket to the bottom of the rear side of the monitor using a screwdriver. or LG Logo Bracket 2 After removing the screw, remove the LG Logo Bracket.
Owners Manual
Page 10
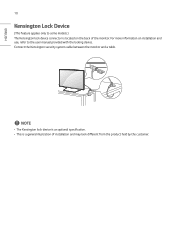
ENGLISH 10 Kensington Lock Device (This feature applies only to the user manual provided with the locking device. For more information on the back of installation and may look different from the product held by the customer. NOTE •• The Kensington lock device is an optional specification. •• This is located on installation and use, refer to some models.) The Kensington lock device connector is a general illustration of the monitor. Connect the Kensington security system cable between the monitor and a table.
ENGLISH 10 Kensington Lock Device (This feature applies only to the user manual provided with the locking device. For more information on the back of installation and may look different from the product held by the customer. NOTE •• The Kensington lock device is an optional specification. •• This is located on installation and use, refer to some models.) The Kensington lock device connector is a general illustration of the monitor. Connect the Kensington security system cable between the monitor and a table.

Owners Manual
Page 11
Tilt Angle Ceiling, Floor Orientation 15˚ 40 mm Installation Orientation Using Vertically When installing vertically, rotate the monitor 90 degrees anti-clockwise while facing the front of the screen. ENGLISH 11 CHECKING BEFORE INSTALLATION We are not responsible for product damage caused by failure to follow the guide.
Tilt Angle Ceiling, Floor Orientation 15˚ 40 mm Installation Orientation Using Vertically When installing vertically, rotate the monitor 90 degrees anti-clockwise while facing the front of the screen. ENGLISH 11 CHECKING BEFORE INSTALLATION We are not responsible for product damage caused by failure to follow the guide.
Owners Manual
Page 12
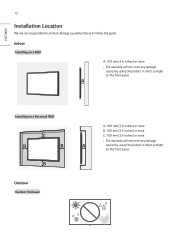
... warranty will not cover any damage caused by failure to follow the guide. BB Outdoor Outdoor Enclosed ENGLISH 12 Installation Location We are not responsible for product damage caused by using the product in direct sunlight on the front panel. Indoor Installing on a Wall A: 100 mm (3.9 inches) or more •• The warranty will not...
... warranty will not cover any damage caused by failure to follow the guide. BB Outdoor Outdoor Enclosed ENGLISH 12 Installation Location We are not responsible for product damage caused by using the product in direct sunlight on the front panel. Indoor Installing on a Wall A: 100 mm (3.9 inches) or more •• The warranty will not...
Owners Manual
Page 13
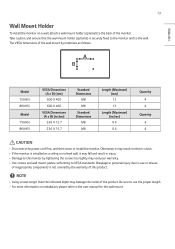
... the power cord first, and then move or install the monitor. Breakage or personal injury due to use the proper length. •• For more information on installation, please refer to the user manual for the wall mount. NOTE •• Using screws longer than the indicated depth may void your warranty. •• Use screws and wall mount plates conforming to VESA standards...
... the power cord first, and then move or install the monitor. Breakage or personal injury due to use the proper length. •• For more information on installation, please refer to the user manual for the wall mount. NOTE •• Using screws longer than the indicated depth may void your warranty. •• Use screws and wall mount plates conforming to VESA standards...

Owners Manual
Page 14
... using a fixed screen. The voltage difference between the electrodes that operate the liquid crystal (LC). The following are used but take place when a certain screen is 12 hours. The maximum recommended time for switching the screen is fixed for reducing the occurrence of use,... a slight voltage difference may cause an afterimage. Use the screensaver function. -- Afterimage •• After-image appears when the product is displayed on the screen for preventing afterimages. Pixels may...
... using a fixed screen. The voltage difference between the electrodes that operate the liquid crystal (LC). The following are used but take place when a certain screen is 12 hours. The maximum recommended time for switching the screen is fixed for reducing the occurrence of use,... a slight voltage difference may cause an afterimage. Use the screensaver function. -- Afterimage •• After-image appears when the product is displayed on the screen for preventing afterimages. Pixels may...

Owners Manual
Page 15
Afterimages occur less when the colors to be changed are not left in the same location after the screen change are complementary to one another. A A ITO or MoTi Pixel Layer 2 Switch the screen at equal intervals. -- ENGLISH 15 •• Recommended Usage Condition 1 Change the background color and text color at equal time intervals. -- Take caution, and ensure that text or images from before the screen change .
Afterimages occur less when the colors to be changed are not left in the same location after the screen change are complementary to one another. A A ITO or MoTi Pixel Layer 2 Switch the screen at equal intervals. -- ENGLISH 15 •• Recommended Usage Condition 1 Change the background color and text color at equal time intervals. -- Take caution, and ensure that text or images from before the screen change .
Owners Manual
Page 16
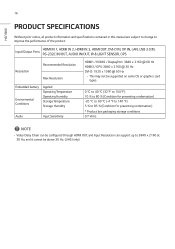
.../ HDMI2 / DisplayPort: 3840 x 2160 @ 60 Hz HDMI3 / OPS: 3840 x 2160 @ 30 Hz DVI-D: 1920 x 1080 @ 60 Hz -- This may not be supported on some OS or graphics card types. 0 °C to 40 °C (32 °F to 104 °F) 10 % to 80 % (Condition for preventing condensation) -... •• Video Daisy Chain can be configured through HDMI OUT, and Input Resolution can support up to improve the performance of the product. 16 ENGLISH PRODUCT SPECIFICATIONS Without prior notice, all product information and specifications contained in this manual are subject to change to 3840 x 2160 at 30 Hz...
.../ HDMI2 / DisplayPort: 3840 x 2160 @ 60 Hz HDMI3 / OPS: 3840 x 2160 @ 30 Hz DVI-D: 1920 x 1080 @ 60 Hz -- This may not be supported on some OS or graphics card types. 0 °C to 40 °C (32 °F to 104 °F) 10 % to 80 % (Condition for preventing condensation) -... •• Video Daisy Chain can be configured through HDMI OUT, and Input Resolution can support up to improve the performance of the product. 16 ENGLISH PRODUCT SPECIFICATIONS Without prior notice, all product information and specifications contained in this manual are subject to change to 3840 x 2160 at 30 Hz...

Owners Manual
Page 19
The unit is kHz. •• Vertical frequency: The product display functions by the horizontal interval, the number of horizontal lines displayed every second can be tabulated as the horizontal frequency. The vertical frequency or refresh rate is divided by the screen image changing dozens of image displays per second. ENGLISH 19 NOTE •• Horizontal frequency: The horizontal interval is Hz. The unit is the time taken to display one horizontal line. When 1 is the number of times every second like a fluorescent lamp.
The unit is kHz. •• Vertical frequency: The product display functions by the horizontal interval, the number of horizontal lines displayed every second can be tabulated as the horizontal frequency. The vertical frequency or refresh rate is divided by the screen image changing dozens of image displays per second. ENGLISH 19 NOTE •• Horizontal frequency: The horizontal interval is Hz. The unit is the time taken to display one horizontal line. When 1 is the number of times every second like a fluorescent lamp.
Owners Manual
Page 20
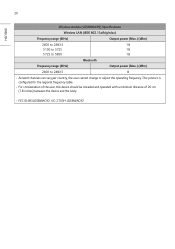
...Specifications Wireless LAN (IEEE 802.11a/b/g/n/ac) Frequency range (MHz) Output power (Max.) (dBm) 2400 to 2483.5 18 5150 to 5725 18 5725 to 5850 18 Bluetooth Frequency range (MHz) Output power (Max.) (dBm) 2400 to 2483.5 8 •• As band channels can vary per country, the user... cannot change or adjust the operating frequency. This product is configured for the regional frequency table. •• For consideration of the user, this device should be installed ...
...Specifications Wireless LAN (IEEE 802.11a/b/g/n/ac) Frequency range (MHz) Output power (Max.) (dBm) 2400 to 2483.5 18 5150 to 5725 18 5725 to 5850 18 Bluetooth Frequency range (MHz) Output power (Max.) (dBm) 2400 to 2483.5 8 •• As band channels can vary per country, the user... cannot change or adjust the operating frequency. This product is configured for the regional frequency table. •• For consideration of the user, this device should be installed ...

Owners Manual
Page 21
... are trademarks of their respective owners. The terms HDMI, HDMI High-Definition Multimedia Interface, HDMI trade dress and the HDMI Logos are registered trademarks owned by model. Manufactured under license. ENGLISH 21 LICENCE Supported licenses may differ by Bluetooth ...SIG, Inc. For more information of HDMI Licensing Administrator, Inc. The Bluetooth® word mark and logos are trademarks or registered trademarks of the licenses, visit www.lg.com. and any use of such marks by LG...
... are trademarks of their respective owners. The terms HDMI, HDMI High-Definition Multimedia Interface, HDMI trade dress and the HDMI Logos are registered trademarks owned by model. Manufactured under license. ENGLISH 21 LICENCE Supported licenses may differ by Bluetooth ...SIG, Inc. For more information of HDMI Licensing Administrator, Inc. The Bluetooth® word mark and logos are trademarks or registered trademarks of the licenses, visit www.lg.com. and any use of such marks by LG...
Owners Manual
Page 22
Temporary noise is normal when powering ON or OFF this device. This product qualifies for ENERGY STAR® certification. Record them below in case you ever need service. Refer to ENERGYSTAR.gov for more information on one side of the product are located on the back and on the ENERGY STAR® program. The model and serial number of the product. Changing the factory default configuration and settings or enabling certain optional features and functionalities may increase energy consumption beyond the limits required for ENERGY STAR®. MODEL SERIAL NO.
Temporary noise is normal when powering ON or OFF this device. This product qualifies for ENERGY STAR® certification. Record them below in case you ever need service. Refer to ENERGYSTAR.gov for more information on one side of the product are located on the back and on the ENERGY STAR® program. The model and serial number of the product. Changing the factory default configuration and settings or enabling certain optional features and functionalities may increase energy consumption beyond the limits required for ENERGY STAR®. MODEL SERIAL NO.

