User Guide
Page 2
HOW TO USE Sorting Loads ...Loading the Dryer ...Check the Lint Filter Before Every Load ...Control Panel Features ...Cycle Guide ...The Time and Status Display ...The Duct Blockage Sensing System ...Operating the Dryer ...Cycle Setting Buttons ...Cycle Option Buttons ...Special Functions ...Custom Program ...21 21 21 22 23 24 24 25 26 27 28 28 CARE AND CLEANING Regular Cleaning ...29 TROUBLESHOOTING Before Calling for Manufactured or Mobile Homes ...Final Installation Check ...Duct Condition Testing ...10 10 11 12 12...
HOW TO USE Sorting Loads ...Loading the Dryer ...Check the Lint Filter Before Every Load ...Control Panel Features ...Cycle Guide ...The Time and Status Display ...The Duct Blockage Sensing System ...Operating the Dryer ...Cycle Setting Buttons ...Cycle Option Buttons ...Special Functions ...Custom Program ...21 21 21 22 23 24 24 25 26 27 28 28 CARE AND CLEANING Regular Cleaning ...29 TROUBLESHOOTING Before Calling for Manufactured or Mobile Homes ...Final Installation Check ...Duct Condition Testing ...10 10 11 12 12...
User Guide
Page 3
... this manual and on or in your appliance. Close supervision of life. This iS the safety alert symbol. All safety messages will follow instructions. Do not reach into the dryer if the drum or any servicing unless specifically recommended in this Use and Care Guide or in published user-repair instructions that could cause a load to persons when using the dryer. • Before use, the dryer must...
... this manual and on or in your appliance. Close supervision of life. This iS the safety alert symbol. All safety messages will follow instructions. Do not reach into the dryer if the drum or any servicing unless specifically recommended in this Use and Care Guide or in published user-repair instructions that could cause a load to persons when using the dryer. • Before use, the dryer must...
User Guide
Page 4
... READ ALL iNSTRUCTiONS _WARNING followed property BEFORB USE electric shock, or to prevent For your safe_, theinformation inthismanual must be performed by properly venting the dryer to the outdoors. 4 Follow the gas supplier's instructions carefully. Gas appliances can be to such substances. WHAT TO DO iF YOU SMELL GAS: 1. Clear... of this appliance or any phone in the vicinity of natural gas or LP fuels. CALIFORNIA SAFE DRINKING WATER AND TOXIC ENFORCEMENT ACT This act requires the governor of California to publish a list of substances known to the state to cause cancer, birth...
... READ ALL iNSTRUCTiONS _WARNING followed property BEFORB USE electric shock, or to prevent For your safe_, theinformation inthismanual must be performed by properly venting the dryer to the outdoors. 4 Follow the gas supplier's instructions carefully. Gas appliances can be to such substances. WHAT TO DO iF YOU SMELL GAS: 1. Clear... of this appliance or any phone in the vicinity of natural gas or LP fuels. CALIFORNIA SAFE DRINKING WATER AND TOXIC ENFORCEMENT ACT This act requires the governor of California to publish a list of substances known to the state to cause cancer, birth...
User Guide
Page 5
... dispose of life. Electrical shock can cause serious injury, fire, electrical shock or death. • Connect to a properly rated, protected, and sized power circuit to the equipmentgrounding terminal or lead on the appliance. Use only authorized factory parts. Failure to follow basic precautions, including the following: • Properly ground dryer to conform with a qualified electrician or service SAFETY INSTRUCTIONS FOR INSTALLATION ,WARNING: To reduce...
... dispose of life. Electrical shock can cause serious injury, fire, electrical shock or death. • Connect to a properly rated, protected, and sized power circuit to the equipmentgrounding terminal or lead on the appliance. Use only authorized factory parts. Failure to follow basic precautions, including the following: • Properly ground dryer to conform with a qualified electrician or service SAFETY INSTRUCTIONS FOR INSTALLATION ,WARNING: To reduce...
User Guide
Page 6
... the Installation Instructions. I PORTANTSAFETY INST UcTIONS READ ALL iNSTRUCTiONS WARNING followed property BEFORE USE electric shock, or to prevent For yo.rsafew, theinformation inthisman.al re.stbe to minimize the risk of fire or explosion, damage, personal injury, or loss of moisture will affect drying time. The exhaust duct should have hinged dampers to prevent backdraft when the dryer is...
... the Installation Instructions. I PORTANTSAFETY INST UcTIONS READ ALL iNSTRUCTiONS WARNING followed property BEFORE USE electric shock, or to prevent For yo.rsafew, theinformation inthisman.al re.stbe to minimize the risk of fire or explosion, damage, personal injury, or loss of moisture will affect drying time. The exhaust duct should have hinged dampers to prevent backdraft when the dryer is...
User Guide
Page 7
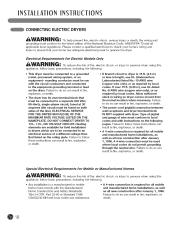
... to the dryer, the electrical power cord must be careful not to persons when using this manual for specific electrical requirements for your dryer by a qualified electrician to follow basic precautions, including the following: • Do not, under any circumstances, cut or remove the ground prong from the outlet. This provides the best performance and also prevents overloading house wiring circuits which has a voltage rating that matches...
... to the dryer, the electrical power cord must be careful not to persons when using this manual for specific electrical requirements for your dryer by a qualified electrician to follow basic precautions, including the following: • Do not, under any circumstances, cut or remove the ground prong from the outlet. This provides the best performance and also prevents overloading house wiring circuits which has a voltage rating that matches...
User Guide
Page 9
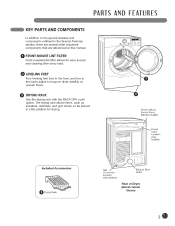
... the Special Features section, there are several other important components that are referenced in a flat position for easy access and cleaning after every load. O LEVELING FEET Four leveling feet (two in the front, and two in the back) adjust to improve dryer stability on uneven floors. Terminal Block Access Panel (Electric Models) Power Cord Location (Gas Models) Included Accessories Gas Connection Location (Gas Models) Exhaust Duct Outlet Rear of Dryer (Electric Model Shown) O Drying Rack O DRYING RACK Use the drying rack with the RACK DRY cycle option.
... the Special Features section, there are several other important components that are referenced in a flat position for easy access and cleaning after every load. O LEVELING FEET Four leveling feet (two in the front, and two in the back) adjust to improve dryer stability on uneven floors. Terminal Block Access Panel (Electric Models) Power Cord Location (Gas Models) Included Accessories Gas Connection Location (Gas Models) Exhaust Duct Outlet Rear of Dryer (Electric Model Shown) O Drying Rack O DRYING RACK Use the drying rack with the RACK DRY cycle option.
User Guide
Page 13
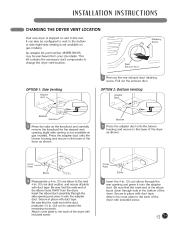
... tabs on gas models). Press the adapter duct onto the blower housing and secure to the rear. Cover Plate Cover Plate Elbow ,/ __J Elbow Rear Exhaust Duct I Remove the rear exhaust duct retaining screw. An adapter kit, part number 383EEL9001 B, may be configured to vent to change the dryer vent location. This kit contains the necessary duct components to the bottom or side (right-side venting is not available on the knockout and carefully remove the knockout...
... tabs on gas models). Press the adapter duct onto the blower housing and secure to the rear. Cover Plate Cover Plate Elbow ,/ __J Elbow Rear Exhaust Duct I Remove the rear exhaust duct retaining screw. An adapter kit, part number 383EEL9001 B, may be configured to vent to change the dryer vent location. This kit contains the necessary duct components to the bottom or side (right-side venting is not available on the knockout and carefully remove the knockout...
User Guide
Page 14
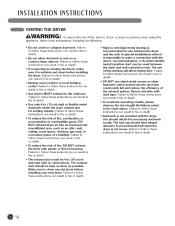
... fire or death. 14 The exhaust duct should be 4 in. {10 cm) in fire or death. • Ductwork is recommended for venting outside. INSTALLATIONINST UCTIONS VENTING THE DRYER &WARN|NG: To reduce the risk of fire, electric shock, or injury to persons when using this ducting will affect drying time. Failure to follow these instructions can result in diameter with plastic...
... fire or death. 14 The exhaust duct should be 4 in. {10 cm) in fire or death. • Ductwork is recommended for venting outside. INSTALLATIONINST UCTIONS VENTING THE DRYER &WARN|NG: To reduce the risk of fire, electric shock, or injury to persons when using this ducting will affect drying time. Failure to follow these instructions can result in diameter with plastic...
User Guide
Page 16
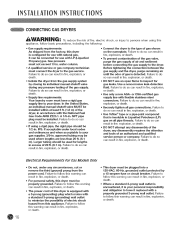
... can result in Liquefied Petroleum (LP) gas on the nameplate. DO NOT attempt any disassembly requires the attention and tools of gas shown on all gas connections. Failure to minimize the possibility of electric shock hazard from the factory, this dryer is equipped with a 3=prong (grounding) plug which mates with natural gas. Larger tubing should be used where lengths are less than 20 ft...
... can result in Liquefied Petroleum (LP) gas on the nameplate. DO NOT attempt any disassembly requires the attention and tools of gas shown on all gas connections. Failure to minimize the possibility of electric shock hazard from the factory, this dryer is equipped with a 3=prong (grounding) plug which mates with natural gas. Larger tubing should be used where lengths are less than 20 ft...
User Guide
Page 17
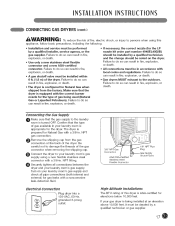
...; The dryer is being used (Natural Gas or Liquefied Petroleum). NPT gas connection. Be threads of the gas the shipping cap. Flexible Connector O Electrical Connection Plug dryer into a 120-VAC, 60-Hz. Failure to do so can result in fire, explosion, or death. Remove the shipping cap connection at an elevation above 10,000 feet, it must be installed within 6 ft. (1.8 m) of the dryer. O O Connect the dryer to...
...; The dryer is being used (Natural Gas or Liquefied Petroleum). NPT gas connection. Be threads of the gas the shipping cap. Flexible Connector O Electrical Connection Plug dryer into a 120-VAC, 60-Hz. Failure to do so can result in fire, explosion, or death. Remove the shipping cap connection at an elevation above 10,000 feet, it must be installed within 6 ft. (1.8 m) of the dryer. O O Connect the dryer to...
User Guide
Page 18
... circuit to the equipment=grounding terminal or lead on the following pages. Failure to do not permit grounding through the neutral wire. ELECTRICAL SERVICE FOR THE DRYER SHOULD BE OF THE MAXIMUM RATE VOLTAGE LISTED ON THE NAMEPLATE. Allow sufficient slack in wiring so dryer can result in length, use UL (Underwriters Laboratories) listed No.-10 AWG wire (copper wire only), or as required by local codes. A 4=wire connection...
... circuit to the equipment=grounding terminal or lead on the following pages. Failure to do not permit grounding through the neutral wire. ELECTRICAL SERVICE FOR THE DRYER SHOULD BE OF THE MAXIMUM RATE VOLTAGE LISTED ON THE NAMEPLATE. Allow sufficient slack in wiring so dryer can result in length, use UL (Underwriters Laboratories) listed No.-10 AWG wire (copper wire only), or as required by local codes. A 4=wire connection...
User Guide
Page 19
... with these standards, please contact a service and installation professional for proper installation. The opening for 3 minutes. Please be measured with a clearance of the duct from the gas line, the gas igniter may be vented to turn the dryer on, and start the dryer on a heat setting. FINAL iNSTALLATiON CHECK Once you have completed the installation of the dryer. ELECTRIC MODELS Close the dryer door, press the ON/OFF switch to be at the sides...
... with these standards, please contact a service and installation professional for proper installation. The opening for 3 minutes. Please be measured with a clearance of the duct from the gas line, the gas igniter may be vented to turn the dryer on, and start the dryer on a heat setting. FINAL iNSTALLATiON CHECK Once you have completed the installation of the dryer. ELECTRIC MODELS Close the dryer door, press the ON/OFF switch to be at the sides...
User Guide
Page 22
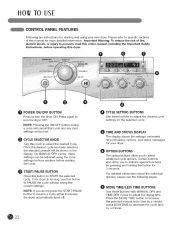
... the START/PAUSE button to select the desired cycle. START/PAUSE BUTTON Press this button to select additional cycle options. Press the MORE TIME button to specific sections of fire, electric shock, or injury to turn the dryer ON. Please refer to increase the selected manual cycle time by a minute; O 0 POWER ON/OFF BUTTON O CYCLE SETTING BUTTONS Use these buttons with MANUAL DRY and TIME DRY cycles to adjust the desired cycle settings for the selected cycle. If the dryer is running, use this manual...
... the START/PAUSE button to select the desired cycle. START/PAUSE BUTTON Press this button to select additional cycle options. Press the MORE TIME button to specific sections of fire, electric shock, or injury to turn the dryer ON. Please refer to increase the selected manual cycle time by a minute; O 0 POWER ON/OFF BUTTON O CYCLE SETTING BUTTONS Use these buttons with MANUAL DRY and TIME DRY cycles to adjust the desired cycle settings for the selected cycle. If the dryer is running, use this manual...
User Guide
Page 24
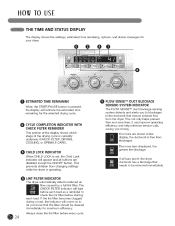
... know that needs to be cleaned immediately for maximum efficiency. The CHECK FILTER indicator will indicate the estimated time remaining for the selected drying cycle. The more bars displayed, the If all buttons are shown in the ductwork that reduce exhaust flow from changing settings while the dryer is operating. Always clean the lint filter before starting each load. FLOW SENSE TM DUCT BLOCKAGE SENSING SYSTEM INDICATOR The FLOW SENSE TM duct blockage...
... know that needs to be cleaned immediately for maximum efficiency. The CHECK FILTER indicator will indicate the estimated time remaining for the selected drying cycle. The more bars displayed, the If all buttons are shown in the ductwork that reduce exhaust flow from changing settings while the dryer is operating. Always clean the lint filter before starting each load. FLOW SENSE TM DUCT BLOCKAGE SENSING SYSTEM INDICATOR The FLOW SENSE TM duct blockage...
User Guide
Page 29
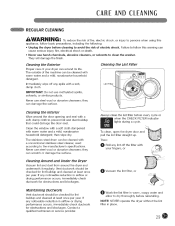
... off any lint off the filter with a soft, damp cloth. Lint Filter Cleaning the Interior Always clean the lint filter before cleaning to avoid the risk of electric cause serious injury, fire, electrical shock or death. The stainless steel drum can be cleaned with a soft, damp cloth to prevent lint and dust buildup that could damage the door seal. Vent ductwork should be checked for lint buildup and cleaned at least...
... off any lint off the filter with a soft, damp cloth. Lint Filter Cleaning the Interior Always clean the lint filter before cleaning to avoid the risk of electric cause serious injury, fire, electrical shock or death. The stainless steel drum can be cleaned with a soft, damp cloth to prevent lint and dust buildup that could damage the door seal. Vent ductwork should be checked for lint buildup and cleaned at least...
User Guide
Page 30
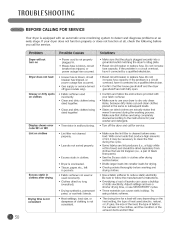
.... Drying time is not consistent Heat settings, load size, or dampness of the exhaust ducts and lint filter. provided with an automatic error-monitoring system to dry only clean items, because dirty items can soil clean clothes placed in clothes. Gas supply or service turned off the dryer and call for a load will not turn on • Power cord is cleaned before every load. With some loads that weren't removed during the cycle. Divide larger loads into a grounded outlet matching the dryer's rating...
.... Drying time is not consistent Heat settings, load size, or dampness of the exhaust ducts and lint filter. provided with an automatic error-monitoring system to dry only clean items, because dirty items can soil clean clothes placed in clothes. Gas supply or service turned off the dryer and call for a load will not turn on • Power cord is cleaned before every load. With some loads that weren't removed during the cycle. Divide larger loads into a grounded outlet matching the dryer's rating...
User Guide
Page 31
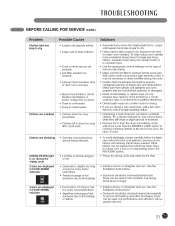
... loads of a consistent size. • Use the appropriate control settings for the type of the or debris, ductwork due to wrinkled clothes. Exhaust ducts blocked, dirty, or duct run . Partial blockage of laundry can lead to lint buildup ...J 31 Dryer can be washed but will shrink when dried in this condition, but performance and efficiency will naturally shrink when washed. If the problem is not properly sorted. Use the WRINKLE CARE...
... loads of a consistent size. • Use the appropriate control settings for the type of the or debris, ductwork due to wrinkled clothes. Exhaust ducts blocked, dirty, or duct run . Partial blockage of laundry can lead to lint buildup ...J 31 Dryer can be washed but will shrink when dried in this condition, but performance and efficiency will naturally shrink when washed. If the problem is not properly sorted. Use the WRINKLE CARE...
User Guide
Page 35
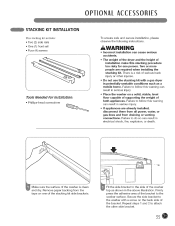
... stacking kit side brackets. OPTIONAL ACCESSORIES STACKING KIT INSTALLATION This stacking kit includes: • Two (2) side rails One (1) front rail • Four (4) screws To ensure safe and secure installation, please observe the following instructions. Remove paper backing from draining or venting connections. Repeat steps 1 and 2 to the washer with a gas dryer in serious injury. Two or more people are already installed, disconnect them from all power, water, or gas lines...
... stacking kit side brackets. OPTIONAL ACCESSORIES STACKING KIT INSTALLATION This stacking kit includes: • Two (2) side rails One (1) front rail • Four (4) screws To ensure safe and secure installation, please observe the following instructions. Remove paper backing from draining or venting connections. Repeat steps 1 and 2 to the washer with a gas dryer in serious injury. Two or more people are already installed, disconnect them from all power, water, or gas lines...
User Guide
Page 37
... sale as it is in the repair of the product or replacement of God. WARRANTY PERIOD: LABOR: Two Years from the Date of unauthorized repairs. To locate the nearest Authorized Service Center: Access our website at the time warranty service is valid only to deliver, pick up, and/or install the product, instruct, replace house fuses or correct house wiring or plumbing, or correction of...
... sale as it is in the repair of the product or replacement of God. WARRANTY PERIOD: LABOR: Two Years from the Date of unauthorized repairs. To locate the nearest Authorized Service Center: Access our website at the time warranty service is valid only to deliver, pick up, and/or install the product, instruct, replace house fuses or correct house wiring or plumbing, or correction of...


