
Owners Manual
Page 1
OWNER'S MANUAL LCD TV Please read this manual carefully before operating your set and retain it for future reference. 26LH210C 32LH210C 26LH200C 32LH200C 37LH200C 42LH200C 42LH300C 47LH300C P/NO : SAC34026003 (1004-REV01) www.lg.com
OWNER'S MANUAL LCD TV Please read this manual carefully before operating your set and retain it for future reference. 26LH210C 32LH210C 26LH200C 32LH200C 37LH200C 42LH200C 42LH300C 47LH300C P/NO : SAC34026003 (1004-REV01) www.lg.com

Owners Manual
Page 2
... equilateral triangle is subject to which are designed to correct the interference by turning the equipment off and on a circuit different from LG Electronics. Operation is intended to alert the user to the point of the cable entry as close to the presence of important operating...hazards, do not expose this product. 2 Consult the dealer or an experienced radio/TV technician for a Class B digital device, pursuant to operate this product to operate the equipment. NOTE TO CABLE/TV INSTALLER This reminder is no guarantee that the cable ground shall be of sufficient ...
... equilateral triangle is subject to which are designed to correct the interference by turning the equipment off and on a circuit different from LG Electronics. Operation is intended to alert the user to the point of the cable entry as close to the presence of important operating...hazards, do not expose this product. 2 Consult the dealer or an experienced radio/TV technician for a Class B digital device, pursuant to operate this product to operate the equipment. NOTE TO CABLE/TV INSTALLER This reminder is no guarantee that the cable ground shall be of sufficient ...

Owners Manual
Page 4
... on or over the apparatus (e.g. Do not install this product near flammable objects such as gasoline or candles or expose the TV to direct air conditioning. 16 Do not expose to the AC wall outlet, it is recommend that you turn off this apparatus or antenna during a thunder... possible electric shock (i.e. To reduce the risk of the appliance, and have a qualified electrician install a separate circuit breaker. Do not touch the TV with something. 14 CAUTION concerning the Power Cord: It is not disconnected from physical or mechanical abuse, such as vases, cups, etc. that ...
... on or over the apparatus (e.g. Do not install this product near flammable objects such as gasoline or candles or expose the TV to direct air conditioning. 16 Do not expose to the AC wall outlet, it is recommend that you turn off this apparatus or antenna during a thunder... possible electric shock (i.e. To reduce the risk of the appliance, and have a qualified electrician install a separate circuit breaker. Do not touch the TV with something. 14 CAUTION concerning the Power Cord: It is not disconnected from physical or mechanical abuse, such as vases, cups, etc. that ...
Owners Manual
Page 5
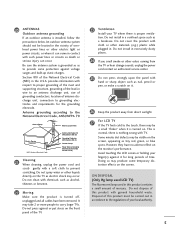
... electric shock may be a small "flicker" when it . 26 Keep the product away from direct sunlight. 27 For LCD TV If the TV feels cold to grounding electrodes and requirements for long periods of this product with chemicals such as nail, pencil or pen, or make a scratch on ... as death or serious injury can occur. Doing so may take 2 or more people to provide some temporary dis- ON DISPOSAL (Only Hg lamp used LCD TV) The fluorescent lamp used in this product must be located in excessively dusty places. 24 If you smell smoke or other liquids directly on the...
... electric shock may be a small "flicker" when it . 26 Keep the product away from direct sunlight. 27 For LCD TV If the TV feels cold to grounding electrodes and requirements for long periods of this product with chemicals such as nail, pencil or pen, or make a scratch on ... as death or serious injury can occur. Doing so may take 2 or more people to provide some temporary dis- ON DISPOSAL (Only Hg lamp used LCD TV) The fluorescent lamp used in this product must be located in excessively dusty places. 24 If you smell smoke or other liquids directly on the...

Owners Manual
Page 6
...64 Preset Picture Settings (Picture Mode 66 Manual Picture Adjustment - CONTENTS WARNING / CAUTION 2 SAFETY INSTRUCTIONS 3 FEATURE OF THIS TV 8 PREPARATION Accessories 9 Front Panel Information 10 Back Panel Information 11 Stand Instruction 12 VESA Wall Mounting 14 Cable Management 15 Desktop Pedestal ...Installation 16 Swivel Stand 16 Kensington Security System 16 Attaching the TV to a Desk 17 Securing the TV to the wall to prevent falling when the TV is used on a stand 18 Antenna or Cable Connection 19 ...
...64 Preset Picture Settings (Picture Mode 66 Manual Picture Adjustment - CONTENTS WARNING / CAUTION 2 SAFETY INSTRUCTIONS 3 FEATURE OF THIS TV 8 PREPARATION Accessories 9 Front Panel Information 10 Back Panel Information 11 Stand Instruction 12 VESA Wall Mounting 14 Cable Management 15 Desktop Pedestal ...Installation 16 Swivel Stand 16 Kensington Security System 16 Attaching the TV to a Desk 17 Securing the TV to the wall to prevent falling when the TV is used on a stand 18 Antenna or Cable Connection 19 ...
Owners Manual
Page 7
Caption Option 89 TIME SETTING Clock Setting - User Mode 79 Balance 80 Audio Reset 81 TV Speakers On/Off Setup 82 External Speakers On/Off Setup 83 Stereo/SAP Broadcasts Setup 84 Audio Language 85 On-Screen Menus Language Selection 86 ... Clock Setup 91 Auto On/Off Time Setting 92 Sleep Timer Setting 93 PARENTAL CONTROL / RATINGS Set Password & Lock System 94 Channel Blocking 97 Movie & TV Rating 98 Downloadable Rating 101 External Input Blocking 102 Key Lock 103 APPENDIX Troubleshooting 104 Maintenance 106 Product Specifications 107 IR Codes 108 External Control...
Caption Option 89 TIME SETTING Clock Setting - User Mode 79 Balance 80 Audio Reset 81 TV Speakers On/Off Setup 82 External Speakers On/Off Setup 83 Stereo/SAP Broadcasts Setup 84 Audio Language 85 On-Screen Menus Language Selection 86 ... Clock Setup 91 Auto On/Off Time Setting 92 Sleep Timer Setting 93 PARENTAL CONTROL / RATINGS Set Password & Lock System 94 Channel Blocking 97 Movie & TV Rating 98 Downloadable Rating 101 External Input Blocking 102 Key Lock 103 APPENDIX Troubleshooting 104 Maintenance 106 Product Specifications 107 IR Codes 108 External Control...

Owners Manual
Page 8
... the film for professional certification by the user to experience the best their LG HDTV has to quickly switch between common settings. Image burn is a trademark of Dolby ...the sound of digital television, HDTV formats include 1080i and 720p resolutions. Please contact your TV if you use the 4:3 aspect ratio setting for LCD, 1 or more pixels, 16:9 aspect-ratio screens, and AC3..., Sports, and Game Modes. TruSurround XT technology is displayed on the TV for Plasma). HDMI, the HDMI logo and High-Definition Multimedia Interface are trademarks of SRS Labs, Inc. This ...
... the film for professional certification by the user to experience the best their LG HDTV has to quickly switch between common settings. Image burn is a trademark of Dolby ...the sound of digital television, HDTV formats include 1080i and 720p resolutions. Please contact your TV if you use the 4:3 aspect ratio setting for LCD, 1 or more pixels, 16:9 aspect-ratio screens, and AC3..., Sports, and Game Modes. TruSurround XT technology is displayed on the TV for Plasma). HDMI, the HDMI logo and High-Definition Multimedia Interface are trademarks of SRS Labs, Inc. This ...

Owners Manual
Page 9
...P.13) Protective Bracket and Bolt for Power Cord (Refer to maintain standards compliance. 9 Option Extras D-sub 15 pin Cable When using the VGA (D-sub 15 pin cable) PC connection, the user must use shielded signal interface cables with ferrite cores to P.15) Not included with all ...models Polishing Cloth * Wipe spots on the exterior only with your TV. PREPARATION PREPARATION ACCESSORIES Ensure that the following accessories are included with the polishing cloth. * Do not wipe roughly when removing stain. If...
...P.13) Protective Bracket and Bolt for Power Cord (Refer to maintain standards compliance. 9 Option Extras D-sub 15 pin Cable When using the VGA (D-sub 15 pin cable) PC connection, the user must use shielded signal interface cables with ferrite cores to P.15) Not included with all ...models Polishing Cloth * Wipe spots on the exterior only with your TV. PREPARATION PREPARATION ACCESSORIES Ensure that the following accessories are included with the polishing cloth. * Do not wipe roughly when removing stain. If...

Owners Manual
Page 10
PREPARATION PREPARATION FRONT PANEL INFORMATION I Image shown may differ from your TV. 26LH200C, 26LH210C INPUT Button POWER Button MENU Button ENTER Button VOLUME CHANNEL (-, +) Buttons (E,D) Buttons INPUT MENU ENTER VOL CH 32LH210C, 32/37/42LH200C, 42/47LH300C ... OPTION menu. G p.74) CH VOL ENTER MENU INPUT CHANNEL (D,E) Buttons VOLUME (+, -) Buttons ENTER Button MENU Button INPUT Button POWER Button 10 Illuminates blue when the TV is switched on. (Can be adjusted using the Power Indicator in standby mode.
PREPARATION PREPARATION FRONT PANEL INFORMATION I Image shown may differ from your TV. 26LH200C, 26LH210C INPUT Button POWER Button MENU Button ENTER Button VOLUME CHANNEL (-, +) Buttons (E,D) Buttons INPUT MENU ENTER VOL CH 32LH210C, 32/37/42LH200C, 42/47LH300C ... OPTION menu. G p.74) CH VOL ENTER MENU INPUT CHANNEL (D,E) Buttons VOLUME (+, -) Buttons ENTER Button MENU Button INPUT Button POWER Button 10 Illuminates blue when the TV is switched on. (Can be adjusted using the Power Indicator in standby mode.
Owners Manual
Page 11
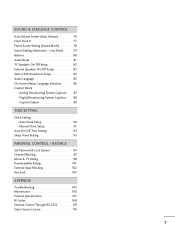
.../Video) IN Analog composite connection. Supports HD video and Digital audio. Accepts DVI video using an adapter or HDMI to operate the TV on DC power. 11 Uses a D-sub 15 pin cable (VGA cable). Supports HD. This port is used for viewing photos and listening to this port doesn't work. 8...support 480i. Uses a red, green, and blue cable for video & red and white for audio. 11 USB IN Used for Service or Hotel mode. 3 HDMI/DVI IN, HDMI IN Digital Connection. Caution: Never attempt to DVI cable (not included). 4 RGB IN (PC) Analog PC Connection. AUDIO IN (RGB/DVI) 1/8" (0.32...
.../Video) IN Analog composite connection. Supports HD video and Digital audio. Accepts DVI video using an adapter or HDMI to operate the TV on DC power. 11 Uses a D-sub 15 pin cable (VGA cable). Supports HD. This port is used for viewing photos and listening to this port doesn't work. 8...support 480i. Uses a red, green, and blue cable for video & red and white for audio. 11 USB IN Used for Service or Hotel mode. 3 HDMI/DVI IN, HDMI IN Digital Connection. Caution: Never attempt to DVI cable (not included). 4 RGB IN (PC) Analog PC Connection. AUDIO IN (RGB/DVI) 1/8" (0.32...

Owners Manual
Page 12
Do not over tighten. 12 INSTALLATION 1 Carefully place the TV screen side down on a cushioned surface to protect the screen from your TV. NOTE G When assembling the desk type stand, make sure the screws are fully tightened (If not tightened fully, the TV can tilt forward after the product installation). PREPARATION PREPARATION STAND INSTRUCTIONS I Image shown may differ from damage. 2 Assemble the TV as shown. 3 Fix the 4 screws securely using the holes in the back of the TV. !
Do not over tighten. 12 INSTALLATION 1 Carefully place the TV screen side down on a cushioned surface to protect the screen from your TV. NOTE G When assembling the desk type stand, make sure the screws are fully tightened (If not tightened fully, the TV can tilt forward after the product installation). PREPARATION PREPARATION STAND INSTRUCTIONS I Image shown may differ from damage. 2 Assemble the TV as shown. 3 Fix the 4 screws securely using the holes in the back of the TV. !

Owners Manual
Page 13
PREPARATION DETACHMENT 1 Carefully place the TV screen side down on a cushioned surface to protect the screen from damage. 2 Remove the screws from the TV. 3 Detach the stand from TV. PROTECTION COVER After removing the stand, install the included protection cover over the hole for the stand. Press the PROTECTION COVER into the TV until you hear it click. 13
PREPARATION DETACHMENT 1 Carefully place the TV screen side down on a cushioned surface to protect the screen from damage. 2 Remove the screws from the TV. 3 Detach the stand from TV. PROTECTION COVER After removing the stand, install the included protection cover over the hole for the stand. Press the PROTECTION COVER into the TV until you hear it click. 13

Owners Manual
Page 14
...solid wall perpendicular to a wall. G Standard dimensions for wall mount kits are provided. G Do not use an LG brand wall mount when mounting the TV to the floor. We recommend that you use screws that do not comply with the VESA standard screw specifications, the... contact your wall mount on a ceiling or slanted wall, it may damage the TV or cause the TV to electric shock. 14 Model VESA (A * B) A B Standard Screw Quantity 26LH200C 26LH210C 200 * 100 M4 4 32LH210C, 32LH200C 37LH200C, 42LH200C, 42LH300C, 200 * 200 M6 4 47LH300C Wall Mounting Bracket (sold...
...solid wall perpendicular to a wall. G Standard dimensions for wall mount kits are provided. G Do not use an LG brand wall mount when mounting the TV to the floor. We recommend that you use screws that do not comply with the VESA standard screw specifications, the... contact your wall mount on a ceiling or slanted wall, it may damage the TV or cause the TV to electric shock. 14 Model VESA (A * B) A B Standard Screw Quantity 26LH200C 26LH210C 200 * 100 M4 4 32LH210C, 32LH200C 37LH200C, 42LH200C, 42LH300C, 200 * 200 M6 4 47LH300C Wall Mounting Bracket (sold...

Owners Manual
Page 15
... the power cable with the PROTECTIVE BRACKET and SCREW as shown. If the TV is dropped, you may be injured or the product may differ from being removed by accident. 2 Install the CABLE MANAGEMENT CLIP as shown. 3 Put the ...cables inside the CABLE MANAGEMENT CLIP and snap it closed. ! It will help prevent the power cable from your TV. 1 Connect the cables as necessary. PROTECTIVE BRACKET CABLE MANAGEMENT CLIP 15 PREPARATION To connect additional equipment, see the EXTERNAL EQUIPMENT SETUP section. CABLE MANAGEMENT I Image...
... the power cable with the PROTECTIVE BRACKET and SCREW as shown. If the TV is dropped, you may be injured or the product may differ from being removed by accident. 2 Install the CABLE MANAGEMENT CLIP as shown. 3 Put the ...cables inside the CABLE MANAGEMENT CLIP and snap it closed. ! It will help prevent the power cable from your TV. 1 Connect the cables as necessary. PROTECTIVE BRACKET CABLE MANAGEMENT CLIP 15 PREPARATION To connect additional equipment, see the EXTERNAL EQUIPMENT SETUP section. CABLE MANAGEMENT I Image...
Owners Manual
Page 16
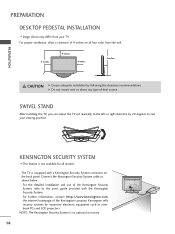
The TV is equipped with the Kensington Security System. Kensington sells security systems for all four sides from your viewing position. NOTE: The Kensington Security System is an optional accessory. 16 KENSINGTON SECURITY SYSTEM I Image shown may differ from the wall. 4 inches 4 inches 4 inches 4 inches... as shown below. - Connect the Kensington Security System cable as notebook PCs and LCD projectors. For proper ventilation, allow a clearance of the Kensington Security System, refer to suit your TV. G Do not mount near or above any type of the Kensington company. SWIVEL...
The TV is equipped with the Kensington Security System. Kensington sells security systems for all four sides from your viewing position. NOTE: The Kensington Security System is an optional accessory. 16 KENSINGTON SECURITY SYSTEM I Image shown may differ from the wall. 4 inches 4 inches 4 inches 4 inches... as shown below. - Connect the Kensington Security System cable as notebook PCs and LCD projectors. For proper ventilation, allow a clearance of the Kensington Security System, refer to suit your TV. G Do not mount near or above any type of the Kensington company. SWIVEL...

Owners Manual
Page 17
... A DESK I Image shown may cause injury. 17 Tipping, shaking, or rocking the machine may differ from falling over, the TV should be pulled in a forward/backward direction, potentially causing injury or damaging the product. Stand Desk 4-Screws (not provided as parts of the product) G ... L (*L: Table depth + 8~10 mm) ex) Table depth: 15mm, Screw: M5 x 25 (Except 47LH300C) Stand 1-Screw (provided as parts of the product) Desk WARNING G To prevent TV from your TV. The TV must be attached to a desk so it cannot be securely attached to the floor/wall per installation instructions.
... A DESK I Image shown may cause injury. 17 Tipping, shaking, or rocking the machine may differ from falling over, the TV should be pulled in a forward/backward direction, potentially causing injury or damaging the product. Stand Desk 4-Screws (not provided as parts of the product) G ... L (*L: Table depth + 8~10 mm) ex) Table depth: 15mm, Screw: M5 x 25 (Except 47LH300C) Stand 1-Screw (provided as parts of the product) Desk WARNING G To prevent TV from your TV. The TV must be attached to a desk so it cannot be securely attached to the floor/wall per installation instructions.

Owners Manual
Page 18
... so it becomes horizontal between the wall and the product. ! I Insert the eye-bolts (or TV brackets and bolts) to tighten the product to the wall as shown in a forward direction, potentially ...weight of the bracket on the wall and the one on the TV are tightened securely. Match the height of the bracket that the height of the TV. Secure the wall brackets with the bolts (sold separately) to ... to tie the rope so it cannot fall over (when not using a wall mount). G To use the TV safely make sure that children don't climb on the wall to tie the product. It is mounted on or ...
... so it becomes horizontal between the wall and the product. ! I Insert the eye-bolts (or TV brackets and bolts) to tighten the product to the wall as shown in a forward direction, potentially ...weight of the bracket on the wall and the one on the TV are tightened securely. Match the height of the bracket that the height of the TV. Secure the wall brackets with the bolts (sold separately) to ... to tie the rope so it cannot fall over (when not using a wall mount). G To use the TV safely make sure that children don't climb on the wall to tie the product. It is mounted on or ...

Owners Manual
Page 19
...not installed properly, contact your TV. I To improve the picture quality in a poor signal area, please purchase a signal amplifier and install properly. ANTENNA OR CABLE CONNECTION 1. For optimum picture quality, adjust antenna direction if needed. Cable Cable TV Wall Jack RF Coaxial Wire (75 ohm) ...ACNATBELNENIAN/ I Refer to be split for two TV's, install a 2-Way Signal Splitter. I To prevent damage do not connect to bend the...
...not installed properly, contact your TV. I To improve the picture quality in a poor signal area, please purchase a signal amplifier and install properly. ANTENNA OR CABLE CONNECTION 1. For optimum picture quality, adjust antenna direction if needed. Cable Cable TV Wall Jack RF Coaxial Wire (75 ohm) ...ACNATBELNENIAN/ I Refer to be split for two TV's, install a 2-Way Signal Splitter. I To prevent damage do not connect to bend the...
Owners Manual
Page 20
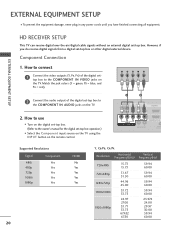
...the video outputs (Y, PB, PR) of the digital set -top box. EXTERNAL EQUIPMENT SETUP I Select the Component input source on the TV using the INPUT button on the TV. Component Connection 1. Match the jack colors (Y = green, PB = blue, and PR = red). How to use I Turn ... IN L AUDIO R L R SPEAKER OUT /DVI IN REMO CONTRO Supported Resolutions Signal Component 480i Yes 480p Yes 720p Yes 1080i Yes 1080p Yes HDMI No Yes Yes Yes Yes 20 Y, CB/PB, CR/PR Resolution Horizontal Vertical Frequency(KHz) Frequency(Hz) 720x480i 720x480p 1280x720p 1920x1080i 1920x1080p 15.73...
...the video outputs (Y, PB, PR) of the digital set -top box. EXTERNAL EQUIPMENT SETUP I Select the Component input source on the TV using the INPUT button on the TV. Component Connection 1. Match the jack colors (Y = green, PB = blue, and PR = red). How to use I Turn ... IN L AUDIO R L R SPEAKER OUT /DVI IN REMO CONTRO Supported Resolutions Signal Component 480i Yes 480p Yes 720p Yes 1080i Yes 1080p Yes HDMI No Yes Yes Yes Yes 20 Y, CB/PB, CR/PR Resolution Horizontal Vertical Frequency(KHz) Frequency(Hz) 720x480i 720x480p 1280x720p 1920x1080i 1920x1080p 15.73...
Owners Manual
Page 21
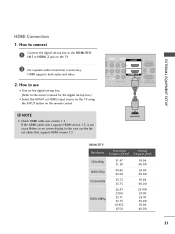
...on the digital set -top box.) I N 1or HDMI 2 jack on the remote control. ! How to connect 1 Connect the digital set-top box to the owner's manual for the digital set -top box. (Refer to the HDMI/DVI I Select the HDMI1 or HDMI2 input source on the TV using the INPUT button on the... TV. 2 No separate audio connection is necessary. EXTERNAL EQUIPMENT SETUP...
...on the digital set -top box.) I N 1or HDMI 2 jack on the remote control. ! How to connect 1 Connect the digital set-top box to the owner's manual for the digital set -top box. (Refer to the HDMI/DVI I Select the HDMI1 or HDMI2 input source on the TV using the INPUT button on the... TV. 2 No separate audio connection is necessary. EXTERNAL EQUIPMENT SETUP...


