
magicolor 1600W User Guide
Page 64
Note Do not touch the PC drum and the transfer belt on the imaging cartridge. 4 Slowly insert the new imaging cartridge vertically, and then push it slightly down toward you to your local regulations. Replacing Consumables 5-15 Do not burn the imaging cartridge. 3 Prepare the new imaging cartridge. Note Dispose of the used imaging cartridge according to finish installing the imaging cartridge.
Note Do not touch the PC drum and the transfer belt on the imaging cartridge. 4 Slowly insert the new imaging cartridge vertically, and then push it slightly down toward you to your local regulations. Replacing Consumables 5-15 Do not burn the imaging cartridge. 3 Prepare the new imaging cartridge. Note Dispose of the used imaging cartridge according to finish installing the imaging cartridge.
magicolor 1600W User Guide
Page 77
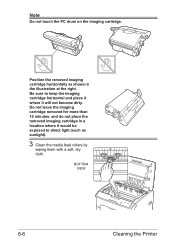
BOTTOM VIEW 6-6 Cleaning the Printer Position the removed imaging cartridge horizontally as sunlight). 3 Clean the media feed rollers by wiping them with a soft, dry cloth. Do not leave the imaging cartridge removed for more than 15 minutes, and do not place the removed imaging cartridge in the illustration at the right. Be sure to keep the imaging cartridge horizontal and place it where it would be exposed to direct light (such as shows in a location where it will not become dirty. Note Do not touch the PC drum on the imaging cartridge.
BOTTOM VIEW 6-6 Cleaning the Printer Position the removed imaging cartridge horizontally as sunlight). 3 Clean the media feed rollers by wiping them with a soft, dry cloth. Do not leave the imaging cartridge removed for more than 15 minutes, and do not place the removed imaging cartridge in the illustration at the right. Be sure to keep the imaging cartridge horizontal and place it where it would be exposed to direct light (such as shows in a location where it will not become dirty. Note Do not touch the PC drum on the imaging cartridge.
magicolor 1600W User Guide
Page 82
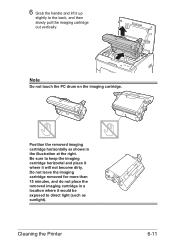
Position the removed imaging cartridge horizontally as sunlight). Be sure to direct light (such as shows in a location where it would be exposed to keep the imaging cartridge horizontal and place it where it up slightly to the back, and then slowly pull the imaging cartridge out vertically. Do not leave the imaging cartridge removed for more than 15 minutes, and do not place the removed imaging cartridge in the illustration at the right. 6 Grab the handle and lift it will not become dirty. Cleaning the Printer 6-11 Note Do not touch the PC drum on the imaging cartridge.
Position the removed imaging cartridge horizontally as sunlight). Be sure to direct light (such as shows in a location where it would be exposed to keep the imaging cartridge horizontal and place it where it up slightly to the back, and then slowly pull the imaging cartridge out vertically. Do not leave the imaging cartridge removed for more than 15 minutes, and do not place the removed imaging cartridge in the illustration at the right. 6 Grab the handle and lift it will not become dirty. Cleaning the Printer 6-11 Note Do not touch the PC drum on the imaging cartridge.
magicolor 1600W User Guide
Page 100
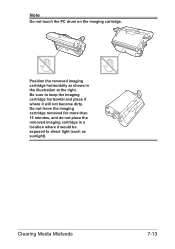
Note Do not touch the PC drum on the imaging cartridge. Clearing Media Misfeeds 7-13 Be sure to direct light (such as shows in a location where it would be exposed to keep the imaging cartridge horizontal and place it where it will not become dirty. Position the removed imaging cartridge horizontally as sunlight). Do not leave the imaging cartridge removed for more than 15 minutes, and do not place the removed imaging cartridge in the illustration at the right.
Note Do not touch the PC drum on the imaging cartridge. Clearing Media Misfeeds 7-13 Be sure to direct light (such as shows in a location where it would be exposed to keep the imaging cartridge horizontal and place it where it will not become dirty. Position the removed imaging cartridge horizontally as sunlight). Do not leave the imaging cartridge removed for more than 15 minutes, and do not place the removed imaging cartridge in the illustration at the right.

Service Manual
Page 35
...drum type Photoconductor cleaning Resolution Media feeding system Developing system Charging system Image transfer system Media separating system Fusing system Media exit system Desktop full-color laser beam printer Semiconductor laser and electrostatic image transfer to plain paper 2 laser diodes and polygon mirror OPC (organic photo conductor) Blade cleaning system magicolor 1600W... 1200 x 600 dpi, 600 x 600 dpi magicolor 1650EN 600 ...
...drum type Photoconductor cleaning Resolution Media feeding system Developing system Charging system Image transfer system Media separating system Fusing system Media exit system Desktop full-color laser beam printer Semiconductor laser and electrostatic image transfer to plain paper 2 laser diodes and polygon mirror OPC (organic photo conductor) Blade cleaning system magicolor 1600W... 1200 x 600 dpi, 600 x 600 dpi magicolor 1650EN 600 ...
Service Manual
Page 43
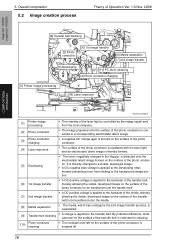
... surface of the photo conductor. Overall composition 5.2 Image creation process Theory of Operation Ver. 1.0 Nov. 2008 magicolor 1600W magicolor 1650EN COMPOSITION/ OPERATION [9] Transfer belt cleaning [2] Photo conductor [6] 1st image transfer [8] Media separation [7] 2nd image transfer [5] Developing [10] PC drum cleaning [3] Photo conductor charging [1] Printer image processing [4] Laser exposure A00VT1C005AA [1] Printer image processing • The intensity of the laser light...
... surface of the photo conductor. Overall composition 5.2 Image creation process Theory of Operation Ver. 1.0 Nov. 2008 magicolor 1600W magicolor 1650EN COMPOSITION/ OPERATION [9] Transfer belt cleaning [2] Photo conductor [6] 1st image transfer [8] Media separation [7] 2nd image transfer [5] Developing [10] PC drum cleaning [3] Photo conductor charging [1] Printer image processing [4] Laser exposure A00VT1C005AA [1] Printer image processing • The intensity of the laser light...
Service Manual
Page 67
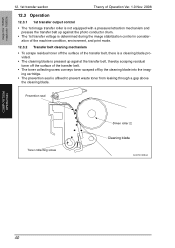
... magicolor 1600W magicolor 1650EN 12. 1st transfer section Theory of Operation Ver. 1.0 Nov. 2008 12.3 Operation 12.3.1 1st transfer output control • The 1st image transfer roller is not equipped with a pressure/retraction mechanism and presses the transfer belt up against the photo conductor drum.... • The 1st transfer voltage is determined during the image stabilization control in consideration of the machine condition, environment, and print mode. 12.3.2 Transfer ...
... magicolor 1600W magicolor 1650EN 12. 1st transfer section Theory of Operation Ver. 1.0 Nov. 2008 12.3 Operation 12.3.1 1st transfer output control • The 1st image transfer roller is not equipped with a pressure/retraction mechanism and presses the transfer belt up against the photo conductor drum.... • The 1st transfer voltage is determined during the image stabilization control in consideration of the machine condition, environment, and print mode. 12.3.2 Transfer ...
Service Manual
Page 96
Image stabilization control Mode Mode 1 Mode 2 Operation timing • The environment in which the power ... ON or the Energy saver mode is canceled after a predetermined number of printed pages have been produced. • A new drum cartridge or toner cartridge is detected. • The power switch is turned OFF and ON or the Energy saver mode is... Control of the maximum amount of Operation Ver. 1.0 Nov. 2008 18.3 Operation timing 18. magicolor 1600W magicolor 1650EN COMPOSITION/ OPERATION Theory of toner sticking Laser intensity control γ correction control A034T2E581AA 69
Image stabilization control Mode Mode 1 Mode 2 Operation timing • The environment in which the power ... ON or the Energy saver mode is canceled after a predetermined number of printed pages have been produced. • A new drum cartridge or toner cartridge is detected. • The power switch is turned OFF and ON or the Energy saver mode is... Control of the maximum amount of Operation Ver. 1.0 Nov. 2008 18.3 Operation timing 18. magicolor 1600W magicolor 1650EN COMPOSITION/ OPERATION Theory of toner sticking Laser intensity control γ correction control A034T2E581AA 69


