User Manual
Page 9
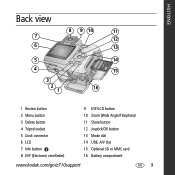
ENGLISH Back view 8 9 10 11 7 12 6 13 5 4 3 2 1 14 15 16 1 Review button 2 Menu button 3 Delete button 4 Tripod socket 5 Dock connector 6 LCD 7 Info button 8 EVF (Electronic viewfinder) 9 EVF/LCD button 10 Zoom (Wide Angle/Telephoto) 11 Share button 12 Joystick/OK button 13 Mode dial 14 USB, A/V Out 15 Optional SD or MMC card 16 Battery compartment www.kodak.com/go/z710support 9
ENGLISH Back view 8 9 10 11 7 12 6 13 5 4 3 2 1 14 15 16 1 Review button 2 Menu button 3 Delete button 4 Tripod socket 5 Dock connector 6 LCD 7 Info button 8 EVF (Electronic viewfinder) 9 EVF/LCD button 10 Zoom (Wide Angle/Telephoto) 11 Share button 12 Joystick/OK button 13 Mode dial 14 USB, A/V Out 15 Optional SD or MMC card 16 Battery compartment www.kodak.com/go/z710support 9
User Manual
Page 19
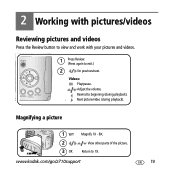
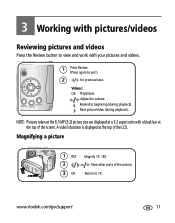
www.kodak.com/go/z710support 19 2 Working with pictures/videos Reviewing pictures and videos Press the Review button to view and work with your pictures and videos. 1 Press Review. (Press again to 1X. View other parts of the picture. Adjust the volume. Magnifying a picture 1 W/T 2 3 OK Magnify 1X - 8X. Next picture/video (during playback). Return to exit.) 2 for previous/next. Rewind to beginning (during playback). Videos: OK Play/pause.
www.kodak.com/go/z710support 19 2 Working with pictures/videos Reviewing pictures and videos Press the Review button to view and work with your pictures and videos. 1 Press Review. (Press again to 1X. View other parts of the picture. Adjust the volume. Magnifying a picture 1 W/T 2 3 OK Magnify 1X - 8X. Next picture/video (during playback). Return to exit.) 2 for previous/next. Rewind to beginning (during playback). Videos: OK Play/pause.

User Manual
Page 20
Deleting pictures and videos 1 Press Review. 2 View previous/next. 3 Press Delete. 4 Follow the screen prompts. 20 www.kodak.com/go/easysharecenter Working with pictures/videos Viewing multi-up (thumbnails) 1 View multi-up thumbnails. 2 View previous/next row or thumbnail. 3 OK View single picture.
Deleting pictures and videos 1 Press Review. 2 View previous/next. 3 Press Delete. 4 Follow the screen prompts. 20 www.kodak.com/go/easysharecenter Working with pictures/videos Viewing multi-up (thumbnails) 1 View multi-up thumbnails. 2 View previous/next row or thumbnail. 3 OK View single picture.
User Manual
Page 23
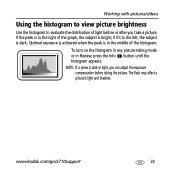
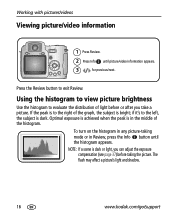
... Review, press the Info button until the histogram appears. The flash may affect a picture's light and shadow. Working with pictures/videos Using the histogram to view picture brightness Use the histogram to evaluate the distribution of the graph, the subject is bright; Optimal exposure is achieved when the peak is dark... any picture-taking the picture. NOTE: If a scene is dark or light, you can adjust the exposure compensation before or after you take a picture. www.kodak.com/go/z710support 23 To turn on the histogram in the middle of the histogram.
... Review, press the Info button until the histogram appears. The flash may affect a picture's light and shadow. Working with pictures/videos Using the histogram to view picture brightness Use the histogram to evaluate the distribution of the graph, the subject is bright; Optimal exposure is achieved when the peak is dark... any picture-taking the picture. NOTE: If a scene is dark or light, you can adjust the exposure compensation before or after you take a picture. www.kodak.com/go/z710support 23 To turn on the histogram in the middle of the histogram.

User Manual
Page 4
Product features Back view 8 9 10 11 7 12 6 13 5 4 3 2 1 14 15 16 1 Review button 2 Menu button 3 Delete button 4 Tripod socket 5 Dock connector 6 LCD 7 Info button 8 EVF (Electronic viewfinder) 9 EVF/LCD button 10 Zoom (Wide Angle/Telephoto) 11 Share button 12 Joystick/OK button 13 Mode dial 14 USB, A/V Out 15 Optional SD or MMC card 16 Battery compartment ii www.kodak.com/go/support
Product features Back view 8 9 10 11 7 12 6 13 5 4 3 2 1 14 15 16 1 Review button 2 Menu button 3 Delete button 4 Tripod socket 5 Dock connector 6 LCD 7 Info button 8 EVF (Electronic viewfinder) 9 EVF/LCD button 10 Zoom (Wide Angle/Telephoto) 11 Share button 12 Joystick/OK button 13 Mode dial 14 USB, A/V Out 15 Optional SD or MMC card 16 Battery compartment ii www.kodak.com/go/support

User Manual
Page 5
.../video information 16 Using the histogram to view picture brightness 16 Copying pictures and videos 17 Pre-tagging for album names 17 Tagging pictures/videos for albums 19 Sharing your pictures 20 4 Doing more with your camera 25 Changing the flash settings 25 Using the self-timer 26 Capture modes... 27 Taking close-up and landscape pictures 30 Using burst 31 www.kodak.com/go/support iii
.../video information 16 Using the histogram to view picture brightness 16 Copying pictures and videos 17 Pre-tagging for album names 17 Tagging pictures/videos for albums 19 Sharing your pictures 20 4 Doing more with your camera 25 Changing the flash settings 25 Using the self-timer 26 Capture modes... 27 Taking close-up and landscape pictures 30 Using burst 31 www.kodak.com/go/support iii
User Manual
Page 17
... is displayed at the top of the picture. Magnifying a picture 1 W/T 2 3 OK Magnify 1X - 8X. Return to exit.) 2 for previous/next. www.kodak.com/go/support 11 NOTE: Pictures taken at the 6.3 MP (3:2) picture size are displayed at a 3:2 aspect ratio with your pictures and videos. 1 Press Review.... (Press again to 1X. View other parts of the LCD. 3 Working with pictures/videos Reviewing pictures and videos Press the Review button to view and work with a black bar at the top of the screen. Rewind to beginning ...
... is displayed at the top of the picture. Magnifying a picture 1 W/T 2 3 OK Magnify 1X - 8X. Return to exit.) 2 for previous/next. www.kodak.com/go/support 11 NOTE: Pictures taken at the 6.3 MP (3:2) picture size are displayed at a 3:2 aspect ratio with your pictures and videos. 1 Press Review.... (Press again to 1X. View other parts of the LCD. 3 Working with pictures/videos Reviewing pictures and videos Press the Review button to view and work with a black bar at the top of the screen. Rewind to beginning ...

User Manual
Page 18
Working with pictures/videos Viewing multi-up (thumbnails) 1 View multi-up thumbnails. 2 View previous/next row or thumbnail. 3 OK View single picture. What the review icons mean Print tag/number of prints Favorite tag Email tag Protected Picture/video number Image storage location Scroll arrows Video length Favorite tag Email tag Play or Pause Scroll arrows 12 Review mode Protected Picture/video number Image storage location Review mode www.kodak.com/go/support
Working with pictures/videos Viewing multi-up (thumbnails) 1 View multi-up thumbnails. 2 View previous/next row or thumbnail. 3 OK View single picture. What the review icons mean Print tag/number of prints Favorite tag Email tag Protected Picture/video number Image storage location Scroll arrows Video length Favorite tag Email tag Play or Pause Scroll arrows 12 Review mode Protected Picture/video number Image storage location Review mode www.kodak.com/go/support

User Manual
Page 19
www.kodak.com/go/support 13 appears with pictures/videos Deleting pictures and videos 1 Press Review. 2 View previous/next. 3 Press Delete. 4 Follow the screen prompts. Protecting pictures and videos from your current storage location. Press the Menu button to exit the menu. ... or video is protected and cannot be deleted. Working with CAUTION: Formatting internal memory or a card deletes all pictures and videos from deletion 1 Press Review. 2 View previous/next. 3 Press Menu. 4 Highlight Protect, then press OK.
www.kodak.com/go/support 13 appears with pictures/videos Deleting pictures and videos 1 Press Review. 2 View previous/next. 3 Press Delete. 4 Follow the screen prompts. Protecting pictures and videos from your current storage location. Press the Menu button to exit the menu. ... or video is protected and cannot be deleted. Working with CAUTION: Formatting internal memory or a card deletes all pictures and videos from deletion 1 Press Review. 2 View previous/next. 3 Press Menu. 4 Highlight Protect, then press OK.
User Manual
Page 22
... the graph, the subject is dark. Optimal exposure is achieved when the peak is dark or light, you take a picture. Using the histogram to view picture brightness Use the histogram to the left, the subject is bright; If the peak is to exit Review. To turn on the histogram in... any picture-taking the picture. The flash may affect a picture's light and shadow. 16 www.kodak.com/go/support NOTE: If a scene is in Review, press the Info button until picture/video information appears. 3 for previous/next. Working with pictures/...
... the graph, the subject is dark. Optimal exposure is achieved when the peak is dark or light, you take a picture. Using the histogram to view picture brightness Use the histogram to the left, the subject is bright; If the peak is to exit Review. To turn on the histogram in... any picture-taking the picture. The flash may affect a picture's light and shadow. 16 www.kodak.com/go/support NOTE: If a scene is in Review, press the Info button until picture/video information appears. 3 for previous/next. Working with pictures/...

User Manual
Page 28
...(see EasyShare software Help. 22 www.kodak.com/go/support The first time you transfer pictures, the software helps you can preserve your favorite pictures in the Favorites section of your camera's internal memory, then share them with this camera. (See page 40.) 2 Connect the camera to ...use the EasyShare software that was packaged with friends and family. To remove the tag, press the OK button again. Then, your pictures are stored on your favorite pictures. NOTE: The camera holds a limited number of your camera Favorites section. Press for previous/next picture. View favorites 1...
...(see EasyShare software Help. 22 www.kodak.com/go/support The first time you transfer pictures, the software helps you can preserve your favorite pictures in the Favorites section of your camera's internal memory, then share them with this camera. (See page 40.) 2 Connect the camera to ...use the EasyShare software that was packaged with friends and family. To remove the tag, press the OK button again. Then, your pictures are stored on your favorite pictures. NOTE: The camera holds a limited number of your camera Favorites section. Press for previous/next picture. View favorites 1...

User Manual
Page 29
All pictures stored in the Favorites section of the screen. Click the My Collection tab. 2 Go to the Albums view. 3 Click the Camera Favorites Album for your camera 1 Move the Power/Favorites switch to Favorites . 2 Press the Menu button. 3 Highlight , then press the OK button. Favorites ...you transfer pictures from your camera. 4 Click Remove Album. The next time you transfer pictures to the computer. 4 Press the Menu button to exit the menu. Preventing favorites from your Camera Favorites Album or to the camera 1 Open the Kodak EasyShare software. Removing all favorites ...
All pictures stored in the Favorites section of the screen. Click the My Collection tab. 2 Go to the Albums view. 3 Click the Camera Favorites Album for your camera 1 Move the Power/Favorites switch to Favorites . 2 Press the Menu button. 3 Highlight , then press the OK button. Favorites ...you transfer pictures from your camera. 4 Click Remove Album. The next time you transfer pictures to the computer. 4 Press the Menu button to exit the menu. Preventing favorites from your Camera Favorites Album or to the camera 1 Open the Kodak EasyShare software. Removing all favorites ...
User Manual
Page 43
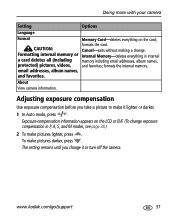
email addresses, album names, and favorites. About View camera information. formats the card. Formatting internal memory or Internal Memory-deletes everything on the LCD or EVF. (To change exposure compensation in internal ...including email addresses, album names, protected) pictures, videos, and favorites; The setting remains until you take a picture to make pictures darker, press . www.kodak.com/go/support 37 Adjusting exposure compensation Use exposure compensation before you change it lighter or darker. 1 In Auto mode, press . CAUTION: Cancel-exits without...
email addresses, album names, and favorites. About View camera information. formats the card. Formatting internal memory or Internal Memory-deletes everything on the LCD or EVF. (To change exposure compensation in internal ...including email addresses, album names, protected) pictures, videos, and favorites; The setting remains until you take a picture to make pictures darker, press . www.kodak.com/go/support 37 Adjusting exposure compensation Use exposure compensation before you change it lighter or darker. 1 In Auto mode, press . CAUTION: Cancel-exits without...
User Manual
Page 70
...internal memory, 13 from SD/MMC card, 13 protecting pictures, videos, 13 digital zoom, using, 8 displaying slide show, 14 disposal, recycling, 59 distant scenes, 30 dock camera, 58 connector, ii printer, 42, 58 downloading pictures, 40 E emailing... pictures, videos, 21 EVF (electronic viewfinder), ii EVF/LCD button, ii expected battery life, 57 exposure compensation, 38 64 metering, 33 external video device viewing pictures...web links, 49 histogram, 16 I icons, mode dial, 27 image storage, 34 www.kodak.com/go/support
...internal memory, 13 from SD/MMC card, 13 protecting pictures, videos, 13 digital zoom, using, 8 displaying slide show, 14 disposal, recycling, 59 distant scenes, 30 dock camera, 58 connector, ii printer, 42, 58 downloading pictures, 40 E emailing... pictures, videos, 21 EVF (electronic viewfinder), ii EVF/LCD button, ii expected battery life, 57 exposure compensation, 38 64 metering, 33 external video device viewing pictures...web links, 49 histogram, 16 I icons, mode dial, 27 image storage, 34 www.kodak.com/go/support
User Manual
Page 74
Index transfer, via USB cable, 40 tripod socket, ii turning camera on and off, 3 U upgrading software, firmware, 58 URLs, Kodak Web sites, 49 USB (universal serial bus) transferring pictures, 40 USB, A/V out, ii V VCCI compliance, 62 video checking settings, 12 ... out, 36 protecting, 13 reviewing, 11 size, 32 storage capacities, 55 transfer to computer, 40 viewing, 11 viewfinder, ii viewing picture after taking, 11 viewing picture, video information, 16 W warranty, 59 white balance, 33 68 Windows computers installing software, 40 Z zoom button, ii digital, 8 optical, 8 www.kodak.com/go/support
Index transfer, via USB cable, 40 tripod socket, ii turning camera on and off, 3 U upgrading software, firmware, 58 URLs, Kodak Web sites, 49 USB (universal serial bus) transferring pictures, 40 USB, A/V out, ii V VCCI compliance, 62 video checking settings, 12 ... out, 36 protecting, 13 reviewing, 11 size, 32 storage capacities, 55 transfer to computer, 40 viewing, 11 viewfinder, ii viewing picture after taking, 11 viewing picture, video information, 16 W warranty, 59 white balance, 33 68 Windows computers installing software, 40 Z zoom button, ii digital, 8 optical, 8 www.kodak.com/go/support


