

User Manual
Page 1
After installing the software, return to this Getting Started Guide. www.kodak.com/go/v803support or v1003support 1 Follow the on-screen instructions. ENGLISH ᕡ Installing the software IMPORTANT: Before connecting any cables, install the software that was included with your camera.
After installing the software, return to this Getting Started Guide. www.kodak.com/go/v803support or v1003support 1 Follow the on-screen instructions. ENGLISH ᕡ Installing the software IMPORTANT: Before connecting any cables, install the software that was included with your camera.
User Manual
Page 3
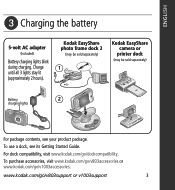
Kodak EasyShare photo frame dock 2 (may be sold separately) 1 Kodak EasyShare camera or printer dock (may be sold separately) Battery 2 charging lights For package contents, see its Getting Started Guide. To use a dock, see your product package. To purchase accessories, visit www.kodak.com/go/v803accessories or www.kodak.com/go /dockcompatibility. For dock compatibility, visit www.kodak.com...
Kodak EasyShare photo frame dock 2 (may be sold separately) 1 Kodak EasyShare camera or printer dock (may be sold separately) Battery 2 charging lights For package contents, see its Getting Started Guide. To use a dock, see your product package. To purchase accessories, visit www.kodak.com/go/v803accessories or www.kodak.com/go /dockcompatibility. For dock compatibility, visit www.kodak.com...
User Manual
Page 4
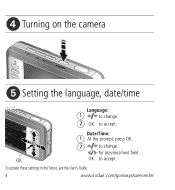
for previous/next field. ᕤ Turning on the camera ᕥ Setting the language, date/time Language: 1 to change . To update these settings in the future, see the User's Guide. 4 www.kodak.com/go/easysharecenter OK OK to accept. Date/Time: 1 At the prompt, press OK. 2 to change . 2 OK to accept.
for previous/next field. ᕤ Turning on the camera ᕥ Setting the language, date/time Language: 1 to change . To update these settings in the future, see the User's Guide. 4 www.kodak.com/go/easysharecenter OK OK to accept. Date/Time: 1 At the prompt, press OK. 2 to change . 2 OK to accept.
User Manual
Page 5
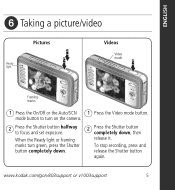
www.kodak.com/go/v803support or v1003support 5 When the Ready light or framing marks turn on the camera. 2 Press the Shutter button halfway to focus and set exposure. To stop recording, press and release the Shutter button again. ENGLISH ᕦ Taking a picture/video Pictures Ready light Videos Video mode Framing marks 1 Press the On/Off or the Auto/SCN mode button to turn green, press the Shutter button completely down. 1 Press the Video mode button. 2 Press the Shutter button completely down, then release it.
www.kodak.com/go/v803support or v1003support 5 When the Ready light or framing marks turn on the camera. 2 Press the Shutter button halfway to focus and set exposure. To stop recording, press and release the Shutter button again. ENGLISH ᕦ Taking a picture/video Pictures Ready light Videos Video mode Framing marks 1 Press the On/Off or the Auto/SCN mode button to turn green, press the Shutter button completely down. 1 Press the Video mode button. 2 Press the Shutter button completely down, then release it.
User Manual
Page 7
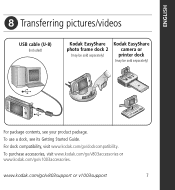
To purchase accessories, visit www.kodak.com/go/v803accessories or www.kodak.com/go /dockcompatibility. ENGLISH ᕨ Transferring pictures/videos USB cable (U-8) (included) Kodak EasyShare photo frame dock 2 (may be sold separately) Kodak EasyShare camera or printer dock (may be sold separately) For package contents, see its Getting Started Guide. For dock compatibility, visit www.kodak.com/go /v1003accessories. www.kodak.com/go/v803support or v1003support 7 To use a dock, see your product package.
To purchase accessories, visit www.kodak.com/go/v803accessories or www.kodak.com/go /dockcompatibility. ENGLISH ᕨ Transferring pictures/videos USB cable (U-8) (included) Kodak EasyShare photo frame dock 2 (may be sold separately) Kodak EasyShare camera or printer dock (may be sold separately) For package contents, see its Getting Started Guide. For dock compatibility, visit www.kodak.com/go /v1003accessories. www.kodak.com/go/v803support or v1003support 7 To use a dock, see your product package.

User Manual
Page 8
...transferred pictures to your best pictures! To better understand each menu option, use camera Help. (Highlight a menu choice, then press the Zoom telephoto T button.) Visit www.kodak.com/go/v803support or www.kodak.com/go/v1003support for: • the user's guide • interactive ...• interactive tutorials • FAQs • downloads • accessories • printing information • product registration 8 www.kodak.com/go/easysharecenter Congratulations! Finish reading this book, so you can take and share your computer Keep learning! ᕩ Keep learning about ...
...transferred pictures to your best pictures! To better understand each menu option, use camera Help. (Highlight a menu choice, then press the Zoom telephoto T button.) Visit www.kodak.com/go/v803support or www.kodak.com/go/v1003support for: • the user's guide • interactive ...• interactive tutorials • FAQs • downloads • accessories • printing information • product registration 8 www.kodak.com/go/easysharecenter Congratulations! Finish reading this book, so you can take and share your computer Keep learning! ᕩ Keep learning about ...
User Manual
Page 11
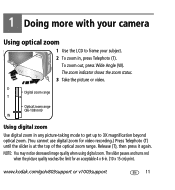
...of the optical zoom range. www.kodak.com/go/v803support or v1003support 11 Release (T), then press it again. NOTE: You may notice decreased image quality when using digital zoom. D Digital zoom range T Optical zoom range (36-108 mm) W Using digital zoom Use digital zoom in any picture-taking mode to... zoom indicator shows the zoom status. 3 Take the picture or video. To zoom out, press Wide Angle (W). 1 Doing more with your camera Using optical zoom 1 Use the LCD to 3X magnification beyond optical zoom. (You cannot use digital zoom for an acceptable 4 x 6-in , press Telephoto (T).
...of the optical zoom range. www.kodak.com/go/v803support or v1003support 11 Release (T), then press it again. NOTE: You may notice decreased image quality when using digital zoom. D Digital zoom range T Optical zoom range (36-108 mm) W Using digital zoom Use digital zoom in any picture-taking mode to... zoom indicator shows the zoom status. 3 Take the picture or video. To zoom out, press Wide Angle (W). 1 Doing more with your camera Using optical zoom 1 Use the LCD to 3X magnification beyond optical zoom. (You cannot use digital zoom for an acceptable 4 x 6-in , press Telephoto (T).

User Manual
Page 12
Place camera on a tripod). 2 shot-The first picture is taken after the delay. NOTE: The video stops when no storage space remains. Only the 2- A second picture is taken after a 10-second Menu delay (so you want to be included in video mode. 12 www.kodak.com/go/easysharecenter ...Press the Shutter button halfway, then completely down . The camera takes the picture/pictures after a 10-second delay. and 10-second options are available in a picture, ...
Place camera on a tripod). 2 shot-The first picture is taken after the delay. NOTE: The video stops when no storage space remains. Only the 2- A second picture is taken after a 10-second Menu delay (so you want to be included in video mode. 12 www.kodak.com/go/easysharecenter ...Press the Shutter button halfway, then completely down . The camera takes the picture/pictures after a 10-second delay. and 10-second options are available in a picture, ...

User Manual
Page 13
...the Red Eye Preflash off. NOTE: When automatic red eye reduction is on, the camera cannot take a picture, regardless of red eye.) ■ Flash once and automatically ...modes. Flash modes Auto Flash fires When the lighting conditions require it. In low light, hold the camera steady or use a tripod. Take more pictures when the Ready light turns green. Fill Every time you... by using automatic red eye reduction. Red Eye In Red Eye flash, you take more with your camera Press the flash button repeatedly to reduce the chance of the lighting conditions. The current flash mode is...
...the Red Eye Preflash off. NOTE: When automatic red eye reduction is on, the camera cannot take a picture, regardless of red eye.) ■ Flash once and automatically ...modes. Flash modes Auto Flash fires When the lighting conditions require it. In low light, hold the camera steady or use a tripod. Take more pictures when the Ready light turns green. Fill Every time you... by using automatic red eye reduction. Red Eye In Red Eye flash, you take more with your camera Press the flash button repeatedly to reduce the chance of the lighting conditions. The current flash mode is...
User Manual
Page 14
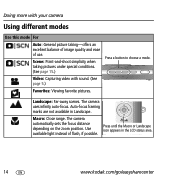
Press a button to choose a mode. Auto-focus framing marks are not available in the LCD status area. 14 www.kodak.com/go/easysharecenter The camera uses infinity auto-focus. Landscape: Far-away scenes. Use available light instead of use. Macro: Close range. Scene: Point-...and-shoot simplicity when taking pictures under special conditions. (See page 15.) Video: Capturing video with your camera Using different modes Use this mode For Auto: General picture taking-offers an excellent balance of image quality and ease of flash, if possible...
Press a button to choose a mode. Auto-focus framing marks are not available in the LCD status area. 14 www.kodak.com/go/easysharecenter The camera uses infinity auto-focus. Landscape: Far-away scenes. Use available light instead of use. Macro: Close range. Scene: Point-...and-shoot simplicity when taking pictures under special conditions. (See page 15.) Video: Capturing video with your camera Using different modes Use this mode For Auto: General picture taking-offers an excellent balance of image quality and ease of flash, if possible...
User Manual
Page 15
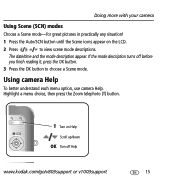
... choice, then press the Zoom telephoto (T) button. Using camera Help To better understand each menu option, use camera Help. T Turn on the LCD. 2 Press to choose a Scene mode. If the mode description turns off Help www.kodak.com/go/v803support or v1003support 15 The date/time and... the mode description appear. Doing more with your camera Using Scene (SCN) modes Choose a Scene mode-for great pictures in practically any ...
... choice, then press the Zoom telephoto (T) button. Using camera Help To better understand each menu option, use camera Help. T Turn on the LCD. 2 Press to choose a Scene mode. If the mode description turns off Help www.kodak.com/go/v803support or v1003support 15 The date/time and... the mode description appear. Doing more with your camera Using Scene (SCN) modes Choose a Scene mode-for great pictures in practically any ...
User Manual
Page 16
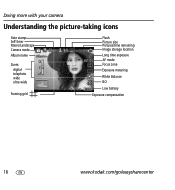
Doing more with your camera Understanding the picture-taking icons Date stamp Self timer Macro/Landscape Camera mode Album name Zoom: digital telephoto wide ultra-wide Framing grid Flash Picture size Pictures/time remaining Image storage location Long time exposure AF mode Focus zone Exposure metering White Balance ISO Low battery Exposure compensation 16 www.kodak.com/go/easysharecenter
Doing more with your camera Understanding the picture-taking icons Date stamp Self timer Macro/Landscape Camera mode Album name Zoom: digital telephoto wide ultra-wide Framing grid Flash Picture size Pictures/time remaining Image storage location Long time exposure AF mode Focus zone Exposure metering White Balance ISO Low battery Exposure compensation 16 www.kodak.com/go/easysharecenter
User Manual
Page 19
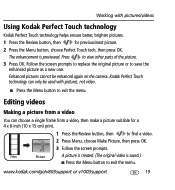
... A picture is created. (The original video is previewed. Editing videos Making a picture from a video You can only be enhanced again on the camera. Press to exit the menu. The enhancement is saved.) ■ Press the Menu button to view other parts of the picture. 3 Press OK.... Follow the screen prompts to replace the original picture or to save the enhanced picture as a new one. www.kodak.com/go/v803support or v1003support 19 Kodak Perfect Touch technology can choose a single frame from a video, then make a picture suitable for previous/next picture. 2 Press ...
... A picture is created. (The original video is previewed. Editing videos Making a picture from a video You can only be enhanced again on the camera. Press to exit the menu. The enhancement is saved.) ■ Press the Menu button to view other parts of the picture. 3 Press OK.... Follow the screen prompts to replace the original picture or to save the enhanced picture as a new one. www.kodak.com/go/v803support or v1003support 19 Kodak Perfect Touch technology can choose a single frame from a video, then make a picture suitable for previous/next picture. 2 Press ...
User Manual
Page 22
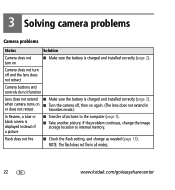
...In Review, a blue or black screen is displayed instead of a picture ■ Transfer all modes. 22 www.kodak.com/go/easysharecenter 3 Solving camera problems Camera problems Status Solution Camera does not turn off , then on again. (The lens does not extend in all pictures to internal memory. Flash... and change the image storage location to the computer (page 7). ■ Take another picture. when camera turns on ■ Turn the camera off and the lens does not retract Camera buttons and controls do not function Lens does not extend ■ Make sure the battery is charged...
...In Review, a blue or black screen is displayed instead of a picture ■ Transfer all modes. 22 www.kodak.com/go/easysharecenter 3 Solving camera problems Camera problems Status Solution Camera does not turn off , then on again. (The lens does not extend in all pictures to internal memory. Flash... and change the image storage location to the computer (page 7). ■ Take another picture. when camera turns on ■ Turn the camera off and the lens does not retract Camera buttons and controls do not function Lens does not extend ■ Make sure the battery is charged...
User Manual
Page 24
...original dated sales receipt. Visit www.kodak.com/go/v803downloads, www.kodak.com/go /v1003support. Proof of the date of the software included on the Kodak EasyShare software CD and the camera firmware (the software that runs on the camera). If Kodak is only available from within the ...may be required with a soft, lint-free cloth or an untreated lens-cleaning tissue. For more information. ■ For digital camera disposal or recycling information, contact your country. Upgrading your expense, to contact painted surfaces. ■ Service agreements may be free from ...
...original dated sales receipt. Visit www.kodak.com/go/v803downloads, www.kodak.com/go /v1003support. Proof of the date of the software included on the Kodak EasyShare software CD and the camera firmware (the software that runs on the camera). If Kodak is only available from within the ...may be required with a soft, lint-free cloth or an untreated lens-cleaning tissue. For more information. ■ For digital camera disposal or recycling information, contact your country. Upgrading your expense, to contact painted surfaces. ■ Service agreements may be free from ...
User Manual
Page 26
.... Canadian DOC statement DOC Class B Compliance-This Class B digital apparatus complies with Canadian ICES-003. Contact your local authorities or go to www.kodak.com/go/recycle for recycling program information. 26 www.kodak.com/go/easysharecenter However, there is connected; 4) consult the... against harmful interference in a particular installation. Appendix FCC compliance and advisory Kodak EasyShare V803/V1003 zoom digital camera This equipment has been tested and found to comply with the limits for a Class B digital device, pursuant to Part 15 of the product, they must be used...
.... Canadian DOC statement DOC Class B Compliance-This Class B digital apparatus complies with Canadian ICES-003. Contact your local authorities or go to www.kodak.com/go/recycle for recycling program information. 26 www.kodak.com/go/easysharecenter However, there is connected; 4) consult the... against harmful interference in a particular installation. Appendix FCC compliance and advisory Kodak EasyShare V803/V1003 zoom digital camera This equipment has been tested and found to comply with the limits for a Class B digital device, pursuant to Part 15 of the product, they must be used...


