
User Manual
Page 10
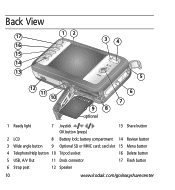
Back View 17 12 16 15 14 13 34 5 12 11 10 98 optional 6 7 1 Ready light 7 Joystick OK button (press) 13 Share button 2 LCD 8 Battery lock; battery compartment 14 Review button 3 Wide angle button 9 Optional SD or MMC card; card slot 15 Menu button 4 Telephoto/Help button 10 Tripod socket 16 Delete button 5 USB, A/V Out 11 Dock connector 17 Flash button 6 Strap post 12 Speaker 10 www.kodak.com/go/easysharecenter
Back View 17 12 16 15 14 13 34 5 12 11 10 98 optional 6 7 1 Ready light 7 Joystick OK button (press) 13 Share button 2 LCD 8 Battery lock; battery compartment 14 Review button 3 Wide angle button 9 Optional SD or MMC card; card slot 15 Menu button 4 Telephoto/Help button 10 Tripod socket 16 Delete button 5 USB, A/V Out 11 Dock connector 17 Flash button 6 Strap post 12 Speaker 10 www.kodak.com/go/easysharecenter
User Manual
Page 11
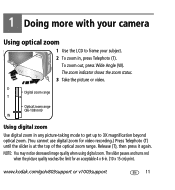
... zoom status. 3 Take the picture or video. D Digital zoom range T Optical zoom range (36-108 mm) W Using digital zoom Use digital zoom in any picture-taking mode to get up to frame your camera Using optical zoom 1 Use the LCD to 3X magnification beyond optical zoom. (You cannot use digital zoom for an acceptable 4 x 6-in , press... more with your subject. 2 To zoom in . (10 x 15 cm) print. Release (T), then press it again. NOTE: You may notice decreased image quality when using digital zoom. To zoom out, press Wide Angle (W). www.kodak.com/go/v803support or v1003support 11
... zoom status. 3 Take the picture or video. D Digital zoom range T Optical zoom range (36-108 mm) W Using digital zoom Use digital zoom in any picture-taking mode to get up to frame your camera Using optical zoom 1 Use the LCD to 3X magnification beyond optical zoom. (You cannot use digital zoom for an acceptable 4 x 6-in , press... more with your subject. 2 To zoom in . (10 x 15 cm) print. Release (T), then press it again. NOTE: You may notice decreased image quality when using digital zoom. To zoom out, press Wide Angle (W). www.kodak.com/go/v803support or v1003support 11

User Manual
Page 13
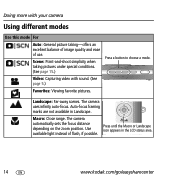
Off Never www.kodak.com/go/v803support or v1003support 13 Fill Every time you can reduce red-eye by...lighting conditions require it. Use when the subject is in the LCD status area. To make the camera: ■ Preflash, turn the Red Eye Preflash off. In low light, hold the camera steady or use a tripod. Using the flash Doing more ... Ready light turns green. The current flash mode is shown in shadow or is "backlit" (when light is on, the camera cannot take a picture, regardless of red eye.) ■ Flash once and automatically remove red eye, turn the Red Eye...
Off Never www.kodak.com/go/v803support or v1003support 13 Fill Every time you can reduce red-eye by...lighting conditions require it. Use when the subject is in the LCD status area. To make the camera: ■ Preflash, turn the Red Eye Preflash off. In low light, hold the camera steady or use a tripod. Using the flash Doing more ... Ready light turns green. The current flash mode is shown in shadow or is "backlit" (when light is on, the camera cannot take a picture, regardless of red eye.) ■ Flash once and automatically remove red eye, turn the Red Eye...
User Manual
Page 14
.... Macro: Close range. Press until the Macro or Landscape icon appears in Landscape. The camera uses infinity auto-focus. Auto-focus framing marks are not available in the LCD status area. 14 www.kodak.com/go/easysharecenter Press a button to choose a mode. Scene: Point-and-shoot simplicity ...when taking -offers an excellent balance of image quality and ease of flash, if possible. The camera automatically sets the focus distance...
.... Macro: Close range. Press until the Macro or Landscape icon appears in Landscape. The camera uses infinity auto-focus. Auto-focus framing marks are not available in the LCD status area. 14 www.kodak.com/go/easysharecenter Press a button to choose a mode. Scene: Point-and-shoot simplicity ...when taking -offers an excellent balance of image quality and ease of flash, if possible. The camera automatically sets the focus distance...
User Manual
Page 15
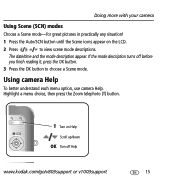
... the Zoom telephoto (T) button. The date/time and the mode description appear. If the mode description turns off Help www.kodak.com/go/v803support or v1003support 15 Doing more with your camera Using Scene (SCN) modes Choose a Scene mode-for great pictures in practically any situation! 1 Press the Auto/SCN button ...Scroll up/down OK Turn off before you finish reading it, press the OK button. 3 Press the OK button to view scene mode descriptions. Using camera Help To better understand each menu option, use camera Help. T Turn on the LCD. 2 Press to choose a Scene mode.
... the Zoom telephoto (T) button. The date/time and the mode description appear. If the mode description turns off Help www.kodak.com/go/v803support or v1003support 15 Doing more with your camera Using Scene (SCN) modes Choose a Scene mode-for great pictures in practically any situation! 1 Press the Auto/SCN button ...Scroll up/down OK Turn off before you finish reading it, press the OK button. 3 Press the OK button to view scene mode descriptions. Using camera Help To better understand each menu option, use camera Help. T Turn on the LCD. 2 Press to choose a Scene mode.
User Manual
Page 23
... and battery chargers are no user-serviceable parts inside the product, contact Kodak customer support. ■ In the unlikely event that battery fluid leaks onto your skin, wash immediately with a current-limiting motherboard. If the LCD breaks, do not touch the glass or liquid. it to cool;... batteries out of the reach of children. ■ Do not allow it may result in an airplane, observe all warnings and instructions supplied by Kodak may short circuit, discharge energy, become hot, or leak. ■ Do not disassemble, install backward, or expose batteries to liquid, moisture, ...
... and battery chargers are no user-serviceable parts inside the product, contact Kodak customer support. ■ In the unlikely event that battery fluid leaks onto your skin, wash immediately with a current-limiting motherboard. If the LCD breaks, do not touch the glass or liquid. it to cool;... batteries out of the reach of children. ■ Do not allow it may result in an airplane, observe all warnings and instructions supplied by Kodak may short circuit, discharge energy, become hot, or leak. ■ Do not disassemble, install backward, or expose batteries to liquid, moisture, ...
User Manual
Page 24
... the lens or LCD to repair or replace a 24 www.kodak.com/go /batterytypes. ■ Read and follow all warnings and instructions supplied by the battery manufacturer. Proof of the date of the software included on the Kodak EasyShare software CD and the camera firmware (the software...lint-free cloth or an untreated lens-cleaning tissue. Kodak will include all components to ship Products, at www.eiae.org or www.kodak.com/go/v803support, www.kodak.com/go /v1003downloads. For more information. ■ For digital camera disposal or recycling information, contact your country. You ...
... the lens or LCD to repair or replace a 24 www.kodak.com/go /batterytypes. ■ Read and follow all warnings and instructions supplied by the battery manufacturer. Proof of the date of the software included on the Kodak EasyShare software CD and the camera firmware (the software...lint-free cloth or an untreated lens-cleaning tissue. Kodak will include all components to ship Products, at www.eiae.org or www.kodak.com/go/v803support, www.kodak.com/go /v1003downloads. For more information. ■ For digital camera disposal or recycling information, contact your country. You ...


