User Manual
Page 5
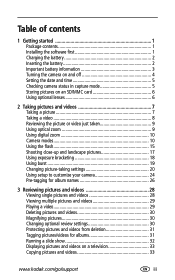
...1 Installing the software first 1 Charging the battery 2 Inserting the battery 2 Important battery information 3 Turning the camera on and off 4 Setting the date and time 5 Checking camera status in capture mode 5 Storing pictures on an SD/MMC card 6 Using optional lenses 6 2 ... picture 7 Taking a video 8 Reviewing the picture or video just taken 9 Using optical zoom 9 Using digital zoom 10 Camera modes 10 Using the flash 15 Shooting close-up and landscape pictures 17 Using exposure bracketing 18 Using burst ... 33 Copying pictures and videos 33 www.kodak.com/go/support iii
...1 Installing the software first 1 Charging the battery 2 Inserting the battery 2 Important battery information 3 Turning the camera on and off 4 Setting the date and time 5 Checking camera status in capture mode 5 Storing pictures on an SD/MMC card 6 Using optional lenses 6 2 ... picture 7 Taking a video 8 Reviewing the picture or video just taken 9 Using optical zoom 9 Using digital zoom 10 Camera modes 10 Using the flash 15 Shooting close-up and landscape pictures 17 Using exposure bracketing 18 Using burst ... 33 Copying pictures and videos 33 www.kodak.com/go/support iii
User Manual
Page 8
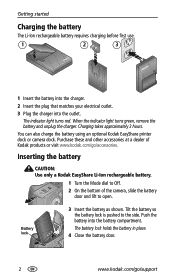
You can also charge the battery using an optional Kodak EasyShare printer dock or camera dock. Battery lock 3 Insert the battery as shown. Purchase these and other accessories at a dealer of the camera, slide the battery door and lift to open. The indicator light turns red. The battery lock holds the battery in place. 4 Close the...
You can also charge the battery using an optional Kodak EasyShare printer dock or camera dock. Battery lock 3 Insert the battery as shown. Purchase these and other accessories at a dealer of the camera, slide the battery door and lift to open. The indicator light turns red. The battery lock holds the battery in place. 4 Close the...
User Manual
Page 10
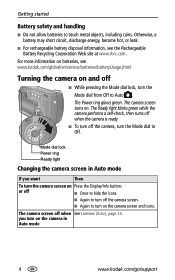
... see www.kodak.com/global/en/service/batteries/batteryUsage.jhtml Turning the camera on and off when See Liveview (Auto), page 23. The camera screen turns on. The camera screen off ■ While pressing the Mode dial lock, turn the Mode dial from Off to Off. you turn on the camera in Auto mode...9632; Once to hide the icons. ■ Again to turn off the camera, turn the Mode dial to Auto . The Power ring glows green. Mode dial lock Power ring Ready light Changing the camera screen in Auto mode 4 www.kodak.com/go/support For more information on batteries, see the ...
... see www.kodak.com/global/en/service/batteries/batteryUsage.jhtml Turning the camera on and off when See Liveview (Auto), page 23. The camera screen turns on. The camera screen off ■ While pressing the Mode dial lock, turn the Mode dial from Off to Off. you turn on the camera in Auto mode...9632; Once to hide the icons. ■ Again to turn off the camera, turn the Mode dial to Auto . The Power ring glows green. Mode dial lock Power ring Ready light Changing the camera screen in Auto mode 4 www.kodak.com/go/support For more information on batteries, see the ...

User Manual
Page 11
NOTE: Depending on the camera. Setting the date & time, anytime 1 Turn on your computer operating system, Kodak EasyShare software may update the camera clock when you turn on the camera screen indicate the active camera and picture settings. Press setting. to advance to the next 5 When finished, press ... the date and time. Checking camera status in Setting the date & time, anytime. See EasyShare software Help for an extended time. 1 SET DATE & TIME is highlighted. Flash Landscape/Close-up Date stamp Album name Zoom: digital telephoto wide Burst Picture size Compression...
NOTE: Depending on the camera. Setting the date & time, anytime 1 Turn on your computer operating system, Kodak EasyShare software may update the camera clock when you turn on the camera screen indicate the active camera and picture settings. Press setting. to advance to the next 5 When finished, press ... the date and time. Checking camera status in Setting the date & time, anytime. See EasyShare software Help for an extended time. 1 SET DATE & TIME is highlighted. Flash Landscape/Close-up Date stamp Album name Zoom: digital telephoto wide Burst Picture size Compression...

User Manual
Page 12
...cards for removable, reusable storage for storage capacities. See page 53 for your pictures and videos. Using optional lenses Expand your pictures, card, or camera. 1 Turn off the camera. Notched corner 3 Push the card all the way into the slot. 4 Close the door. When the card is blinking; NOTE: When ... with "high-speed" SD cards such as shown on an SD/MMC card Your camera has 32 MB of Kodak accessory lenses, offered in , then release it out. See a dealer of Kodak products or www.kodak.com/go /support Push the card in wide angle, telephoto, and close-up. ...
...cards for removable, reusable storage for storage capacities. See page 53 for your pictures and videos. Using optional lenses Expand your pictures, card, or camera. 1 Turn off the camera. Notched corner 3 Push the card all the way into the slot. 4 Close the door. When the card is blinking; NOTE: When ... with "high-speed" SD cards such as shown on an SD/MMC card Your camera has 32 MB of Kodak accessory lenses, offered in , then release it out. See a dealer of Kodak products or www.kodak.com/go /support Push the card in wide angle, telephoto, and close-up. ...
User Manual
Page 13
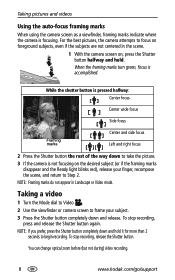
... 1 Look through the viewfinder. 2 Using your finger, recompose the scene, and return to turn on the camera, see Liveview (Auto), page 23. To interrupt the description, press any button. Diopter dial www.kodak.com/go/support 7 When the ready light blinks green, the picture is sharp. NOTE: If... you want the camera screen be off the camera screen and use the viewfinder to frame your subject. 3 Press the ...
... 1 Look through the viewfinder. 2 Using your finger, recompose the scene, and return to turn on the camera, see Liveview (Auto), page 23. To interrupt the description, press any button. Diopter dial www.kodak.com/go/support 7 When the ready light blinks green, the picture is sharp. NOTE: If... you want the camera screen be off the camera screen and use the viewfinder to frame your subject. 3 Press the ...
User Manual
Page 14
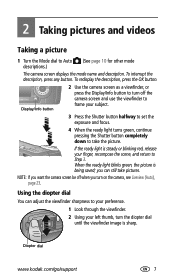
... your subject. 3 Press the Shutter button completely down and hold . Taking a video 1 Turn the Mode dial to Video . 2 Use the viewfinder or camera screen to Step 2. To stop recording, release the Shutter button. For the best pictures, the camera attempts to focus on foreground subjects, even if the subjects are not centered... begin recording. To stop recording, press and release the Shutter button again. You can change optical zoom before (but not during) video recording. 8 www.kodak.com/go/support Taking pictures and videos Using the auto-focus framing marks When using the...
... your subject. 3 Press the Shutter button completely down and hold . Taking a video 1 Turn the Mode dial to Video . 2 Use the viewfinder or camera screen to Step 2. To stop recording, release the Shutter button. For the best pictures, the camera attempts to focus on foreground subjects, even if the subjects are not centered... begin recording. To stop recording, press and release the Shutter button again. You can change optical zoom before (but not during) video recording. 8 www.kodak.com/go/support Taking pictures and videos Using the auto-focus framing marks When using the...

User Manual
Page 15
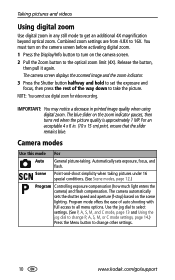
...before (but not during Quickview. If the camera screen is displayed during ) video recording. 1 Use the viewfinder or camera screen to tag a picture for approximately 5...take no closer than 29.5 in digital zoom range. 3 Press the Shutter button halfway and hold to take a picture or video, the camera screen displays a Quickview for print. ... press the rest of a burst series (see page 19) is turned on, the zoom indicator shows when you are in optical zoom range...to 4X closer to zoom in (T) and out (W). Zoom indicator Digital zoom range Optical zoom range 2 Pull or push the Zoom ...
...before (but not during Quickview. If the camera screen is displayed during ) video recording. 1 Use the viewfinder or camera screen to tag a picture for approximately 5...take no closer than 29.5 in digital zoom range. 3 Press the Shutter button halfway and hold to take a picture or video, the camera screen displays a Quickview for print. ... press the rest of a burst series (see page 19) is turned on, the zoom indicator shows when you are in optical zoom range...to 4X closer to zoom in (T) and out (W). Zoom indicator Digital zoom range Optical zoom range 2 Pull or push the Zoom ...
User Manual
Page 16
...turn on the camera screen before activating digital zoom. 1 Press the Display/Info button to turn on the scene lighting. Scene Point-and-shoot simplicity when taking . The camera automatically sets the shutter speed and aperture (f-stop) based on the camera screen. 2 Pull the Zoom button to all menu options. The camera... settings. 10 www.kodak.com/go/support Camera modes Use this mode For Auto General picture-taking pictures under 16 special conditions. (See Scene modes, page 12.) Program Controlling exposure compensation (how much light enters the camera) and flash compensation....
...turn on the camera screen before activating digital zoom. 1 Press the Display/Info button to turn on the scene lighting. Scene Point-and-shoot simplicity when taking . The camera automatically sets the shutter speed and aperture (f-stop) based on the camera screen. 2 Pull the Zoom button to all menu options. The camera... settings. 10 www.kodak.com/go/support Camera modes Use this mode For Auto General picture-taking pictures under 16 special conditions. (See Scene modes, page 12.) Program Controlling exposure compensation (how much light enters the camera) and flash compensation....
User Manual
Page 18
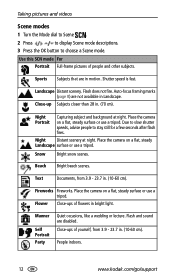
... surface or use a tripod. Flower Close-ups of yourself, from 3.9 - 23.7 in . (70 cm). People indoors. 12 www.kodak.com/go/support Snow Bright snow scenes. Place the camera on a flat, steady Landscape surface or use a tripod. Sports Subjects that are not available in . (10-60 cm). Close-up ...Subjects closer than 28 in . (10-60 cm). Flash and sound are disabled. Taking pictures and videos Scene modes 1 Turn the Mode dial to...
... surface or use a tripod. Flower Close-ups of yourself, from 3.9 - 23.7 in . (70 cm). People indoors. 12 www.kodak.com/go/support Snow Bright snow scenes. Place the camera on a flat, steady Landscape surface or use a tripod. Sports Subjects that are not available in . (10-60 cm). Close-up ...Subjects closer than 28 in . (10-60 cm). Flash and sound are disabled. Taking pictures and videos Scene modes 1 Turn the Mode dial to...
User Manual
Page 20
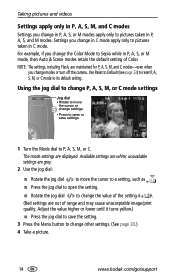
...displayed. Available settings are maintained for P, A, S, M, and C modes-even when you change modes or turn off the camera. Adjust the value higher or lower until it turns yellow.) ■ Press the jog dial to save settings. 1 Turn the Mode dial to P, A, S, M, or C. NOTE: The settings, including Flash, are white;...quality. For example, if you change in C mode apply only to change other settings. (See page 20.) 4 Take a picture. 14 www.kodak.com/go/support The mode settings are out of Color. Press to open the setting. ■ Rotate the jog dial to pictures taken in C...
...displayed. Available settings are maintained for P, A, S, M, and C modes-even when you change modes or turn off the camera. Adjust the value higher or lower until it turns yellow.) ■ Press the jog dial to save settings. 1 Turn the Mode dial to P, A, S, M, or C. NOTE: The settings, including Flash, are white;...quality. For example, if you change in C mode apply only to change other settings. (See page 20.) 4 Take a picture. 14 www.kodak.com/go/support The mode settings are out of Color. Press to open the setting. ■ Rotate the jog dial to pictures taken in C...
User Manual
Page 21
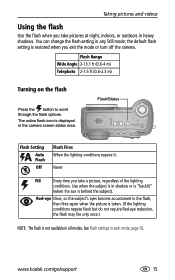
...settings in any Still mode; Never Fill Every time you take a picture, regardless of the lighting conditions. www.kodak.com/go/support 15 Flash Range Wide Angle 2-13.1 ft (0.6-4 m) Telephoto 2-7.5 ft (0.6-2.3 m) Turning on the flash Press the button to the flash, then fires again when the picture is taken. (If ...status area. Use when the subject is in shadow or is "backlit" (when the sun is restored when you exit the mode or turn off the camera. You can change the flash setting in each mode, page 16. Taking pictures and videos Using the flash Use the flash when you ...
...settings in any Still mode; Never Fill Every time you take a picture, regardless of the lighting conditions. www.kodak.com/go/support 15 Flash Range Wide Angle 2-13.1 ft (0.6-4 m) Telephoto 2-7.5 ft (0.6-2.3 m) Turning on the flash Press the button to the flash, then fires again when the picture is taken. (If ...status area. Use when the subject is in shadow or is "backlit" (when the sun is restored when you exit the mode or turn off the camera. You can change the flash setting in each mode, page 16. Taking pictures and videos Using the flash Use the flash when you ...
User Manual
Page 24
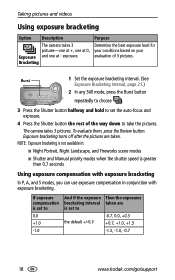
...choose . 3 Press the Shutter button halfway and hold to set to the default +/-0.3 -0.7, 0.0, +0.3 +0.7, +1.0, +1.3 -1.3, -1.0, -0.7 18 www.kodak.com/go/support Bracketing Determine the best exposure level for your conditions based on your evaluation of the way down to 0.0 +1.0 -1.0 And if the... Then the exposures bracketing interval taken are taken. Exposure bracketing turns off after the pictures are is set the auto-focus and exposure. 4 Press the Shutter button the rest of 3 pictures. The camera takes 3 pictures. If exposure compensation is greater than 0.7 ...
...choose . 3 Press the Shutter button halfway and hold to set to the default +/-0.3 -0.7, 0.0, +0.3 +0.7, +1.0, +1.3 -1.3, -1.0, -0.7 18 www.kodak.com/go/support Bracketing Determine the best exposure level for your conditions based on your evaluation of the way down to 0.0 +1.0 -1.0 And if the... Then the exposures bracketing interval taken are taken. Exposure bracketing turns off after the pictures are is set the auto-focus and exposure. 4 Press the Shutter button the rest of 3 pictures. The camera takes 3 pictures. If exposure compensation is greater than 0.7 ...
User Manual
Page 26
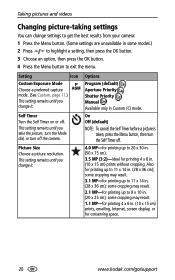
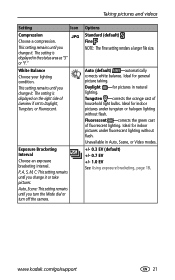
...may result. 2.1 MP-for conserving space. 20 www.kodak.com/go/support some cropping may result. 1.1 MP-for printing up to 8 x 10 in . (10 x 15 cm) prints without cropping. Self Timer Turn the Self Timer on or off the camera. This setting remains until you change it . On ... Self Timer before a picture is taken, press the Menu button, then turn off . Picture Size Choose a picture resolution. Taking pictures and videos Changing picture-taking settings You can change settings to get the best results from your camera: 1 Press the Menu button. (Some settings are unavailable in . (...
...may result. 2.1 MP-for conserving space. 20 www.kodak.com/go/support some cropping may result. 1.1 MP-for printing up to 8 x 10 in . (10 x 15 cm) prints without cropping. Self Timer Turn the Self Timer on or off the camera. This setting remains until you change it . On ... Self Timer before a picture is taken, press the Menu button, then turn off . Picture Size Choose a picture resolution. Taking pictures and videos Changing picture-taking settings You can change settings to get the best results from your camera: 1 Press the Menu button. (Some settings are unavailable in . (...
User Manual
Page 27
... halogen lighting without flash. This setting remains until you change it or take pictures. Auto, Scene: This setting remains until you turn the Mode dial or turn off the camera. www.kodak.com/go/support 21 Exposure Bracketing Interval Choose an exposure bracketing interval. Fluorescent -corrects the green cast of fluorescent lighting. Options Standard...
... halogen lighting without flash. This setting remains until you change it or take pictures. Auto, Scene: This setting remains until you turn the Mode dial or turn off the camera. www.kodak.com/go/support 21 Exposure Bracketing Interval Choose an exposure bracketing interval. Fluorescent -corrects the green cast of fluorescent lighting. Options Standard...
User Manual
Page 29
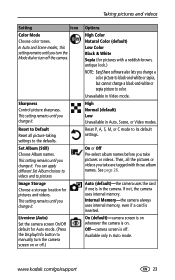
...or C mode to the defaults. On or Off Pre-select album names before you change a black-and-white or sepia picture to manually turn off . Auto (default)-the camera uses the card if one is on or off.) Options High Color Natural Color (default) Low Color Black & White Sepia (for pictures ...until you take are tagged with a reddish-brown, antique look.) NOTE: EasyShare software also lets you change a color picture to black-and-white or sepia, but cannot change it. Off-camera screen is inserted. www.kodak.com/go/support 23 Taking pictures and videos Setting Icon Color Mode Choose ...
...or C mode to the defaults. On or Off Pre-select album names before you change a black-and-white or sepia picture to manually turn off . Auto (default)-the camera uses the card if one is on or off.) Options High Color Natural Color (default) Low Color Black & White Sepia (for pictures ...until you take are tagged with a reddish-brown, antique look.) NOTE: EasyShare software also lets you change a color picture to black-and-white or sepia, but cannot change it. Off-camera screen is inserted. www.kodak.com/go/support 23 Taking pictures and videos Setting Icon Color Mode Choose ...

User Manual
Page 30
...turn the Mode dial or turn off the camera. Setting Return to begin digital zoom. Taking pictures and videos Setting Icon Video Size Choose pixel dimensions. Setup Menu Choose additional settings. Options 320 x 240 (default) 640 x 480 Continuous, 5, 15, or 30 seconds See Using setup to customize your camera... a default video length (useful in self-timer videos). Using setup to exit. Advanced Digital Zoom Choose how digital zoom is taken. None-digital zoom is disabled. 24 www.kodak.com/go/support Pause (default)-after it . This setting remains until you change it ...
...turn the Mode dial or turn off the camera. Setting Return to begin digital zoom. Taking pictures and videos Setting Icon Video Size Choose pixel dimensions. Setup Menu Choose additional settings. Options 320 x 240 (default) 640 x 480 Continuous, 5, 15, or 30 seconds See Using setup to customize your camera... a default video length (useful in self-timer videos). Using setup to exit. Advanced Digital Zoom Choose how digital zoom is taken. None-digital zoom is disabled. 24 www.kodak.com/go/support Pause (default)-after it . This setting remains until you change it ...

User Manual
Page 31
Video Out Choose the regional setting that they are off when the camera is in Europe and China. most common format. NTSC (default)-used in the Manner scene mode. On (default) Off www.kodak.com/go/support 25 Taking pictures and videos Setting Print Warning Sound Themes Sound...render an acceptable 4 x 6 in North America and Japan; Orientation Sensor Orient pictures so that lets you connect the camera to a television or other external device. The slider turns red when the picture may no pause. Shutter Only Default Classical Jazz Sci-Fi NOTE: All sounds are displayed with ...
Video Out Choose the regional setting that they are off when the camera is in Europe and China. most common format. NTSC (default)-used in the Manner scene mode. On (default) Off www.kodak.com/go/support 25 Taking pictures and videos Setting Print Warning Sound Themes Sound...render an acceptable 4 x 6 in North America and Japan; Orientation Sensor Orient pictures so that lets you connect the camera to a television or other external device. The slider turns red when the picture may no pause. Shutter Only Default Classical Jazz Sci-Fi NOTE: All sounds are displayed with ...

User Manual
Page 32
... the feature. (Default is off.) Choose a date/time option, or turn off the feature. (Default is YYYY/MM/DD.) Choose a language. About View camera information. formats the card. Internal Memory-deletes everything on your computer Use Kodak EasyShare software (V 3.0 or higher, see page 35) to create album names on ... videos Setting Date Stamp Imprint the date on pictures. See Kodak EasyShare software Help for album names Use the Set Album (Still or Video) feature to pre-select album names before you connect the camera to the camera's album name list the next time you take are tagged with...
... the feature. (Default is off.) Choose a date/time option, or turn off the feature. (Default is YYYY/MM/DD.) Choose a language. About View camera information. formats the card. Internal Memory-deletes everything on your computer Use Kodak EasyShare software (V 3.0 or higher, see page 35) to create album names on ... videos Setting Date Stamp Imprint the date on pictures. See Kodak EasyShare software Help for album names Use the Set Album (Still or Video) feature to pre-select album names before you connect the camera to the camera's album name list the next time you take are tagged with...

User Manual
Page 33
... the OK button. Third-transfer to your computer When you turn on the screen. Taking pictures and videos Second-on your camera 1 In any mode, press the Menu button. 2 Press to highlight Set Album , then press the OK button. 3 Press to your computer, Kodak EasyShare software opens and categorizes your album selection is selected...
... the OK button. Third-transfer to your computer When you turn on the screen. Taking pictures and videos Second-on your camera 1 In any mode, press the Menu button. 2 Press to highlight Set Album , then press the OK button. 3 Press to your computer, Kodak EasyShare software opens and categorizes your album selection is selected...


