

User's Guide
Page 2
Eastman Kodak Company 343 State Street Rochester, New York 14650 © Eastman Kodak Company, 2003 All screen images are trademarks of Eastman Kodak Company. P/N 6B8476 Kodak, EasyShare, and Max are simulated.
Eastman Kodak Company 343 State Street Rochester, New York 14650 © Eastman Kodak Company, 2003 All screen images are trademarks of Eastman Kodak Company. P/N 6B8476 Kodak, EasyShare, and Max are simulated.

User's Guide
Page 4
Back View Product Overview 6 789 10 11 5 12 4 13 32 1 1 Camera screen (LCD, liquid crystal display) 2 Share button (page 47) 3 Controller buttons 4 OK button 5 Delete button 6 Viewfinder 7 Ready light 8 Mode dial 9 Shutter button 10 Flash/Status button 11 Thumb rest 12 Menu button 13 Review button ii
Back View Product Overview 6 789 10 11 5 12 4 13 32 1 1 Camera screen (LCD, liquid crystal display) 2 Share button (page 47) 3 Controller buttons 4 OK button 5 Delete button 6 Viewfinder 7 Ready light 8 Mode dial 9 Shutter button 10 Flash/Status button 11 Thumb rest 12 Menu button 13 Review button ii
User's Guide
Page 7
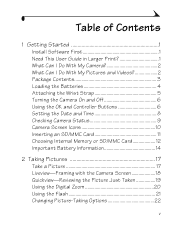
... and Videos 2 Package Contents 3 Loading the Batteries 4 Attaching the Wrist Strap 5 Turning the Camera On and Off 6 Using the OK and Controller Buttons 6 Setting the Date and Time 8 Checking Camera Status 9 Camera Screen Icons 10 Inserting an SD/MMC Card 11 Choosing Internal Memory or SD/MMC Card 12 Important... Battery Information 14 2 Taking Pictures 17 Take a Picture 17 Liveview-Framing with the Camera Screen 18 Quickview-Reviewing the Picture Just Taken 19 Using the Digital Zoom 20 Using the Flash 21 Changing Picture-Taking Options 22 v
... and Videos 2 Package Contents 3 Loading the Batteries 4 Attaching the Wrist Strap 5 Turning the Camera On and Off 6 Using the OK and Controller Buttons 6 Setting the Date and Time 8 Checking Camera Status 9 Camera Screen Icons 10 Inserting an SD/MMC Card 11 Choosing Internal Memory or SD/MMC Card 12 Important... Battery Information 14 2 Taking Pictures 17 Take a Picture 17 Liveview-Framing with the Camera Screen 18 Quickview-Reviewing the Picture Just Taken 19 Using the Digital Zoom 20 Using the Flash 21 Changing Picture-Taking Options 22 v
User's Guide
Page 10
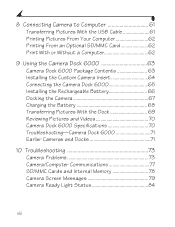
... 62 9 Using the Camera Dock 6000 63 Camera Dock 6000 Package Contents 63 Installing the Custom Camera Insert 64 Connecting the Camera Dock 6000 65 Installing the Rechargeable Battery 66 Docking the Camera 67 Charging the Battery ...68 Transferring Pictures With the Dock 69 Reviewing Pictures and Videos 70 Camera Dock 6000 Specifications 70 Troubleshooting-Camera Dock 6000 71 Earlier Cameras and Docks 71 10 Troubleshooting 73 Camera Problems 73 Camera/Computer Communications 77 SD/MMC Cards and Internal Memory 78 Camera Screen Messages 79 Camera...
... 62 9 Using the Camera Dock 6000 63 Camera Dock 6000 Package Contents 63 Installing the Custom Camera Insert 64 Connecting the Camera Dock 6000 65 Installing the Rechargeable Battery 66 Docking the Camera 67 Charging the Battery ...68 Transferring Pictures With the Dock 69 Reviewing Pictures and Videos 70 Camera Dock 6000 Specifications 70 Troubleshooting-Camera Dock 6000 71 Earlier Cameras and Docks 71 10 Troubleshooting 73 Camera Problems 73 Camera/Computer Communications 77 SD/MMC Cards and Internal Memory 78 Camera Screen Messages 79 Camera...
User's Guide
Page 18
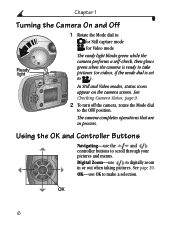
... the Mode dial to: for Still capture mode for Video mode Ready light The ready light blinks green while the camera performs a self-check, then glows green when the camera is ready to take pictures (or videos, if the mode dial is set to the OFF position. OK-use...Navigating-use OK to digitally zoom in process. The camera completes operations that are in or out when taking pictures. See page 20. Digital Zoom-use to make a selection. In Still and Video modes, status icons appear on the camera screen. See Checking Camera Status, page 9. 2 To turn off the camera, rotate the Mode...
... the Mode dial to: for Still capture mode for Video mode Ready light The ready light blinks green while the camera performs a self-check, then glows green when the camera is ready to take pictures (or videos, if the mode dial is set to the OFF position. OK-use...Navigating-use OK to digitally zoom in process. The camera completes operations that are in or out when taking pictures. See page 20. Digital Zoom-use to make a selection. In Still and Video modes, status icons appear on the camera screen. See Checking Camera Status, page 9. 2 To turn off the camera, rotate the Mode...
User's Guide
Page 19
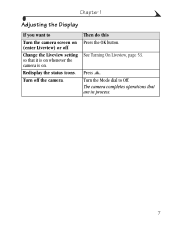
Turn the Mode dial to Turn the camera screen on . The camera completes operations that it is on whenever the camera is on (enter Liveview) or off the camera. Redisplay the status icons. See Turning On Liveview, page 53. Press . Then do this Press the OK button. Turn off . Chapter 1 Adjusting the Display If you want to Off. Change the Liveview setting so that are in process. 7
Turn the Mode dial to Turn the camera screen on . The camera completes operations that it is on whenever the camera is on (enter Liveview) or off the camera. Redisplay the status icons. See Turning On Liveview, page 53. Press . Then do this Press the OK button. Turn off . Chapter 1 Adjusting the Display If you want to Off. Change the Liveview setting so that are in process. 7
User's Guide
Page 20
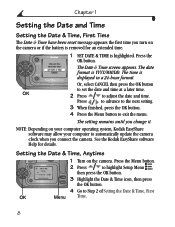
...operating system, Kodak EasyShare software may allow your computer to automatically update the camera clock when you change it. Press the OK button. The date format is displayed in a 24-hour format. Or, select CANCEL then press the OK button to exit the menu. The Date & Time screen appears. ...Chapter 1 Setting the Date and Time Setting the Date & Time, First Time The Date & Time have been reset message appears the first time you turn on the camera. See the Kodak EasyShare software Help for an extended time. 1 SET DATE...
...operating system, Kodak EasyShare software may allow your computer to automatically update the camera clock when you change it. Press the OK button. The date format is displayed in a 24-hour format. Or, select CANCEL then press the OK button to exit the menu. The Date & Time screen appears. ...Chapter 1 Setting the Date and Time Setting the Date & Time, First Time The Date & Time have been reset message appears the first time you turn on the camera. See the Kodak EasyShare software Help for an extended time. 1 SET DATE...

User's Guide
Page 21
Press to Auto . Turn the Mode dial to redisplay the status information at any time. The current camera status icons are displayed in the bottom half of the icons. To check the current camera settings: Status ! Press the Flash/Status button. Chapter 1 Checking Camera Status The icons that appear on the camera screen indicate the active camera and picture settings. Mode icon ! area The status screen appears. See page 10 for a list of the Flash/Status screen. 9
Press to Auto . Turn the Mode dial to redisplay the status information at any time. The current camera status icons are displayed in the bottom half of the icons. To check the current camera settings: Status ! Press the Flash/Status button. Chapter 1 Checking Camera Status The icons that appear on the camera screen indicate the active camera and picture settings. Mode icon ! area The status screen appears. See page 10 for a list of the Flash/Status screen. 9
User's Guide
Page 22
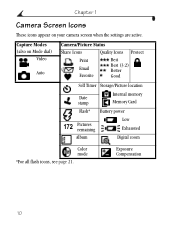
Capture Modes (also on your camera screen when the settings are active. Exposure Compensation 10 Chapter 1 Camera Screen Icons These icons appear on Mode dial) Video Auto Camera/Picture Status Share Icons Quality Icons Protect Print Email Favorite Best Best (3:2) Better Good Self Timer Storage/Picture location Date stamp Internal memory Memory Card Flash* Battery power 172 Pictures remaining Low Exhausted Album Digital zoom Color mode *For all flash icons, see page 21.
Capture Modes (also on your camera screen when the settings are active. Exposure Compensation 10 Chapter 1 Camera Screen Icons These icons appear on Mode dial) Video Auto Camera/Picture Status Share Icons Quality Icons Protect Print Email Favorite Best Best (3:2) Better Good Self Timer Storage/Picture location Date stamp Internal memory Memory Card Flash* Battery power 172 Pictures remaining Low Exhausted Album Digital zoom Color mode *For all flash icons, see page 21.

User's Guide
Page 27
... transfers pictures, and is reduced at www.rbrc.com. 15 Carry spare batteries when using your camera, transfers pictures, and is also a battery charger for its included Kodak EasyShare Ni-MH rechargeable battery pack. ! For rechargeable battery disposal information, visit the Rechargeable Battery Recycling ...or leak. ! Using Liveview (see page 19 and page 30). - Dirt on the camera screen (see page 35) - Limit the following activities that do not work; Purchase an optional Kodak EasyShare printer dock 6000 (see page 63). Do not allow batteries to room temperature, they return ...
... transfers pictures, and is reduced at www.rbrc.com. 15 Carry spare batteries when using your camera, transfers pictures, and is also a battery charger for its included Kodak EasyShare Ni-MH rechargeable battery pack. ! For rechargeable battery disposal information, visit the Rechargeable Battery Recycling ...or leak. ! Using Liveview (see page 19 and page 30). - Dirt on the camera screen (see page 35) - Limit the following activities that do not work; Purchase an optional Kodak EasyShare printer dock 6000 (see page 63). Do not allow batteries to room temperature, they return ...
User's Guide
Page 29
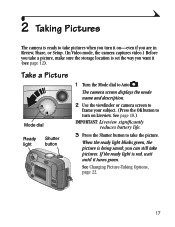
... the mode name and description. 2 Use the viewfinder or camera screen to frame your subject. (Press the OK button to turn it on Liveview. See Changing Picture-Taking... battery life. 3 Press the Shutter button to Auto . you can still take the picture. 2 Taking Pictures The camera is ready to take pictures when you turn on -even if you are in Review, Share, or Setup. (In Video mode, ...the camera captures video.) Before you take a picture, make sure the storage location is set the way you want it (see...
... the mode name and description. 2 Use the viewfinder or camera screen to frame your subject. (Press the OK button to turn it on Liveview. See Changing Picture-Taking... battery life. 3 Press the Shutter button to Auto . you can still take the picture. 2 Taking Pictures The camera is ready to take pictures when you turn on -even if you are in Review, Share, or Setup. (In Video mode, ...the camera captures video.) Before you take a picture, make sure the storage location is set the way you want it (see...
User's Guide
Page 30
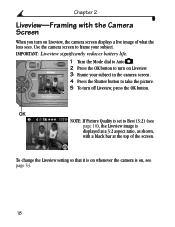
To change the Liveview setting so that it is on whenever the camera is displayed at a 3:2 aspect ratio, as shown, with the Camera Screen When you turn on Liveview, the camera screen displays a live image of the screen. Use the camera screen to take the picture. 5 To turn on , see page 53. 18 IMPORTANT: Liveview ... NOTE: If Picture Quality is set to Best (3:2) (see page 10), the Liveview image is on Liveview. 3 Frame your subject in the camera screen. 4 Press the Shutter button to frame your subject. Chapter 2 Liveview-Framing with a black bar at the top of what the lens sees.
To change the Liveview setting so that it is on whenever the camera is displayed at a 3:2 aspect ratio, as shown, with the Camera Screen When you turn on Liveview, the camera screen displays a live image of the screen. Use the camera screen to take the picture. 5 To turn on , see page 53. 18 IMPORTANT: Liveview ... NOTE: If Picture Quality is set to Best (3:2) (see page 10), the Liveview image is on Liveview. 3 Frame your subject in the camera screen. 4 Press the Shutter button to frame your subject. Chapter 2 Liveview-Framing with a black bar at the top of what the lens sees.
User's Guide
Page 31
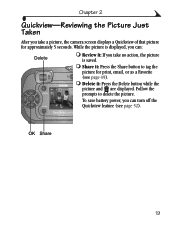
While the picture is saved. ! Delete it : If you take a picture, the camera screen displays a Quickview of that picture for print, email, or as a Favorite (see page 52). OK Share 19 Share it: Press the Share button to delete ...
While the picture is saved. ! Delete it : If you take a picture, the camera screen displays a Quickview of that picture for print, email, or as a Favorite (see page 52). OK Share 19 Share it: Press the Share button to delete ...

User's Guide
Page 33
...the flash at night, indoors, or outdoors in heavy shadows. The active flash icon is taken, the camera flashes twice, once to set the exposure, once to reduce red-eye, and once to take the...when the lighting conditions require it. When the picture is taken in Auto and Fill modes, the camera flashes twice, once to set the exposure and once to the flash, then fires again when ...exposure and once to take the picture. 21 You can only change the flash setting in the camera screen status area (page 9). Fill-flash fires every time you take pictures at distances of the lighting ...
...the flash at night, indoors, or outdoors in heavy shadows. The active flash icon is taken, the camera flashes twice, once to set the exposure, once to reduce red-eye, and once to take the...when the lighting conditions require it. When the picture is taken in Auto and Fill modes, the camera flashes twice, once to set the exposure and once to the flash, then fires again when ...exposure and once to take the picture. 21 You can only change the flash setting in the camera screen status area (page 9). Fill-flash fires every time you take pictures at distances of the lighting ...
User's Guide
Page 35
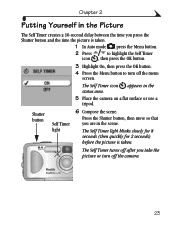
... picture is taken. The Self Timer icon appears in the scene. The Self Timer turns off after you take the picture or turn off the camera. 23 The Self Timer light blinks slowly for 8 seconds (then quickly for 2 seconds) before the picture is taken. 1 In Auto mode , press the ...Menu button. 2 Press to turn off the menu screen. Shutter button Self Timer light 3 Highlight On, then press the OK button. 4 Press the Menu button to highlight the Self Timer icon , then press the...
... picture is taken. The Self Timer icon appears in the scene. The Self Timer turns off after you take the picture or turn off the camera. 23 The Self Timer light blinks slowly for 8 seconds (then quickly for 2 seconds) before the picture is taken. 1 In Auto mode , press the ...Menu button. 2 Press to turn off the menu screen. Shutter button Self Timer light 3 Highlight On, then press the OK button. 4 Press the Menu button to highlight the Self Timer icon , then press the...

User's Guide
Page 36
This setting is useful for retaking pictures when you turn off the camera. 24 This setting remains until you are not satisfied with the brightness. If pictures are too light, decrease the value. ! Adjust the exposure by plus ... pictures are too dark, increase the value. 4 Press the OK button to accept the change. 5 Press the Menu button to exit the menu. 6 Use the camera viewfinder or screen to frame your subject. 7 Press the Shutter button to control how much light enters the...
This setting is useful for retaking pictures when you turn off the camera. 24 This setting remains until you are not satisfied with the brightness. If pictures are too light, decrease the value. ! Adjust the exposure by plus ... pictures are too dark, increase the value. 4 Press the OK button to accept the change. 5 Press the Menu button to exit the menu. 6 Use the camera viewfinder or screen to frame your subject. 7 Press the Shutter button to control how much light enters the...

User's Guide
Page 37
... up to 5 x 7 in . (10 x 15 cm) prints. ideal for emailing, Internet, or screen display; appears in the status area. appears in the status area. 4 Press the Menu button to exit the menu. Good (0.5 MP)-for printing to the Kodak EasyShare printer dock 6000 and other printing solutions (see page 62); Chapter 2 Setting Picture...
... up to 5 x 7 in . (10 x 15 cm) prints. ideal for emailing, Internet, or screen display; appears in the status area. appears in the status area. 4 Press the Menu button to exit the menu. Good (0.5 MP)-for printing to the Kodak EasyShare printer dock 6000 and other printing solutions (see page 62); Chapter 2 Setting Picture...

User's Guide
Page 39
...Album Names Use the Set Album (Still) feature to the camera's internal memory. If you take pictures. Chapter 2 Pre-tagging for details. Repeat to add pictures to create album names on the screen. First-On Your Computer Use Kodak EasyShare software, V 3.0 or higher, to more than one album... 3 Highlight an album name, then press the OK button. A plus (+) after the album name means more than one album. Second-On Your Camera 1 In Auto mode , press the Menu button. 2 Press to exit the menu. Selected albums are saved. Your selections are noted with those ...
...Album Names Use the Set Album (Still) feature to the camera's internal memory. If you take pictures. Chapter 2 Pre-tagging for details. Repeat to add pictures to create album names on the screen. First-On Your Computer Use Kodak EasyShare software, V 3.0 or higher, to more than one album... 3 Highlight an album name, then press the OK button. A plus (+) after the album name means more than one album. Second-On Your Camera 1 In Auto mode , press the Menu button. 2 Press to exit the menu. Selected albums are saved. Your selections are noted with those ...
User's Guide
Page 41
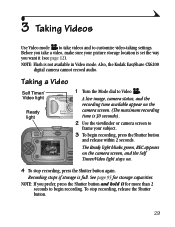
... Timer/ Video light Ready light 1 Turn the Mode dial to begin recording, press the Shutter button and release within 2 seconds. Also, the Kodak EasyShare CX6200 digital camera cannot record audio. NOTE: If you want it for storage capacities. 3 Taking Videos Use Video mode to take a video, make sure your ... To stop recording, press the Shutter button again. The Ready light blinks green, REC appears on the camera screen, and the Self Timer/Video light stays on the camera screen. (The maximum recording time is set the way you prefer, press the Shutter button and hold it...
... Timer/ Video light Ready light 1 Turn the Mode dial to begin recording, press the Shutter button and release within 2 seconds. Also, the Kodak EasyShare CX6200 digital camera cannot record audio. NOTE: If you want it for storage capacities. 3 Taking Videos Use Video mode to take a video, make sure your ... To stop recording, press the Shutter button again. The Ready light blinks green, REC appears on the camera screen, and the Self Timer/Video light stays on the camera screen. (The maximum recording time is set the way you prefer, press the Shutter button and hold it...
User's Guide
Page 42
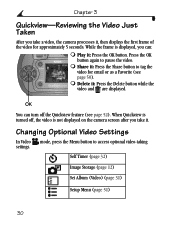
... In Video mode, press the Menu button to pause the video. ! While the frame is not displayed on the camera screen after you can turn off , the video is displayed, you take a video, the camera processes it . When Quickview is turned off the Quickview feature (see page 50). ! OK You can : ! Delete it...
... In Video mode, press the Menu button to pause the video. ! While the frame is not displayed on the camera screen after you can turn off , the video is displayed, you take a video, the camera processes it . When Quickview is turned off the Quickview feature (see page 50). ! OK You can : ! Delete it...


