User Manual
Page 5
...camera 1 Attaching the strap 1 Loading the battery 1 Turning on the camera 2 Setting the language, date/time 2 Storing pictures on an SD card 3 2 Taking pictures/videos 4 Taking a picture 4 Taking a video 5 Using optical zoom 6 Using the flash 7 Using different picture-taking modes 8 Using camera... Help 10 Understanding the picture-taking icons 11 3 Working with pictures/videos 12 Reviewing pictures/videos 12 Deleting pictures/videos 14 Using Kodak Perfect Touch technology 15 Cropping pictures 15 Editing videos ...
...camera 1 Attaching the strap 1 Loading the battery 1 Turning on the camera 2 Setting the language, date/time 2 Storing pictures on an SD card 3 2 Taking pictures/videos 4 Taking a picture 4 Taking a video 5 Using optical zoom 6 Using the flash 7 Using different picture-taking modes 8 Using camera... Help 10 Understanding the picture-taking icons 11 3 Working with pictures/videos 12 Reviewing pictures/videos 12 Deleting pictures/videos 14 Using Kodak Perfect Touch technology 15 Cropping pictures 15 Editing videos ...
User Manual
Page 8
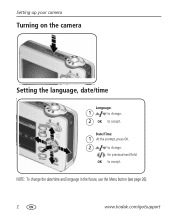
Setting up your camera Turning on the camera Setting the language, date/time Language: 1 to change the date/time and language in the future, use the Menu button (see page 26). 2 www.kodak.com/go/support NOTE: To change . 2 OK to accept. for previous/next field. Date/Time: 1 At the prompt, press OK. 2 to accept. OK to change.
Setting up your camera Turning on the camera Setting the language, date/time Language: 1 to change the date/time and language in the future, use the Menu button (see page 26). 2 www.kodak.com/go/support NOTE: To change . 2 OK to accept. for previous/next field. Date/Time: 1 At the prompt, press OK. 2 to accept. OK to change.

User Manual
Page 9
... and videos, see page 25. 1 Turn off the camera. 2 Insert or remove the optional card. 3 Turn on an SD card Your camera has internal memory. Setting up your camera Storing pictures on the camera. If you insert or remove a card while the camera is accessing it may be inserted one way... the card, pictures, or camera may cause damage. CAUTION: A card can purchase an SD card to conveniently store more pictures and videos (www.kodak.com/go/c713accessories, www.kodak.com/go /support 3 www.kodak.com/go /c813accessories). You can only be damaged. We recommend Kodak SD cards. NOTE: To ...
... and videos, see page 25. 1 Turn off the camera. 2 Insert or remove the optional card. 3 Turn on an SD card Your camera has internal memory. Setting up your camera Storing pictures on the camera. If you insert or remove a card while the camera is accessing it may be inserted one way... the card, pictures, or camera may cause damage. CAUTION: A card can purchase an SD card to conveniently store more pictures and videos (www.kodak.com/go/c713accessories, www.kodak.com/go /support 3 www.kodak.com/go /c813accessories). You can only be damaged. We recommend Kodak SD cards. NOTE: To ...
User Manual
Page 10
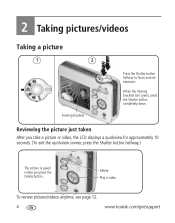
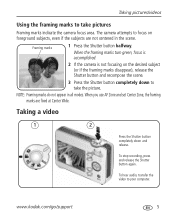
2 Taking pictures/videos Taking a picture 1 2 Framing brackets Press the Shutter button halfway to focus and set exposure. To review pictures/videos anytime, see page 12. 4 www.kodak.com/go/support Delete Play a video. Reviewing the picture just taken After you take a picture or video, the LCD displays a quickview for approximately 10 seconds. (To exit the quickview sooner, press the Shutter button halfway.) The picture is saved unless you press the Delete button. When the framing brackets turn green, press the Shutter button completely down.
2 Taking pictures/videos Taking a picture 1 2 Framing brackets Press the Shutter button halfway to focus and set exposure. To review pictures/videos anytime, see page 12. 4 www.kodak.com/go/support Delete Play a video. Reviewing the picture just taken After you take a picture or video, the LCD displays a quickview for approximately 10 seconds. (To exit the quickview sooner, press the Shutter button halfway.) The picture is saved unless you press the Delete button. When the framing brackets turn green, press the Shutter button completely down.
User Manual
Page 11
... Using the framing marks to your computer. Framing marks 1 Press the Shutter button halfway. When the framing marks turn green, focus is accomplished. 2 If the camera is not focusing on foreground subjects, even if the subjects are fixed at Center Wide. To hear audio, transfer... the video to take the picture. NOTE: Framing marks do not appear in the scene. www.kodak.com/go/support 5 The camera attempts to take pictures Framing marks indicate the camera focus area. Taking a video 1 2 Press the Shutter button completely down to focus on the desired...
... Using the framing marks to your computer. Framing marks 1 Press the Shutter button halfway. When the framing marks turn green, focus is accomplished. 2 If the camera is not focusing on foreground subjects, even if the subjects are fixed at Center Wide. To hear audio, transfer... the video to take the picture. NOTE: Framing marks do not appear in the scene. www.kodak.com/go/support 5 The camera attempts to take pictures Framing marks indicate the camera focus area. Taking a video 1 2 Press the Shutter button completely down to focus on the desired...
User Manual
Page 12
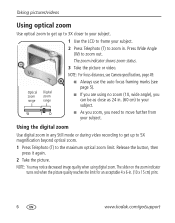
Optical zoom range Digital zoom range ■ Always use the auto focus framing marks (see Camera specifications, page 49. The slider on the zoom indicator turns red when the picture quality reaches the limit for an acceptable 4 x 6-in . (60 cm) to your subject. Press Wide Angle (W) to move further from ...your subject. W TD ■ As you zoom, you can be as close as 24 in . (10 x 15 cm) print. 6 www.kodak.com/go/...
Optical zoom range Digital zoom range ■ Always use the auto focus framing marks (see Camera specifications, page 49. The slider on the zoom indicator turns red when the picture quality reaches the limit for an acceptable 4 x 6-in . (60 cm) to your subject. Press Wide Angle (W) to move further from ...your subject. W TD ■ As you zoom, you can be as close as 24 in . (10 x 15 cm) print. 6 www.kodak.com/go/...
User Manual
Page 15
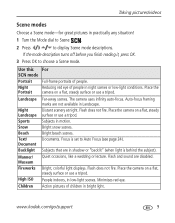
... High ISO Children Far-away scenes. Focus is behind the subject). People indoors, in night scenes or low-light conditions. www.kodak.com/go/support 9 Night Portrait Reducing red eye of people in low-light scenes. Bright beach scenes. Documents. Place the... surface or use a tripod. Bright snow scenes. Place the camera on a flat, steady surface or use a tripod. Minimizes red eye. Taking pictures/videos Scene modes Choose a Scene mode-for great pictures in motion. Subjects in practically any situation! 1 Turn the Mode dial to Scene . 2 Press to display Scene mode...
... High ISO Children Far-away scenes. Focus is behind the subject). People indoors, in night scenes or low-light conditions. www.kodak.com/go/support 9 Night Portrait Reducing red eye of people in low-light scenes. Bright beach scenes. Documents. Place the... surface or use a tripod. Bright snow scenes. Place the camera on a flat, steady surface or use a tripod. Minimizes red eye. Taking pictures/videos Scene modes Choose a Scene mode-for great pictures in motion. Subjects in practically any situation! 1 Turn the Mode dial to Scene . 2 Press to display Scene mode...
User Manual
Page 16
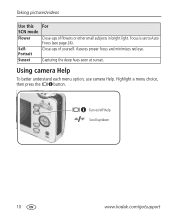
SelfPortrait Close-ups of flowers or other small subjects in bright light. Using camera Help To better understand each menu option, use camera Help. Sunset Capturing the deep hues seen at sunset. Highlight a menu choice, then press the button. Turn on/off Help Scroll up/down 10 www.kodak.com/go/support Assures proper focus and minimizes red eye. Taking pictures/videos Use this For SCN mode Flower Close-ups of yourself. Focus is set to Auto Focus (see page 24).
SelfPortrait Close-ups of flowers or other small subjects in bright light. Using camera Help To better understand each menu option, use camera Help. Sunset Capturing the deep hues seen at sunset. Highlight a menu choice, then press the button. Turn on/off Help Scroll up/down 10 www.kodak.com/go/support Assures proper focus and minimizes red eye. Taking pictures/videos Use this For SCN mode Flower Close-ups of yourself. Focus is set to Auto Focus (see page 24).
User Manual
Page 19
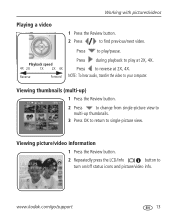
... reverse at 2X, 4X. NOTE: To hear audio, transfer the video to turn on/off status icons and picture/video info. Playback speed 4X 2X 1X 2X 4X Reverse Forward Press during playback to play at 2X, 4X. www.kodak.com/go/support 13 Viewing picture/video information 1 Press the Review button...
... reverse at 2X, 4X. NOTE: To hear audio, transfer the video to turn on/off status icons and picture/video info. Playback speed 4X 2X 1X 2X 4X Reverse Forward Press during playback to play at 2X, 4X. www.kodak.com/go/support 13 Viewing picture/video information 1 Press the Review button...

User Manual
Page 24
... and hold . 3 Press OK. The slide show is exhausted. Running a continuous slide show loop When you turn on Loop, the slide show repeats until you press OK or until you change it . 18 www.kodak.com/go/support You can set the display interval from 3-60 seconds. 1 On the Slide Show menu...
... and hold . 3 Press OK. The slide show is exhausted. Running a continuous slide show loop When you turn on Loop, the slide show repeats until you press OK or until you change it . 18 www.kodak.com/go/support You can set the display interval from 3-60 seconds. 1 On the Slide Show menu...

User Manual
Page 28
...use camera Help. others, until you change modes or turn off the camera. A second picture is taken after a 10-second delay. Some settings remain until you change them; Some modes offer limited settings. 4 Doing more with your camera ...camera. 1 Press the Menu button. 2 Press to highlight a setting, then press OK. 3 Choose an option, then press OK. ■ Press the Menu button to get into the scene. 2 seconds-for a steady, auto-shutter release on a tripod. 2-shot-one picture is taken 8 seconds later. 0.0, -0.5, -1.0, -1.5, -2.0, +0.5, +1.0, +1.5, +2.0 22 www.kodak...
...use camera Help. others, until you change modes or turn off the camera. A second picture is taken after a 10-second delay. Some settings remain until you change them; Some modes offer limited settings. 4 Doing more with your camera ...camera. 1 Press the Menu button. 2 Press to highlight a setting, then press OK. 3 Choose an option, then press OK. ■ Press the Menu button to get into the scene. 2 seconds-for a steady, auto-shutter release on a tripod. 2-shot-one picture is taken 8 seconds later. 0.0, -0.5, -1.0, -1.5, -2.0, +0.5, +1.0, +1.5, +2.0 22 www.kodak...
User Manual
Page 32
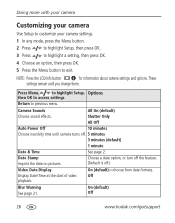
... until camera turns off .) On (default)-choose from date formats. Camera Sounds All On (default) Choose sound effects. Date Stamp Imprint the date on pictures. Press Menu, to highlight Setup, Options then OK to access settings Return to exit. On (default) Off 26 www.kodak.com/go.../support Doing more with your camera Customizing your camera Use Setup to customize your camera settings. 1 In any mode, press the Menu button. 2 Press to highlight Setup, then press ...
... until camera turns off .) On (default)-choose from date formats. Camera Sounds All On (default) Choose sound effects. Date Stamp Imprint the date on pictures. Press Menu, to highlight Setup, Options then OK to access settings Return to exit. On (default) Off 26 www.kodak.com/go.../support Doing more with your camera Customizing your camera Use Setup to customize your camera settings. 1 In any mode, press the Menu button. 2 Press to highlight Setup, then press ...
User Manual
Page 34
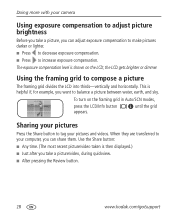
.... Using the framing grid to tag your pictures and videos. When they are transferred to your computer, you can share them. Doing more with your camera Using exposure compensation to adjust picture brightness Before you take a picture/video, during quickview. ■ After pressing the Review button. 28 www...
.... Using the framing grid to tag your pictures and videos. When they are transferred to your computer, you can share them. Doing more with your camera Using exposure compensation to adjust picture brightness Before you take a picture/video, during quickview. ■ After pressing the Review button. 28 www...
User Manual
Page 37
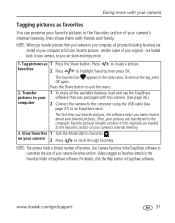
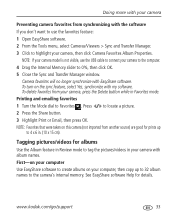
...Then, your pictures are loaded to your camera's internal memory. 3. View favorites 1 Turn the Mode dial to locate a picture. Tag pictures as favorites You can share and enjoy more with this camera. (See page 36.) 2 Connect the camera to scroll through favorites. Press to Favorites ... copies of your favorite pictures. To remove the tag, press OK again. Use Camera Favorites in EasyShare software. Favorite pictures - Favorite pictures (smaller versions of favorites. www.kodak.com/go/support 31 The first time you transfer pictures, the software helps you transfer...
...Then, your pictures are loaded to your camera's internal memory. 3. View favorites 1 Turn the Mode dial to locate a picture. Tag pictures as favorites You can share and enjoy more with this camera. (See page 36.) 2 Connect the camera to scroll through favorites. Press to Favorites ... copies of your favorite pictures. To remove the tag, press OK again. Use Camera Favorites in EasyShare software. Favorite pictures - Favorite pictures (smaller versions of favorites. www.kodak.com/go/support 31 The first time you transfer pictures, the software helps you transfer...
User Manual
Page 38
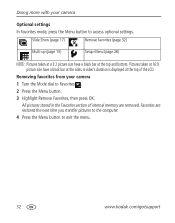
...next time you transfer pictures to the computer. 4 Press the Menu button to exit the menu. 32 www.kodak.com/go/support Favorites are removed. Doing more with your camera 1 Turn the Mode dial to Favorites . 2 Press the Menu button. 3 Highlight Remove Favorites, then press OK. ...Removing favorites from your camera Optional settings In Favorites mode, press the Menu button to access optional settings. Pictures taken at ...
...next time you transfer pictures to the computer. 4 Press the Menu button to exit the menu. 32 www.kodak.com/go/support Favorites are removed. Doing more with your camera 1 Turn the Mode dial to Favorites . 2 Press the Menu button. 3 Highlight Remove Favorites, then press OK. ...Removing favorites from your camera Optional settings In Favorites mode, press the Menu button to access optional settings. Pictures taken at ...
User Manual
Page 39
... . (10 x 15 cm). NOTE: Favorites that were taken on the sync feature, select Yes, synchronize with EasyShare software. www.kodak.com/go/support 33 First-on your camera with album names. Press to 4 x 6 in your computer, then copy up to locate a picture. 2 ...your computer Use EasyShare software to the camera's internal memory. Camera favorites will no longer synchronize with my software. Printing and emailing favorites 1 Turn the Mode dial to highlight your camera, then click Camera Favorites Album Properties. Doing more with your camera Preventing camera favorites from ...
... . (10 x 15 cm). NOTE: Favorites that were taken on the sync feature, select Yes, synchronize with EasyShare software. www.kodak.com/go/support 33 First-on your camera with album names. Press to 4 x 6 in your computer, then copy up to locate a picture. 2 ...your computer Use EasyShare software to the camera's internal memory. Camera favorites will no longer synchronize with my software. Printing and emailing favorites 1 Turn the Mode dial to highlight your camera, then click Camera Favorites Album Properties. Doing more with your camera Preventing camera favorites from ...
User Manual
Page 41
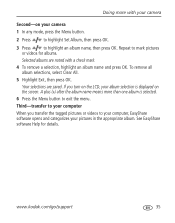
... Exit, then press OK. Your selections are noted with your camera Second-on the screen. Third-transfer to your computer When you turn on the LCD, your album selection is selected. 6 Press the Menu button to exit the menu. www.kodak.com/go/support 35 A plus (+) after the album name ... Help for albums. Selected albums are saved. If you transfer the tagged pictures or videos to your computer, EasyShare software opens and categorizes your camera 1 In any mode, press the Menu button. 2 Press to highlight Set Album, then press OK. 3 Press to mark pictures or videos for...
... Exit, then press OK. Your selections are noted with your camera Second-on the screen. Third-transfer to your computer When you turn on the LCD, your album selection is selected. 6 Press the Menu button to exit the menu. www.kodak.com/go/support 35 A plus (+) after the album name ... Help for albums. Selected albums are saved. If you transfer the tagged pictures or videos to your computer, EasyShare software opens and categorizes your camera 1 In any mode, press the Menu button. 2 Press to highlight Set Album, then press OK. 3 Press to mark pictures or videos for...
User Manual
Page 42
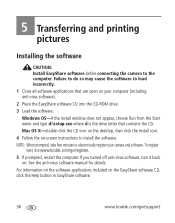
... on . 5 Transferring and printing pictures Installing the software CAUTION: Install EasyShare software before connecting the camera to load incorrectly. 1 Close all software applications that contains the CD. To register later, visit www.kodak.com/go /support If you turned off anti-virus software, turn it back on -screen instructions to electronically register your computer (including...
... on . 5 Transferring and printing pictures Installing the software CAUTION: Install EasyShare software before connecting the camera to load incorrectly. 1 Close all software applications that contains the CD. To register later, visit www.kodak.com/go /support If you turned off anti-virus software, turn it back on -screen instructions to electronically register your computer (including...
User Manual
Page 43
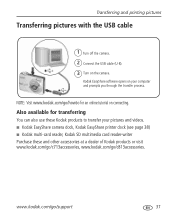
... printing pictures Transferring pictures with the USB cable 1 Turn off the camera. 2 Connect the USB cable (U-8). 3 Turn on connecting. Kodak EasyShare software opens on your pictures and videos. ■ Kodak EasyShare camera dock, Kodak EasyShare printer dock (see page 38) ■ Kodak multi-card reader, Kodak SD multimedia card reader-writer Purchase these Kodak products to transfer your computer and prompts you through...
... printing pictures Transferring pictures with the USB cable 1 Turn off the camera. 2 Connect the USB cable (U-8). 3 Turn on connecting. Kodak EasyShare software opens on your pictures and videos. ■ Kodak EasyShare camera dock, Kodak EasyShare printer dock (see page 38) ■ Kodak multi-card reader, Kodak SD multimedia card reader-writer Purchase these Kodak products to transfer your computer and prompts you through...
User Manual
Page 44
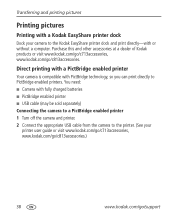
... Kodak EasyShare printer dock Dock your camera to the Kodak EasyShare printer dock and print directly-with PictBridge technology, so you can print directly to the printer. (See your printer user guide or visit www.kodak.com/go/c713accessories, www.kodak.com/go/c813accessories.) 38 www.kodak.... of Kodak products or visit www.kodak.com/go/c713accessories, www.kodak.com/go /support You need: ■ Camera with fully charged batteries ■ PictBridge enabled printer ■ USB cable (may be sold separately) Connecting the camera to a PictBridge enabled printer 1 Turn off the camera and ...
... Kodak EasyShare printer dock Dock your camera to the Kodak EasyShare printer dock and print directly-with PictBridge technology, so you can print directly to the printer. (See your printer user guide or visit www.kodak.com/go/c713accessories, www.kodak.com/go/c813accessories.) 38 www.kodak.... of Kodak products or visit www.kodak.com/go/c713accessories, www.kodak.com/go /support You need: ■ Camera with fully charged batteries ■ PictBridge enabled printer ■ USB cable (may be sold separately) Connecting the camera to a PictBridge enabled printer 1 Turn off the camera and ...


