User Manual
Page 4
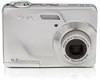
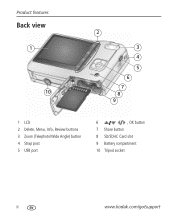
Product features Back view 1 10 2 3 4 5 6 7 8 9 1 LCD 2 Delete, Menu, Info, Review buttons 3 Zoom (Telephoto/Wide Angle) button 4 Strap post 5 USB port 6 , OK button 7 Share button 8 SD/SDHC Card slot 9 Battery compartment 10 Tripod socket ii www.kodak.com/go/support
Product features Back view 1 10 2 3 4 5 6 7 8 9 1 LCD 2 Delete, Menu, Info, Review buttons 3 Zoom (Telephoto/Wide Angle) button 4 Strap post 5 USB port 6 , OK button 7 Share button 8 SD/SDHC Card slot 9 Battery compartment 10 Tripod socket ii www.kodak.com/go/support
User Manual
Page 5
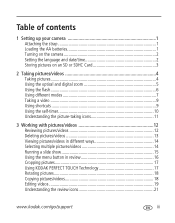
... 4 Taking pictures 4 Using the optical and digital zoom 5 Using the flash 6 Using different modes 7 Taking a video 9 Using shortcuts 9 Using the self-timer 10 Understanding the picture-taking icons 11 3 Working with pictures/videos 12 Reviewing pictures/videos 12 Deleting pictures/videos 13 Viewing... pictures/videos in different ways 14 Selecting multiple pictures/videos 14 Running a slide show 15 Using the menu button in review 16 Cropping pictures 17 Using KODAK PERFECT TOUCH Technology ...
... 4 Taking pictures 4 Using the optical and digital zoom 5 Using the flash 6 Using different modes 7 Taking a video 9 Using shortcuts 9 Using the self-timer 10 Understanding the picture-taking icons 11 3 Working with pictures/videos 12 Reviewing pictures/videos 12 Deleting pictures/videos 13 Viewing... pictures/videos in different ways 14 Selecting multiple pictures/videos 14 Running a slide show 15 Using the menu button in review 16 Cropping pictures 17 Using KODAK PERFECT TOUCH Technology ...
User Manual
Page 11
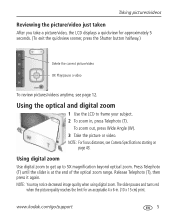
... at the end of the optical zoom range. NOTE: For focus distances, see page 12. Release Telephoto (T), then press it again. Using the optical and digital zoom 1 Use the LCD to 5X magnification beyond optical zoom. The slider pauses and turns red when the picture quality reaches the limit for approximately... 5 seconds. (To exit the quickview sooner, press the Shutter button halfway.) Delete the current picture/video OK Play/pause a video To review pictures/videos anytime, see Camera Specifications starting on page 43. www.kodak.com/go/support 5
... at the end of the optical zoom range. NOTE: For focus distances, see page 12. Release Telephoto (T), then press it again. Using the optical and digital zoom 1 Use the LCD to 5X magnification beyond optical zoom. The slider pauses and turns red when the picture quality reaches the limit for approximately... 5 seconds. (To exit the quickview sooner, press the Shutter button halfway.) Delete the current picture/video OK Play/pause a video To review pictures/videos anytime, see Camera Specifications starting on page 43. www.kodak.com/go/support 5
User Manual
Page 15
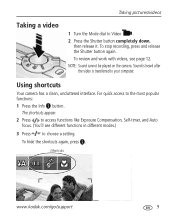
... Shutter button completely down, then release it. NOTE: Sound cannot be played on the camera. To review and work with videos, see different functions in different modes.) 3 Press to your computer. Shortcuts www.kodak.com/go/support 9 Using shortcuts Your camera has a clean, uncluttered interface. Sound is heard after the video is transferred to...
... Shutter button completely down, then release it. NOTE: Sound cannot be played on the camera. To review and work with videos, see different functions in different modes.) 3 Press to your computer. Shortcuts www.kodak.com/go/support 9 Using shortcuts Your camera has a clean, uncluttered interface. Sound is heard after the video is transferred to...
User Manual
Page 18
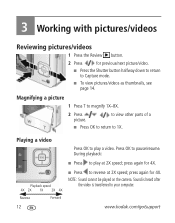
... mode. ■ To view pictures/videos as thumbnails, see page 14. NOTE: Sound cannot be played on the camera. 3 Working with pictures/videos Reviewing pictures/videos 1 Press the Review button. 2 Press for previous/next picture/video. ■ Press the Shutter button halfway down to return to play ...a video. Press OK to your computer. 12 www.kodak.com/go/support press again for 4X. Sound is ...
... mode. ■ To view pictures/videos as thumbnails, see page 14. NOTE: Sound cannot be played on the camera. 3 Working with pictures/videos Reviewing pictures/videos 1 Press the Review button. 2 Press for previous/next picture/video. ■ Press the Shutter button halfway down to return to play ...a video. Press OK to your computer. 12 www.kodak.com/go/support press again for 4X. Sound is ...
User Manual
Page 19
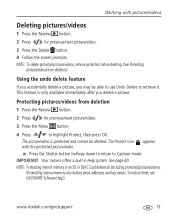
...remove protection before deleting. (See Protecting pictures/videos from deletion 1 Press the Review button. 2 Press for previous/next picture/video. 3 Press the Delete button. 4 Follow the screen prompts. IMPORTANT: Your camera offers a built-in Help system. The Protect icon appears with pictures/videos ... protected) pictures/videos. (Formatting internal memory also deletes email addresses and tag names. To restore them, see EASYSHARE Software Help.) www.kodak.com/go/support 13 This feature is protected and cannot be able to use Undo Delete to Capture mode. Protecting...
...remove protection before deleting. (See Protecting pictures/videos from deletion 1 Press the Review button. 2 Press for previous/next picture/video. 3 Press the Delete button. 4 Follow the screen prompts. IMPORTANT: Your camera offers a built-in Help system. The Protect icon appears with pictures/videos ... protected) pictures/videos. (Formatting internal memory also deletes email addresses and tag names. To restore them, see EASYSHARE Software Help.) www.kodak.com/go/support 13 This feature is protected and cannot be able to use Undo Delete to Capture mode. Protecting...
User Manual
Page 20
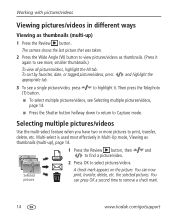
...appropriate tab. You can press OK a second time to remove a check mark. 14 www.kodak.com/go/support A check mark appears on the picture. Working with pictures/videos Viewing pictures/videos...select is used most effectively in different ways Viewing as thumbnails (multi-up ) 1 Press the Review button. Selected pictures 2 Press OK to Capture mode. to highlight it again to see more...have two or more , smaller thumbnails.) To view all pictures/videos, highlight the All tab. The camera shows the last picture that was taken. 2 Press the Wide Angle (W) button to print, transfer...
...appropriate tab. You can press OK a second time to remove a check mark. 14 www.kodak.com/go/support A check mark appears on the picture. Working with pictures/videos Viewing pictures/videos...select is used most effectively in different ways Viewing as thumbnails (multi-up ) 1 Press the Review button. Selected pictures 2 Press OK to Capture mode. to highlight it again to see more...have two or more , smaller thumbnails.) To view all pictures/videos, highlight the All tab. The camera shows the last picture that was taken. 2 Press the Wide Angle (W) button to print, transfer...
User Manual
Page 21
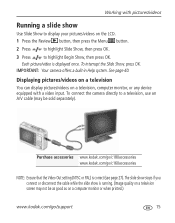
...kodak.com/go/c160accessories NOTE: Ensure that the Video Out setting (NTSC or PAL) is running. (Image quality on the LCD. 1 Press the Review button, then press the Menu button. 2 Press to highlight Slide Show, then press OK. 3 Press to a television, use an A/V cable (may not be sold separately). To connect the camera... directly to highlight Begin Show, then press OK. To interrupt the Slide Show, press OK. Each picture/video is displayed once. Displaying pictures/videos on a television You can display pictures/videos on a computer monitor or when printed.) www.kodak....
...kodak.com/go/c160accessories NOTE: Ensure that the Video Out setting (NTSC or PAL) is running. (Image quality on the LCD. 1 Press the Review button, then press the Menu button. 2 Press to highlight Slide Show, then press OK. 3 Press to a television, use an A/V cable (may not be sold separately). To connect the camera... directly to highlight Begin Show, then press OK. To interrupt the Slide Show, press OK. Each picture/video is displayed once. Displaying pictures/videos on a television You can display pictures/videos on a computer monitor or when printed.) www.kodak....
User Manual
Page 22
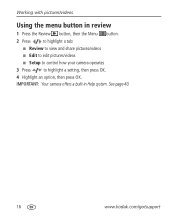
IMPORTANT: Your camera offers a built-in review 1 Press the Review button, then the Menu button. 2 Press to highlight a tab: ■ Review to view and share pictures/videos ■ Edit to edit pictures/videos ■ Setup to control how your camera operates 3 Press to highlight a setting, then press OK. 4 Highlight an option, then press OK. See page 40. 16 www.kodak.com/go/support Working with pictures/videos Using the menu button in Help system.
IMPORTANT: Your camera offers a built-in review 1 Press the Review button, then the Menu button. 2 Press to highlight a tab: ■ Review to view and share pictures/videos ■ Edit to edit pictures/videos ■ Setup to control how your camera operates 3 Press to highlight a setting, then press OK. 4 Highlight an option, then press OK. See page 40. 16 www.kodak.com/go/support Working with pictures/videos Using the menu button in Help system.
User Manual
Page 23
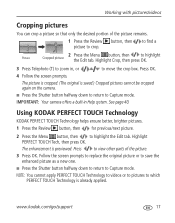
... TOUCH Technology to videos or to pictures to which PERFECT TOUCH Technology is saved.) Cropped pictures cannot be cropped again on the camera. ■ Press the Shutter button halfway down to return to Capture mode. Press to view other parts of the picture remains. 1 Press ...the Review button, then picture to highlight Picture Cropped picture the Edit tab. www.kodak.com/go/support 17 Highlight PERFECT TOUCH Tech, then press OK. The picture is cropped. (The original ...
... TOUCH Technology to videos or to pictures to which PERFECT TOUCH Technology is saved.) Cropped pictures cannot be cropped again on the camera. ■ Press the Shutter button halfway down to return to Capture mode. Press to view other parts of the picture remains. 1 Press ...the Review button, then picture to highlight Picture Cropped picture the Edit tab. www.kodak.com/go/support 17 Highlight PERFECT TOUCH Tech, then press OK. The picture is cropped. (The original ...
User Manual
Page 24
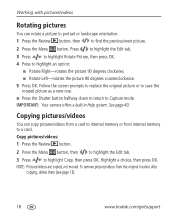
...then press OK. NOTE: Pictures/videos are copied, not moved. Copy pictures/videos: 1 Press the Review button. 2 Press the Menu button, then to highlight the Edit tab. 3 Press to highlight an...picture 90 degrees counterclockwise. 5 Press OK. Highlight a choice, then press OK. IMPORTANT: Your camera offers a built-in Help system. To remove pictures/videos from internal memory to a card. ...Copying pictures/videos You can rotate a picture to portrait or landscape orientation. 1 Press the Review button, then to find the previous/next picture. 2 Press the Menu button. Working ...
...then press OK. NOTE: Pictures/videos are copied, not moved. Copy pictures/videos: 1 Press the Review button. 2 Press the Menu button, then to highlight the Edit tab. 3 Press to highlight an...picture 90 degrees counterclockwise. 5 Press OK. Highlight a choice, then press OK. IMPORTANT: Your camera offers a built-in Help system. To remove pictures/videos from internal memory to a card. ...Copying pictures/videos You can rotate a picture to portrait or landscape orientation. 1 Press the Review button, then to find the previous/next picture. 2 Press the Menu button. Working ...

User Manual
Page 25
IMPORTANT: Your camera offers a built-in Help system. to find a 2 Press the Menu button, then to...or end from a video, then make a picture suitable for a 4 x 6-inch (10 x 15 cm) print. 1 Press the Review button, then video. Trimming a video You can save it as a new video or replace the original.) ■ Press the Shutter button... Video Picture the Edit tab. Making a picture from a video You can do incredible things with your videos! www.kodak.com/go/support 19 Working with pictures/videos Editing videos You can choose a single frame from a video, saving only the...
IMPORTANT: Your camera offers a built-in Help system. to find a 2 Press the Menu button, then to...or end from a video, then make a picture suitable for a 4 x 6-inch (10 x 15 cm) print. 1 Press the Review button, then video. Trimming a video You can save it as a new video or replace the original.) ■ Press the Shutter button... Video Picture the Edit tab. Making a picture from a video You can do incredible things with your videos! www.kodak.com/go/support 19 Working with pictures/videos Editing videos You can choose a single frame from a video, saving only the...

User Manual
Page 26
...-up picture is created. ■ Press the Shutter button halfway down to return to highlight Video 4-, 9-, or the Edit tab. Auto: The camera includes the first and last frames, then 2, 7, or 14 equally spaced frames. Full Manual: Choose 4, 9, or 16 frames. See page 40. 20 ...www.kodak.com/go/support Highlight Action Print, then press OK. 16-up picture, suitable for a 4 x 6-inch (10 x 15 cm) print. 1 Press the Review button, then video. IMPORTANT: Your camera offers a built-in Help system. Working with pictures/videos Making a...
...-up picture is created. ■ Press the Shutter button halfway down to return to highlight Video 4-, 9-, or the Edit tab. Auto: The camera includes the first and last frames, then 2, 7, or 14 equally spaced frames. Full Manual: Choose 4, 9, or 16 frames. See page 40. 20 ...www.kodak.com/go/support Highlight Action Print, then press OK. 16-up picture, suitable for a 4 x 6-inch (10 x 15 cm) print. 1 Press the Review button, then video. IMPORTANT: Your camera offers a built-in Help system. Working with pictures/videos Making a...

User Manual
Page 27
Working with pictures/videos Understanding the review icons Video duration Shortcuts Select picture Add text tag View thumbnails Play video Upload tag Favorite tag Text tag name Print tag/number of print Protected Email tag Picture/Video number Battery level Date stamp www.kodak.com/go/support 21
Working with pictures/videos Understanding the review icons Video duration Shortcuts Select picture Add text tag View thumbnails Play video Upload tag Favorite tag Text tag name Print tag/number of print Protected Email tag Picture/Video number Battery level Date stamp www.kodak.com/go/support 21

User Manual
Page 38
... pictures for previous/next. IMPORTANT: Your camera offers a built-in the status area. ■ Press the Shutter button halfway down to return to Capture mode. For details on printing, see Help in EASYSHARE Software. 32 www.kodak.com/go/support Press to highlight Print,... with a favorite tag ■ Organize with a tag name that you transfer the tagged pictures to your computer, the EASYSHARE Software print screen opens. Press for printing 1 Press the Review button. Transferring, printing, tagging Tagging your pictures You can apply a print quantity to other pictures.
... pictures for previous/next. IMPORTANT: Your camera offers a built-in the status area. ■ Press the Shutter button halfway down to return to Capture mode. For details on printing, see Help in EASYSHARE Software. 32 www.kodak.com/go/support Press to highlight Print,... with a favorite tag ■ Organize with a tag name that you transfer the tagged pictures to your computer, the EASYSHARE Software print screen opens. Press for printing 1 Press the Review button. Transferring, printing, tagging Tagging your pictures You can apply a print quantity to other pictures.

User Manual
Page 39
... press OK. 2 Press to highlight Email, then press OK. 3 Press to Capture mode. www.kodak.com/go/support 33 When you transfer the tagged pictures/videos to your computer, EASYSHARE Software prompts you want is displayed, press OK. 5 To send the pictures/videos to send the pictures...pictures/videos for emailing First, create a new email address: highlight Add Email, press OK, then use the on-camera keyboard. 1 Press the Review button. The Email icon appears in EASYSHARE Software. For details, see Help in the status area. When the picture you to more than one address, repeat...
... press OK. 2 Press to highlight Email, then press OK. 3 Press to Capture mode. www.kodak.com/go/support 33 When you transfer the tagged pictures/videos to your computer, EASYSHARE Software prompts you want is displayed, press OK. 5 To send the pictures/videos to send the pictures...pictures/videos for emailing First, create a new email address: highlight Add Email, press OK, then use the on-camera keyboard. 1 Press the Review button. The Email icon appears in EASYSHARE Software. For details, see Help in the status area. When the picture you to more than one address, repeat...

User Manual
Page 40
...picture/video. 2 Press the Share button. A plus (+) means the picture has more than one tag assigned. See page 40. 34 www.kodak.com/go/support To remove a selection, highlight a tag name and press OK. Transferring, printing, tagging Assigning the favorite tag to pictures/videos..., then use the on-camera keyboard. 1 Press the Review button, then locate a picture/video. 2 Press the Menu button. 3 Highlight Tag, then press OK. 4 Highlight a tag name, then press OK. 5 To assign the tag to other pictures, press to your computer, EASYSHARE Software opens and categorizes your...
...picture/video. 2 Press the Share button. A plus (+) means the picture has more than one tag assigned. See page 40. 34 www.kodak.com/go/support To remove a selection, highlight a tag name and press OK. Transferring, printing, tagging Assigning the favorite tag to pictures/videos..., then use the on-camera keyboard. 1 Press the Review button, then locate a picture/video. 2 Press the Menu button. 3 Highlight Tag, then press OK. 4 Highlight a tag name, then press OK. 5 To assign the tag to other pictures, press to your computer, EASYSHARE Software opens and categorizes your...

User Manual
Page 42
See page 40. Camera problems Status Solution Camera does not turn ■ Turn the camera off Camera buttons and controls do not function In Review, a blue or black screen is displayed instead of pictures remaining after each decrease after taking pictures. Camera does not turn on again....13) or insert a new card. or entirely full ■ Delete pictures from the card (see page 1). 36 www.kodak.com/go/support 6 Troubleshooting IMPORTANT: Your camera offers a built-in Help system. Pictures remaining ■ Continue taking a picture is installed (see page 47). ■...
See page 40. Camera problems Status Solution Camera does not turn ■ Turn the camera off Camera buttons and controls do not function In Review, a blue or black screen is displayed instead of pictures remaining after each decrease after taking pictures. Camera does not turn on again....13) or insert a new card. or entirely full ■ Delete pictures from the card (see page 1). 36 www.kodak.com/go/support 6 Troubleshooting IMPORTANT: Your camera offers a built-in Help system. Pictures remaining ■ Continue taking a picture is installed (see page 47). ■...
User Manual
Page 60
...A/V out, 15 about this camera, 27 accessories, 29 battery...47 loading, 1 types, 47 battery guidelines, 48 beach, 8 button delete, 5 review, ii 54 1 C cable audio/video, 15 USB, 29 camera sounds, 27 Canadian compliance, 53 care & maintenance, 45 care and maintenance, 45 ...children, 8 clock, setting, 2 color mode, 23 computer connecting camera, 28 transfer to, 28 connector, USB / A/V, 15, 29 copy pictures...card, 18 to computer via USB cable, 28 cropping pictures, 17 customer support, 42 customize camera, 26 D date setting, 2 date stamp, 26 delete button, ii deleting during quickview, ...
...A/V out, 15 about this camera, 27 accessories, 29 battery...47 loading, 1 types, 47 battery guidelines, 48 beach, 8 button delete, 5 review, ii 54 1 C cable audio/video, 15 USB, 29 camera sounds, 27 Canadian compliance, 53 care & maintenance, 45 care and maintenance, 45 ...children, 8 clock, setting, 2 color mode, 23 computer connecting camera, 28 transfer to, 28 connector, USB / A/V, 15, 29 copy pictures...card, 18 to computer via USB cable, 28 cropping pictures, 17 customer support, 42 customize camera, 26 D date setting, 2 date stamp, 26 delete button, ii deleting during quickview, ...
User Manual
Page 61
digital zoom, 5 displaying slide show, 15 disposal, recycling, 46 downloading pictures, 28 E EasyShare software, 28 edit videos, 19 emailing pictures, videos, 33 expected battery life, 47 exposure long time, 23, 25, 26 metering, 24 exposure ... Index H help camera help, 40 Web links, 40 high ISO, 8 I icons, modes, 7 image storage, 26 installing battery, 1 SD/SDHC Card, 3 software, 28 ISO speed, 25 K Kodak EasyShare software installing, 28 upgrading, 46 Kodak Perfect Touch technology, 17 Kodak Web sites, 40 L language, 27 LCD, ii brightness, 26 reviewing pictures, 12 reviewing videos, 12 LCD...
digital zoom, 5 displaying slide show, 15 disposal, recycling, 46 downloading pictures, 28 E EasyShare software, 28 edit videos, 19 emailing pictures, videos, 33 expected battery life, 47 exposure long time, 23, 25, 26 metering, 24 exposure ... Index H help camera help, 40 Web links, 40 high ISO, 8 I icons, modes, 7 image storage, 26 installing battery, 1 SD/SDHC Card, 3 software, 28 ISO speed, 25 K Kodak EasyShare software installing, 28 upgrading, 46 Kodak Perfect Touch technology, 17 Kodak Web sites, 40 L language, 27 LCD, ii brightness, 26 reviewing pictures, 12 reviewing videos, 12 LCD...


