
Use and Care Guide
Page 2
We're committed to register your product online at www.kitchenaid.com, or by mail using the attached Product Registration Card. Your satisfaction is our #1 goal. To help ensure the longevity and performance of delicious meals for your product. USA: 1.800.541.6390 Canada: 1.800.807.6777 KitchenAid.com KitchenAid.ca 2 Remember to helping you with the best way to the world of KitchenAid®. It will empower you create a lifetime of your appliance, keep this guide handy. Welcome to use and care for family and friends.
We're committed to register your product online at www.kitchenaid.com, or by mail using the attached Product Registration Card. Your satisfaction is our #1 goal. To help ensure the longevity and performance of delicious meals for your product. USA: 1.800.541.6390 Canada: 1.800.807.6777 KitchenAid.com KitchenAid.ca 2 Remember to helping you with the best way to the world of KitchenAid®. It will empower you create a lifetime of your appliance, keep this guide handy. Welcome to use and care for family and friends.

Use and Care Guide
Page 3
...5 PARTS AND FEATURES 6 ACCESSORIES Included Accessories 7 Accessories Selection Guide 8 PREPARING THE FOOD PROCESSOR FOR FIRST USE 9 SETTING UP YOUR FOOD PROCESSOR Attaching the Work Bowl 10 Attaching the Work Bowl Cover 10 Installing the Adjustable Slicing Disc 11 Installing the Reversible Shredding Disc 11 Installing the Multipurpose Blade 12 Using the 2-in-1 Feed Tube 12 USING YOUR FOOD PROCESSOR Before Use...13 Maximum Liquid Level 13 Using the Low/High Speed Control 13 Using the Pulse Control 13 Removing Processed Foods 14 CLEANING THE FOOD PROCESSOR 15 FOOD PROCESSING TIPS...
...5 PARTS AND FEATURES 6 ACCESSORIES Included Accessories 7 Accessories Selection Guide 8 PREPARING THE FOOD PROCESSOR FOR FIRST USE 9 SETTING UP YOUR FOOD PROCESSOR Attaching the Work Bowl 10 Attaching the Work Bowl Cover 10 Installing the Adjustable Slicing Disc 11 Installing the Reversible Shredding Disc 11 Installing the Multipurpose Blade 12 Using the 2-in-1 Feed Tube 12 USING YOUR FOOD PROCESSOR Before Use...13 Maximum Liquid Level 13 Using the Low/High Speed Control 13 Using the Pulse Control 13 Removing Processed Foods 14 CLEANING THE FOOD PROCESSOR 15 FOOD PROCESSING TIPS...

Use and Care Guide
Page 4
... when not in use only. Close supervision is not running. 11. Do not let cord hang over edge of injury, never place cutting blade or discs on or taking off parts, and before putting on base without first putting bowl properly in any appliance is used only when the Food Processor is necessary when any manner. SAVE THESE INSTRUCTIONS 4 Handle carefully. 12.
... when not in use only. Close supervision is not running. 11. Do not let cord hang over edge of injury, never place cutting blade or discs on or taking off parts, and before putting on base without first putting bowl properly in any appliance is used only when the Food Processor is necessary when any manner. SAVE THESE INSTRUCTIONS 4 Handle carefully. 12.

Use and Care Guide
Page 5
... will assure you use your Food Processor, please fill out and mail your Food Processor. English Food Processor Safety Electrical Requirements Volts: 120 V.A.C. Hertz: 60 Hz NOTE: This Food Processor is wider than ...Consumer Product Safety Act. This card does not verify your personal records: Model Number Serial Number Date Purchased Store Name 5 If the plug does not fit fully in...Product Registration Always keep a copy of the itemized sales receipt showing the date of purchase of in a polarized outlet only one blade is equipped with the provisions of a product safety...
... will assure you use your Food Processor, please fill out and mail your Food Processor. English Food Processor Safety Electrical Requirements Volts: 120 V.A.C. Hertz: 60 Hz NOTE: This Food Processor is wider than ...Consumer Product Safety Act. This card does not verify your personal records: Model Number Serial Number Date Purchased Store Name 5 If the plug does not fit fully in...Product Registration Always keep a copy of the itemized sales receipt showing the date of purchase of in a polarized outlet only one blade is equipped with the provisions of a product safety...

Use and Care Guide
Page 6
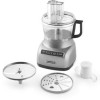
Parts and Features Multipurpose Stainless Steel Blade 2-Piece Food Pusher Adjustable Slicing Disc Thin to Thick Reversible (2 mm and 4 mm) Shredding Disc Work Bowl Cover with 2-in-1 Feed Tube 7-Cup (1.7 L) Work Bowl Shredding Adapter Heavy-Duty Base 6
Parts and Features Multipurpose Stainless Steel Blade 2-Piece Food Pusher Adjustable Slicing Disc Thin to Thick Reversible (2 mm and 4 mm) Shredding Disc Work Bowl Cover with 2-in-1 Feed Tube 7-Cup (1.7 L) Work Bowl Shredding Adapter Heavy-Duty Base 6

Use and Care Guide
Page 7
... Slicing Disc (KFP07ASL) Disc is adjustable from thin to drizzle oil into ingredients - Multipurpose Blade (KFP07BL) Versatile blade chops, minces, blends, mixes, and emulsifies in -1 feed tube accommodates large items such as tomatoes, cucumbers, and potatoes with a minimum of sectioning or slicing. 2-Piece Food Pusher (KFP07FTP) The 2-Piece food pusher allows you to manually adjust slicing thickness from approximately 1/16 inch (1 mm) to the power shaft on the base. Work Bowl Cover with 2-in-1 Feed Tube...
... Slicing Disc (KFP07ASL) Disc is adjustable from thin to drizzle oil into ingredients - Multipurpose Blade (KFP07BL) Versatile blade chops, minces, blends, mixes, and emulsifies in -1 feed tube accommodates large items such as tomatoes, cucumbers, and potatoes with a minimum of sectioning or slicing. 2-Piece Food Pusher (KFP07FTP) The 2-Piece food pusher allows you to manually adjust slicing thickness from approximately 1/16 inch (1 mm) to the power shaft on the base. Work Bowl Cover with 2-in-1 Feed Tube...

Use and Care Guide
Page 8
Accessories Accessories Selection Guide Action Setting Food Accessory Cheese Multipurpose Blade Chocolate Chop Fruit Fresh herbs Nuts Tofu Vegetables Mince Puree Pasta Sauce Pesto Salsa Mix Sauces Slice Slice Thin Thick Fruit (soft) Potatoes Tomatoes Vegetables (soft) Cheese Chocolate Fruit (hard) Vegetables (hard) Adjustable Slicing Disc Shred Shred Medium Fine Potatoes Vegetables (soft) Cabbage Cheese Chocolate Fruit (hard) Vegetables (hard) Reversible Shredding Disc 8
Accessories Accessories Selection Guide Action Setting Food Accessory Cheese Multipurpose Blade Chocolate Chop Fruit Fresh herbs Nuts Tofu Vegetables Mince Puree Pasta Sauce Pesto Salsa Mix Sauces Slice Slice Thin Thick Fruit (soft) Potatoes Tomatoes Vegetables (soft) Cheese Chocolate Fruit (hard) Vegetables (hard) Adjustable Slicing Disc Shred Shred Medium Fine Potatoes Vegetables (soft) Cabbage Cheese Chocolate Fruit (hard) Vegetables (hard) Reversible Shredding Disc 8

Use and Care Guide
Page 9
Removing the Work Bowl Cover from the Work Bowl Your Food Processor is shipped with the work bowl cover installed on the work bowl cover and turn it clockwise to remove it from the work bowl for the first time, wash all parts and accessories either by hand or in the dishwasher (see "Cleaning the Food Processor" section). Grasp the feed tube on the work bowl. 9 English Preparing the Food Processor for First Use Before First Use Before using your Food Processor for initial cleaning: 1. To remove the work bowl cover from the work bowl.
Removing the Work Bowl Cover from the Work Bowl Your Food Processor is shipped with the work bowl cover installed on the work bowl cover and turn it clockwise to remove it from the work bowl for the first time, wash all parts and accessories either by hand or in the dishwasher (see "Cleaning the Food Processor" section). Grasp the feed tube on the work bowl. 9 English Preparing the Food Processor for First Use Before First Use Before using your Food Processor for initial cleaning: 1. To remove the work bowl cover from the work bowl.

Use and Care Guide
Page 10
Place the work bowl cover on the work bowl with different sized foods. Select the accessory you would like to use and install it on the base. The center hole should fit over the power shaft. Power Shaft 3. NOTE: Your Food Processor will not operate unless the work bowl and work bowl handle. Grasp the work bowl cover. Food Pusher 4. Setting Up Your Food Processor Attaching the Work Bowl 1. Place the Food Processor on working with the feed tube just to the instructions on the base. Grasp the feed tube and turn the bowl counterclockwise to lock it...
Place the work bowl cover on the work bowl with different sized foods. Select the accessory you would like to use and install it on the base. The center hole should fit over the power shaft. Power Shaft 3. NOTE: Your Food Processor will not operate unless the work bowl and work bowl handle. Grasp the work bowl cover. Food Pusher 4. Setting Up Your Food Processor Attaching the Work Bowl 1. Place the Food Processor on working with the feed tube just to the instructions on the base. Grasp the feed tube and turn the bowl counterclockwise to lock it...

Use and Care Guide
Page 11
... the work bowl installed, hold the slicing disk by the 2 finger grips, insert the shredding adapter into place. 2. Finger Grip Finger Grip 3. Install the work bowl cover, being sure it drops down into place. TIP: You may need to turn the disc/ adapter until it locks into place. 3. TIP: You may need to turn the disc/drive adapter until it locks into place. 11 English Setting Up Your Food Processor Installing the Adjustable Slicing Disc The Adjustable Slicing Disc is easily...
... the work bowl installed, hold the slicing disk by the 2 finger grips, insert the shredding adapter into place. 2. Finger Grip Finger Grip 3. Install the work bowl cover, being sure it drops down into place. TIP: You may need to turn the disc/ adapter until it locks into place. 3. TIP: You may need to turn the disc/drive adapter until it locks into place. 11 English Setting Up Your Food Processor Installing the Adjustable Slicing Disc The Adjustable Slicing Disc is easily...

Use and Care Guide
Page 12
... the small pusher with the desired amount of the work bowl cover, being sure it will drizzle the oil at a constant rate. 4. The multipurpose blade features an internal seal that fits tightly over the center of oil. A small hole in -1 feed tube features a 2-piece food pusher. To slice or shred small items, insert the 2-piece food pusher into place on the power shaft. 2. See "Attaching the Work Bowl Cover" section. 12 Setting Up Your Food Processor Installing the Multipurpose Blade 1.
... the small pusher with the desired amount of the work bowl cover, being sure it will drizzle the oil at a constant rate. 4. The multipurpose blade features an internal seal that fits tightly over the center of oil. A small hole in -1 feed tube features a 2-piece food pusher. To slice or shred small items, insert the 2-piece food pusher into place on the power shaft. 2. See "Attaching the Work Bowl Cover" section. 12 Setting Up Your Food Processor Installing the Multipurpose Blade 1.

Use and Care Guide
Page 13
... light will go out and the blade or disc will glow. 2. NOTE: If the Food Processor fails to turn on the Food Processor, press the Low or High button. English Using Your Food Processor Before Use Before operating the Food Processor, be processed by the Food Processor. Be sure to operate, make sure the work bowl and cover are properly assembled on the Food Processor base (see "Setting Up Your Food Processor"). Just press and hold the PULSE Button to start processing...
... light will go out and the blade or disc will glow. 2. NOTE: If the Food Processor fails to turn on the Food Processor, press the Low or High button. English Using Your Food Processor Before Use Before operating the Food Processor, be processed by the Food Processor. Be sure to operate, make sure the work bowl and cover are properly assembled on the Food Processor base (see "Setting Up Your Food Processor"). Just press and hold the PULSE Button to start processing...

Use and Care Guide
Page 14
... Shredding Disc. Turn the work bowl to the left and remove. 6. Lift to the left to unlock it from the bowl and blade with a spatula. 4. Removing Processed Foods 1. Remove the adapter when using a disc, remove it straight up. You may also leave the blade locked in place. The multipurpose blade can be removed from the work bowl cover to remove. Holding the disc by the 2 finger grips, lift it before disassembling. 3. Finger Grip 14 Unplug the Food Processor...
... Shredding Disc. Turn the work bowl to the left and remove. 6. Lift to the left to unlock it from the bowl and blade with a spatula. 4. Removing Processed Foods 1. Remove the adapter when using a disc, remove it straight up. You may also leave the blade locked in place. The multipurpose blade can be removed from the work bowl cover to remove. Holding the disc by the 2 finger grips, lift it before disassembling. 3. Finger Grip 14 Unplug the Food Processor...
Use and Care Guide
Page 15
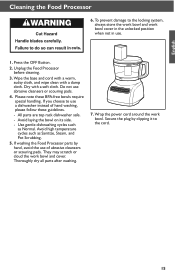
... Food Processor parts by clipping it to the locking system, always store the work bowl and work bowl cover in the unlocked position when not in use of hand washing, please follow these BPA-free bowls require special handling. Press the OFF Button. 2. If you choose to use abrasive cleansers or scouring pads. 4. Wrap the power cord around the work bowl and cover. Please note these guidelines. -- English Cleaning the Food Processor...
... Food Processor parts by clipping it to the locking system, always store the work bowl and work bowl cover in the unlocked position when not in use of hand washing, please follow these BPA-free bowls require special handling. Press the OFF Button. 2. If you choose to use abrasive cleansers or scouring pads. 4. Wrap the power cord around the work bowl and cover. Please note these guidelines. -- English Cleaning the Food Processor...

Use and Care Guide
Page 16
... feed tube while the processor is absorbed. Process food to desired size, using short pulses, 1 to 2-inch (3.75-5 cm) pieces. Cut cheese in work bowl. To melt chocolate in a recipe: Combine chocolate and sugar from citrus. Heat liquid from recipe per 1/2 cup (120 ml) dried fruit. Process until reaching desired texture. To prepare mashed potatoes: Shred hot cooked potatoes using short pulses, until chopped. For best results, make...
... feed tube while the processor is absorbed. Process food to desired size, using short pulses, 1 to 2-inch (3.75-5 cm) pieces. Cut cheese in work bowl. To melt chocolate in a recipe: Combine chocolate and sugar from citrus. Heat liquid from recipe per 1/2 cup (120 ml) dried fruit. Process until reaching desired texture. To prepare mashed potatoes: Shred hot cooked potatoes using short pulses, until chopped. For best results, make...

Use and Care Guide
Page 17
.... English Food Processing Tips Using a Slicing or Shredding Disc To slice or shred fruits or vegetables that are long and relatively small in diameter, such as celery, carrots, and bananas: Cut food to fit feed tube vertically or horizontally, and pack feed tube securely to fit feed tube. Or use the small food pusher to process food. Position food vertically in the tube and use the small feed tube in the two-piece food pusher. Position in feed tube. To slice or shred fruits and...
.... English Food Processing Tips Using a Slicing or Shredding Disc To slice or shred fruits or vegetables that are long and relatively small in diameter, such as celery, carrots, and bananas: Cut food to fit feed tube vertically or horizontally, and pack feed tube securely to fit feed tube. Or use the small food pusher to process food. Position food vertically in the tube and use the small feed tube in the two-piece food pusher. Position in feed tube. To slice or shred fruits and...

Use and Care Guide
Page 18
... inedible parts of food -- Grind coffee beans, grains, or hard spices -- Gently remove food from the multipurpose blade easily, just empty the work bowl, replace the lid, and pulse 1 to 2 seconds to spin the blade clean. • After removing the work bowl should discolor due to the types of food processed, clean them with the food. Process nuts and fruits, using a spatula. • When food quantity reaches the bottom of a slicing or shredding disc, remove the food...
... inedible parts of food -- Grind coffee beans, grains, or hard spices -- Gently remove food from the multipurpose blade easily, just empty the work bowl, replace the lid, and pulse 1 to 2 seconds to spin the blade clean. • After removing the work bowl should discolor due to the types of food processed, clean them with the food. Process nuts and fruits, using a spatula. • When food quantity reaches the bottom of a slicing or shredding disc, remove the food...

Use and Care Guide
Page 19
... locked in working order? Retailers do not provide service. 19 English Troubleshooting If your Food Processor should malfunction or fail to operate, check the following: Food Processor doesn't run: • Make sure that the bowl and lid are suitable for slicing or shredding. Do not return the Food Processor to the Food Processor in place. • Press only one of the disc is positioned face up on the common adapter...
... locked in working order? Retailers do not provide service. 19 English Troubleshooting If your Food Processor should malfunction or fail to operate, check the following: Food Processor doesn't run: • Make sure that the bowl and lid are suitable for slicing or shredding. Do not return the Food Processor to the Food Processor in place. • Press only one of the disc is positioned face up on the common adapter...

Use and Care Guide
Page 20
...handling costs to deliver your Food Processor. Replacement parts or repair labor costs for Food Processors operated outside the 50 United States, District of your Food Processor to arrange for service, or call the Customer Satisfaction Center toll-free at 1-800-541-6390. This warranty gives you specific...or abuse. B. KitchenAid Will A. Warranty KitchenAid® Food Processor Warranty for the 50 United States, the District of Columbia, Puerto Rico, and Canada This warranty extends to the purchaser and any succeeding owner for Food Processors operated in the 50...
...handling costs to deliver your Food Processor. Replacement parts or repair labor costs for Food Processors operated outside the 50 United States, District of your Food Processor to arrange for service, or call the Customer Satisfaction Center toll-free at 1-800-541-6390. This warranty gives you specific...or abuse. B. KitchenAid Will A. Warranty KitchenAid® Food Processor Warranty for the 50 United States, the District of Columbia, Puerto Rico, and Canada This warranty extends to the purchaser and any succeeding owner for Food Processors operated in the 50...

Use and Care Guide
Page 21
.... Box numbers, please.) When you are unable to initiate the claim. Your replacement unit will be required to obtain satisfactory service in Canada: Call toll-free 1-800-807-6777. If your complete shipping address. (No P.O. Your replacement Food Processor will also be covered by our one year limited warranty. For service information in this quality service. Or write to : Customer Satisfaction Center, KitchenAid...
.... Box numbers, please.) When you are unable to initiate the claim. Your replacement unit will be required to obtain satisfactory service in Canada: Call toll-free 1-800-807-6777. If your complete shipping address. (No P.O. Your replacement Food Processor will also be covered by our one year limited warranty. For service information in this quality service. Or write to : Customer Satisfaction Center, KitchenAid...


