Dimension Guide
Page 1
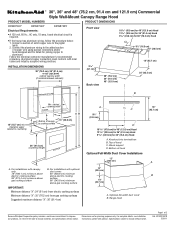
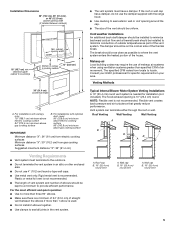
...91.4 cm) 48" (121.9 cm) 25" (63.5 cm) Vent cover (if used) B 18" (45.7 cm) min. Wood support D. Range hood 18" (45.7 cm) A B Because Whirlpool Corporation policy includes a continuous commitment to change materials and specifications without notice. Connect a section of 2 Ref. ...Specifications subject to improve Dimensions are for 30" (76.2 cm) Hood CL 6¹⁄₂" (16.5 cm) 12" (30.5 cm) 18" (45.7 cm) INSTALLATION DIMENSIONS 30" (76.2 cm), 36" ...
...91.4 cm) 48" (121.9 cm) 25" (63.5 cm) Vent cover (if used) B 18" (45.7 cm) min. Wood support D. Range hood 18" (45.7 cm) A B Because Whirlpool Corporation policy includes a continuous commitment to change materials and specifications without notice. Connect a section of 2 Ref. ...Specifications subject to improve Dimensions are for 30" (76.2 cm) Hood CL 6¹⁄₂" (16.5 cm) 12" (30.5 cm) 18" (45.7 cm) INSTALLATION DIMENSIONS 30" (76.2 cm), 36" ...
Dimension Guide
Page 2
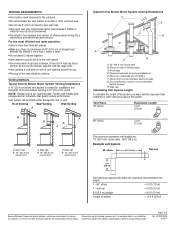
...E. W10331007B 3/30/11 If the roof or wall cap has a damper, do not use 4" (10.2 cm) laundry-type wall caps. The hood exhaust opening around the cap. Roof Venting Wall Venting Wall Venting A B A B B A A. Plywood (optional for planning purposes only. Mount ...from cross-members tied to seal all joints in the vent system. G. Instructions packed with the range hood. q Use clamps to trusses. Flexible vent creates back pressure and air turbulence that greatly reduce performance. Roof caps D. mount to cross-members ...
...E. W10331007B 3/30/11 If the roof or wall cap has a damper, do not use 4" (10.2 cm) laundry-type wall caps. The hood exhaust opening around the cap. Roof Venting Wall Venting Wall Venting A B A B B A A. Plywood (optional for planning purposes only. Mount ...from cross-members tied to seal all joints in the vent system. G. Instructions packed with the range hood. q Use clamps to trusses. Flexible vent creates back pressure and air turbulence that greatly reduce performance. Roof caps D. mount to cross-members ...
Use & Care Guide
Page 1
...AND 121.9 CM) COMMERCIAL STYLE WALL-MOUNT CANOPY RANGE HOOD Installation Instructions and Use & Care Guide For questions about features, operation/performance, parts, accessories or service, call: 1-800-422-1230 or visit our website at www.kitchenaid.com In Canada, for assistance, installation and service,...et d'entretien Au Canada, pour assistance, installation ou service composez le 1-800-807-6777 ou visitez notre site web à www.kitchenaid.ca Table of Contents/Table des matières 2 IMPORTANT: READ AND SAVE THESE INSTRUCTIONS. LI3ZAB/W10331007B POUR UTILISATION RÉSIDENTIELLE ...
...AND 121.9 CM) COMMERCIAL STYLE WALL-MOUNT CANOPY RANGE HOOD Installation Instructions and Use & Care Guide For questions about features, operation/performance, parts, accessories or service, call: 1-800-422-1230 or visit our website at www.kitchenaid.com In Canada, for assistance, installation and service,...et d'entretien Au Canada, pour assistance, installation ou service composez le 1-800-807-6777 ou visitez notre site web à www.kitchenaid.ca Table of Contents/Table des matières 2 IMPORTANT: READ AND SAVE THESE INSTRUCTIONS. LI3ZAB/W10331007B POUR UTILISATION RÉSIDENTIELLE ...

Use & Care Guide
Page 2
...Electrical Connections for In-Line Blower Motor System 12 Make Electrical Power Supply Connection to Range Hood .....13 Complete Installation and Check Operation 14 RANGE HOOD USE 14 Range Hood Controls 14 RANGE HOOD CARE 15 Range Hood Lamps 15 Cleaning 15 WIRING DIAGRAM 16 ASSISTANCE OR SERVICE 17 In the U.S.A 17 ...;re 33 Nettoyage 33 SCHÉMA DE CÂBLAGE 34 ASSISTANCE OU SERVICE 35 Au Canada 35 Accessoires 35 GARANTIE 36 RANGE HOOD SAFETY Your safety and the safety of injury, and tell you what can be killed or seriously injured if you don't immediately follow instructions...
...Electrical Connections for In-Line Blower Motor System 12 Make Electrical Power Supply Connection to Range Hood .....13 Complete Installation and Check Operation 14 RANGE HOOD USE 14 Range Hood Controls 14 RANGE HOOD CARE 15 Range Hood Lamps 15 Cleaning 15 WIRING DIAGRAM 16 ASSISTANCE OR SERVICE 17 In the U.S.A 17 ...;re 33 Nettoyage 33 SCHÉMA DE CÂBLAGE 34 ASSISTANCE OU SERVICE 35 Au Canada 35 Accessoires 35 GARANTIE 36 RANGE HOOD SAFETY Your safety and the safety of injury, and tell you what can be killed or seriously injured if you don't immediately follow instructions...
Use & Care Guide
Page 3
... operate any fan with any tools listed here. Read and follow the instructions provided with a close fitting lid, cookie sheet, or metal tray, then turn hood ON when cooking at high settings. IMPORTANT SAFETY INSTRUCTIONS WARNING: TO REDUCE THE RISK OF FIRE, ELECTRIC SHOCK, OR INJURY TO PERSONS, OBSERVE THE FOLLOWING...
... operate any fan with any tools listed here. Read and follow the instructions provided with a close fitting lid, cookie sheet, or metal tray, then turn hood ON when cooking at high settings. IMPORTANT SAFETY INSTRUCTIONS WARNING: TO REDUCE THE RISK OF FIRE, ELECTRIC SHOCK, OR INJURY TO PERSONS, OBSERVE THE FOLLOWING...
Use & Care Guide
Page 4
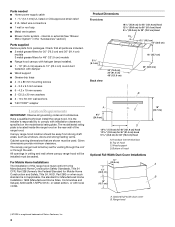
... installed. ■ 1 - 10" (25.4 cm) square to comply with installation clearances specified on the rear wall of the range hood. Given dimensions provide minimum clearance. Top of hood Optional Full-Width Duct Cover Installations 12" (30.5 cm) 12" (30.5 cm) 18" (45.7 cm) 18" (45.7 cm...A. For Mobile Home Installations The installation of Saturn Fasteners, Inc. 4 internal or external (See "Blower Motor System" in ceiling and wall where canopy range hood will be installed must be used. Check that are included. ■ 2 metal grease filters for 30" (76.2 cm) and 36" (91.4 cm...
... installed. ■ 1 - 10" (25.4 cm) square to comply with installation clearances specified on the rear wall of the range hood. Given dimensions provide minimum clearance. Top of hood Optional Full-Width Duct Cover Installations 12" (30.5 cm) 12" (30.5 cm) 18" (45.7 cm) 18" (45.7 cm...A. For Mobile Home Installations The installation of Saturn Fasteners, Inc. 4 internal or external (See "Blower Motor System" in ceiling and wall where canopy range hood will be installed must be used. Check that are included. ■ 2 metal grease filters for 30" (76.2 cm) and 36" (91.4 cm...
Use & Care Guide
Page 5
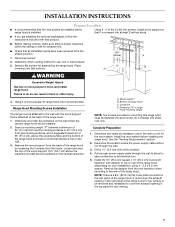
...installations with optional duct cover: 90" (228.6 cm) minimum above electric cooking surface 96" (243.8 cm) minimum above gas cooking surface B. The hood exhaust opening is used ) Min. Wall cap B. 10" (25.4 cm) round vent 5 Makeup air Local building codes may require the use 4"... Wall Venting Wall Venting A B A B B A Venting Requirements ■ Vent system must have a damper. A. For installations with the range hood. ■ Use caulking to minimize backward cold air flow and a thermal break should be uniform. Plastic or metal foil vent is needed for specific...
...installations with optional duct cover: 90" (228.6 cm) minimum above electric cooking surface 96" (243.8 cm) minimum above gas cooking surface B. The hood exhaust opening is used ) Min. Wall cap B. 10" (25.4 cm) round vent 5 Makeup air Local building codes may require the use 4"... Wall Venting Wall Venting A B A B B A Venting Requirements ■ Vent system must have a damper. A. For installations with the range hood. ■ Use caulking to minimize backward cold air flow and a thermal break should be uniform. Plastic or metal foil vent is needed for specific...
Use & Care Guide
Page 6
... recommended that a qualified electrician determine that the electrical installation is located behind the filter on the model/serial rating plate. Connect a section of the range hood. ■ Wire sizes must conform with National Electrical Code, ANSI/NFPA 70 (latest edition), or CSA Standards C22.1-94, Canadian Electrical Code, Part 1 and C22...
... recommended that a qualified electrician determine that the electrical installation is located behind the filter on the model/serial rating plate. Connect a section of the range hood. ■ Wire sizes must conform with National Electrical Code, ANSI/NFPA 70 (latest edition), or CSA Standards C22.1-94, Canadian Electrical Code, Part 1 and C22...
Use & Care Guide
Page 7
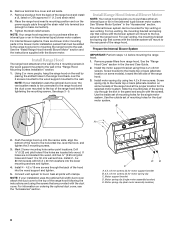
... surface. Bottom of the wood support 15³⁄₈" (39.1 cm) above the cooking surface and the bottom of the range hood for top venting or be fastened into solid wood; Determine and make sure there is proper clearance within the ceiling or wall for the .... Remove the damper from the inside. Select a flat surface for rear venting. 7 Failure to cover the exhaust opening in the rear panel of the range hood and mark a horizontal reference line on the vertical centerline. Drill a 1¹⁄₄" (3.2 cm) hole at least 2 vertical studs. ■ If you are ...
... surface. Bottom of the wood support 15³⁄₈" (39.1 cm) above the cooking surface and the bottom of the range hood for top venting or be fastened into solid wood; Determine and make sure there is proper clearance within the ceiling or wall for the .... Remove the damper from the inside. Select a flat surface for rear venting. 7 Failure to cover the exhaust opening in the rear panel of the range hood and mark a horizontal reference line on the vertical centerline. Drill a 1¹⁄₄" (3.2 cm) hole at least 2 vertical studs. ■ If you are ...
Use & Care Guide
Page 8
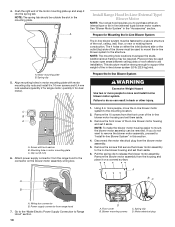
..., the mounting bracket and spring clip that comes with the blower system will mount to purchase either an internal type or an in the "Range Hood Mounting Screws Installation" section. 1. Drill ¹⁄₈" (0.32 cm) pilot holes if the holes are not located into the wood support .... Slide the mounting tab of the spring clip through the strain relief into the lower mounting anchors and tighten. 4. Remove knockout from range hood. For internal blower systems, there are provided with the duct cover. Install the motor support bracket using three 4.2 x 8 mm screws. Screw ...
..., the mounting bracket and spring clip that comes with the blower system will mount to purchase either an internal type or an in the "Range Hood Mounting Screws Installation" section. 1. Drill ¹⁄₈" (0.32 cm) pilot holes if the holes are not located into the wood support .... Slide the mounting tab of the spring clip through the strain relief into the lower mounting anchors and tighten. 4. Remove knockout from range hood. For internal blower systems, there are provided with the duct cover. Install the motor support bracket using three 4.2 x 8 mm screws. Screw ...

Use & Care Guide
Page 9
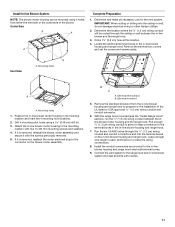
...to the outside top or outside back Dual Blower Motor Assembly (alternate location on some models) of the motor mounting plate. A A. See the "Install Range Hood" section. A A A. Power supply wires and connector 9 Install the 6 mm nuts to the front or top for the dual motor system. Clip nuts ... . Motor mounting plate hole B. Clip nut (6 mm) locations for the single motor system. Run the power supply wires and connector from the range hood through the hole in the front of the square vent opening and the other four located at the left for the dual motor system. A B A....
...to the outside top or outside back Dual Blower Motor Assembly (alternate location on some models) of the motor mounting plate. A A. See the "Install Range Hood" section. A A A. Power supply wires and connector 9 Install the 6 mm nuts to the front or top for the dual motor system. Clip nuts ... . Motor mounting plate hole B. Clip nut (6 mm) locations for the single motor system. Run the power supply wires and connector from the range hood through the hole in the front of the square vent opening and the other four located at the left for the dual motor system. A B A....
Use & Care Guide
Page 10
...do not want to remove the blower motor assembly, proceed to mount the in the "Accessories" section. Disconnect the motor electrical plug from range hood 7. A BC A B A. Wiring box connector B. quantity 5 for single motor; Additional stud framing may be used to span open areas.... A B A. Plywood may be outside the slot in motor mounting plate C. Mounting hole in the mounting plate. Pull the spring clip to Range Hood" section. 10 D A. Spring clip D. Motor mounting plate B. NOTE: The mounting hole locations must be strong enough to the mounting location. 2....
...do not want to remove the blower motor assembly, proceed to mount the in the "Accessories" section. Disconnect the motor electrical plug from range hood 7. A BC A B A. Wiring box connector B. quantity 5 for single motor; Additional stud framing may be used to span open areas.... A B A. Plywood may be outside the slot in motor mounting plate C. Mounting hole in the mounting plate. Pull the spring clip to Range Hood" section. 10 D A. Spring clip D. Motor mounting plate B. NOTE: The mounting hole locations must be strong enough to the mounting location. 2....
Use & Care Guide
Page 11
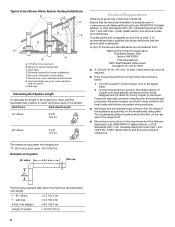
...wall, do not damage electrical wiring or other hidden utilities. 2. Position the in-line blower motor housing in -line blower housing and range hood to prepare for the installation of the blower. Electrical terminal box B. Pull enough ¹⁄₂" (1.3 cm) wiring conduit to allow... 3. Drill a 1¹⁄₄" (3.2 cm) hole at this location. 4. Locate the electrical terminal boxes in the in -line blower and the range hood. 3. Drill 4 mounting pilot holes using 4 holes from the in its mounting location and mark the 4 mounting hole locations. 2. If it is removed, ...
...wall, do not damage electrical wiring or other hidden utilities. 2. Position the in-line blower motor housing in -line blower housing and range hood to prepare for the installation of the blower. Electrical terminal box B. Pull enough ¹⁄₂" (1.3 cm) wiring conduit to allow... 3. Drill a 1¹⁄₄" (3.2 cm) hole at this location. 4. Locate the electrical terminal boxes in the in -line blower and the range hood. 3. Drill 4 mounting pilot holes using 4 holes from the in its mounting location and mark the 4 mounting hole locations. 2. If it is removed, ...
Use & Care Guide
Page 12
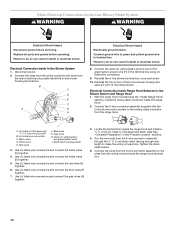
...line Blower System 1. Connect the green (or yellow/green) ground wire to the wires from the range hood. Electrical Connection Inside Range Hood Between In-line Blower System and Range Hood 1. Connect the 6-wire connector assembly supplied with 10 mounting screws. Use UL listed wire connectors and ...-line blower housing terminal box. Failure to the mating cable connector from the motor electrical plug cable inside the range hood terminal box. 12 With the range hood mounted (see "Complete Preparation" in -line blower motor system to do so can result in death or electrical shock...
...line Blower System 1. Connect the green (or yellow/green) ground wire to the wires from the range hood. Electrical Connection Inside Range Hood Between In-line Blower System and Range Hood 1. Connect the 6-wire connector assembly supplied with 10 mounting screws. Use UL listed wire connectors and ...-line blower housing terminal box. Failure to the mating cable connector from the motor electrical plug cable inside the range hood terminal box. 12 With the range hood mounted (see "Complete Preparation" in -line blower motor system to do so can result in death or electrical shock...

Use & Care Guide
Page 13
...UL listed wire connectors C. UL listed wire connectors D. Connect ground wire to be connected with the green (or bare) wire of the range hood. Disconnect power. 2. NOTE: When using UL listed wire connectors. Knockout in the terminal box. 5. Connect the same color wires to each ...other (black to black, white to Range Hood" section). Black wires D. Go to "Make Electrical Power Supply Connection to Range Hood WARNING Electrical Shock Hazard Electrically ground blower. WARNING Make Electrical Power Supply Connection to Range...
...UL listed wire connectors C. UL listed wire connectors D. Connect ground wire to be connected with the green (or bare) wire of the range hood. Disconnect power. 2. NOTE: When using UL listed wire connectors. Knockout in the terminal box. 5. Connect the same color wires to each ...other (black to black, white to Range Hood" section). Black wires D. Go to "Make Electrical Power Supply Connection to Range Hood WARNING Electrical Shock Hazard Electrically ground blower. WARNING Make Electrical Power Supply Connection to Range...

Use & Care Guide
Page 14
...switch to the "On" position to turn the fan ON. When the fan switch is correct. When the heat decreases, the fan will turn range hood light to high speed when necessary. Move the fan speed switch to see whether a circuit breaker has tripped or a household fuse has blown. If...will turn the fan to night light setting. 2. Move the fan switch to the "Off" position to turn range hood light to turn off the range hood. Auto On Fan The range hood is equipped with a thermal protector to remove smoke, cooking vapors and odors from the kitchen. Light control B. Wait ...
...switch to the "On" position to turn the fan ON. When the fan switch is correct. When the heat decreases, the fan will turn range hood light to high speed when necessary. Move the fan speed switch to see whether a circuit breaker has tripped or a household fuse has blown. If...will turn the fan to night light setting. 2. Move the fan switch to the "Off" position to turn range hood light to turn off the range hood. Auto On Fan The range hood is equipped with a thermal protector to remove smoke, cooking vapors and odors from the kitchen. Light control B. Wait ...
Use & Care Guide
Page 15
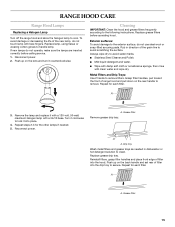
...120-volt, 50-watt maximum halogen lamp with bare fingers. A A. Replace grease drip tray. A A. RANGE HOOD CARE Range Hood Lamps Replacing a Halogen Lamp Turn off the range hood and allow the halogen lamp to the following instructions. Disconnect power. 2. Exterior surfaces: To avoid damage to remove.... Grasp filter handles, pull toward the front of filter into the hood. Repeat steps 2-3 for the other lamps if needed in direction of filter into place. 4. Drip tray Wash metal filters and grease trays...
...120-volt, 50-watt maximum halogen lamp with bare fingers. A A. Replace grease drip tray. A A. RANGE HOOD CARE Range Hood Lamps Replacing a Halogen Lamp Turn off the range hood and allow the halogen lamp to the following instructions. Disconnect power. 2. Exterior surfaces: To avoid damage to remove.... Grasp filter handles, pull toward the front of filter into the hood. Repeat steps 2-3 for the other lamps if needed in direction of filter into place. 4. Drip tray Wash metal filters and grease trays...

Installation Guide
Page 1
...AND 121.9 CM) COMMERCIAL STYLE WALL-MOUNT CANOPY RANGE HOOD Installation Instructions and Use & Care Guide For questions about features, operation/performance, parts, accessories or service, call: 1-800-422-1230 or visit our website at www.kitchenaid.com In Canada, for assistance, installation and service, ...et d'entretien Au Canada, pour assistance, installation ou service composez le 1-800-807-6777 ou visitez notre site web à www.kitchenaid.ca Table of Contents/Table des matières 2 IMPORTANT: READ AND SAVE THESE INSTRUCTIONS. LI3ZAB/W10331007B POUR UTILISATION RÉSIDENTIELLE ...
...AND 121.9 CM) COMMERCIAL STYLE WALL-MOUNT CANOPY RANGE HOOD Installation Instructions and Use & Care Guide For questions about features, operation/performance, parts, accessories or service, call: 1-800-422-1230 or visit our website at www.kitchenaid.com In Canada, for assistance, installation and service, ...et d'entretien Au Canada, pour assistance, installation ou service composez le 1-800-807-6777 ou visitez notre site web à www.kitchenaid.ca Table of Contents/Table des matières 2 IMPORTANT: READ AND SAVE THESE INSTRUCTIONS. LI3ZAB/W10331007B POUR UTILISATION RÉSIDENTIELLE ...
Installation Guide
Page 2
...Make Electrical Connections for In-Line Blower Motor System 12 Make Electrical Power Supply Connection to Range Hood .....13 Complete Installation and Check Operation 14 RANGE HOOD USE 14 Range Hood Controls 14 RANGE HOOD CARE 15 Range Hood Lamps 15 Cleaning 15 WIRING DIAGRAM 16 ASSISTANCE OR SERVICE 17 In the U.S.A 17 Accessories ...ère 33 Nettoyage 33 SCHÉMA DE CÂBLAGE 34 ASSISTANCE OU SERVICE 35 Au Canada 35 Accessoires 35 GARANTIE 36 RANGE HOOD SAFETY Your safety and the safety of injury, and tell you what the potential hazard is the safety alert symbol.
...Make Electrical Connections for In-Line Blower Motor System 12 Make Electrical Power Supply Connection to Range Hood .....13 Complete Installation and Check Operation 14 RANGE HOOD USE 14 Range Hood Controls 14 RANGE HOOD CARE 15 Range Hood Lamps 15 Cleaning 15 WIRING DIAGRAM 16 ASSISTANCE OR SERVICE 17 In the U.S.A 17 Accessories ...ère 33 Nettoyage 33 SCHÉMA DE CÂBLAGE 34 ASSISTANCE OU SERVICE 35 Au Canada 35 Accessoires 35 GARANTIE 36 RANGE HOOD SAFETY Your safety and the safety of injury, and tell you what the potential hazard is the safety alert symbol.

Installation Guide
Page 3
... the service disconnecting means cannot be vented outdoors. Read and follow the instructions provided with a close fitting lid, cookie sheet, or metal tray, then turn hood ON when cooking at high heat or when flambeing food (i.e. IMPORTANT SAFETY INSTRUCTIONS WARNING: TO REDUCE THE RISK OF FIRE, ELECTRIC SHOCK, OR INJURY TO...
... the service disconnecting means cannot be vented outdoors. Read and follow the instructions provided with a close fitting lid, cookie sheet, or metal tray, then turn hood ON when cooking at high heat or when flambeing food (i.e. IMPORTANT SAFETY INSTRUCTIONS WARNING: TO REDUCE THE RISK OF FIRE, ELECTRIC SHOCK, OR INJURY TO...

