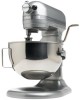
Instruction and Recipe Booklet
Page 3
... Instructions for Service Outside the 50 United States and Puerto Rico ...........4 Ordering Accessories and Replacement Parts 4 Electrical Requirements 5 Troubleshooting Problems 5 About Your Mixer Bowl Lift Stand Mixer Features 6 Assembling Your Bowl Lift Mixer 7 Assembling Your Pouring Shield 8 Using Your KitchenAid® Attachments 9 Mixing Time ...9 Mixer Use ...9 Care and Cleaning 10 Beater to Bowl Clearance 10 Speed Control...
... Instructions for Service Outside the 50 United States and Puerto Rico ...........4 Ordering Accessories and Replacement Parts 4 Electrical Requirements 5 Troubleshooting Problems 5 About Your Mixer Bowl Lift Stand Mixer Features 6 Assembling Your Bowl Lift Mixer 7 Assembling Your Pouring Shield 8 Using Your KitchenAid® Attachments 9 Mixing Time ...9 Mixer Use ...9 Care and Cleaning 10 Beater to Bowl Clearance 10 Speed Control...
Instruction and Recipe Booklet
Page 6
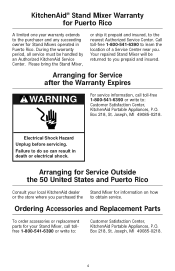
... Appliances, P.O. Call toll-free 1-800-541-6390 to you . Your repaired Stand Mixer will be handled by an Authorized KitchenAid Service Center. Ordering Accessories and Replacement Parts To order accessories or replacement parts for your local KitchenAid dealer Stand Mixer for information on how or the store where you purchased the to the purchaser and any succeeding owner...
... Appliances, P.O. Call toll-free 1-800-541-6390 to you . Your repaired Stand Mixer will be handled by an Authorized KitchenAid Service Center. Ordering Accessories and Replacement Parts To order accessories or replacement parts for your local KitchenAid dealer Stand Mixer for information on how or the store where you purchased the to the purchaser and any succeeding owner...
Instruction and Recipe Booklet
Page 10
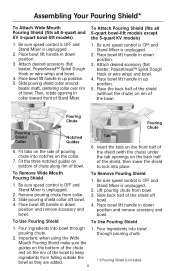
... back half of the shield (without the chute) on bottom of chute along rim of the bowl. Be sure speed control is OFF and Stand Mixer is unplugged. 2. Assembling Your Pouring Shield* To Attach Wide Mouth Pouring Shield (fits all 5-quart bowl-lift models except the 5-quart KV ...Dough Hook or wire whip) and bowl. 4. Then, rotate opening in down position and remove accessory and bowl. through 1. Slide pouring shield collar around beater shaft, centering collar over rim of Stand Mixer. Fit tabs on the side of pouring chute into place. Slide back half of the shield, ...
... back half of the shield (without the chute) on bottom of chute along rim of the bowl. Be sure speed control is OFF and Stand Mixer is unplugged. 2. Assembling Your Pouring Shield* To Attach Wide Mouth Pouring Shield (fits all 5-quart bowl-lift models except the 5-quart KV ...Dough Hook or wire whip) and bowl. 4. Then, rotate opening in down position and remove accessory and bowl. through 1. Slide pouring shield collar around beater shaft, centering collar over rim of Stand Mixer. Fit tabs on the side of pouring chute into place. Slide back half of the shield, ...
Instruction and Recipe Booklet
Page 16
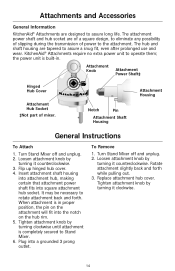
... shaft fits into a grounded 3 prong outlet. Plug into square attachment hub socket. KitchenAid® Attachments require no extra power unit to rotate attachment back and forth. Turn Stand Mixer off and unplug. 2. It may be necessary to operate them; Replace attachment hub...Loosen attachment knob by turning it counterclockwise. Tighten attachment knob by turning it clockwise. 14 Attachments and Accessories General Information KitchenAid® Attachments are designed to Stand Mixer. 6. When attachment is completely secured to assure long life. To Remove 1.
... shaft fits into a grounded 3 prong outlet. Plug into square attachment hub socket. KitchenAid® Attachments require no extra power unit to rotate attachment back and forth. Turn Stand Mixer off and unplug. 2. It may be necessary to operate them; Replace attachment hub...Loosen attachment knob by turning it counterclockwise. Tighten attachment knob by turning it clockwise. 14 Attachments and Accessories General Information KitchenAid® Attachments are designed to Stand Mixer. 6. When attachment is completely secured to assure long life. To Remove 1.


