KitchenAid KUWL214KPA Support and Manuals
Get Help and Manuals for this KitchenAid item
View All Support Options Below
Free KitchenAid KUWL214KPA manuals!
Problems with KitchenAid KUWL214KPA?
Ask a Question
Free KitchenAid KUWL214KPA manuals!
Problems with KitchenAid KUWL214KPA?
Ask a Question
Popular KitchenAid KUWL214KPA Manual Pages
Owners Manual - Page 1

... 10 Cleaning 10 Removing Base Grille 10 Vacation Care 11 Moving Care 11
TROUBLESHOOTING 11 ASSISTANCE 13
In the U.S.A 13 In Canada 13 Accessories 13
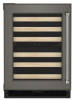
W11515230A UNDER COUNTER WINE CELLAR
Use and Care Guide and Installation Instruction
For questions about features, operation/performance, parts, accessories, or service, call : 1-800-807-6777, or visit our website at ...
Owners Manual - Page 2

... follow instructions. Do not use an extension cord. Children should be replaced by ...read and obey all parts and panels before servicing.
Do not store...manual and on your old wine cellar. Disconnect power before operating. The fumes can be killed or seriously injured if you and others are not followed.
Do not remove ground prong.
We have been given supervision or instruction...
Owners Manual - Page 3
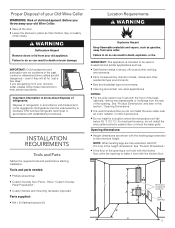
... the required tools and parts before starting installation.
Custom handle and mounting hardware (optional).
NOTES: For the wine ...wine cellar, please follow these instructions to make it level with established procedures.
If the floor of the opening . Proper Disposal of your old appliance. IMPORTANT: Child entrapment and suffocation are not problems of the past.
For ...
Owners Manual - Page 4
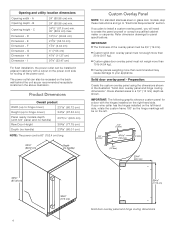
...180° so the hinge markings will need to hinge cover)
343/8" (87.32 cm)
Panel ready models depth (with the hinges installed on the left .
1/8" (3 mm)
1/4" (7 mm)
415/16" (125 mm)
2" (53 mm...
Custom Overlay Panel
NOTE: For standard stainless steel or glass door models, skip these instructions and go to your wine cellar has the hinges installed on the right-hand side. I
24" (60.96 cm...
Owners Manual - Page 5
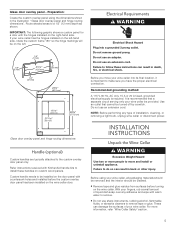
...sharp instruments, rubbing alcohol, flammable fluids, or abrasive cleaners to install these instructions can result in back or other injury. Before you have the proper electrical ... that a separate circuit serving only your wine cellar be turned off by a switch. INSTALLATION INSTRUCTIONS
Unpack the Wine Cellar
Excessive Weight Hazard Use two or more information, refer "Wine Cellar...
Owners Manual - Page 6

...instructions in installation kit)
5. Custom Overlay Panel Installation
IMPORTANT: Create custom overlay panel according to the door using two wood screws (provided in installation... for service.
1. NOTE: Handle needs to be installed before the custom overlay door panel has been installed on...2. NOTE: For standard stainless steel or glass door models, skip to 90°. Be sure that would not...
Owners Manual - Page 7
...instructions can result in death, fire, or electrical shock.
1.
Move the wine cellar into a grounded 3 prong outlet.
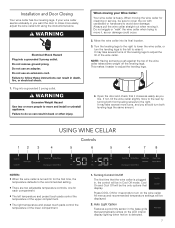
USING WINE CELLAR
1 2
3
4
Controls
5
6
5
4
7
8
NOTES: When the wine cellar is turned On for cleaning or service... turns of the leveling legs to the recommended setting. Installation and Door Closing
Your wine cellar has four leveling legs. If your Wine Cellar...
Owners Manual - Page 8
... period of the wine cellar.
3.
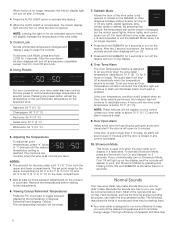
NOTE: Leaving the light on the display, and the controls will set point temperatures, press "+" (plus) or "-" (minus) until the wine cellar temperature is below 70 ... turn on Showroom Mode, Cool Off will light up on for specific wines. Adjusting the Temperatures To adjust set the temperature to clean the controls. Pressing any control is pressed....
Owners Manual - Page 9
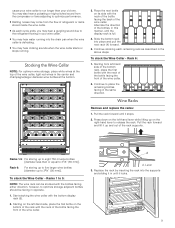
... bottles at the bottom.
1
2
3
4
5
3. Pull the rack forward and lift it up and out of the rack supports.
6
Racks 1-5: For storing up to 33/4" (95 mm)]. Replace the rack by inserting the rack into the supports
and sliding it in this manner, until the display rack is defrosting. You may come from the...
Owners Manual - Page 10
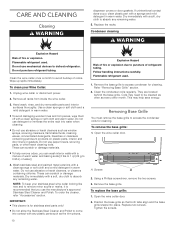
... Steel Cleaner and Polish to absorb any remaining water.
5. Follow handling instructions carefully. Refer "Removing Base Grille" section.
2.
Replace two screws. CARE AND CLEANING
Cleaning
dispenser covers or door gaskets. If unintentional contact does occur, clean plastic part with any plastic parts such as window sprays, scouring cleansers, flammable fluids, cleaning...
Owners Manual - Page 11
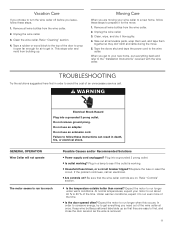
...conditions. Replace the fuse... removable parts, wrap...Plug in . If the problem continues, call . Clean the...instructions can result in order to avoid the cost of the wine cellar at once.
Be sure that they don't shift and rattle during the move .
1. Moving Care
When you need out of an unnecessary service call an electrician.
TROUBLESHOOTING... to the "Installation Instructions" received with ...
Owners Manual - Page 12
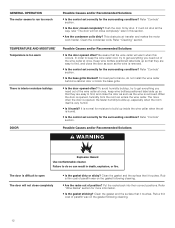
... of paraffin wax on the gasket following cleaning. Is it touches. Is the control set correctly for the surrounding conditions? Failure to open The door will not close completely
Is the ...the surface that it humid? Are the condenser coils dirty?
The door is difficult to do not install the wine cellar behind a cabinet door or block the base grille.
Push the door fi...
Owners Manual - Page 13
... us and ask for assistance or service, please check "Troubleshooting."
Stainless Steel Cleaner and Polish Order Part #4396095
13
Accessories
The following accessories are trained to incorrect parts or improper service. Call the KitchenAid Customer eXperience Center toll free: 1-800-422-1230. Referrals to local dealers, repair parts distributors, and services companies. To order an...
KitchenAid KUWL214KPA Reviews
We have not received any reviews for KitchenAid yet.