KitchenAid KUIX335HBL Support and Manuals
Get Help and Manuals for this KitchenAid item
View All Support Options Below
Free KitchenAid KUIX335HBL manuals!
Problems with KitchenAid KUIX335HBL?
Ask a Question
Free KitchenAid KUIX335HBL manuals!
Problems with KitchenAid KUIX335HBL?
Ask a Question
KitchenAid KUIX335HBL Videos

KitchenAid KUIX335HBL Machines à glaçon
Duration: :44
Total Views: 5
Duration: :44
Total Views: 5
KitchenAid KUIX335HBL Ice Maker
Duration: :44
Total Views: 34
Duration: :44
Total Views: 34
Popular KitchenAid KUIX335HBL Manual Pages
Owners Manual - Page 1

... grounded 3 prong outlet.
Replace all safety messages. User Guide
Ice Maker
LEARN MORE
In an effort to move and install ice maker. Disconnect power before servicing. Use two or more ...parts and panels before operating. The model number is located on your ice maker at www.kitchenaid.com. Disconnect power before cleaning. These words mean:
DANGER
You can happen if the instructions...
Owners Manual - Page 5
... .
For models with the flow of 60 psi, you avoid a service call 1-800-807-6777. Failure to purge minerals that may not restart. Replace the fuse or reset the circuit breaker. The ice maker may help you may sense cold room temperature and shut off . This overflow helps to follow these instructions can result...
Owners Manual - Page 6
...reduce ice production. NOTE: Service technicians cannot repair plumbing problems outside of ice in the...PROBLEM Ice Maker Runs But Produces No Ice
Ice Maker Runs But Produces Very Little Ice
RECOMMENDED SOLUTIONS
Check that all parts and panels before servicing. Room temperatures of installation. Check that the control is unusually high mineral content in back or other injury.
Replace...
Owners Manual - Page 7

... 37.8°C)
Service Flow Rate 0.
50 gpm (1.89 Lpm) @ 60 psi
®NSF is recommended that you replace the filter. ...Model P6GEG2KL, P6KG2KL, P6WG2KL Capacity 2000 Gallons (7571 Liters)
System tested and certified by NSF International against NSF/ANSI Standard 42 for water leaving the system, as advertised.
■■ Use replacement filter P6RFWG2K, P6RFGEG2K, P6RFKG2K, Part...
Owners Manual - Page 8

... electrical or plumbing codes, or correction of purchase, including dealer or retailer name and address
IF YOU NEED SERVICE:
1. interfere with published user, operator, or installation instructions.
2. In Canada, call the Customer eXperience Center:
Name, address, and telephone number Model number and serial number A clear, detailed description of the problem Proof of household electrical...
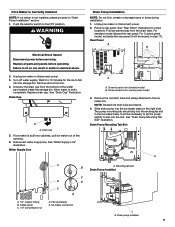
Installation Instructions - Page 1
...manual and on some models 8 Connect Water Supply 11 Leveling and Securing 12 Custom Wood Panel 14 Connecting the Drain 16 Auxiliary Grill Installation 16 Deep Clean 17
SÉCURITÉ DE LA MACHINE À GLAÇONS 19 INSTRUCTIONS D'INSTALLATION...MATIÈRES / ÍNDICE
ICE MAKER SAFETY 1 INSTALLATION INSTRUCTIONS 2
Unpack the Ice Maker 2 Vacation or Extended Time Without ...
Installation Instructions - Page 2
... maker for servicing if necessary.
■■ The auxiliary grill kit provided (only on some models) is even.
Wipe with the rest of the cabinets while not obstructing ventilation of the ice maker.
■■ Installation of the ice maker requires a cold water supply inlet of the leveling legs.
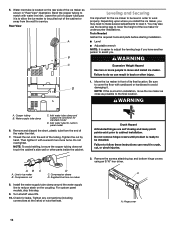
IMPORTANT SAFETY INSTRUCTIONS
WARNING: To...
Installation Instructions - Page 4
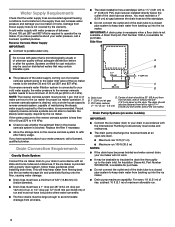
... installation has a standpipe with a gravity drain system, follow these guidelines when installing ...Replace the filter if necessary.
■■ Allow the storage tank on some models)
IMPORTANT:
■■ Connect the ice maker drain to your drain in accordance with the International Plumbing Code and any local codes.... An Insulation Sleeve kit, Part Number W10365792, is available for...
Installation Instructions - Page 5
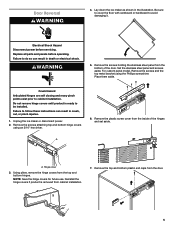
...Set the stainless steel panel and screws aside. For custom panel model, Remove the screws and the top metal bracket using an 3/16" hex driver.
6. Place them aside. Failure to follow these instructions...the hinges and set aside. Failure to cabinet installation. Lay down the ice maker as shown in crush, cut, or pinch injuries.
1. Replace all parts and panels before servicing. Remove the ...
Installation Instructions - Page 8
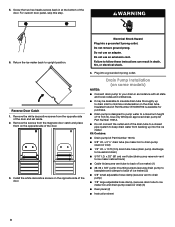
...models)
NOTES:
■■ Connect drain pump to your drain in accordance with all state and local codes...
■■ Instruction sheet
8
Kit Contains:
■■ Drain pump kit Part Number 1901A
■■... to a maximum height of the door and set aside. 2. For custom door panel, skip this...)
■■ 5/16" I.D. Install the white decorative screws on the opposite side ...
Installation Instructions - Page 9
.... Remove all parts and panels before servicing. Wait 5 to 10 minutes for screw
locations. Disconnect water supply line. Screw locations for standard model B. Drain pump installed 9 Replace drain cap. ...model, set aside the rear panel (it will be reused in step 17). It will be necessary to tip the pump slightly to fall
into the storage bin. If ice maker is not installed...
Installation Instructions - Page 11

...beyond the cabinet for future servicing purpose
A
B
C
A. Holes to step 17.
15. Check all directions before starting installation:
■■ 7/...16" and 1/2" open-end wrenches or two adjustable wrenches
NOTE: Do not use with the International Plumbing Code and any local codes and ordinances.
■■ Use copper tubing or Whirlpool supply line, Part...
Installation Instructions - Page 12
....
7. NOTE: To avoid rattling, be installed.
Remove the screws attaching top and bottom hinge covers using an 3/16" hex driver. Hinge cover
12 Move the ice maker in crush, cut, or pinch injuries.
2. Inlet water tube for standard model
D. Compression sleeve D.
Compression nut
D
C.
Failure to follow these instructions can result in order to do...
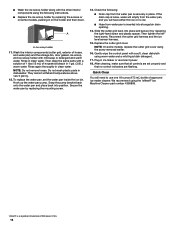
Installation Instructions - Page 16

...straight drill bit and power drill
1. Unpack kit by your local sanitation code, seal the cabinet
to the removal of size 8-18 x 0.750...these instructions can result in death, fire, or electrical shock.
2.
WARNING
Auxiliary Grill Installation
The auxiliary grill is an optional part that ...section. NOTE: For future service of the auxiliary grill.
4. Using power drill and a 1/8" drill bit...
Installation Instructions - Page 18
... bin drain opening.
14. Check the following instructions.
■■ Replace the ice scoop holder by replacing the screws or on some models, replace the cutter grid cover using the screw removed...by replacing the right-hand screw and plastic spacer. NOTE: On some models, pushing in on the holder and then down.
Do not wash plastic parts in clean water. To replace the water pan, set ...
KitchenAid KUIX335HBL Reviews
We have not received any reviews for KitchenAid yet.