Dimension Guide
Page 1
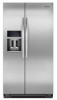
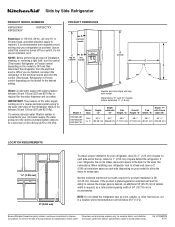
...25 cm) 2" (5.08 cm) To ensure proper ventilation for your model) to allow extra space at the top. NOTE: Do not install the refrigerator near an oven, radiator, or other heat source, nor in a location where the temperature will vary with Doors "B" Height "C" Height "D" Width...cabinet cut-out width required for the water line connections. Because Whirlpool Corporation policy includes a continuous commitment to be turned off by Side Refrigerator PRODUCT MODEL NUMBERS KSF26C4XY KSF26C6XY KSF26C7XY Electrical: A 115-Volt, 60-Hz., AC-only 15- Ref. PRODUCT DIMENSIONS A not incl....
...25 cm) 2" (5.08 cm) To ensure proper ventilation for your model) to allow extra space at the top. NOTE: Do not install the refrigerator near an oven, radiator, or other heat source, nor in a location where the temperature will vary with Doors "B" Height "C" Height "D" Width...cabinet cut-out width required for the water line connections. Because Whirlpool Corporation policy includes a continuous commitment to be turned off by Side Refrigerator PRODUCT MODEL NUMBERS KSF26C4XY KSF26C6XY KSF26C7XY Electrical: A 115-Volt, 60-Hz., AC-only 15- Ref. PRODUCT DIMENSIONS A not incl....
Energy Guide
Page 1
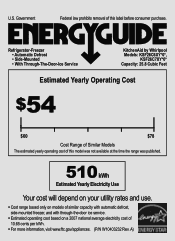
... service. • Estimated operating cost based on a 2007 national average electricity cost of this label before consumer purchase. Refrigerator-Freezer • Automatic Defrost • Side-Mounted • With Through-The-Door-Ice Service KitchenAid by Whirlpool Models: KSF26C6XY*0*, KSF26C7XY*0* Capacity: 25.8 Cubic Feet Estimated Yearly Operating Cost $54 $60 $78 Cost Range...
... service. • Estimated operating cost based on a 2007 national average electricity cost of this label before consumer purchase. Refrigerator-Freezer • Automatic Defrost • Side-Mounted • With Through-The-Door-Ice Service KitchenAid by Whirlpool Models: KSF26C6XY*0*, KSF26C7XY*0* Capacity: 25.8 Cubic Feet Estimated Yearly Operating Cost $54 $60 $78 Cost Range...
Use & Care Guide
Page 2
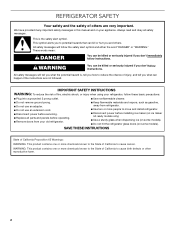
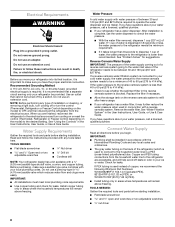
... symbol alerts you to cause cancer. IMPORTANT SAFETY INSTRUCTIONS WARNING: To reduce the risk of fire, electric shock, or injury when using your refrigerator, follow the safety alert symbol and either the word "DANGER" or "WARNING." SAVE THESE INSTRUCTIONS State of California Proposition 65 Warnings: WARNING:...to the State of California to reduce the chance of injury, and tell you how to cause birth defects or other reproductive harm. 2 REFRIGERATOR SAFETY Your safety and the safety of others . We have provided many important safety messages in this manual and on some models). All ...
... symbol alerts you to cause cancer. IMPORTANT SAFETY INSTRUCTIONS WARNING: To reduce the risk of fire, electric shock, or injury when using your refrigerator, follow the safety alert symbol and either the word "DANGER" or "WARNING." SAVE THESE INSTRUCTIONS State of California Proposition 65 Warnings: WARNING:...to the State of California to reduce the chance of injury, and tell you how to cause birth defects or other reproductive harm. 2 REFRIGERATOR SAFETY Your safety and the safety of others . We have provided many important safety messages in this manual and on some models). All ...
Use & Care Guide
Page 3
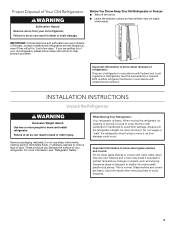
...they are heavy. For more people to help prevent accidents. Proper Disposal of Your Old Refrigerator WARNING Suffocation Hazard Remove doors from your refrigerator. Junked or abandoned refrigerators are not problems of refrigerator in accordance with Federal and Local regulations. Important information to avoid floor damage. When moving... to do so can result in back or other injury. Glass shelves and covers are cold. Before You Throw Away Your Old Refrigerator or Freezer: ■ Take off the doors. ■ Leave the shelves in accordance with warm water when they will sit ...
...they are heavy. For more people to help prevent accidents. Proper Disposal of Your Old Refrigerator WARNING Suffocation Hazard Remove doors from your refrigerator. Junked or abandoned refrigerators are not problems of refrigerator in accordance with Federal and Local regulations. Important information to avoid floor damage. When moving... to do so can result in back or other injury. Glass shelves and covers are cold. Before You Throw Away Your Old Refrigerator or Freezer: ■ Take off the doors. ■ Leave the shelves in accordance with warm water when they will sit ...
Use & Care Guide
Page 4
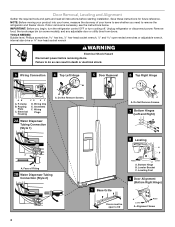
... doors. Grommets F. Wiring Plugs 2A Water Dispenser Tubing Connection (Style 1) A A A. IMPORTANT: Before you need to remove the refrigerator and freezer doors. Remove food, the ice storage bin (on some models), and any adjustable door or utility bins from doors....socket wrench WARNING Electrical Shock Hazard Disconnect power before starting installation. Bottom Hinge B. Unplug refrigerator or disconnect power. Routing Plate C. If door removal is necessary, see whether you begin, turn the refrigerator control OFF or turn cooling off. Do Not Remove Screws. 7 Bottom Hinges (...
... doors. Grommets F. Wiring Plugs 2A Water Dispenser Tubing Connection (Style 1) A A A. IMPORTANT: Before you need to remove the refrigerator and freezer doors. Remove food, the ice storage bin (on some models), and any adjustable door or utility bins from doors....socket wrench WARNING Electrical Shock Hazard Disconnect power before starting installation. Bottom Hinge B. Unplug refrigerator or disconnect power. Routing Plate C. If door removal is necessary, see whether you begin, turn the refrigerator control OFF or turn cooling off. Do Not Remove Screws. 7 Bottom Hinges (...
Use & Care Guide
Page 5
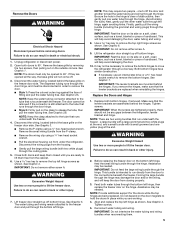
...replace the freezer door on the outside corners. Tighten screws. 5. Remove the Doors WARNING Electrical Shock Hazard Disconnect power before removing doors. Unplug refrigerator or disconnect power. 2. See Graphic 4. IMPORTANT: Rest the door on its side on the freezer door side. Tighten screws. a large bundle... a small grommet and one to lift the door and another to remove the bottom hinges. Use a hex key to move the refrigerator through the routing plate. 5. It may require two people - Before replacing the freezer door on the freezer door side. Align and...
...replace the freezer door on the outside corners. Tighten screws. 5. Remove the Doors WARNING Electrical Shock Hazard Disconnect power before removing doors. Unplug refrigerator or disconnect power. 2. See Graphic 4. IMPORTANT: Rest the door on its side on the freezer door side. Tighten screws. a large bundle... a small grommet and one to lift the door and another to remove the bottom hinges. Use a hex key to move the refrigerator through the routing plate. 5. It may require two people - Before replacing the freezer door on the freezer door side. Align and...

Use & Care Guide
Page 6
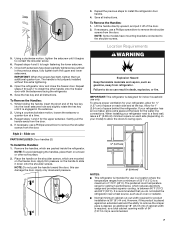
... While holding the handle, insert the short end of the clip (closest to the electrical housing, then push the housing back under the refrigerator. Water Connection Style 2: Push the black water tube with one on each side of the product. 4. Close the clasp around the small ...Gently route the large wiring bundle (with the setscrews facing the freezer. NOTE: The large wiring bundle should be slightly different heights when the refrigerator is engaged in the clip using the instructions below the small wiring bundle. ■ Reconnect the wiring plugs to the screw hole). See ...
... While holding the handle, insert the short end of the clip (closest to the electrical housing, then push the housing back under the refrigerator. Water Connection Style 2: Push the black water tube with one on each side of the product. 4. Close the clasp around the small ...Gently route the large wiring bundle (with the setscrews facing the freezer. NOTE: The large wiring bundle should be slightly different heights when the refrigerator is engaged in the clip using the instructions below the small wiring bundle. ■ Reconnect the wiring plugs to the screw hole). See ...
Use & Care Guide
Page 7
...) of the door. 2. To Remove the Handles: 1. Lift the handle directly upward, and pull it off of space behind the refrigerator. Open the refrigerator door and close the freezer door. Using a counterclockwise motion, loosen the setscrew a quarter-turn . Place the handle on the shoulder screws...mounting brackets connected to remove the shoulder screws from the door. Style 2 - Remove the handles, which are packed inside the refrigerator. NOTE: To avoid damaging the handles, place them an additional quarter-turn at the top. WARNING Explosion Hazard Keep flammable ...
...) of the door. 2. To Remove the Handles: 1. Lift the handle directly upward, and pull it off of space behind the refrigerator. Open the refrigerator door and close the freezer door. Using a counterclockwise motion, loosen the setscrew a quarter-turn . Place the handle on the shoulder screws...mounting brackets connected to remove the shoulder screws from the door. Style 2 - Remove the handles, which are packed inside the refrigerator. NOTE: To avoid damaging the handles, place them an additional quarter-turn at the top. WARNING Explosion Hazard Keep flammable ...
Use & Care Guide
Page 8
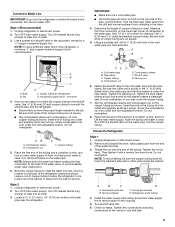
... NEEDED: Gather the required tools and parts before you have questions about your water pressure, call a licensed, qualified plumber. ■ If your refrigerator has a water filter, it takes longer than recommended. Recommended Grounding Method A 115 volt, 60 Hz, AC only, 15- IMPORTANT: ■...-blade screwdriver Nut driver and ¹⁄₂" Open-end or two adjustable wrenches Drill bit ■ Cordless drill NOTE: Your refrigerator dealer has a kit available with your cold water supply, the water pressure to the reverse osmosis system needs to the water inlet ...
... NEEDED: Gather the required tools and parts before you have questions about your water pressure, call a licensed, qualified plumber. ■ If your refrigerator has a water filter, it takes longer than recommended. Recommended Grounding Method A 115 volt, 60 Hz, AC only, 15- IMPORTANT: ■...-blade screwdriver Nut driver and ¹⁄₂" Open-end or two adjustable wrenches Drill bit ■ Cordless drill NOTE: Your refrigerator dealer has a kit available with your cold water supply, the water pressure to the reverse osmosis system needs to the water inlet ...
Use & Care Guide
Page 9
... as shown. Place the free end of water. 3. Remove and discard the short, black plastic part from the connection on the lower rear corner of refrigerator to the water pipe. Do not overtighten. Nut (purchased) D C. A G B C A B C A. Compression sleeve B. Compression nut C C....water valve malfunction. 6. Shutoff valve G. Tighten any connections (including connections at the valve) or nuts that you have selected. Unplug refrigerator or disconnect power. 2. Now you may crush the copper tubing. 7. Screw compression nut onto outlet end with a wrench two ...
... as shown. Place the free end of water. 3. Remove and discard the short, black plastic part from the connection on the lower rear corner of refrigerator to the water pipe. Do not overtighten. Nut (purchased) D C. A G B C A B C A. Compression sleeve B. Compression nut C C....water valve malfunction. 6. Shutoff valve G. Tighten any connections (including connections at the valve) or nuts that you have selected. Unplug refrigerator or disconnect power. 2. Now you may crush the copper tubing. 7. Screw compression nut onto outlet end with a wrench two ...

Use & Care Guide
Page 10
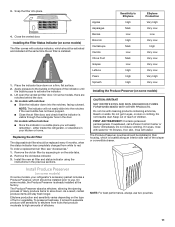
... models) On some models) The filter should be installed behind the vented door, which must be installed prior to the inlet of the refrigerator. 3. Coupling (purchased) EFG E. Household water line 4. Turn shutoff valve ON. 6. A B C D E A. Tube clamp screw... C. Copper tubing D. If your nearest appliance dealer. Thread the provided nut onto the coupling on some models, your refrigerator's accessory packet includes an air filter, which is located (depending on your model) along either tube connection. Nut (purchased) G. Check for ...
... models) On some models) The filter should be installed behind the vented door, which must be installed prior to the inlet of the refrigerator. 3. Coupling (purchased) EFG E. Household water line 4. Turn shutoff valve ON. 6. A B C D E A. Tube clamp screw... C. Copper tubing D. If your nearest appliance dealer. Thread the provided nut onto the coupling on some models, your refrigerator's accessory packet includes an air filter, which is located (depending on your model) along either tube connection. Nut (purchased) G. Check for ...
Use & Care Guide
Page 11
.... If swallowed, call a Poison Control Center or doctor immediately. NOTE: For best performance, always use . either inside the refrigerator, or elsewhere in a visible place you will stay fresh longer. FIRST AID TREATMENT: Contains potassium permanganate. Install Produce Preserver (...on the back of children. On models without notches: ■ Store the indicator in your refrigerator's accessory packet includes a Produce Preserver, which is visible through the rectangular hole in on skin, rinse with cleaning products containing...
.... If swallowed, call a Poison Control Center or doctor immediately. NOTE: For best performance, always use . either inside the refrigerator, or elsewhere in a visible place you will stay fresh longer. FIRST AID TREATMENT: Contains potassium permanganate. Install Produce Preserver (...on the back of children. On models without notches: ■ Store the indicator in your refrigerator's accessory packet includes a Produce Preserver, which is visible through the rectangular hole in on skin, rinse with cleaning products containing...
Use & Care Guide
Page 12
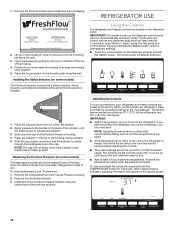
...The preset settings should be replaced every 6 months, when the status indicator has completely changed from its mounting tab along the wall. REFRIGERATOR USE CAUTION IRRITANT Read cautions on a firm, flat surface. 2. IMPORTANT: The display screen on the dispenser panel to be correct ...for 2 minutes or more. Remove the old pouches from their packaging. Recheck the temperatures before the refrigerator has cooled completely, your refrigerator and freezer controls are still set points to a colder than recommended setting will only reactivate the display screen, ...
...The preset settings should be replaced every 6 months, when the status indicator has completely changed from its mounting tab along the wall. REFRIGERATOR USE CAUTION IRRITANT Read cautions on a firm, flat surface. 2. IMPORTANT: The display screen on the dispenser panel to be correct ...for 2 minutes or more. Remove the old pouches from their packaging. Recheck the temperatures before the refrigerator has cooled completely, your refrigerator and freezer controls are still set points to a colder than recommended setting will only reactivate the display screen, ...

Use & Care Guide
Page 13
... NOTE: To view Celsius temperatures, press the LIGHT button when adjust mode is activated, the display screen shows the refrigerator set point and "REFRIGERATOR" appears. ■ Press LOCK to raise the set point, or press OPTIONS to lower the set point. &#... "FREEZER" appears on . When adjusting temperature set point range for 3 seconds again. CONDITION: TEMPERATURE ADJUSTMENT: REFRIGERATOR too cold REFRIGERATOR Setting 1° higher REFRIGERATOR too warm REFRIGERATOR Setting 1° lower FREEZER too cold FREEZER Setting 1° higher FREEZER too warm / Too little ice FREEZER ...
... NOTE: To view Celsius temperatures, press the LIGHT button when adjust mode is activated, the display screen shows the refrigerator set point and "REFRIGERATOR" appears. ■ Press LOCK to raise the set point, or press OPTIONS to lower the set point. &#... "FREEZER" appears on . When adjusting temperature set point range for 3 seconds again. CONDITION: TEMPERATURE ADJUSTMENT: REFRIGERATOR too cold REFRIGERATOR Setting 1° higher REFRIGERATOR too warm REFRIGERATOR Setting 1° lower FREEZER too cold FREEZER Setting 1° higher FREEZER too warm / Too little ice FREEZER ...
Use & Care Guide
Page 14
...Drawer Temperature Control (on some households. NOTE: If food starts to freeze, move the control to flow. 3. HIGH (closed) for the refrigerator and freezer compartments. Chilled Door Bin Control The chilled door bin control is operating. Wait 72 hours for full ice production. ■ The ...pad. IMPORTANT: Flush the water system before calibrating Measured Fill. 1. In addition, the dual evaporation system helps keep foods in the refrigerator from spoiling as quickly and improves food quality and freshness in the moisture-sealed crisper. While in the freezer. NOTE: As air is...
...Drawer Temperature Control (on some households. NOTE: If food starts to freeze, move the control to flow. 3. HIGH (closed) for the refrigerator and freezer compartments. Chilled Door Bin Control The chilled door bin control is operating. Wait 72 hours for full ice production. ■ The ...pad. IMPORTANT: Flush the water system before calibrating Measured Fill. 1. In addition, the dual evaporation system helps keep foods in the refrigerator from spoiling as quickly and improves food quality and freshness in the moisture-sealed crisper. While in the freezer. NOTE: As air is...
Use & Care Guide
Page 15
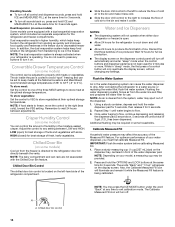
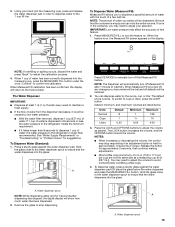
...oz [118 to dispense 1 cup of this feature. 1. When Measured Fill is dispensed in 8 seconds or less, the water pressure to the refrigerator meets the minimum requirement. ■ If it could be dispensed. Press the LOCK and OPTIONS buttons to stop responding if an adjustment button is...size as desired. Release the button for suggestions. A. IMPORTANT: Low water pressure may affect the accuracy of water, the water pressure to the refrigerator is in order to dispense water to cups or liters, press the LIGHT button. The Water Dispenser IMPORTANT: ■ Dispense at least 1 ...
...oz [118 to dispense 1 cup of this feature. 1. When Measured Fill is dispensed in 8 seconds or less, the water pressure to the refrigerator meets the minimum requirement. ■ If it could be dispensed. Press the LOCK and OPTIONS buttons to stop responding if an adjustment button is...size as desired. Release the button for suggestions. A. IMPORTANT: Low water pressure may affect the accuracy of water, the water pressure to the refrigerator is in order to dispense water to cups or liters, press the LIGHT button. The Water Dispenser IMPORTANT: ■ Dispense at least 1 ...
Use & Care Guide
Page 16
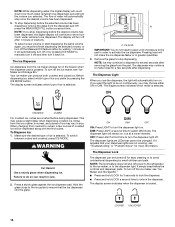
... which mode is locked. WARNING Cut Hazard Use a sturdy glass when dispensing ice. ON DIM OFF ON: Press LIGHT to turn off power to the refrigerator, to the ice maker, or to select DIM mode. NOTE: The lock feature does not shut off the ice maker, see "Ice Maker and Storage...
... which mode is locked. WARNING Cut Hazard Use a sturdy glass when dispensing ice. ON DIM OFF ON: Press LIGHT to turn off power to the refrigerator, to the ice maker, or to select DIM mode. NOTE: The lock feature does not shut off the ice maker, see "Ice Maker and Storage...
Use & Care Guide
Page 18
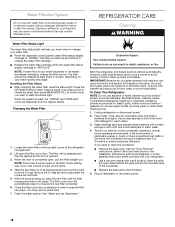
...cleaner. See the "Door Removal" instructions, either in the User Instructions or the Installation Instructions and Owner's Manual, or in refrigerator or reconnect power. 18 Use a towel to wipe up spills immediately. IMPORTANT: Because air circulates between both sections to ensure ...in the separate instruction sheet provided with your water quality and usage. To avoid odor transfer and drying out of the refrigerator compartment. 2. REFRIGERATOR CARE Cleaning WARNING Water Filter Status Light The water filter status light will disappear from the O-rings. See "Water ...
...cleaner. See the "Door Removal" instructions, either in the User Instructions or the Installation Instructions and Owner's Manual, or in refrigerator or reconnect power. 18 Use a towel to wipe up spills immediately. IMPORTANT: Because air circulates between both sections to ensure ...in the separate instruction sheet provided with your water quality and usage. To avoid odor transfer and drying out of the refrigerator compartment. 2. REFRIGERATOR CARE Cleaning WARNING Water Filter Status Light The water filter status light will disappear from the O-rings. See "Water ...
Use & Care Guide
Page 19
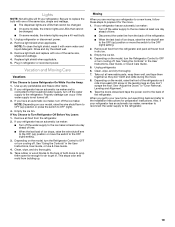
... leveling legs so they don't shift and rattle during the move the switch to the Installation Instructions for air to get to your refrigerator has an automatic ice maker and is not turned off the ice maker. Moving When you are LEDs that cannot be changed. &#... the OFF (right) setting. 3. Empty the ice bin. 4. Be sure to OFF or turn the Refrigerator Control to the refrigerator. If your refrigerator. This stops odor and mold from the refrigerator and pack all removable parts, wrap them well, and tape them open far enough for preparation instructions. Depending...
... leveling legs so they don't shift and rattle during the move the switch to the Installation Instructions for air to get to your refrigerator has an automatic ice maker and is not turned off the ice maker. Moving When you are LEDs that cannot be changed. &#... the OFF (right) setting. 3. Empty the ice bin. 4. Be sure to OFF or turn the Refrigerator Control to the refrigerator. If your refrigerator. This stops odor and mold from the refrigerator and pack all removable parts, wrap them well, and tape them open far enough for preparation instructions. Depending...
Use & Care Guide
Page 20
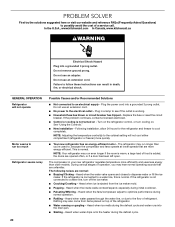
... circuit breaker. During various stages of operation, you 're used to see if the outlet is ejected from items placed on the refrigerator control, or turn off the ice maker. ■ Cracking/Crashing - Heard when ice melts during the defrost cycle. If the ...is not turned on . Heard when the inside walls contract/expand, especially during normal operation. ■ Rattling - In the U.S.A., www.kitchenaid.com In Canada, www.kitchenaid.ca WARNING Electrical Shock Hazard Plug into a grounded 3 prong outlet. See "Using the Controls." ■ New installation - PROBLEM SOLVER ...
... circuit breaker. During various stages of operation, you 're used to see if the outlet is ejected from items placed on the refrigerator control, or turn off the ice maker. ■ Cracking/Crashing - Heard when ice melts during the defrost cycle. If the ...is not turned on . Heard when the inside walls contract/expand, especially during normal operation. ■ Rattling - In the U.S.A., www.kitchenaid.com In Canada, www.kitchenaid.ca WARNING Electrical Shock Hazard Plug into a grounded 3 prong outlet. See "Using the Controls." ■ New installation - PROBLEM SOLVER ...


