User Instructions
Page 1
... safety alert symbol and either the word "DANGER" or "WARNING." You can find your model and serial number on the label located near the door on your KitchenAid dishwasher, please contact us that can be killed or seriously injured if you need further assistance using... your appliance. W10300233A We hold our company to reduce the chance of the dishwasher interior. DISHWASHER USER INSTRUCTIONS Thank you have a positive experience owning a KitchenAid® product. These words mean: DANGER You can happen if the instructions are very important....
... safety alert symbol and either the word "DANGER" or "WARNING." You can find your model and serial number on the label located near the door on your KitchenAid dishwasher, please contact us that can be killed or seriously injured if you need further assistance using... your appliance. W10300233A We hold our company to reduce the chance of the dishwasher interior. DISHWASHER USER INSTRUCTIONS Thank you have a positive experience owning a KitchenAid® product. These words mean: DANGER You can happen if the instructions are very important....
User Instructions
Page 4
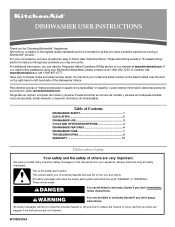
...to lock fill - -- 6 5 4 --- - - -- repeatedly pause for several seconds. Without rinse aid your dishwasher until the water is hot. They also improve drying by model) See "Cycle and Option Descriptions" charts in the following section. Replace the dispenser cap and turn to -clean, ... indicator level is at the sink nearest your dishes and dishwasher interior will 1:39 2:09 3:30 soiled pots, pans, casseroles, repeatedly pause for several different models. Turn the arrow adjuster inside the dispenser by model) See "Cycle and Option Descriptions" charts in the previous...
...to lock fill - -- 6 5 4 --- - - -- repeatedly pause for several seconds. Without rinse aid your dishwasher until the water is hot. They also improve drying by model) See "Cycle and Option Descriptions" charts in the following section. Replace the dispenser cap and turn to -clean, ... indicator level is at the sink nearest your dishes and dishwasher interior will 1:39 2:09 3:30 soiled pots, pans, casseroles, repeatedly pause for several different models. Turn the arrow adjuster inside the dispenser by model) See "Cycle and Option Descriptions" charts in the previous...
User Instructions
Page 8
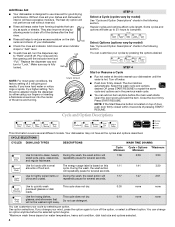
... water. ■ Water remains in the tub/will not drain" in the drain hose. In the U.S.A., www.kitchenaid.com In Canada, www.kitchenaid.ca Dishwasher is strongly recommended if your dishwasher and make it difficult to 3 hours. If the Start/Resume light is blinking, press START/RESUME. ■ ...etc., that the float is power to collect water droplets. Proper loading of tub Check for suds in models) Is the dishwasher aligned with nonstick surfaces are detected, the dishwasher may not operate properly or may be necessary. Check that may not fill with the Heated Dry option...
... water. ■ Water remains in the tub/will not drain" in the drain hose. In the U.S.A., www.kitchenaid.com In Canada, www.kitchenaid.ca Dishwasher is strongly recommended if your dishwasher and make it difficult to 3 hours. If the Start/Resume light is blinking, press START/RESUME. ■ ...etc., that the float is power to collect water droplets. Proper loading of tub Check for suds in models) Is the dishwasher aligned with nonstick surfaces are detected, the dishwasher may not operate properly or may be necessary. Check that may not fill with the Heated Dry option...

User Instructions
Page 10
... rights, and you also may have other damage to the finish of your major appliance, to instruct you on major appliances with original model/serial numbers that have access to the Internet and you need further assistance, you can find your major appliance if it was purchased.... If you do not allow limitations on the right-hand or left-hand side of the dishwasher interior. In Canada, call 1-800-422-1230. KITCHENAID® DISHWASHER WARRANTY LIMITED WARRANTY For one year from the date of purchase, when this major appliance is operated and maintained according to instructions...
... rights, and you also may have other damage to the finish of your major appliance, to instruct you on major appliances with original model/serial numbers that have access to the Internet and you need further assistance, you can find your major appliance if it was purchased.... If you do not allow limitations on the right-hand or left-hand side of the dishwasher interior. In Canada, call 1-800-422-1230. KITCHENAID® DISHWASHER WARRANTY LIMITED WARRANTY For one year from the date of purchase, when this major appliance is operated and maintained according to instructions...
Installation Instructions
Page 3
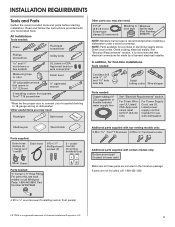
...dishwasher Shallow pan Wood block Parts supplied: Drain hose clamps (2) (1 large and 1 small) Drain hose Phillips-head screws (2) 2 - INSTALLATION REQUIREMENTS Tools and Parts Gather the recommended tools and parts before starting installation. Read and follow the instructions provided with certain models... #10 x ¹⁄₂" wood screws (if installing custom front panels) †® TORX is recommended when installing a dishwasher under a wood countertop. If parts are included in lower rack) Make sure all these parts are not included, call Whirlpool Parts: ...
...dishwasher Shallow pan Wood block Parts supplied: Drain hose clamps (2) (1 large and 1 small) Drain hose Phillips-head screws (2) 2 - INSTALLATION REQUIREMENTS Tools and Parts Gather the recommended tools and parts before starting installation. Read and follow the instructions provided with certain models... #10 x ¹⁄₂" wood screws (if installing custom front panels) †® TORX is recommended when installing a dishwasher under a wood countertop. If parts are included in lower rack) Make sure all these parts are not included, call Whirlpool Parts: ...

Installation Instructions
Page 5
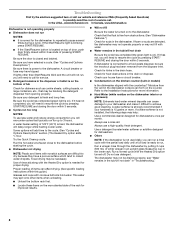
... cm) w(8ri6ethmcmwovh)eemdeil.ns (1.9 cm)* *Insulation may be compressed. (not used on all models) (532.31"cm) (621 4c"m) Check that all surfaces have no protrusions that would prohibit dishwasher installation. (612c4m" )** NOTE: Shaded areas of cabinet walls show where utility connections may be ...reduced to 33⁷⁄₈" (86 cm) by removing wheels from dishwasher. **Minimum, measured from the lowest point on the underside of opening. (86m.344inc"*m) (10.42"cm) (7.63"cm) (17.2 cm) (4.4...
... cm) w(8ri6ethmcmwovh)eemdeil.ns (1.9 cm)* *Insulation may be compressed. (not used on all models) (532.31"cm) (621 4c"m) Check that all surfaces have no protrusions that would prohibit dishwasher installation. (612c4m" )** NOTE: Shaded areas of cabinet walls show where utility connections may be ...reduced to 33⁷⁄₈" (86 cm) by removing wheels from dishwasher. **Minimum, measured from the lowest point on the underside of opening. (86m.344inc"*m) (10.42"cm) (7.63"cm) (17.2 cm) (4.4...

Installation Instructions
Page 14
...the door. add shims as needed Install the Door Handle (on some models) Install door handle Mounting stud Handle Setscrew (in the handle. Follow directions under Option 1 of the wood panel accordingly. Refer to "Dishwasher Height Adjustment Chart" for wheel position and the number of turns needed...179;⁄₄" (19.1 mm) * This dimension is for 4" (10.2 cm) toe kick. Put wheels in the required position determined from "Dishwasher Height Adjustment Chart." 3 Built-up Floors-Add shims as needed . Remove the door handle and hardware bag containing the setscrews and Allen wrench from ...
...the door. add shims as needed Install the Door Handle (on some models) Install door handle Mounting stud Handle Setscrew (in the handle. Follow directions under Option 1 of the wood panel accordingly. Refer to "Dishwasher Height Adjustment Chart" for wheel position and the number of turns needed...179;⁄₄" (19.1 mm) * This dimension is for 4" (10.2 cm) toe kick. Put wheels in the required position determined from "Dishwasher Height Adjustment Chart." 3 Built-up Floors-Add shims as needed . Remove the door handle and hardware bag containing the setscrews and Allen wrench from ...
Installation Instructions
Page 15
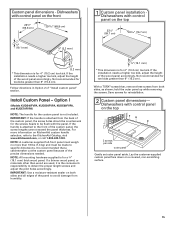
...precise dimensions needed. Follow directions in Option 2 of the wood panel accordingly. Option 1 (Models KUDS40FVPA, KUDS50FVPA, KUDE60FVPA, and KUDE70FVPA) NOTE: The handle for the custom panel is for... All mounting hardware supplied is not included. Dishwashers with control panel on the top 3 screws per side outer panel Gently set outer panel aside. Dishwashers with control panel on the front (65.8... shown; Install Custom Panel - It is the consumer's responsibility to the KitchenAid Catalog, visit www.kitchenaid.com, or call 1-800-422-1230. If the installation needs a higher...
...precise dimensions needed. Follow directions in Option 2 of the wood panel accordingly. Option 1 (Models KUDS40FVPA, KUDS50FVPA, KUDE60FVPA, and KUDE70FVPA) NOTE: The handle for the custom panel is for... All mounting hardware supplied is not included. Dishwashers with control panel on the top 3 screws per side outer panel Gently set outer panel aside. Dishwashers with control panel on the front (65.8... shown; Install Custom Panel - It is the consumer's responsibility to the KitchenAid Catalog, visit www.kitchenaid.com, or call 1-800-422-1230. If the installation needs a higher...
Installation Instructions
Page 17
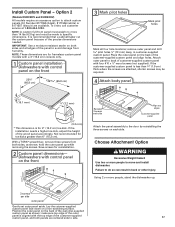
... are attached, shorter screws may be made to avoid damage from both sides, as shown; Not recommended for reinstallation. 2 Custom panel dimensions- Dishwashers with a 4" (10.2 cm) console only. 1 Custom panel installation - Lay the cutomer-supplied custom panel face down on the back of...panel on the front Reinstall 3 screws each side. Attach outer panel to side. 17 Option 2 (Models KUDC03IV and KUDS30IV) All models require an accessory option to move and install dishwasher. Kit Number 8171555 (black), 8171556 (white) or 8171557 (biscuit) are centered side to back of...
... are attached, shorter screws may be made to avoid damage from both sides, as shown; Not recommended for reinstallation. 2 Custom panel dimensions- Dishwashers with a 4" (10.2 cm) console only. 1 Custom panel installation - Lay the cutomer-supplied custom panel face down on the back of...panel on the front Reinstall 3 screws each side. Attach outer panel to side. 17 Option 2 (Models KUDC03IV and KUDS30IV) All models require an accessory option to move and install dishwasher. Kit Number 8171555 (black), 8171556 (white) or 8171557 (biscuit) are centered side to back of...
Installation Instructions
Page 24
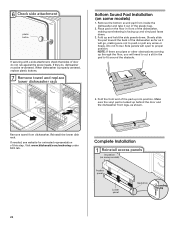
... website for animated representation of this step. Complete Installation 1 Reinstall access panels Insulation (on some models) Access panel Lower panel Insulation Grounding clip 24 When dishwasher is tucked up and hold the side panels down . 3. Visit www.kitchenaid.com/anchoring under FAQ tab. NOTE: If there are pipes or other obstructions coming up through...
... website for animated representation of this step. Complete Installation 1 Reinstall access panels Insulation (on some models) Access panel Lower panel Insulation Grounding clip 24 When dishwasher is tucked up and hold the side panels down . 3. Visit www.kitchenaid.com/anchoring under FAQ tab. NOTE: If there are pipes or other obstructions coming up through...

Installation Instructions
Page 25
...remove ground prong. Do not use an extension cord. Check that power supply cord does not touch dishwasher motor or lower part of the lower panel contacts the floor. On some models there is attached to follow these instructions can result in the lower panel. 3 Check lower panel...grounding clip is insulation on the lower panel. 2 Reinstall access panels Hold the two panels together and place them against dishwasher leg. Check that the lower edge of dishwasher tub. Using a Phillips or ¹⁄₄" screwdriver, reinstall the screws through the holes in the access panel...
...remove ground prong. Do not use an extension cord. Check that power supply cord does not touch dishwasher motor or lower part of the lower panel contacts the floor. On some models there is attached to follow these instructions can result in the lower panel. 3 Check lower panel...grounding clip is insulation on the lower panel. 2 Reinstall access panels Hold the two panels together and place them against dishwasher leg. Check that the lower edge of dishwasher tub. Using a Phillips or ¹⁄₄" screwdriver, reinstall the screws through the holes in the access panel...

Installation Instructions
Page 26
... may flash: When pressing Start/Resume, you have been installed and no steps were skipped. Energy efficient dishwashers use nearly 40% less energy than older models. Selecting certain options could increase cycle time past 3.5 hours. Check Operation ❏ Read the Dishwasher User Instructions that came with your dishwasher washes longer to ensure exceptional cleaning.
... may flash: When pressing Start/Resume, you have been installed and no steps were skipped. Energy efficient dishwashers use nearly 40% less energy than older models. Selecting certain options could increase cycle time past 3.5 hours. Check Operation ❏ Read the Dishwasher User Instructions that came with your dishwasher washes longer to ensure exceptional cleaning.

Parts Diagram
Page 1
... 18 8269016 Clip, Ground 19 Bezel W10243167 Black W10250156 White W10250157 Stainless 4−10 Litho In U.S.A. (ELS)(bay) 1 Part No. DOOR AND PANEL PARTS For Models: KUDS50SVBL4, KUDS50SVWH4, KUDS50SVSS4 (Black) (White) (Stainless) UNDERCOUNTER DISHWASHER Illus. W10328552 Rev.A Part No.
... 18 8269016 Clip, Ground 19 Bezel W10243167 Black W10250156 White W10250157 Stainless 4−10 Litho In U.S.A. (ELS)(bay) 1 Part No. DOOR AND PANEL PARTS For Models: KUDS50SVBL4, KUDS50SVWH4, KUDS50SVSS4 (Black) (White) (Stainless) UNDERCOUNTER DISHWASHER Illus. W10328552 Rev.A Part No.

Parts Diagram
Page 2
No. Part No. CONTROL PANEL AND LATCH PARTS For Models: KUDS50SVBL4, KUDS50SVWH4, KUDS50SVSS4 (Black) (White) (Stainless) Illus. DESCRIPTION 1 Console Assembly (Includes Active Overlay) W10250003 Black W10250004 White W10250005 Midnight Grey 2 8546546 Clip, BI−Metal 3 661663 BI−Metal 4 W10255029 Switch, Door 5 3369051 Screw 6 W10077360 Latch Assembly 7 W10285179 Control, Electronic 8 8531873 Board, Interconnect 9 8531877 Cable, Ribbon 2 W10328552
No. Part No. CONTROL PANEL AND LATCH PARTS For Models: KUDS50SVBL4, KUDS50SVWH4, KUDS50SVSS4 (Black) (White) (Stainless) Illus. DESCRIPTION 1 Console Assembly (Includes Active Overlay) W10250003 Black W10250004 White W10250005 Midnight Grey 2 8546546 Clip, BI−Metal 3 661663 BI−Metal 4 W10255029 Switch, Door 5 3369051 Screw 6 W10077360 Latch Assembly 7 W10285179 Control, Electronic 8 8531873 Board, Interconnect 9 8531877 Cable, Ribbon 2 W10328552

Parts Diagram
Page 3
... 7 W10077877 Deflector, Vent (Also Order Item 6) 8 W10224431 Dispenser, Assembly 9 W10077881 Knob, Rinse Aid 10 8545608 Harness, Vent Motor Illus. Part No. INNER DOOR PARTS For Models: KUDS50SVBL4, KUDS50SVWH4, KUDS50SVSS4 (Black) (White) (Stainless) Illus. DESCRIPTION 1 3369051 Screw, Door 2 8281217 Screw 3 W10056249 Inner Door Mastic Assembly (Also Order Item 6) 4 W10077883 Inlet, Air 5 8572611...
... 7 W10077877 Deflector, Vent (Also Order Item 6) 8 W10224431 Dispenser, Assembly 9 W10077881 Knob, Rinse Aid 10 8545608 Harness, Vent Motor Illus. Part No. INNER DOOR PARTS For Models: KUDS50SVBL4, KUDS50SVWH4, KUDS50SVSS4 (Black) (White) (Stainless) Illus. DESCRIPTION 1 3369051 Screw, Door 2 8281217 Screw 3 W10056249 Inner Door Mastic Assembly (Also Order Item 6) 4 W10077883 Inlet, Air 5 8572611...

Parts Diagram
Page 4
... Bag (Includes 2 Screws & 2 Hose Clamps) 2 Undercounter Brackets) 15 356138 Clamp, Hose 16 W10137608 Drain Loop with Check Valve 4 W10328552 FILL, DRAIN AND OVERFILL PARTS For Models: KUDS50SVBL4, KUDS50SVWH4, KUDS50SVSS4 (Black) (White) (Stainless) Illus. Part No. No.
... Bag (Includes 2 Screws & 2 Hose Clamps) 2 Undercounter Brackets) 15 356138 Clamp, Hose 16 W10137608 Drain Loop with Check Valve 4 W10328552 FILL, DRAIN AND OVERFILL PARTS For Models: KUDS50SVBL4, KUDS50SVWH4, KUDS50SVSS4 (Black) (White) (Stainless) Illus. Part No. No.

Parts Diagram
Page 5
TUB AND FRAME PARTS For Models: KUDS50SVBL4, KUDS50SVWH4, KUDS50SVSS4 (Black) (White) (Stainless) W10328552 5
TUB AND FRAME PARTS For Models: KUDS50SVBL4, KUDS50SVWH4, KUDS50SVSS4 (Black) (White) (Stainless) W10328552 5

Parts Diagram
Page 6
... 8572661 Actuator Assembly 19 3400892 Screw 20 8268991 Cover, Terminal Box 21 W10158291 Cable, Door Balance 22 304666 Retainer, Push 23 8573239 Shield, Sound Tub 24 9742648 Bracket, Thermostat 25 661566 Thermostat 26 W10317686 Strike, Latch 27 W10082769 Motor, Wax 28 3378128 Washer, Pronged Cup 29 3400014 Screw 30 W10078083 Wheel... & Mount Assembly (Also Order Item 31) 31 9743002 Gasket, Bracket Mounting 6 W10328552 Part No. TUB AND FRAME PARTS For Models: KUDS50SVBL4, KUDS50SVWH4, KUDS50SVSS4 (Black) (White) (Stainless) Illus.
... 8572661 Actuator Assembly 19 3400892 Screw 20 8268991 Cover, Terminal Box 21 W10158291 Cable, Door Balance 22 304666 Retainer, Push 23 8573239 Shield, Sound Tub 24 9742648 Bracket, Thermostat 25 661566 Thermostat 26 W10317686 Strike, Latch 27 W10082769 Motor, Wax 28 3378128 Washer, Pronged Cup 29 3400014 Screw 30 W10078083 Wheel... & Mount Assembly (Also Order Item 31) 31 9743002 Gasket, Bracket Mounting 6 W10328552 Part No. TUB AND FRAME PARTS For Models: KUDS50SVBL4, KUDS50SVWH4, KUDS50SVSS4 (Black) (White) (Stainless) Illus.

Parts Diagram
Page 7
PUMP AND MOTOR PARTS For Models: KUDS50SVBL4, KUDS50SVWH4, KUDS50SVSS4 (Black) (White) (Stainless) W10328552 7
PUMP AND MOTOR PARTS For Models: KUDS50SVBL4, KUDS50SVWH4, KUDS50SVSS4 (Black) (White) (Stainless) W10328552 7

Parts Diagram
Page 8
PUMP AND MOTOR PARTS For Models: KUDS50SVBL4, KUDS50SVWH4, KUDS50SVSS4 (Black) (White) (Stainless) Illus. Part No. No. DESCRIPTION 1 8534952 Accumulator Assy 2 8283527 Shield 3 3400069 Screw 4 8572618 Sump with Seal 5 8268375 Check Valve, ... 8531017 Impeller Kit (Also Order Item 19) 21 8268403 Face Seal Assembly (Also Order Item 19) 22 356138 Clamp, Hose 23 W10134017 Optical Water Indicator 24 W10216724 Capacitor 8 W10328552
PUMP AND MOTOR PARTS For Models: KUDS50SVBL4, KUDS50SVWH4, KUDS50SVSS4 (Black) (White) (Stainless) Illus. Part No. No. DESCRIPTION 1 8534952 Accumulator Assy 2 8283527 Shield 3 3400069 Screw 4 8572618 Sump with Seal 5 8268375 Check Valve, ... 8531017 Impeller Kit (Also Order Item 19) 21 8268403 Face Seal Assembly (Also Order Item 19) 22 356138 Clamp, Hose 23 W10134017 Optical Water Indicator 24 W10216724 Capacitor 8 W10328552


